Causes and Cure of a Slice
Click here to go to the index page.
Introduction
This review paper discusses many causes of a slice problem, and it offers analytical golfers many suggested cures that are causally-related to the relevant underlying causes of a slice. Many golf instructional books state that a slice is the most frequent problem affecting amateur golfers and it has frequently been stated that as many as 80-90% of beginner golfers have a slice problem. A slice problem can be a very persistent problem for many golfers, because there are many, many causes of a slice problem and a slice problem may persist if all the underlying causes are not systematically eradicated. I have read many golf instructional books and I have viewed many golf instructional videos that deal with the problem of a slice, and I have noted that they often only mention a few causes of a slice. They also offer a limited amount of useful advice because their suggested cures are small in number and not necessarily causally related to the slice problem from a biomechanical, or mechanical, perspective. Many suggested cures are merely exaggerated movements that are opposite in form/direction to those causing the slice problem, rather than being solidly based on sound golf biomechanics/mechanics. I don't believe that a golfer should attempt to cure his slice problem by using a variable number of biomechanically unrelated golf tips, and I believe that a golfer should attempt to recontruct his swing in a biomechanically/mechanically sound manner so that it eliminates his slice tendencies.
The best golf instructional video that I have seen regarding the causes/cure of a slice problem is a 16-minute swing video by Oliver Heuler [1]. Oliver Heuler is a deeply analytical golf instructor, who is based in Germany, and he has obviously spent a large amount of time studying the slice swing fault. He has produced an excellent swing video lesson and I highly recommend that all golfers view his slice video lesson. I will be using his swing video lesson as a "framework" to format this review paper, but I will be offering my website visitors my personal/independent opinions regarding the optimum method of dealing with each particular slice problem. My website visitors can then independently decide which suggested cure (Oliver Heuler's or mine) makes more sense from a biomechanical and mechanical perspective.
What is a slice?
A sliced shot is a shot where the ball curves to the right due to the presence of slice spin that is imparted to the ball at impact. Slice spin is imparted to the ball if the clubface is open (relative to the clubhead swing path) at impact. A sliced ball will always curve to the right, but its original direction of flight is significantly affected by the clubhead swingpath.
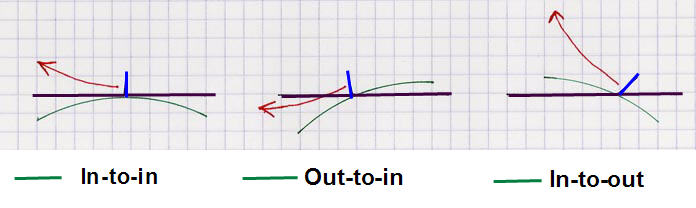
Slice ball flight - as influenced by the clubhead swingpath
The clubhead swingpath is depicted in green, the ball-target line is depicted in black, the clubface is depicted in blue, and the slice ball flight is depicted in red. In all these examples, the ball curves to the right as a result of slice spin.The first image demonstrates a straight slice ball flight. The clubhead swingpath is "correctly" in-to-in and the clubhead approaches the ball from inside the ball-target line and then becomes square to the target by impact. The ball slices to the right because the clubface is open at impact (relative to the ball-target line and relative to the clubhead swingpath which is directed straight towards the target at the exact moment of impact). The initial direction of ball flight is primarily affected (70-90% affected) by the clubface angle and less affected by the clubhead swingpath at impact. This "fact" is a reversal of a commonly held "belief" that previously formed the foundation of the old ball flight laws.
According to older ball flight laws, the original direction of ball flight would be primarily in the direction of the clubhead swingpath, while any ball flight curve would be dependent on the clubface angle (relative to the clubhead swingpath). According to this old ball flight theory, if the clubhead swingpath is in-to-out through impact, then the ball would start off towards the right. If the clubface is open (relative to the clubhead swingpath) at impact, then the ball would curve even further to the right and result in a push-slice ball flight. If the clubface is closed (relative to the clubhead swingpath) at impact, then the ball would start to the right, but curve leftwards due to draw spin imparted by the closed clubface. However, a large amount of evidence from Trackman machines has demonstrated that it is the clubface, and not the clubhead swingpath, that primarily influences the initial direction of ball flight. The old PGA ball flight law predicts that the ball would start on the path and curve to the face, while modern ball flight theory predicts that the ball will start in a direction that is 80% directed towards the clubface angle and that it will curve away from the path.
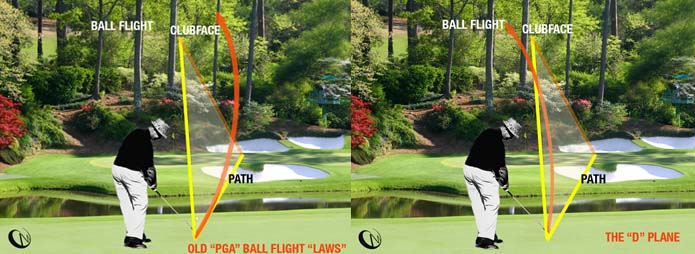
The following composite photo shows the difference in predicted ball flight between old ball flight laws and modern ball flight theory (D-plane theory).
Ball flight photo - constructed from two orginal Brian Manzella photos [2]
In both images, the clubface is facing the target at impact, while the clubhead swingpath is in-to-out (relative to the ball-target line).The first image shows the predicted ball flight - according to the old ball flight laws. The ball flight starts off in the direction of the clubhead swingpath and then curves to the left because the clubface (which is facing the target) is closed relative to the clubhead swingpath. The closed clubface imparts draw spin to the ball, which causes the ball to curve to the left.
The second image better reflects reality. The initial ball flight direction is 80% determined by the clubface angle, and the ball starts off just to the right of the target. The ball then curves to the left because the clubface is closed relative to the clubhead swingpath at impact, which results in draw spin.
If a golfer understands this point, then he can better understand the different patterns of ball flight in sliced shots.
Slice ball flight - as influenced by the clubhead swingpath
The first image shows a straight slice ball flight pattern. Although it is labelled a straight slice pattern, the ball actually starts off in a direction that is slightly right-of-straight (due to the clubface being open and facing slightly right of the target) and it curves further to the right (due to the presence of slice spin).The second image shows a pull-slice ball flight pattern. The ball starts off in a direction that is slightly left-of-straight and it curves to the right (due to the presence of slice spin caused by the clubface being open relative to the clubhead swingpath).
The second image shows a push-slice ball flight pattern. The ball starts off in a direction that is significantly right-of-straight, and it curves further to the right (due to the presence of slice spin caused by the clubface being open relative to the clubhead swingpath).
A golfer who has either a pull-slice or a push-slice ball flight pattern has two problems that need remediation - i) an incorrect clubhead swingpath and ii) an open clubface problem. A golfer who has a straight slice ball flight pattern only needs to correct his open clubface problem, because he doesn't have a clubhead swingpath problem.
Causes of a slice
Straight slice ball flight pattern
I am going to start off by describing golf swing errors that cause a straight slice ball flight pattern - where the problem is due to an open clubface and not due to any clubhead swingpath problem.
1) Open clubface at address (and therefore impact) - despite a neutral grip.
If a golfer has a neutral grip and a perfect golf swing that can generate a perfect in-to-square-to-in clubhead swingpath, then he can still slice the ball if the clubface is open at address (open relative to the back of the left hand). The back of the left hand should be facing the target at address/impact, and the clubface should also be facing the target. If the back of the left hand faces the target at address, but the clubface is directed to the right-of-the-target, then the clubface is open (relative to the left hand) at address.
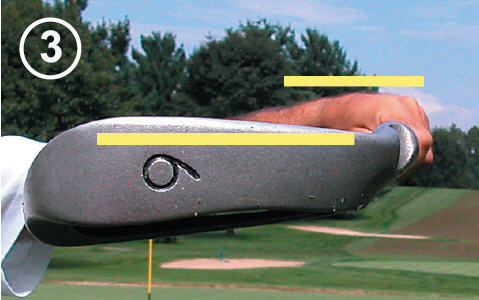
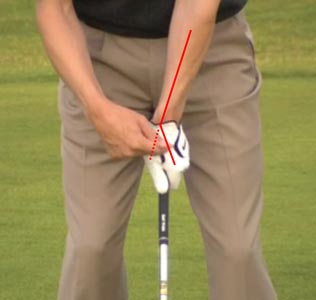
I think that one of the best ways of checking to see whether the clubface is open (relative to the back of the left hand) is to hold the club in front of one's face - as demonstrated by Brian Manzella in this next photo.
Checking left hand/clubface alignment - from reference number [3]
In this photo, Brian Manzella is holding his left arm/forearm parallel to the ground, so that the clubshaft is angled slightly inwards in front of his face. Note that the back of his left hand is flat and straight-in-line with this left forearm. He is looking at the clubface and noting that the lower groove lines on the clubface (represented by the yellow line) are parallel to the back of the left hand. One should not look at the lower edge of the clubface because the lower edge of the clubface may be rounded and not parallel to the clubface's groove lines.Note that the clubshaft is parallel to the left forearm, but slightly closer to the ground than the left forearm - and that is due to the fact that the left wrist is slightly palmar flexed, which flattens the left wrist. A flat left wrist automatically means that the grip end of the club is not straight-in-line with the left forearm - if one has a neutral grip (see "weak grip" as a cause of an open clubface for further details).
If a golfer has a neutral grip and a clubface that is neutral relative to the back of the flat left wrist/hand, then he can be sure that the clubface will be facing the target at impact if the back of the left hand is facing the target at impact.
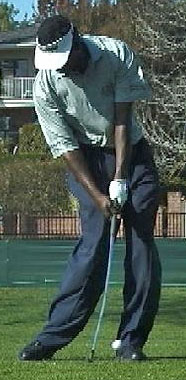
VJ Singh at impact
Note that VJ Singh's flat left wrist/hand and clubface is facing the target at impact.
2) Open clubface at impact due to a weak gripIf a golfer has a weak grip, it predisposes to an open clubface at impact because the hands are further forward at impact (compared to the address position).
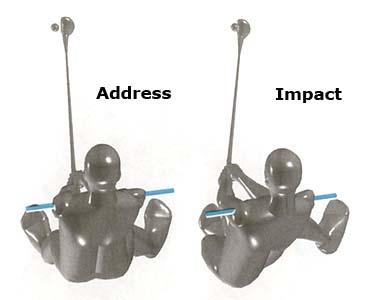
Hands at impact - from reference number [4]
Note that in a good golfer's swing that the hands are a few inches further forward at impact (compared to their address position) and that there is forward clubshaft lean at impact (hands are ahead of the clubhead) - and this causes the clubface to be more open if a golfer has a weak grip.
A beginner golfer must clearly understand the difference between a weak and a neutral grip, and he must also understand why a neutral grip produces a cupped/scooped left wrist at address.
In his swing video lesson, Oliver Heuler demonstrates the difference between a weak grip and a neutral grip, and he states that a golfer must ensure that there is a 30 degree angle in the back of his left wrist at address. I am not sure how he measures the angle, and I presume that it is the angle between the back of the left hand and the left forearm axis.
Neutral grip - from reference number [1]
Note that the left wrist appears to be bent backwards (dorsiflexed) at the level of the left wrist joint, and the left wrist is not flat. What causes the left wrist to be cupped/scooped at address when a golfer adopts a neutral grip?
If a beginner golfer wants to learn how to acquire a neutral grip, then he should start with his left forearm parallel to the ground while ensuring that the radial border of the left forearm faces the sky. He should then stretch out the left hand/fingers so that the back of the flat left hand is straight-in-line with the back of the left forearm - see next photo.
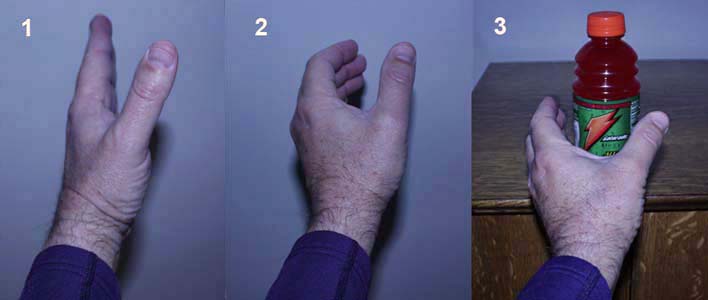
Neutral hand grip attitude when grasping a rounded object
Image 1 shows a neutral wrist position where the left wrist is neither dorsiflexed (bent backwards) or palmar flexed (bent forwards) - note that the back of the flat left hand is straight-in-line with the back of the left forearm. A line drawn along the top of the left forearm is also straight-in-line with the top of left index finger - which means that the wrist is level (neither upcocked or downcocked).
Image 2 shows how the back of the left wrist automatically/passively becomes scooped/cupped when the left hand attempts to grasp an object. This dorsiflexion of the left wrist occurs naturally/automatically and it is not a deliberate action.
Image 3 shows that the degree of left wrist dorsiflexion (degree of cupping) increases when one grasps a rounded object that has a wide diameter.
If a golfer wants to practice holding a rounded object using a neutral grip, then he should practice the motion of reaching out in a neutral manner to grasp a rounded object (eg. beer can) placed directly in front of his extended left forearm (while ensuring that the radial border of the left forearm faces skywards). That is the type of motion that he should then use to grasp the rounded grip of his club.
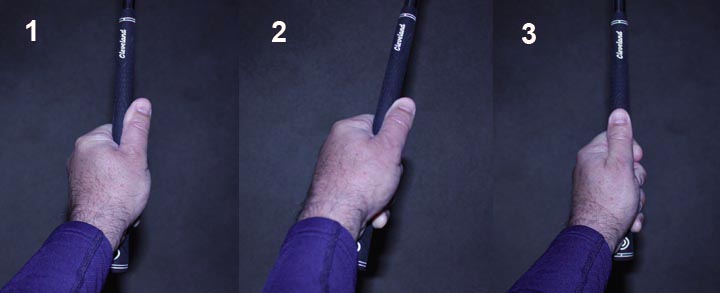
Neutral grip and weak hand grip
Image 1 shows a neutral left hand grip at address (as viewed from a golfer's normal eye position at address). Note that the left wrist is slightly cupped (dorsiflexed) due to the fact that the left hand is grasping a rounded object. Note that the left thumb is placed just to the right of the center of the top-of-the-shaft (slightly aft of the club). Note that one can can clearly see two knuckles of the left hand. The amount of cupping in the left wrist depends on the position of the hands at address - there will naturally be more cupping if the hands move closer to the right leg than the left leg.
Image 2 shows a neutral left hand grip at impact. Note that there is forward shaft lean (due to the hands being ahead of the clubhead at impact). Note that the left wrist is flat. The left wrist is flat because the left wrist is slightly palmar flexed (which means that the clubshaft's grip is not in a straight-in-line relationship with the left forearm).
Image 3 shows a weak left hand grip at address. Note that the hand has rotated counterclockwise on the grip so that one can only see one knuckle of the left hand. Note that the thumb is placed straight down the top of the shaft. Note that the left wrist appears less cupped (less dorsiflexed).
A golfer should avoid adopting a weak grip because it predisposes to an open clubface at impact - because the hands are ahead of the clubhead at impact (thereby producing forward shaft lean at impact).
Many golf instructors routinely advise their students to adopt a strong grip when their student has a slice problem - even if their grip is neutral and not the cause of their slice problem. I think that it is a mistake to ever advise a golfer to adopt a strong grip. A strong grip has many disadvantages, and it doesn't necessarily cure the "true" cause of the slice problem. I believe that the only biomechanically-acceptable grip is a neutral grip, or a slightly strong grip (where one can see three knuckles of the left hand).
3) Open clubface at the end-backswing position
If a golfer has a neutral left hand grip at address, then the left wrist will appear slightly scooped at address. That should be the only time point during the backswing/ downswing when the left wrist is not flat. As soon as a golfer starts the backswing, the left wrist should automatically/passively become flat - due to a small degree of palmar flexion of the left wrist induced by a bending right wrist. The right wrist should start bending back (dorsiflexing) at the initiation of the takeaway action, and the degree of right wrist bending should progressively increase during the backswing. This right wrist bending action will ensure that the left wrist remains flat during the backswing and that it is flat at the end-backswing position.
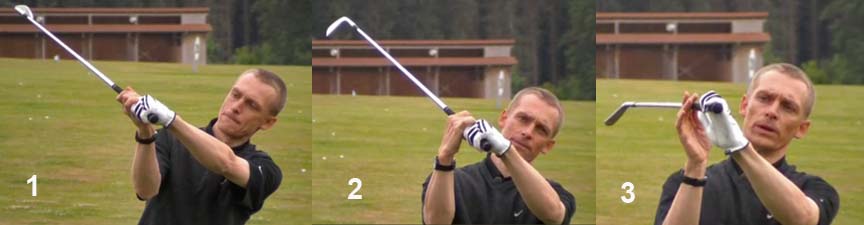
End-backswing position - from reference number 1
Image 1 demonstrates the "correct" position of the left wrist/hand at the end-backswing position - note that the left wrist is flat and note that the clubface is parallel to the back of the flat left wrist and at an angle to the ground. In his swing video lesson, Oliver Heuler states that he "neutralises" the left wrist in the backswing, and what he describes is simply the normal action of flattening the left wrist during the backswing. I don't like his use of the word "neutralise" because it implies that the left wrist was not neutral at address - which is not true.
I believe that the "flat left wrist" phenomenon will happen automatically if one performs a backswing action correctly. If one uses a right forearm takeaway action - as recommended in my review paper on How to Move the Arms, Wrists and Hands in the Golf Swing - then the right hand carries the left hand to the end-backswing position. If the right upper limb moves "correctly" (right arm externally rotates at the level of the right shoulder socket and the right elbow progressively bends to a 90 degree angle and the right wrist progressively bends back while remaining level) then it should allow the left wrist/hand to remain flat throughout the entire backswing action so that one ends up with a flat left wrist/hand at the end-backswing position (as in image 1).
See this swing video lesson segment for a visual demonstration of how the left arm/wrist/hand should move in the backswing - http://www.youtube.com/watch?v=c9OQevIZS38 . The discussion of the left arm/wrist/hand motions starts at 3:15 minutes and continues in the next video segment - http://www.youtube.com/watch?v=DOlhnUpqxHI .
Image 2 shows an open clubface at the end-backswing position due to a straightening right wrist action that twirls the grip within the left hand. That should never happen if the grip is held firmly within the grasp of the left hand.
Image 3 shows an open clubface at the end-backswing position due to a left hand opening-up action (which causes the proximal phalanges of the fingers of the left hand to become straight-in-line with the back of the left hand. A golfer should never allow his left hand to open during the backswing, and a golfer should maintain a firm grasp of the grip end of the club with the 3rd, 4th and 5th fingers of the left hand.
Oliver Heuler doesn't discuss what I believe is the most common cause of an open clubface at the end-backswing position - an upcocking action of the right wrist. In my review paper How to Move the Arms, Wrists and Hands in the Golf Swing, I described how the right upper limb must move to keep the clubshaft on-plane in the backswing. I mentioned that a key factor that keeps the clubshaft on-plane is the "correct" movement of the right wrist. I mentioned that the right wrist must bend backwards during the backswing while remaining level. The right wrist must not cock upwards during the backswing. If the right wrist cocks upwards in the late downswing, then it will move the clubshaft off-plane and cause it to cross the line, and it will also cause cupping of the left wrist and an open clubface (toe of the club will be pointing more towards the ground).
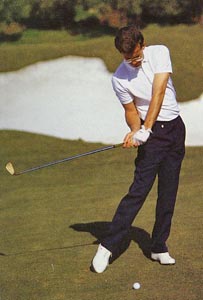
Author with left wrist cupping and an open clubface at the end-backswing
Note that my left wrist is not flat - it is slightly cupped. That is due to a lifting of the arms in the late backswing coupled with an upcocking action of the right wrist - which causes the clubshaft to move off-plane and cross the line. Note that the toe of the club is pointing groundwards and that the clubface is not parallel to the left forearm - and that represents an open clubface. If the left wrist remains cupped during the early-mid downswing, then it will predispose to an open clubface at impact.
4) Open clubface at impact
If a golfer doesn't have the previously mentioned causes of an open clubface (numbers 1-3), then he can still have an open clubface at impact if he doesn't successfully complete the release swivel action by impact. During the release swivel action (which occurs when the clubshaft moves from its delivery position to its impact position), the clubhead has to rotate about 90 degrees so that the clubface can become square by impact. A number of factors can prevent successful completion of this release swivel action by impact.
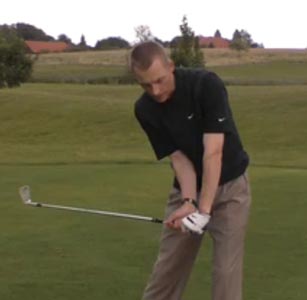
i) An open clubface at impact can occur if the golfer shifts the pelvis too far left-laterally during the downswing.
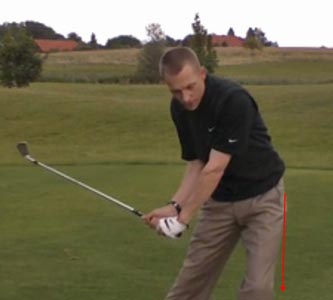
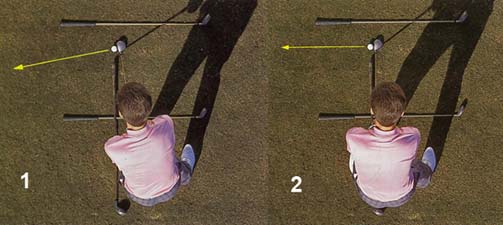
Oliver Heuler demonstrating a pelvis over-slide action - from reference number 1
Note that the outer border of his left pelvis (red arrow) is outside the left foot, and that it is due to excessive sliding of the left pelvis left-laterally during the downswing. When the pelvis slides too far left-laterally, it moves the spine too far to the left and it causes the hands to get to impact too far ahead of the ball with an open clubface. To prevent this problem, a golfer needs to learn how to brace his left-side during the downswing. I discussed this issue in my downswing chapter and I recommend this useful Shawn Clement swing video lesson that discusses the issue of bracing the left side.
Shawn Clement swing video lesson - http://www.youtube.com/watch?v=nI3i936JRd0
ii) An open clubface at impact can occur if the hands move too far forward of the ball by impact - even if the torso is successfully braced so as to prevent excessive left-lateral pelvic sliding.
Oliver Heuler demonstrating a too-far forward hand position at impact - from reference number [1]
If the hands are too far forward at impact, then it predisposes to an open clubface at impact. A golfer must avoid getting the hands too far forward by impact by avoiding any predisposing factors - i) swinging the hands too fast towards impact so that the hands get to impact far ahead of the clubhead; ii) actively applying push-pressure with the right arm at PP#1 during the mid-late downswing that pushes the left hand too fast/far into impact.
The degree of open clubface at impact is also influenced by ball position. The further back the ball position, the more likely the clubface will be open (for a given position of the hands at impact) because there is less time to complete the release swivel action.
iii) An open clubface at impact can occur if the golfer tries to maintain a late lag position too far into the downswing.
Oliver Heuler demonstrating a late lag release position - from reference number [1]
Many amateur golfers see certain professional golfers (eg. Sergio Garcia) using a late release action where the pro golfer maintains a 90 degree clubshaft-left arm angle to this position (see above photo) in their late downswing, and they attempt to mimic that action by artificially "holding onto their left wrist-clubshaft lag angle". However, it is extremely difficult to square the clubface from this late release position, and it will often result in an incomplete release action if a golfer doesn't have the skill to complete the release action by impact. By attempting to artificially "hold onto the 90 degree left arm-clubshaft lag angle" until late in the downswing, a golfer interferes with the natural/automatic centrifugal-induced release action and it becomes even less likely that the clubface will become square by impact. A golfer, who is a swinger, must have relaxed wrists, because stiff wrists prevent the successful completion of a natural release swivel action.
5) Open clubface during impact.
During a normal swinger's action, the clubface should be 1-2 degrees open at the time of first ball contact, and it should continue to close during the time period of ball-clubface contact. The clubface should be square to the target at the exact moment of ball-clubface separation in order for the ball to go straight. If the clubface is closing slightly as the clubhead passes through impact (due to a horizontal hinging action), then it will impart a small degree of draw spin on the ball. The ball will go straight and tend to fall to the left at the end of the ball flight. By contrast, if the clubface is opening slightly as the clubhead passes through impact (due to a vertical hinging action [reverse roll action] that produces clubface layback), then it will impart a small degree of slice spin on the ball. The ball will tend to go straight but it will curve to the right during the late ball flight due to the presence of slice spin. The amount that the ball slices to the right depends on whether another cause of an open clubface is present - because they will act together to increase the amount the ball curves to the right.
See my impact chapter for more details on horizontal/angled/vertical hinging actions.
Open clubface due to a steep clubhead path
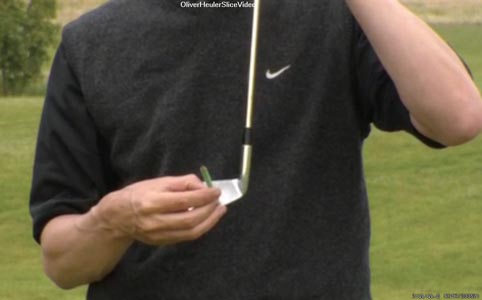
The clubshaft is normally at a 40-50 degree angle to the ground at impact, and the sole of the clubhead should be parallel to the ground. The exact clubshaft angle at impact depends on the club - being steeper for short irons, compared to long irons and woods. If the clubshaft is at an excessively steep angle at impact, then the clubface will be slightly open even if the grip is neutral and even if the clubface is parallel to the back of the left hand at address.
Oliver Heuler demonstrating the fact that an upright clubshaft causes the clubface to be slightly open - from reference number [1]
Note that the pencil, which is vertical to the clubface, points to the right. Note that the heel of the club is higher than the toe of the club - due to the steep clubshaft angle.
There are a number of causes of a steep clubshaft path through the impact zone (other than an OTT move which I will discuss separately).
i) Steep clubshaft path pattern due to high hands at address.
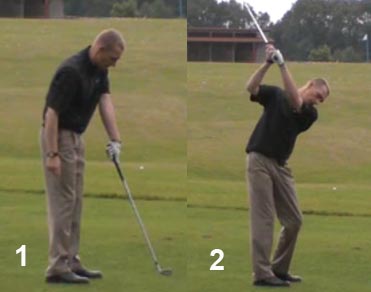
Oliver Heuler demonstrating a steep swing - from reference number [1]
A golfer may hold his clubshaft at address so that the clubshaft is in a straight-in-line relationship with the left arm (image 1). This high hand position can be due to holding the grip end of the club in the mid-palm position - with the butt end of the club being above the heel pad (hypothenar eminence) of the left hand. The golfer then lifts his arms upwards along a steep path during the backswing (image 2). If the golfer swings the clubshaft down the same steep path, then the clubshaft will be very steep at impact, and the clubface is likely to be open. The golfer may also "hold the clubface open" in the direction of the target in the followthrough, which may aggravate the open clubface problem. This type of open clubface problem requires that a golfer learn how to grip the club correctly below the heel pad of the left hand, so that there is an angle between the left arm and the clubshaft at address. The golfer then also needs to learn how to perform a "correct" backswing pivot action that is rotary in nature. That will allow the golfer to acquire a shallower left arm and clubshaft angle during the backswing and downswing.
ii) Steep clubshaft path due to excess bend at the level of the hips.
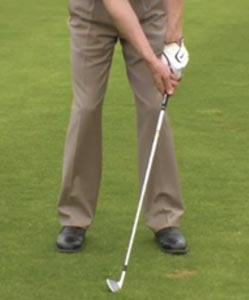
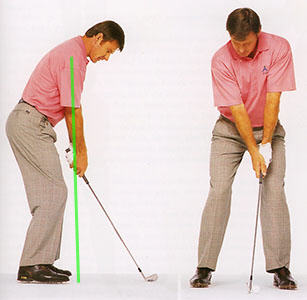
Oliver Heuler demonstrating a too-bent-over address posture - from reference number [1]
If a golfer bends excessively at the waist (hip level), then it predisposes to a steep backswing clubshaft path. Note that the butt end of the clubshaft is pointing at the toes in image 2 - when it should be pointing at the ball-target line at this time point in the mid-backswing. Note that there is little knee bend at address, and this "stiff knee" condition prevents the pelvis from easily rotating. Virtually all the torso rotation is due to an upper body (shoulder) rotation. The shoulders rotate perpendicularly around the bent-over spine, and that causes the shoulders, and therefore the arms/clubshaft, to rotate in a more vertical plane - like a ferris wheel. This problem may be readily remedied if the golfer adopts the correct amount of bend at the level of the hips. If a golfer has a "correct" posture at address, then a vertical line drawn through the middle of the right arm should pass just in front of the knees and hit the ground at toe level (or just ahead of the toes).
Nick Faldo - address posture - from reference number [5]
Note that Nick Faldo has more bend at knee level and less bend at the level of the hips, and that the green line hits the ground just ahead of his toes.
iii) Steep clubshaft path due to reverse pivoting.
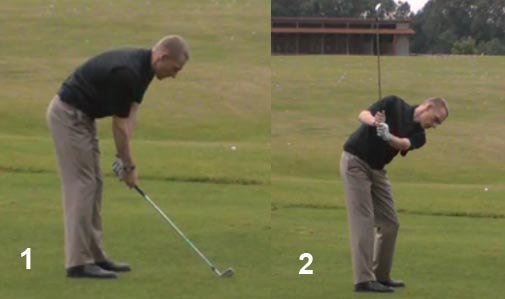
Oliver Heuler demonstrating an incorrect takeaway action and reverse pivoting - from reference number [1]
A golfer may start the one-piece takeaway action by moving the clubhead out towards the ball-target line while leaning the upper torso to the left. This causes the clubshaft to end up in a steep position above the right clavicle (collar bone). There is usually no rotation of the lower torso (pelvis) during this type of backswing action, and the pelvis either sways to the right or it remains static. When the golfer starts the downswing, it is difficult to start the downswing with "correct" kinetic sequencing (lower body moves first, upper body moves second) and the downswing may start with an arm movement that throws the arms/clubshaft down towards the ground along a steep path that passes just in front of the right shoulder. The arms/clubshaft track down steeply towards the ball - in front of the right upper torso - because there is no space under the right shoulder. The golfer often ends up holding the clubface open through impact (image 3).
Oliver Heuler demonstrating a reverse pivot and a "rock-and-block" action - from reference number [1]
In this example, Oliver Heuler is demonstrating a "rock-and-block" body motion. During the backswing, the golfer tilts his head to the left while swaying his pelvis to the right. He then lifts the arms and clubshaft steeply upwards to a position above his neck. During the downswing, the golfer sways the pelvis leftwards in order to acquire rightwards spinal tilt by impact, and this lateral to-and fro swaying motion, that causes a steep shoulder turn in the backswing/downswing, produces a motion that John Jacobs called "rock-and-block". The arms and clubshaft descend too steeply down to the ball and the clubface is open at impact, resulting in push-sliced shots.
Reverse pivoting is a major swing fault, that requires a complete reconstruction of the golfer's backswing action. A reverse pivoting golfer must learn how to perform a "correct" backswing pivot action as demonstrated by Brady Riggs in the following swing video.
http://www.youtube.com/watch?v=WvOr5nNqYEw
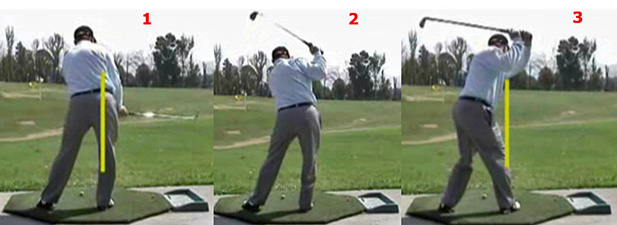
Brady Riggs demonstrating a reverse pivot and a "correct" pivot action
A yellow line was drawn along the outer border of Brady Riggs' right thigh/hip at address. In image 1, one can see that Brady Riggs has allowed his right hip to slide to the right in the early backswing and that he is keeping his head "fixedly" stationary during the entire backswing. That causes his spine to tilt to the left into a reverse pivot position. Image 2 shows what happens at the start of the downswing when one starts the downswing from a reverse pivot position. Because the arms are cramped and there is no space under the right shoulder for the arms to move down to the ball, the reverse pivoting golfer tends to throw his arms forwards over the toe line in a steep over-the-top move.
Image 3 shows the "correct" backswing pivot movement. Note that Brady Riggs has rotated his pelvis, which causes his right buttocks to move leftwards and backwards (away from the ball-target line). Note that "air" appears between the right pelvis and the yellow line, which is a sign of a correct right hip pivot movement. Note that there is a large amount of space under the right shoulder for the arms to move down to the ball, and that there is no sense of arm restriction. One can also sense, that when the downswing starts with a pelvis shift-rotation movement to the left, that the right elbow will be passively pulled down to the right hip area, and that the arms will drop down along the "correct" downswing arm swingpath. I have described this action in great detail in my review paper on The Backswing and Downswing Hip Pivot Movements; Their Critical Role in the Golf swing.
Pull-slice ball flight pattern
A pull-slice ball flight pattern is usually due to a combination of an out-to-in clubhead swingpath and an open clubface (relative to the clubhead swingpath).Golfers who have an out-to-in clubhead swingpath will pull the ball left if the clubface is square to the clubhead swingpath at impact. To prevent the ball going left, the golfer may attempt to direct the ball towards the target by trying to "hold the clubface open" in the direction of the target through impact, and this will result in an open clubface relative to the clubhead swingpath. The end result is a pull-slice ball flight pattern. The ball will start off in a direction that is just to the left of the target and curve away to the right (away from the clubhead swingpath).
I believe (like Oliver Heuler) that a pull-slice golfer should first correct the clubhead swingpath problem before he addresses the open clubface problem. The open clubface problem may simply disappear if the out-to-in clubhead swingpath problem is corrected, because the open clubface problem may be a reactive mechanism that a golfer adopts to prevent a left-pull ball flight.
There are a number of causes of an out-to-in clubhead swingpath, and I will discuss them in sequence.
Out-to-in clubhead swingpath problem due to an incorrect address posture
A golfer may generate an out-to-in clubhead swingpath because his shoulders are open at address and the ball is positioned too far forward.
Golfer at address - from reference number [6]
In image 1, the ball is positioned well forward of the left foot and the shoulders are open at address. This address position predisposes to an out-to-in clubhead swingpath through impact. The problem can often be corrected by moving the ball back a few inches, and by ensuring that the shoulders are squre to the ball-target at address (image 2).
Out-to-in clubhead swingpath due to backswing errors
i) A golfer who takes the club inside too quickly in the early backswing (takeaway) will often get stuck in the mid-backswing, and he will then end up lifting the arms in the late backswing. That backswing action will then cause him to loop the club over his right shoulder in an OTT move at the start of the downswing.
Out-to-in clubhead swingpath - from reference number [4]
The incorrect backswing/downswing clubhead path is depicted in black, and the ideal (ModelPro) clubhead swingpath is depicted in blue [4].
During the incorrect backswing action, the clubhead path is too flat and too inside in the early backswing, and it then becomes steeper in the late backswing as the golfer lifts the arms to the end-backswing position. The golfer then starts the downswing with an upper body/arm movement that throws the clubshaft OTT over the right shoulder, and the clubshaft descends too steeply down to the ball before traveling out-to-in through impact.
Here is a "real life" example of that swing problem.
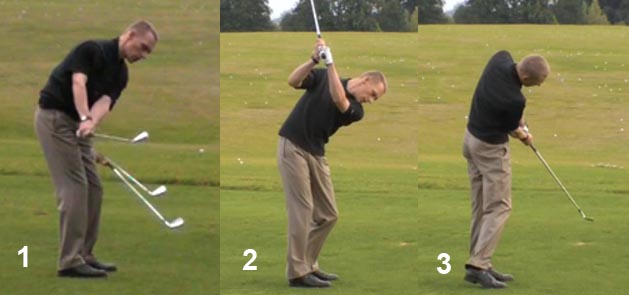
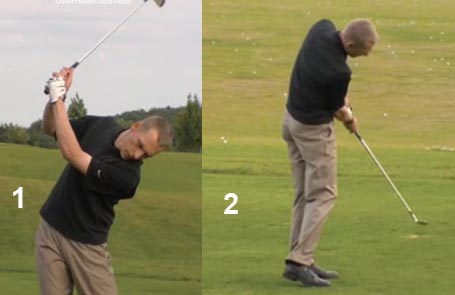
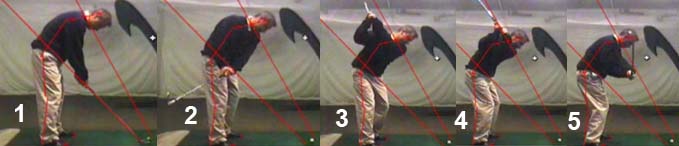
Example of an incorrect backswing action and the resultant OTT move - from reference number [7]
Note that the golfer has a poor address posture - he is too bent-over at the waist with a rounded back and there is insufficient knee bend (image 1).
Note that he starts the takeaway by immediately rotating his pelvis and he pulls the clubshaft inside too quickly (image 2).
He then lifts the club to the end-backswing by lifting his arms (image 3).
He then starts the downswing with an upper body/arm move that throws the clubshaft over his right shoulder (image 4).
His arms/clubshaft then descend too steeply down to the ball (image 5) and he will then subsequently swing out-to-in through impact.
If you view the swing video, you will note that the golf instructor recommends that the golfer should start the backswing takeaway action by pushing the grip end of the club back - by pushing the left hand back while simultaneously rotating the left shoulder back. I personally think that there is a much better way of starting the backswing takeaway action - using a right forearm takeaway action. I have described the right forearm takeaway action in great detail in my How to Move the Arms, Wrists and Hands in the Golf Swing review paper. My recommended takeaway action is based on biomechanically natural body movements that allow a golfer to keep the clubshaft on-plane during the backswing while the clubshaft moves from the hand plane (at address) to the turned shoulder plane (by the end-backswing).
ii) Other backswing causes that predispose to an OTT move.
A key element that a golfer needs to achieve in the backswing is to get the hands sufficiently "deep" - sufficiently far away from the ball-target line so that the hands are close to the right shoulder at the end of the backswing. The hands shouldn't end up above the neck or central end of the right clavicle at the end of the backswing, because it is difficult to prevent the hands from going OTT over the right shoulder at the start of the downswing (even if one starts the downswing correctly with a lower body move).
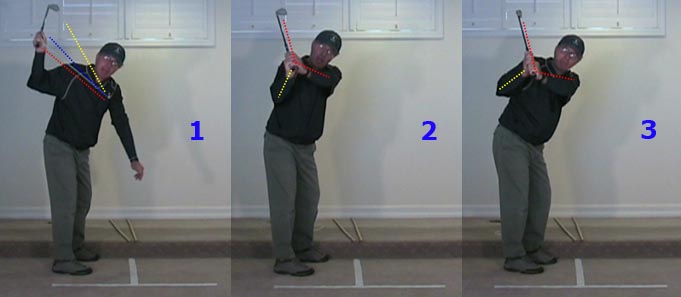
Author demonstrating acceptable hand positions at the end of the backswing
Image 1 shows the right hand position at the end of the backswing (when the clubshaft is parallel to the ball-target line). The hand is behind and above the right shoulder. An inflexible golfer may only be able to get the hands opposite the right shoulder - image 2/3. The left arm should lie somewhere between the red dotted line and the blue dotted line in image 1. It is disadvantageous to have the left arm being too steep at the end of the backswing - see yellow dotted line - because that will predispose to an OTT move at the start of the downswing.
There are a number of reasons why a golfer may get the left arm to be too steep at the end of the backswing. It may be due to a failure to pivot-rotate the pelvis during the backswing. If the pelvis is static during the backswing, then an inflexible golfer may not be able to rotate the shoulders enough to get the hands sufficiently "deep" by the end of the backswing. Insufficiently "deep" hands may also be due to the fact that the golfer lifts the arms straight up (vertical to the ground) during the takeaway.
All these "steep left arm position" problems can be avoided if a golfer uses the right forearm takeaway with an adequate torso rotation that gets the hands to a position near the right shoulder by the end of the backswing action - as described in my How to Move the Arms, Wrists and Hands in the Golf Swing review paper.
Out-to-in clubhead swingpath due to downswing errors
The most common cause of an OTT move and an out-to-in clubhead swingpath is due to a golfer starting the downswing with an incorrect arm movement and/or an upper body rotation movement and/or a rotary pelvic movement.
i) Starting the downswing with an OTT arm movement.
According to Oliver Heuler, the most common reason why a golfer goes OTT at the start of the downswing (which causes an out-to-in clubhead swingpath) is due to the fact that the golfer throws his hands outwards at the start of the downswing, so that the hands soon cross the toe line.
Oliver Heuler demonstrating an OTT move - from reference number [1]
There are certain golf instructors who teach an arm swing, rather than a pivot-driven swing (which is the swing methodology recommended in this golf website). There are a number of variants of the left arm swing methodology, but they all presume that the hands will move down to the ball along the "correct" track - down-and-out-and forwards along an optimum hand path. Unfortunately, many arm swingers (who start the downswing with an arm movement) move their hands too much outwards (towards the ball-target line) and the hands soon cross the toe line in an OTT move. This causes the right elbow to "float in space" (see image 1) when the right elbow should move down to the right hip area at the start of the downswing. Even if an arm swinger correctly brings the right elbow down towards the right hip area, they may have "incorrect" spinal tilt - leftwards spinal tilt (see image 2) rather than rightwards spinal tilt - and this also causes an out-to-in clubhead swingpath.
The approriate remedy is correct kinetic sequencing - starting the downswing with a lower body shift-rotation move => increased rightwards spinal tilt (secondary axis tilt) => right shoulder moves downplane => arms move last along a "correct" inside-out track under the right shoulder. See my downswing chapter for further details.
ii) Starting the downswing with a right shoulder roundhousing move.
Although Oliver Heuler believes that this is not a common cause of an OTT move, I see many golfers go OTT because they rotate their right shoulder too horizontally in a roundhousing manner. This problem is particularly common in golfers who start the downswing with an upper body dive move as demonstrated in the next diagram.
Upper body dive movement - from reference number [4]
Many golfers start the downswing with an upper body move where they rotate their shoulders too horizontally around a spine that becomes tilted to the left (instead of being tilted to the right).
I believe that the remedy lies in correct kinetic sequencing - as described in my downswing chapter. The right shoulder must move downplane at the start of the downswing, so that the right forearm can be driven towards impact along an inside track. A golfer needs to understand the golf biomechanics that allow the right shoulder to move downplane, rather than move too horizontally, at the start of the downswing. I have described the biomechanics in great detail in my downswing chapter and my review paper on The Backswing and Downswing Hip Pivot Movements; Their Critical Role in the Golf swing.
iii) Starting the downswing with a right pelvis rotary movement.
A golfer who starts the downswing correctly with a lower body move can still go OTT if the lower body movement is not correct. The pelvis should shift left-laterally at the start of the downswing, and it should not rotate around in a hip spinning manner. If the right pelvis rotates outwards (towards the ball-target line) at the start of the downswing, then it will cause the right shoulder to also spin outwards and this will cause an OTT clubshaft movement and an out-to-in clubhead swingpath. A golfer needs to learn the correct pelvic shift-rotation move that is described in great detail in my downswing chapter and my review paper on The Backswing and Downswing Hip Pivot Movements; Their Critical Role in the Golf swing.
Many golf instructors attempt to cure the OTT move by using obstacles placed in a golfer's clubshaft/clubhead path to try and induce the golfer to learn how to swing more from the inside.
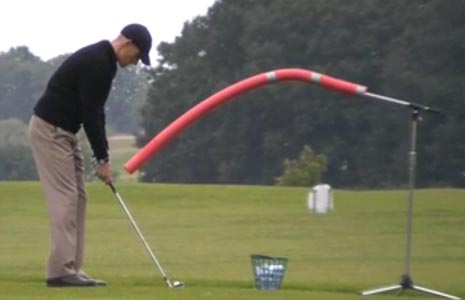
Soft foam obstacle structure - from reference number [1]
This soft foam obstacle structure will obviously induce a golfer to find a "way" to come from the inside, instead of OTT, when he swings his clubshaft down towards the ball. Other golf instructors use other types of obstacle (eg. 2x4 wood plank, or plastic soft drink bottle, or a plastic ball basket) that they place just outside the ball-target line.
I have no sympathy for this type of golf instruction, because although the golfer may learn a "way" to avoid hitting the obstacle, the "way" may not be optimum from a biomechanical perspective and a golfer may also not retain the memory of how to move the body/arms in the "same way" on the golf course when the obstacle is not visually present. My golf instructional website is based on optimum golf biomechanics and optimum golf mechanics, and I believe that a golfer must cognitively learn how to swing correctly. My review paper on How to Move the Arms, Wrists and Hands in the Golf Swing provides a golfer with the intellectual ammunition that will allow him to construct a biomechanically sound golf swing that is not vaguely based on "feel". I don't believe in vague "feel" golf instructional methods, and I believe that a golfer must know exactly what he is doing with his arms, wrists, hands at every moment in the swing. In other words, I believe that a golfer must learn how to have "educated hands".
Push-slice ball flight pattern
A push-slice ball flight pattern usually occurs due to an in-to-out clubhead swingpath combined with an open clubface (relative to the clubhead swingpath).
I suspect that the most frequent cause of an excessive in-to-out clubhead swingpath is excessive pelvic sliding left-laterally towards the target at the start of the downswing. If the pelvis slides too far to the left at the start of the downswing, then the right shoulder tilts more vertically down towards the ground, instead of moving downplane. That causes the arms to also drop behind the right torso, and the arms get blocked ("trapped") behind the right hip area. The only way that a golfer can get the arms to bypass the right hip area is to slide them passed the right hip area in an in-to-out direction (relative to the ball-target line).
"Blocking" due to excessive sliding of the pelvis - from reference number [6]
Note the excessive pelvic slide - the outer border of the left hip is outside the left foot. Note that the right shoulder has tilted down towards the right foot, and note how the right elbow gets trapped behind the right hip (instead of being in a pitch position in front of the right hip).
If the golfer manages to get the right elbow to just scrape passed the right hip area, the arms/clusbhaft will be directed too much outwards (relative to the ball-target line). Also, it is very difficult (from a biomechanical perspective) to successfully complete a release swivel action that gets the right palm to face the target by impact - from that "blocked" position. The end-result will be an in-to-out clubhead swingpath and an open clubface (due to an incomplete release swivel action) and that combination will result in a push-slice ball flight pattern.
The golfer must learn how to brace his left side, and create a "firm supportive left side" in the downswing, to prevent excessive pelvic sliding and I have described this remedial action in my downswing chapter.
Conclusion
I have participated in many online golf discussion forums, and the question of "how to cure a slice problem" is often introduced by a forum member, who has a slice problem. Many forum members subsequently offer advice without seeing a swing video of the golfer, and without accurately identifying the "true" cause of the slice problem. I believe that the cure of a slice must be causally connected to the cause of a slice - and because there are so many causes of a slice problem, there obviously must be many potentially useful remedial actions. The golf tip recommendation of using a "strong grip" is the most common recommendation offered in online golf discussion forums, but it obviously has no relevance to a golfer who has a slice problem that is not causally related to an incorrect grip (weak grip). An individual golfer may also have multiple causes of an "open clubface" swing fault and I believe that the slice problem will only be successfully cured if all the causes are accurately identified and corrected. Using a video camera to record the swing and then examining the videoed swing using a swing analyser program is highly recommended, because it is very difficult to identify all the causes of an open clubface without slowing the swing down to very slow speeds.
References:
1. Slice video. Oliver Heuler.
The text on that website page is in German, but the video is in English.
2. Brian Manzella ball flight patterns
Old ball flight law - http://homepage.mac.com/brianmanzella/.Pictures/balllaws.jpg
D plane ball flight law - http://www.brianmanzella.com/forum/golfing-discussions/11013-finally-d-plane-pic-manzella.html
3. Get a Grip and Save Your Swing. Brian Manzella. AutoSucess Magazine. September 2003.
4. Swing Like a Pro. Ralph Mann and Fred Griffin.

5. A Swing for Life. Nick Faldo.

6. The Complete Encylopedia of Golf Techniques.
7. Slice the Slice out of your swing!
http://video.google.com/videoplay?docid=-4312420981818984859&hl=en


