
Educational Review: Michael Finney's Golf Swing Kinetics Seminar
Click here to go back to the home page.
Introduction:
Michael Finney is a golf instructor based in Louisville, Kentucky and he organised a "Kinetics Seminar" at his home golf course in September 2017. He invited Sasho Mackenzie, Joe Mayo and Chris Como to serve as "experts" while he hosted the seminar. The seminar was videotaped and Michael Finney posted an edited version of the video on his vimeo channel.
If you are interested, it is possible to purchase access to the vimeo video for $40 at
https://vimeo.com/251240309
The video lasts about 4.5 hours and the first ~3 hours is devoted to a formal presentation in the University of Louisville Golf Club's clubhouse, while the last ~1.5 hours was devoted to a group analysis of the "real life" golf swings of 3 golfers.
Michael Finney decided on the choice of topics and he apparently chose "hot topics" that were previously "hotly debated" on Nick Chertock's Facebook Golf Biomechanists forum. The Facebook Golf Biomechanists forum is a closed group forum administered by Nick Chertock, and he arbitrarily determines whether to accept any new forum members into the forum. I applied to join the Facebook Golf Biomechanists forum a few years ago, but Nick Chertock refused to allow me to join the forum. I therefore did not know what "hot topics" were being debated during the past few years, and I was therefore particularly interested in discovering whether I could learn something new about golf swing kinetics by purchasing access to Michael Finney's video.
Although I did not learn anything radically new about golf swing kinetics as result of watching this video presentation, it did give me the opportunity to observe the current teachings of a few of the Facebook Golf Biomechanists' forum members. I agree with many of the opinions expressed by Sasho MacKenzie, Joe Mayo and Michael Finney in the video, but I simultaneously discovered that I disagree with some of their opinions. I therefore decided to write this review paper where I could explain why I sometimes disagreed with their opinions, and where I could offer my regular website visitors (who frequently read my review papers) an alternative way of thinking about how best to perform a full golf swing action. I have a well-established reputation for writing educational review papers, and producing you-tube videos, where I carefully analyse the opinions expressed by other golf swing theorists or golf swing instructors. I realize that only the most analytical golf instructors and players are interested in reading my review papers, where I produce counterarguments in an attempt to clarify and strengthen our understanding of golf swing biomechanics/mechanics. Therefore, my work is not intended for the recreational golfer who simply wishes to enjoy the game; rather, it is for those individuals who truly wish to understand the fundamental golf swing biomechanics/mechanics that are routinely used by professional PGA tour golfers.
Throughout this review paper I will be frequently quoting the opinions expressed by Michael Finney, Sasho MacKenzie and Joe Mayo. Consequently, there is always a chance that I may unintentionally misunderstand or misrepresent their opinions expressed in this video. The only way that I can minimise the potential effect of this problem is to encourage you (as a reader of this review paper) to purchase access to Michael Finney's video so that you can independently verify for yourself that I am not misunderstanding, or misrepresenting, their opinions. If anybody (reading this review paper) believes that I am misrepresenting the opinions expressed by Michael Finney, Sasho MacKenzie or Joe Mayo, then please send me an e-mail message (to jeffmanngolfer@gmail.com). If I agree with your criticism that I could be misrepresenting their opinions, then I will post your unedited opinion in this Page of Addendums. In addition, if you are willing to provide a detailed analysis of any of my counterarguments, where you clearly explain why you believe that my opinions are wrongheaded, then I will gladly post your unedited opinions (in written or video format) in that same Page of Addendums.
Note that I have posted a number of capture images from Michael Finney's video in this review paper. I created those capture images by downloading the video and viewing it in my V1 Home Swing Analyser application. Each capture image will show a time point (expressed in minutes by the V1 Home Swing Analyser program) so that can quickly identify the time point in Michael Finney's video where I captured the image. Note that Michael Finney's video on his vimeo channel is timed in hours and minutes, so you need to make the necessary time adjustment if you want to more easily get to exactly the same time point of the video.
Finally, note that I often use the abbreviation "TGM" in this review paper and it is an abbreviation of the term "The Golfing Machine". Homer Kelly wrote a book called "the Golfing Machine" and he expressed many TGM concepts in his book. When I use the abbreviation "TGM" in this review paper, then it means that I am referring to one of Homer Kelley's TGM concepts.
Here is a list of some of the topics that Michael Finney discussed in his Kinetics Seminar video, and you can use the following hyperlinks if you wish to quickly navigate to any of these specific topics.
Topic number 1 - What moves the golf
club - the hands or the whole body?
Topic number 2 - How can I increase distance?
Topic number 3 - How to passively square the clubface.
Topic number 6 - Clubface ROC (rate-of-closure) through the immediate impact zone
Topic number 1:
What moves the golf club - the hands or the whole body?
It is an unquestionable fact that the golf club only moves in space due to
forces/torques being exerted on the club handle by the hands because that is the
only part of the human body that is in contact with the golf club. I also think
that any knowledgeable golfer believes that a professional golfer does not
simply move the golf club during the downswing via an arm/hand movement and that
he uses the motion of his torso (which includes the pelvis and upper torso) to
move his arms/hands. I did not get the impression that any of the presenters at
the Seminar contested this fact, so the question then becomes how does the
motion of the torso (which is often called the "pivot action") move the
arms/hands? Let's consider how Sasho MacKenzie described this scenario at the
Seminar.
Sasho MacKenzie started off his presentation by explaining that only three factors could potentially affect the motion of a golf club in a full golf swing action - gravity, air resistance and a golfer's biomechanical actions. Sasho stated that one could ignore the effect of gravity and air resistance and simply concentrate on examining a golfer's body/arm motions. Sasho then stated that there is high correlation between clubhead speed at impact and wrist motions (and I presume that he primarily meant a left wrist uncocking motion where the left wrist moves from being radially deviated at the end-backswing position to becoming more ulnarly-deviated during the downswing) and that there is not a high correlation between clubhead speed at impact and the speed of pelvic motion. As an example, Sasho stated that although female professional LPGA golfers have higher pelvic rotational speeds than male professional PGA golfers during the early downswing, they do not drive the ball as far as the male PGA golfers. Sasho did not expand on this point to explain why male PGA golfers can drive the ball farther than female LPGA golfers, and it is possible to imagine that Sasho thinks it may be related to a difference in the efficiency of left wrist motion (because he only talked about pelvic motion and wrist motion in his introductory statements).
Sasho MacKenzie then stated that one could study the body's motion from a kinematic perspective, but he did not expand on this issue to explain how different patterns of kinematic body part sequencing could move the golf club. Michael Finney interjected an interesting comment at this time point when he described how Ben Doyle (the first golf instructor to teach TGM golf swing biomechanics/mechanics) used the example of a woman pushing a grocery cart, and Doyle apparently asked his student-golfers what was causing the golf cart to move forwards. Many recreational golfers would reply that it was the woman's hands, but that does not make sense because the hands are merely the transmitters of the causal forces that move the grocery cart and they are not the generators of those causal forces. Ben Doyle would then answer his own question by stating that the legs were the primary causal agents causing the grocery cart to move forward. How do the legs produce the necessary forces to move the grocery cart forwards? Sasho and Michael did not take the time to discuss this question or suggest other body-generated forces that could be causally responsible for moving a grocery cart forwards.
Sasho did not discuss any other issues in his initial presentation on this topic until an audience member asked a question as to whether ground reaction forces (GRFs) are causally responsible for producing the "forces" that are eventually transmitted to the hands (which are the only part of a golfer's body that is in contact with the golf club). Sasho stated that GRFs were 100% responsible, but he immediately qualified that comment by stating that if parts of the body are relaxed then that figure would be less than 100%. Sasho did not expand on what he meant by "relaxed body parts". The only other comment that Sasho made with respect to this topic of how ground reaction forces are causally responsible for moving the golf club was through a practical demo-example - using Michael as the subject. He got Michael to move to his standard end-backswing position as demonstrated in the following capture image from the video.

Note that Michael is at his end-backswing position. Note that Sasho is placing
his left hand against Michael's hands to prevent them from moving
downwards-and-forwards, and he then instructed Michael to start his downswing
action. One could see that Michael was performing a pelvic motion to start his
downswing action and Sasho asked him if he felt his weight shift immediately to the left foot. Michael answered in the
affirmative and he stated that he had never thought about this phenomenon before
- that the pressure under the right foot (which is often about 70 - 90% of the
overall COP measurement at the P4 position) will immediately move to the left
foot at the start of the downswing. Is Sasho's opinion accurate that the center-of-pressure (COP) will immediately shift
to the left foot as one starts the downswing?
This a good starting point for comparing my personal opinions versus Sasho's personal opinions regarding the topic of how body motions cause the golf club to move during the downswing - if the golfer uses an active pivot action to move the lead arm in a full golf swing action.
Consider Sasho MacKenzie's one-arm golf swing action by viewing the following videos.
You-tube swing video showing a face-on view - https://www.youtube.com/watch?v=GgF_9IfROAU
You-tube swing video showing a DTL view - https://www.youtube.com/watch?v=7JW6A_J4KEA
Note that Sasho states that he can drive the ball 250 yards using a lead arm-only golf swing action.
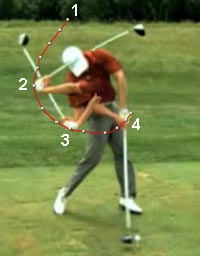
Here are capture images from his DTL swing video showing his golf swing action during the downswing.
Sasho is a left-handed golfer, and I have reversed these capture images in order to
present him as a right-handed golfer.
Image 1 is at his end-backswing position, image 2 is at his P5 position, image 3 is at his P6 position, and image 4 is at impact. See this link if you need to review the definitions of the P positions.
Since Sasho does not use his rear arm in this particular one-arm golf swing action, we can reasonably conclude that his downswing's swing power is primarily derived from the effect of his body's motion on his lead arm/club. I assume that Sasho would agree that any swing power (generated by his body's motion) is transmitted to the golf club's handle via his lead arm, which is only attached to his body via the lead shoulder socket. That means that the body's motional forces causing his lead arm to move downwards-and-forwards during the downswing action must work through the lead shoulder socket - because the body is only connected to the lead arm via the lead shoulder socket. If one looks at his body motion during his downswing action, it is easy to see that he is rotating his pelvis and upper torso towards the target, and that it causes his lead shoulder to move towards the target. Although the targetwards motion of the lead shoulder socket is the primary mechanism that explains how body motion causes the lead arm to move downwards-and-forwards during the downswing action (if we temporarily ignore any added contributory effect of the lead shoulder girdle muscles in synergistically helping to pull the lead arm in a downwards-and-forwards direction) - it is essential to better understand what causes the torso to rotate during the downswing, because any lead shoulder socket motion results from the torso motions.
Let's consider Sasho's opinions on this issue before I present my personal opinions on this issue. Although Sasho did not explain the details of this "body rotational motion" phenomenon during the Seminar, I think I can accurately explain Sasho's personal perspective by referring to what he has stated on the topic from various online sources.
I will now explain in a *second-hand manner how I think that Sasho would explain how the golfer's body (particularly the pelvis) should be induced to rotate during the downswing action.
(* Because I am relating my personal understanding of Sasho's perspective, on how the golfer's body (particularly the pelvis) should be induced to rotate during the downswing action, from other sources not included in this video presentation, it is possible that I might be misrepresenting Sasho's perspective. If anyone notices any errors in my interpretation, please e-mail me so that I can make the necessary corrections to this review paper)
First of all, since I believe that Sasho's opinion on this topic of what causes the body to rotate during the downswing is partly explained by the work of Prof. Young-Hoo Kwon on the topic of ground reaction forces, let’s begin with Dr. Kwon’s contribution to this topic.
Dr. Kwon has stated that the only forces that can cause the body to rotate during the downswing are due to external moments that are the result of ground reaction forces, and he calls these forces ground reaction moments (GRMs).
Here is a link to a short version of his explanatory hypothesis - http://drkwongolf.info/biom/fgmom.html
There are two types of GRMs - pivoting GRMs due to horizontal GRMs that operate around a vertical axis and frontal plane GRMs due to vertical GRMs that operate around the sagittal plane axis. The frontal plane GRMs are the largest GRMs and they operate in the frontal plane producing a counterclockwise rotation of the torso around the body's COM (center-of-mass) as shown in the following diagram from Dr. Kwon's article.
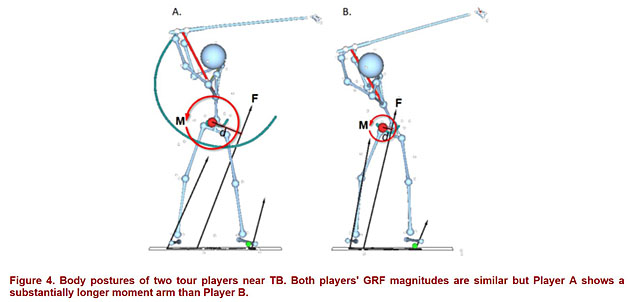
Dr. Kwon states that each foot is generating a vertical GRM and the combination of the two vertical GRMs produces the combined GRM labelled "F". If a golfer pushes off the right foot in a targetwards direction at the start of the transition to the downswing, that action will apparently tilt the combined GRM (F) more to the left, which will increase the magnitude of the moment arm between F and the body's COM thereby increasing the magnitude of the force causing a counterclockwise rotation of the torso around its COM. This probably explains why many golf instructors (who have been influenced by Dr. Kwon's GRF theory) advise their student-golfers to shift their center-of-pressure immediately to the left at the start of the downswing, thereby performing a "shift-then-rotate" pattern of pelvic motion during the early downswing.
Sasho expands on this point in the following Boditrak article - https://boditrakperformance.com/cheat-codes-how-to-improve-club-head-speed-by-increasing-vertical-force-at-a-specific-point-in-the-downswing/
Sasho has also studied skilled golfers and reported a high correlation between clubhead speed at impact and the magnitude of lead foot vertical force when the clubshaft is vertical with respect to the ground during the downswing (usually between P5 and P5.5).
Here is the diagram from that article showing this high correlation.
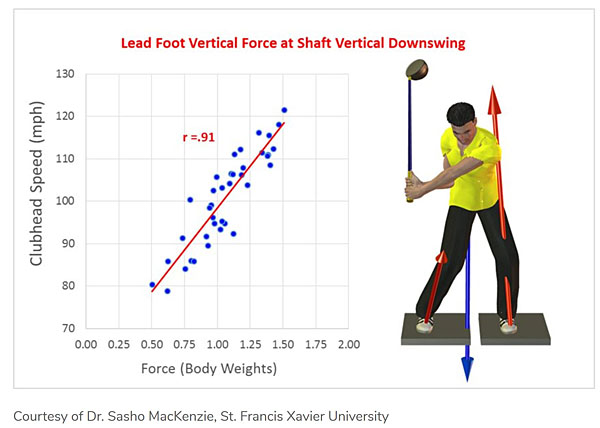
Note that the results of Sasho's study demonstrates that there is a high
correlation between the magnitude of the clubhead speed at impact and the
magnitude of the vertical force under the lead foot at shaft vertical (which
usually happens between P5 and P5.5). Based on these results, Sasho
advises golfers to maximise the vertical force under the lead foot at the shaft vertical position.
Sasho also uses a sledgehammer demonstration example to further encourage golfers to maximize the vertical force under the lead foot by the shaft vertical position.
Here is an image from that article showing Sasho performing a golf swing type of downswing motion using a sledgehammer.
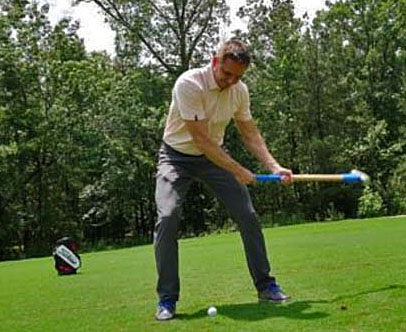
Here is an unedited copy of what Sasho stated in that article regarding his
sledgehammer example-:
"When we’re swinging a golf club, we have a “learned understanding” of the amount of vertical ground reaction force required to counteract the momentum of the club and keep our body stable. Though it isn’t a conscious thought, we know that we have to push into the ground to keep from falling forward in the swing. If we handed you a much heavier implement like a sledgehammer, there is a decent chance that on the first swing you would underestimate the vertical force required to maintain balance and would end up falling forward. As you became more familiar with swinging a heavier weight like a sledgehammer, you’d do more to prepare for the increased momentum by bracing against the ground (increasing vertical ground reaction force) earlier. This is an extreme example, but it’s a representation of what we’re doing in the golf swing. Before we even begin the downswing, we begin building pressure under our left leg (evidenced by a lateral shift in center of pressure towards the target). Shaft vertical downswing doesn’t represent a peak in this pressure, but it represents a key moment in preparing ourselves for impact."
Sasho essentially states that one needs to transfer pressure to the lead foot as fast as possible at the start of the downswing in order to better brace the lead foot against the ground in preparation for the increased momentum of the arms and golf club towards the ball that is going to happen in the later downswing. Sasho believes it will decrease the chance that the golfer will become unbalanced and fall forward towards the toes during the rest of the downswing.
In that Boditrak article, the author also wrote the following-: "At shaft vertical downswing, you need to start generating momentum in your body away from the golf ball to counterbalance the club pulling you towards the golf ball."
As an example of that principle of preparing to push the body away from the golf ball by maximally increasing pressure under the lead foot at shaft vertical, the article features the example of the long-drive competitor Justin James.
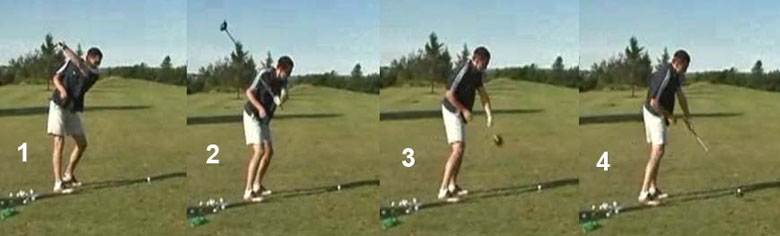
Here are capture images from an Instagram video of Justin James.
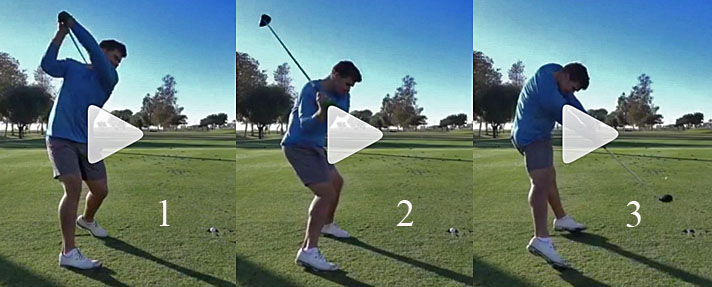
Image 1 is at his end-backswing position, image 2 is at the end of his
hip-squaring phase (about P5) when he is approaching shaft vertical, and image 3 is just
after impact.
It appears that Justin James has maximally increased the vertical force under his lead foot in image 2 (as recommended by Sasho) as a way to create a counterbalancing force in his body to directly oppose the momentum of the swinging club and prevent himself from falling forward toward the ball-target line at impact. In fact, if you view this Instagram video, you will see that Justin James creates so much momentum of his body away from the golf ball that he actually jumps backwards away from the ball-target line through the impact zone.
In a more recent Boditrak article called "The Relationship Between Lead Leg Force and Early Extension" (which is available at https://boditrakperformance.com/early-extension-is-one-of-the-common-swing-characteristics-in-golf/ ), Sasho provides even more instruction on this topic.
However, watch what Sasho presents in the first video featured at the top of the Boditrak article before reading this more recent article.
In the more recent video, Sasho states that to rotate the pelvis counterclockwise at the start of the early downswing, the player needs to generate push-pull forces with the two feet in a horizontal direction where the right foot pushes backwards away from the ball-target line while the left foot pushes forwards towards the ball-target line (producing what Dr. Kwon refers to as the “pivoting GRMs”).
Here is a capture image from that Boditrak video showing that horizontal push-pull phenomenon generated by the two feet.
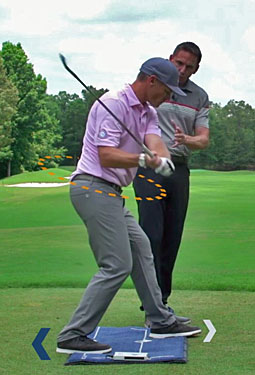
The blue arrow shows how a golfer uses his right forefoot to push away from the
ball-target line while he simultaneously uses his left foot to push towards
the ball-target line (represented by the white arrow) in a symmetrical push-pull
manner. That
action where the two feet generate symmetrical horizontal GRMs should
theoretically (according to Dr. Kwon's theory) rotate the
pelvis counterclockwise.
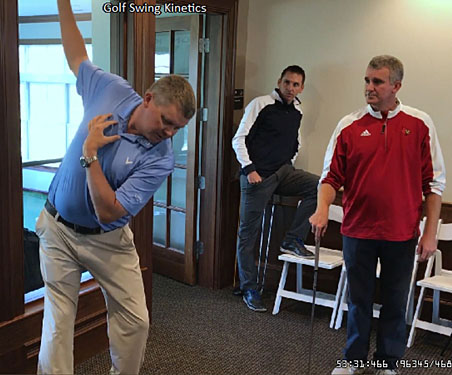
Sasho then states, based on his experience, that many golfers are better at pushing away from the ball-target line with the right foot at the start of the downswing (which will move the right side of the pelvis forwards in the direction of the ball-target line) and less effective at pushing in the opposite direction with the left foot (which will move the left side of the pelvis backwards away from the ball-target line). However, Sasho cautions that this scenario will create an imbalance in the push-pull forces operating horizontally in an anterior-posterior direction, and that the higher trail foot forces will tend to move the body's COM forwards in the direction of the toes and ball-target line. To counter this problem, Sasho states that the golfer must increase the pressure under his toes and also early extend - as demonstrated in the following capture image from that Boditrak video.
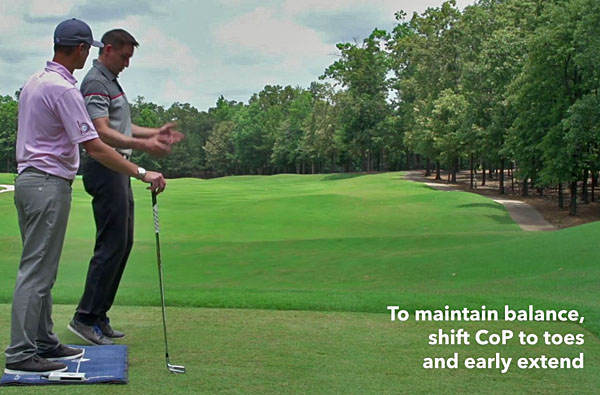
Notice that Sasho is demonstrating how a golfer must early extend while he is simultaneously increasing the COP measurements under the toes of his two feet in order to maintain his balance.
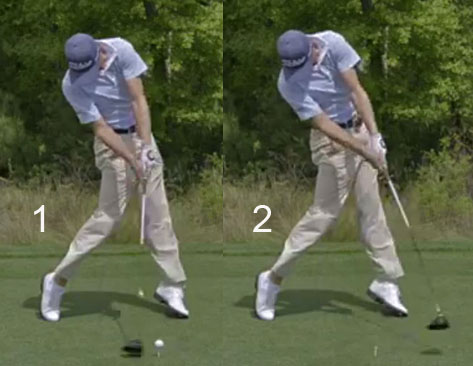
What is particularly interesting to me is that Sasho also exhibits this same early extension move in his one-arm golf swing action as shown in the capture images from the DTL video of his one-arm golf swing action.
Here are capture images from the DTL video of his one-arm golf swing action.
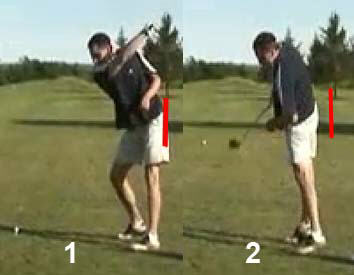
Sasho is a left-handed golfer and image 1 shows him at his end-backswing
position. I have drawn a red line alongside the back of his rear buttock and I
refer to that
red line as the tush line.
Image 2 clearly shows how much his pelvis has moved away from his tush line (in an early extension manner) during his downswing action and how he is "standing-up" on the toes of both feet through the impact zone.
Interestingly, there is a finite number of professional golfers who exhibit this early extension pelvic motion and one of the best examples is Justin Thomas who shows clear evidence of early extension in his early downswing where his right buttock quickly leaves the tush line and where his center-of-pressure is located under the toes of both feet during the later downswing and followthrough.
Here are capture images from a face-on video of Justin Thomas showing him at the P7 (image 1) and P7.2 (image 2) positions.
Note that both heels are well off the ground at impact and note that he is
standing-up on his toes of both feet with most of his overall COP measurement
being located under his right foot's toes (based on "evidence" from a force pressure plate study).
Of course, this type of a pelvic motion is perfectly acceptable, as it is performed by a number of successful PGA golfers. However, for many years, golf instructors have taught that early extension is a major swing fault. Thus, it is currently a controversial topic area and it may not be the best pelvic motion for all amateur or professional golfers.
Most importantly, student-golfers should realise that there is another common way that many amateur and professional golfers perform a pelvic motion during the downswing that is primarily based on active muscular forces, and it is only secondarily influenced by ground reaction forces.
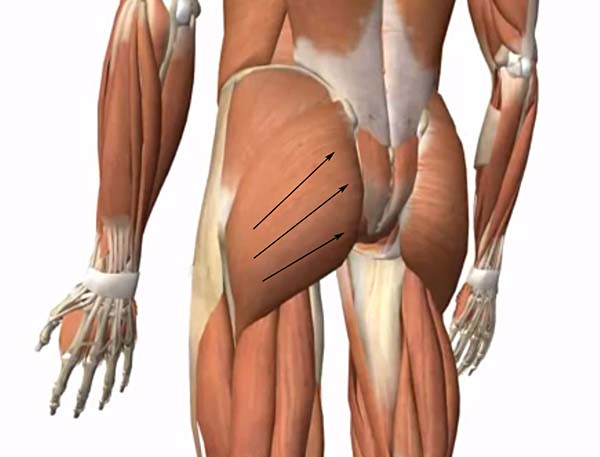
Personally, I favor and teach a downswing pelvic movement pattern that is initiated by the active muscular contraction of the 6 right-sided lateral pelvic rotator muscles.
Consider the anatomy of the 6 lateral pelvic rotator muscles by viewing this superbly animated you-tube video
Anatomy Zone you-tube video (watch the
first 7:29 minutes) -
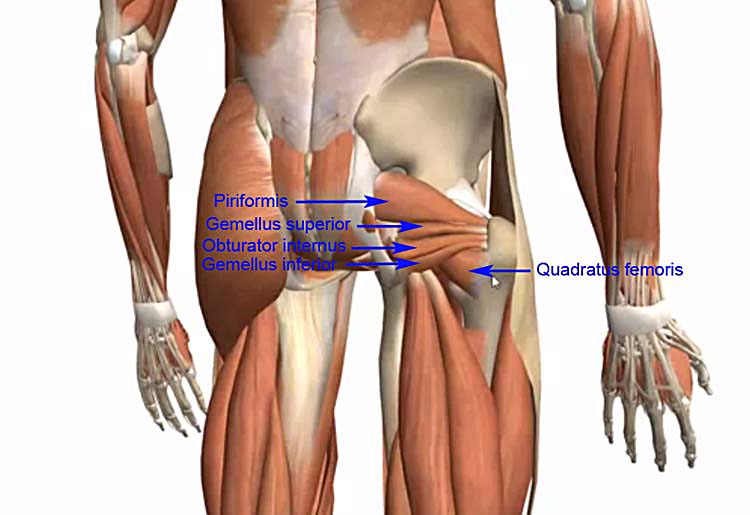
I have highlighted the 6 relatively small, but effective, 6 lateral pelvic rotator muscles-: i) the piriformis muscle, the ii) gemellus superior muscle, the iii) gemellus inferior muscle, the iv) obturator internus muscle, and the v) quadratus femoris muscle. The vi) obturator externus muscle cannot be seen in this illustration because it is hidden beneath the overlying 5 lateral pelvic rotator muscles.
When these 6 right-sided lateral pelvic rotator muscles contract at the start of the downswing, with the right leg/foot stabilised, they cause the pelvis to rotate counterclockwise away from a pressure loaded, and thereby "stabilised", right leg/foot. How does it work from a biomechanical perspective?
When the pelvis is rotated clockwise during the backswing action, this drives the right (trailing) hip joint into a condition of significant internal rotation by P4. This, in turn, stretches or elongates the right-sided lateral pelvic rotator muscles as illustrated in the image below.
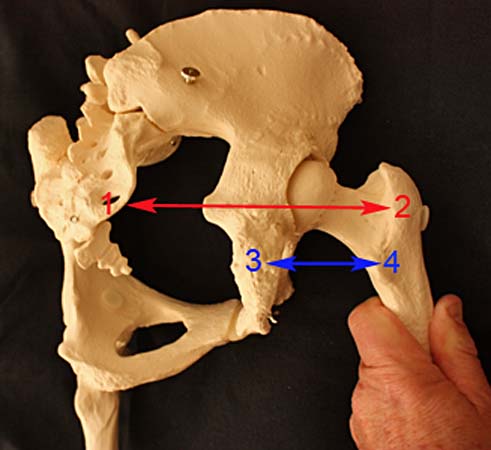
Note that I have rotated the plaster-cast pelvis model about 50 degrees clockwise before I took this photograph. Note that I have simultaneously prevented the right femur from rotating clockwise by the same amount, so that the right femur becomes internally rotated in the right hip joint. When the right femur is internally rotated in the right hip joint, that means that the points of insertion of the lateral pelvic rotator muscles (points 2 and 4) are further away from their points of origin (points 1 and 3). The points 1 - 2 represent the points of origin and insertion of the piriformis muscle and the points 3 - 4 represent the points of origin and insertion of the quadratus femoris muscle. I only referred to those two lateral pelvic rotator muscles as examples, but all the 6 lateral pelvic rotator muscles on the right side are similarly stretched (elongated) at the end-backswing position when the right femur is internally rotated in the right hip joint.
When the 6 right-sided lateral pelvic rotator muscles are stretched at the end-backswing position, they are primed and ready to contract during the early downswing. If they contract and shorten (thereby decreasing the distance between their points of origin and their points of insertion) they will cause external rotation of the right femur in the right hip joint as the pelvis rotates counterclockwise away from the right femur (assuming the right femur is stabilized). This is a critical point that one needs to fully understand, so I will discuss this in greater detail.
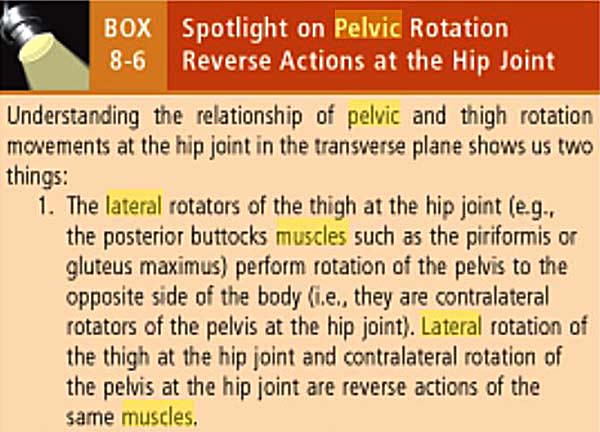
Note that the author astutely states that the lateral pelvic rotator muscles can cause
lateral (external) rotation of the thigh at the level of the hip joint and also
a contralateral rotation of the pelvis at the hip joint, and that these two
motions are merely reverse actions of the same muscles.
Now, consider an illustration of those differential (reverse) actions in the diagram below.
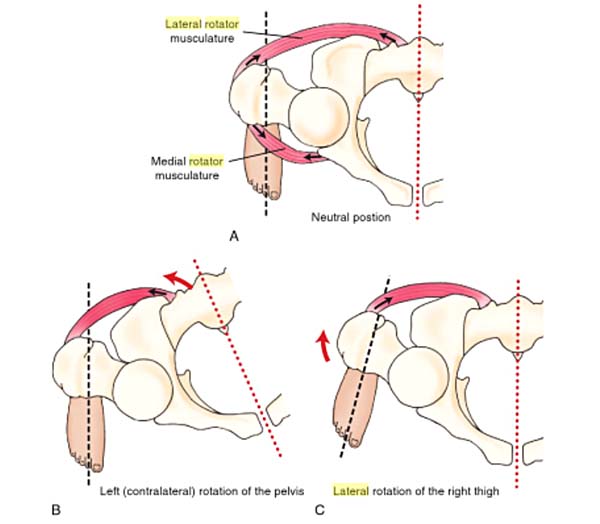
Diagram A shows the pelvis and ipsilateral (same sided) femur in a neutral position.
The black arrows show that when the muscles contract and shorten, they will
cause the muscle's origin (on the pelvis or sacrum) and the muscle's insertion
(on the upper femur) to move closer towards each other. Diagram B shows
that when
the right femur is "stabilised" that contraction of the right-sided lateral
pelvic rotator muscles will cause the pelvis to rotate counterclockwise away
from the "stabilised" right femur. Diagram C shows that when the pelvis is
"stabilised" that contraction of the right-sided lateral pelvic rotator muscles
will cause the right femur to laterally (externally) rotate in the right hip
joint. It should be noted that diagram B is most applicable to the right hip
joint/femur between P4 and P4.5 of the golf swing, assuming that the pressure
loading of the right leg (due to the golfer actively pushing down into the
ground under the right foot) causes the right leg to become "stabilised". At the end-backswing position, if a golfer has
roughly 70-90% of his overall COP-measurement under his right foot, and if he
maintains, or even slightly increases, his degree of pressure-loading of
his right leg/foot at the start of the early downswing, then he can very
effectively stabilise the position of the right femur in space between P4 and
P4.5. Then, when the right-sided lateral pelvic rotator muscles contract, they
will cause a counterclockwise rotation of the pelvis away from the "stabilised"
right femur.
The key point that a golfer needs to understand if he wants to use the active muscular technique of inducing a counterclockwise pelvic rotation between P4 and P5 (by using the 6 right-sided lateral pelvic rotator muscles) is that he needs to keep his right buttocks abutted against the tush line during that early downswing time period. He must specifically not attempt to generate any horizontal GRM (pivoting GRM) under the right foot by pushing away from the ball-target line using horizontal ground reaction forces being exerted under the right foot - as recommended by Dr. Kwon and Sasho - because that would likely induce a premature motion of the right buttocks away from the tush line. Any pressure being exerted under the right foot must be directed straight down vertically into the ground and a golfer must avoid pushing backwards away from the ball-target line (which can induce a right hip spinning motion), or pushing sideways in a direction that is away from the target (which can induce a pelvic slide motion in a targetwards direction). However, it is perfectly permissible to simultaneously generate a horizontal GRM (pivoting GRM) under the left forefoot during the hip-squaring phase between P4 and P5 by pushing towards the toes (toward the ball-target line) and that horizontal GRM being generated under the left forefoot can synergistically help to move the left buttock back toward the tush line (while the right buttock remains in close contact with the tush line). While pushing towards the toes of the left foot, a golfer will also be contracting his left quadriceps muscles that will straighten the left knee and cause the left knee to move backwards away from the ball-target line while the left buttock simultaneously moves back towards the tush line. When the left knee moves backwards away from the ball-target line, it will become inline (as viewed from a DTL viewing perspective) with the right knee, which has remained relatively stationary during the hip-squaring phase.
It is also important to understand that the active muscular contraction of the 6 right-sided lateral pelvic rotator muscles only cause a counterclockwise rotation of the pelvis during the hip-squaring phase between P4 and P5, and contraction of these muscles do not cause any further pelvic motion during the mid-late downswing when other pelvic girdle muscles and thigh muscles are responsible for any further pelvic motion.
If you would like to see how a golfer uses the active muscular contraction of the 6 right-sided lateral pelvic rotator muscles to rotate the pelvis counterclockwise between P4 and P5, watch how Jim George (my model golfer for my video projects) demonstrates the technique in this part 4 video - https://youtu.be/gsX-o6ZWeOw - from my 7-part video project on "How to Perform a Golf Swing Like a PGA Tour Golfer". Watch the video between the 10:28-10:44 minute time point for a face-on view of Jim's hip-squaring action; between the 12:00-12:15 minute time point for a DTL view of Jim's hip-squaring action; and between the 16:46-17:05 minute time point for an upline view of Jim's hip-squaring action. Note how Jim keeps his right buttock against the tush line during the entire hip-squaring phase while he rotates his left buttock back towards the tush line. Notice how he acquires the "Sam Snead sit-down look" at P5, and note that he does not first shift his pelvis left-laterally before he rotates his pelvis.
Here is a capture image from the part 4 video showing how Jim George rotates his left buttock back towards the tush line without allowing his right buttock to prematurely leave the tush line.
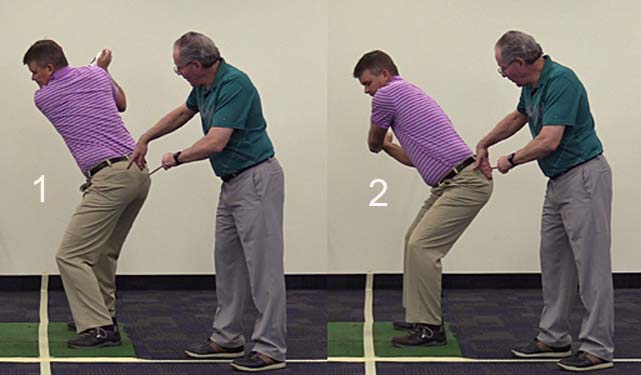
Image 1 shows Jim George at his simulated end-backswing position after he has
rotated his pelvis about 50 degrees clockwise during his backswing action. I
have placed a red rod against the back of his right buttock and this rod
represents the tush line. Note that I am pointing my right index finger at his
left buttock, which is far away from the tush line at his end-backswing
position.
Image 2 shows Jim George at his P5 position (which is defined as the end of the early downswing). Note that he has efficiently rotated his pelvis counterclockwise so that his left buttock is now in contact with the tush line (while he still keeps his right buttock also in contact with the tush line). Note how his left knee has moved back away from the ball-target line so that it becomes inline with his right knee (as viewed from a DTL viewing perspective).
Many professional golfers use the same technique of
keeping the rear buttock in contact with the tush line while they rotate their lead buttock back towards the tush line. I will now show you capture images
of two professional golfers who use this pelvic motional technique during their
hip squaring phase that happens in the early downswing between P4 and P5.
Henrik Stenson
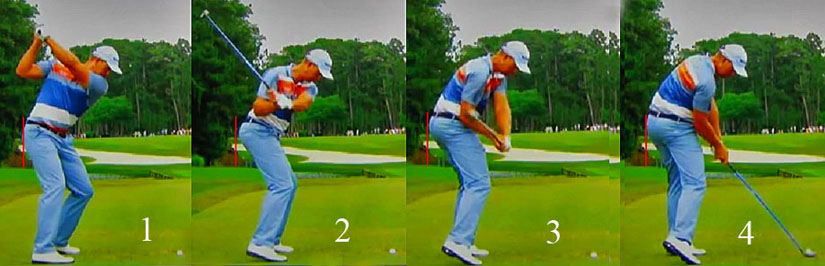
Image 1 shows Henrik Stenson at the P4 position, image 2 shows him at the P5
position, image 3 shows him at the P5.5 position, and image 4 shows him at
impact.
Adam Scott

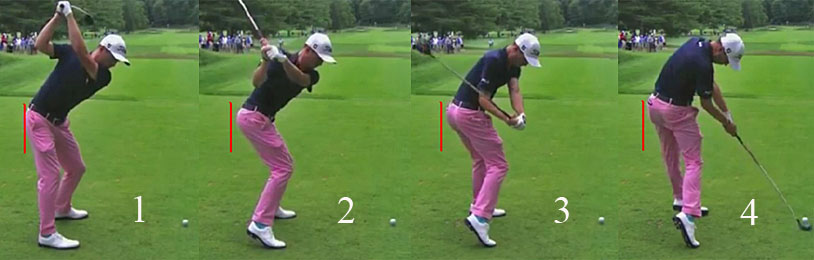
I previously mentioned that an active muscular contraction of the 6 right-sided lateral pelvic rotator muscles can cause a counterclockwise of the pelvis during the hip-squaring phase of the early downswing, but they cannot induce further rotary pelvic motion during the mid-late downswing because they are already fully contracted by the end of the hip squaring phase. So, the pertinent question then becomes, what active muscular forces can be used during the later downswing to induce further pelvic motion if a golfer does not want to use the GRM technique (recommended by Dr. Kwon and Sasho) that is primarily based on ground reaction forces?
My prescribed "active muscular pelvic motional technique" recommends the following muscular, and other biomechanical, actions during the mid-late downswing between P5 and impact.
At the end of the hip-squaring phase (which usually happens just before, or at about, the P5 position) the COP (center-of-pressure) measurements could be roughly 50:50 (equally distributed between the two feet) if the golfer uses a "pure" rotary pelvic motion between P4 and P5 where he acquires the Sam Snead "sit-down" look at P5 where the pelvis is centered between the two feet and where both thighs are in a state of symmetrical external rotation.
Here is a diagram showing the symmetrical, dual-external rotation of both thighs "look" that is often called the Sam Snead "sit-down" look when the pelvis is centered between the feet at the end of hip squaring phase.
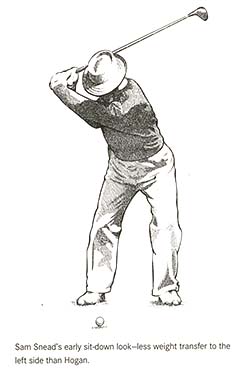
This diagram depicts Sam Snead at the end of his hip-squaring phase. Note that
his pelvis is centered between his feet and both thighs are equally
externally rotated in their respective hip joints. Force pressure plate
technology did not exist in the Sam Snead era of the 1950's so we have no
accurate data with respect to his "real life" COP measurements. But, this is not
important since my recommended active muscular pelvic rotation technique does
not require any specific COP measurement at the end of the hip-squaring phase.
One is simply trying to acquire the Sam Snead "sit-down" look by the end of the
hip- squaring phase by performing a "pure" rotary pelvic motion in the early
downswing.
I also do not believe that a golfer must be mentally rigid in his approach when using my "active muscular pelvic rotational technique" to square his pelvis between P4 and ~P5. Although I may prefer a pure "rotate-without-shift" rotary motion during the hip-squaring phase that creates the Sam Snead "sit-down" look by the end of the hip-squaring phase, I think that it is perfectly acceptable to use a "rotate-and-shift" pelvic motional technique where the pelvis shifts more targetwards during the hip-squaring phase so that it not perfectly centered between the two feet at the end of the hip-squaring phase. Luke List is an example of a golfer who manifests this "rotate-and-shift" pattern of pelvic motion during his early downswing.
Here are capture images from a face-on swing video of Luke List's golf swing showing his pelvic motion between P4 and P5.
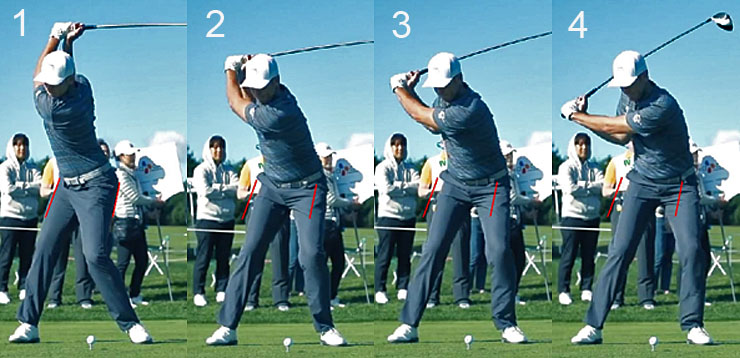
Image 1 is his end-backswing (P4) position and image 4 is at his P5 position
where his pelvis is square to the ball-target line.
Note that he maintains right knee flex during his backswing action, and he prevents his right thigh from rotating externally while he rotates his pelvis clockwise by ~45 degrees - and that causes his right hip joint to become very internally rotated at his P4 position. Under those conditions, his 6 right-sided lateral pelvic rotator muscles are optimally pre-stretched (elongated) and prepared to maximally contract at the start of the downswing. During his hip-squaring phase that happens between P4 and P5, Luke List keeps his right buttock in close contact with the tush line while he rotates his left buttock back towards the tush line, and I strongly suspect that he is using his right-sided lateral pelvic rotator muscles to rotate his pelvis away from his "stabilised" right leg (using the active muscular pelvic rotational technique previously described).
However, Luke List uses a "rotate-and-shift" pattern of pelvic motion during his hip-squaring phase where he shifts his pelvis to a little targetwards while he rotates his pelvis counterclockwise between P4 and P5. I have drawn red lines alongside the outer borders of his pelvis and upper thighs at the P4 position, and one can see that Luke List shifts his pelvis a few inches targetwards during his hip-squaring phase. At the P5 position (image 4) his pelvis is not perfectly centered between his feet, and that causes his right thigh to be slanted more than his more vertically-aligned left thigh at the end of his hip-squaring phase (image 4). Under those conditions, his COP measurements could be shifted more in favor of pressure-loading of his left foot (relative to his right foot) and the COP distribution could possibly be 60:40 (or even 65:35 or even 70:30) in favor of the left foot at the end of the hip-squaring phase, but, again, it's not important to know what's the exact COP measurement distribution at the P5 position. What is much more important to understand, in my recommended "active muscular pelvic motional technique", is the fact that a golfer needs to perform certain necessary biomechanical actions in his later downswing that would cause most of the overall COP measurement to be located under the left heel by impact, which means that he is pressure-loading the left heel at impact.
Here are capture images showing Luke List's COP measurements between P5.5 and impact.
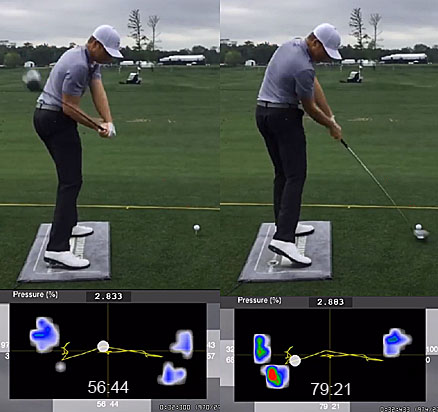
Image 1 shows that Luke List has 56% of his overall COP measurement located
under his left foot at his P5.5 position and 44% located under his right foot.
Note that at impact, Luke List has 79% of his overall COP measurement located under his left foot (and only 21% located under his right foot). Most importantly, note that most of his COP measurement under his left foot is located under his left heel (68% under his left heel and 32% under his left forefoot). I strongly favor that pattern of COP measurement distribution and I will now describe how that left foot pressure-loading pattern can be achieved using my recommended "active muscular pelvic motional technique".
Starting at the P5.5 position, I recommend that a golfer produce a progressive straightening action of the left leg by actively contracting his left thigh's quadriceps muscles (especially the left vastus lateralis muscle) - as depicted in the following diagram.
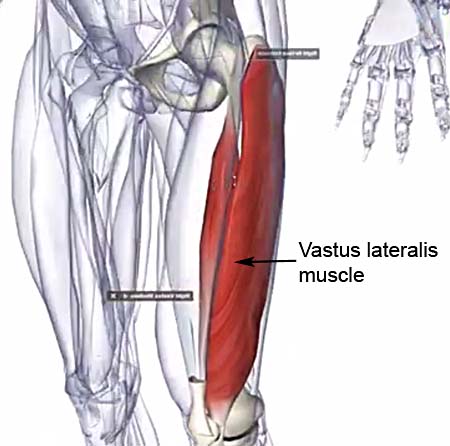
The vastus lateralis muscle is the largest muscle in the quadriceps group of
muscles, and if that muscle in the left thigh is actively contracted during the
P5.5 => P7 (impact) time period it will progressively straighten the left leg.
Because the left foot is grounded against the unyielding resistance of the
ground, contraction of
that muscle cannot move the left foot away from the left hip joint. Instead, the
left hip joint area of the pelvis will be elevated while the COP measurement
under the left foot will progressively increase as a result of the left foot
pushing against the ground under the left foot. That "left leg straightening"
action (against the unyielding resistance of the ground) will also help to brace
the left lower limb and prevent swaying of the pelvis in a targetwards
direction. Simultaneously, I recommend that the golfer actively contract
his left gluteus maximus muscle - as depicted in the following diagram.
The left gluteus maximus muscle is a large, and powerful, muscle in
the left buttocks and if that muscle is actively contracted, it will pull the
left upper femur towards the sacrum (as depicted by those black arrows).
Consequently, when the left gluteus maximus muscle shortens during contraction
it can extend the left femur in the left hip joint and cause additional
straightening of the left leg. Accordingly, the contraction of the left
quadriceps muscles and left gluteus maximus both serve to brace the left leg and
left pelvis in the later downswing after the hip squaring phase. Because some of the muscle fibres of the left
gluteus maximus muscle attach to the back of the femur to the left of the
central longitudinal axis of the posterior femur, an
active contraction of the left gluteus maximus muscle will also cause the left
femur to externally rotate. All of these biomechanical effects can be seen in Ben Hogan's late
downswing and early followthrough action.
Here are back-view capture images from a swing video of Ben Hogan.

Image 1 is at the P4 position, image 2 is at the P5 position, image 3 is at the
P6 position, image 4 is at impact and image 5 is at the P7.5 position.
Ben Hogan uses the "rotate-and-shift" pattern of pelvic rotation between P4 and P5 (like Luke List). Notice that he does not hip spin or early extend like Justin Thomas. In contrast, Ben Hogan retains his posture angles, does not quickly raise his right heel off the ground in the early downswing, and maintains a flexed left knee to P5.
After P5, however, Ben Hogan progressively straightens his left knee into impact which elevates his left pelvis as the left leg straightens. Most importantly, note how he pulls his left buttocks further away from the ball-target line and also further away from the target secondary to the contraction of his left gluteus maximus muscle while he keeps his left heel solidly grounded.
Why is this muscle-induced pelvic rotation so important? I think it allows Ben Hogan's pelvis to rotate counterclockwise around an imaginary axis drawn from his left foot through the left side of his sacrum, with the rotational fulcrum point centered under the left heel area, which is solidly grounded. Why is having a stabilized left leg important from P6.5 to P7.5? During the late downswing and early followthrough, the momentum of the released club can create enough outward-moving force to cause a golfer to fall forward toward the ball-target line. However, Ben Hogan easily maintains his balance during this part of the swing as he opposes the powerful outward (centrifugal) force of the released club due to an equal and opposite stabilizing force from his posted left leg and his solidly grounded left heel. Essentially, Ben Hogan creates an inwardly directed (centripetally-directed) force that matches any outward centrifugally-directed force due to the released club. This allows him to maintain perfect balance as he swings through the impact zone Consequently, Ben Hogan doesn't need to jump backwards or early extend like those golfers who use GRMs to rotate the pelvis (see the discussion above regarding Justin James and Justin Thomas).
However, does using a stable pivot action, like Ben Hogan, make it impossible to be a successful long-drive competitor?
No! Consider the pivot action of Tim Burke, the long-drive competitor, who won the 2015 world long-drive competition.
Watch both of the following two videos of Tim Burke's golf swing action, and note that he is basically using the same stable pivot action pattern as Ben Hogan.
Swing video 1 - https://www.youtube.com/watch?v=K5HWjvntqvw
Swing video 2 - https://www.youtube.com/watch?v=cQaiyNBake4
Here are capture images of Tim Burke from swing video 2.
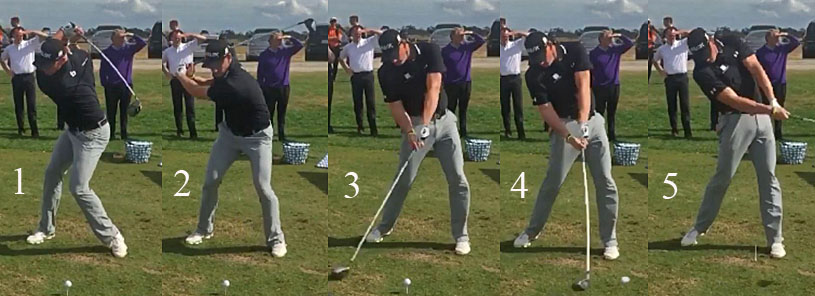
Image 1 is at the P4 position, image 2 is at the P5 position, image 3 is at the
P6.7 position, image 4 is at impact, and image 5 is at the P7.8 position.
Note that Tim Burke has maintained some flex in his right knee and he is preventing his right femur from externally rotating during his backswing action, while he rotates his pelvis clockwise thereby driving his right hip joint into a state of marked internal rotation by his P4 position (image 1). His right-sided lateral pelvic rotator muscles are optimally pre-stretched (elongated) at his P4 position, and prepared to contract so he can rotate his pelvis quickly away from his stabilized right leg during his early downswing.
Image 2 shows Tim Burke at the end of his hip-squaring phase where he has the Sam Snead "sit-down" look. Note how "stable" his right leg has remained during his hip-squaring phase and there is no evidence of right hip spinning (where his right buttocks prematurely moves away from the tush line) or early extension. Note that there is no evidence of his right knee kicking-in or his right heel lifting. He simply rotates his left buttock back towards the tush line between P4 and P5, while keeping his right buttock in contact with the tush line, similar to Ben Hogan.
Note how Tim Burke progressively straightens his left leg between P5 and impact, while he continues to rotate his left buttocks farther back away from the ball-target line and farther away from the target (and that requires the muscular contraction of his left gluteus maximus muscle). Note how solidly grounded his left foot is at impact and also at P7.8 and there is no evidence of any spinning of his left heel or any evidence of a "jumping up" action through impact.
I think that Tim Burke demonstrates that one can have a stable pivot action (like Ben Hogan) and still generate clubhead speeds of >150mph at impact.
Here are capture images from a swing video of Luke List's driver swing action that demonstrates that he basically uses the same stable pivot action pattern as Ben Hogan and Tim Burke.
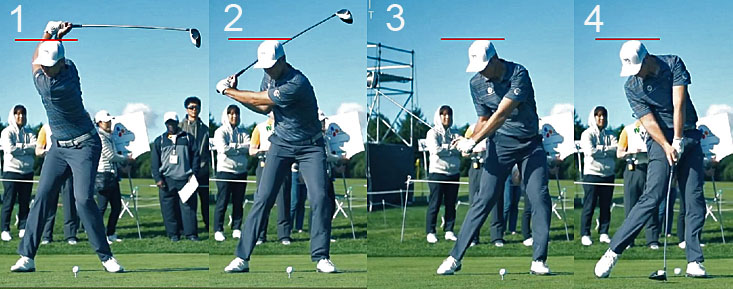
Image 1 is at his P4 position, image 2 is at his P5 position, image 3 is at his
P5.5 position and image 4 is at impact.
I have drawn a red line along the top of his head at his end-backswing position. Note that his head does not drop down during his entire downswing action between P4 (image 1) and impact (image 4).
Note that Luke List has maintained some flex in his right knee and he is preventing his right femur from externally rotating during his backswing action, while he rotates his pelvis clockwise thereby driving his right hip joint into a state of internal rotation by his P4 position (image 1). His right-sided lateral pelvic rotator muscles are optimally pre-stretched at his P4 position, and they can be used to rotate his pelvis away from his "stabilised" right leg during his early downswing.
Image 2 shows Luke List at the end of his hip-squaring phase where he does not have the classic Sam Snead "sit-down" look because he uses the "rotate-and-shift" pattern of pelvic motion during his hip-squaring phase. Note how "stable" his right leg has remained during his hip-squaring phase and there is no evidence of right hip spinning (where his right buttock prematurely moves away from the tush line) or early extension. Note that there is no evidence of his right knee kicking-in or his right heel lifting. Note that he has rotated his left buttock back towards the tush line between P4 and P5 while keeping his right buttock in contact with the tush line.
Note how Luke List progressively straightens his left leg between P5.5 (image 3) and impact (image 4), while he continutes to rotate his left buttock farther back away from the ball-target line and farther away from the target (and that requires the muscular contraction of his left gluteus maximus muscle). Note how solidly grounded his left foot is at impact and note that there is no evidence of any spinning of his left heel or any evidence of a "jumping up" action through impact.
I think that Luke List and Tim Burke demonstrate that it is possible to use a very stable pivot action pattern (like Ben Hogan) when driving the ball a long distance. Most importantly, I believe that the quality and stability of their pivot action is not derived from focusing on GRMs generated under the feet and that it is the *end-product of an optimised kinematic sequence using the sequential muscular contraction of specific pelvic girdle and leg muscles.
(* If you are interested in reading a more detailed explanation of the kinematic sequence of muscular activation that can induce a pelvic rotation during the downswing, then you can read my "Critical Update: How to Optimally Rotate the Pelvis During the Downswing" review paper)
Topic number 2:
How can I increase distance?
At the 33 minute time point of the recorded video
presentation, Sasho started to explain that a golfer can apply a linear force to
the club handle that moves the club handle down the hand arc path. He then
stated that the "work" exerted by the hands when applying that linear force
depends on the "average" magnitude of that linear force combined with the
distance over which the hands are applying that force. Therefore, it makes sense
to have "high hands" at the end-backswing position because that would increase
the distance over which the hands travel down the hand arc path. Sasho correctly
stated that virtually all long-drive competitors have "high hands" at their end-backswing
position as a result of lengthening their backswing's hand arc path and that it
is a major factor that explains why long-drive competitors can drive the golf
ball much farther than PGA tour golfers. Sasho qualified his assertion by
stating that it would only be true if the golfer was capable of performing a
coordinated downswing action with skilled athleticism from a "high hands"
position. I basically agree with Sasho's opinion and I don't think that it can
be considered to be a very controversial opinion.
Michael then asked Joe Mayo to express his opinion on this topic of "how can I increase distance" and Joe did not talk about the specific issue of "high hands", but he immediately asked the audience the question as to whether they would recommend that a golfer should maintain flex in his knees (and I presume that he was really talking about the rear knee) during the backswing action. He then answered his own question by stating that he believed that maintaining right knee flex would be disadvantageous because it would limit the amount of external rotation of the right thigh that could occur during the backswing action, and that it would therefore limit the amount of clockwise pelvic rotation that could occur during that time period. I do agree that a golfer can potentially rotate the pelvis more clockwise during his backswing action if he allows his right knee to straighten, and if he allows his right femur to externally rotate more during his backswing action. However, I do not necessarily agree that the greater range of clockwise pelvic rotation happening during the backswing will necessarily increase the efficiency and speed of rotary pelvic motion happening during the early downswing. It will likely be advantageous if a golfer uses the ground reaction force technique of rotating the pelvis during the downswing where the horizontal GRMs (horizontal pivoting moments) are the major force causing the pelvis to rotate counterclockwise during the downswing. If the range of rotary travel motion of the pelvis is increased, then applying a horizontal GRM over a greater distance of rotary pelvic motional travel should increase the speed of pelvic rotary motion during the early downswing. That makes sense to me and I therefore do not disagree with that line-of-reasoning. However, if a golfer primarily uses the 6 right-sided lateral pelvic rotator muscles to rotate the pelvis counterclockwise during the hip-squaring phase of the early downswing, then it would be disadvantageous to straighten the right knee and externally rotate the right femur more during the backswing's pelvic loading action - because that would decrease the degree of internal rotation of the right hip joint that would exist at the P4 position, which means that the 6 right-sided lateral pelvic rotator muscles would not be optimally pre-stretched at the P4 position. I therefore would recommend that a golfer - if he wants to optimally pre-stretch his right-sided lateral pelvic rotator muscles - maintain flex in the right knee to deliberately prevent the right femur from externally rotating too much during the backswing action, and that should allow the right hip joint to be driven into a condition of marked internal rotation at the end-backswing position.
Here are capture images of some modern-day professional golfers who use that "maintaining a flexed right knee" approach.
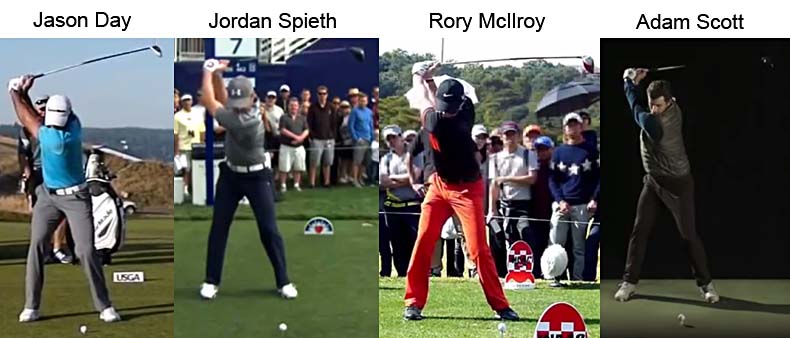
Note that each of these 4 modern-day PGA tour golfers maintains right knee flex during their backswing action and they do not straighten their right knee during their backswing action in order to increase the range of clockwise pelvic rotary motion that would happen during their backswing action. Note that they do not allow their right femur to externally rotate and they keep their right knee cap facing the ball-target line. Note that their right hip joint is very internally rotated at their end-backswing position, which means that their 6 right-sided lateral pelvic rotator muscles are optimally pre-stretched at their end-backswing position.
In summary, I would agree with Joe's recommendation if a student-golfer intends to primarily use horizontal GRMs to rotate his pelvis during the hip-squaring phase of the early downswing, but I would personally use those 4 golfers (Jason Day, Jordan Spieth, Rory McIlroy and Adam Scott) as role models if the student-golfer prefers to use his 6 right-sided lateral pelvic rotator muscles to primarily power his rotary pelvic motion during the hip-squaring phase of the early downswing.
The second issue that Joe brought up was the question as to whether a golfer should use a different pattern of loading of his upper torso if he wanted to increase his distance of hand travel during his backswing.
Here is an image showing different patterns of loading of the upper torso during the backswing.
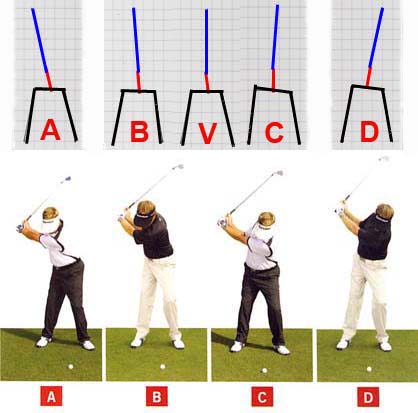
I modified an image from Mike Bennett and Andy Plummer's Stack & Tilt book to
create the above image. I added a diagram at the top where the two vertically
slanted lines represent the two legs, the horizontal black line represents the
pelvis, the red line represents the lumbar spine and the blue line represents
the thoracic spine. I also added a V position that is intermediate between the B
and C positions.
The A position represents a rightwards-tilted upper torso loading position. The B position represents a rightwards-centralised upper torso loading position. The C position represents a leftwards-centralised upper loading position that is used by S&T golfers. The V position represents a vertical-centralised upper torso loading position where the spine is more vertical and it is intermediate in degree between the B and C upper torso loading positions. The D position is a leftwards tilted (reverse pivoting) upper torso loading position.
In the Seminar's video presentation, Joe stated that he preferred a position, which he called a "replacing forward bend with side bend" position as demonstrated in the following capture image from the video presentation.
Note that Joe has adopted an upper torso loading position that looks like it
could be compatible with a vertical-centralised upper torso loading position or
a leftwards-centralised upper torso loading position. Joe believes that it
allows a golfer to get a greater range of motion of the hands along the hand arc
path during the backswing action, and his claim only makes sense to me if compared to
position A (rightwards-tilted upper torso loading position) which would make it
biomechanically much more difficult for the golfer to get his hands farther back
to a "high hands" position. However, I have noted that many long-drive
competitors use a rightwards-centralised upper torso loading pattern and they
simply continute to rotate their upper torso clockwise around a rightwards
tilted lumbar and lower thoracic spine in such a manner that their extra degree
of horizontal rotation of the upper torso occurs at the level of their mid and
upper thoracic spine.
Here are capture images showing that pattern of upper torso loading in two long-drive champions and one PGA tour golfer.
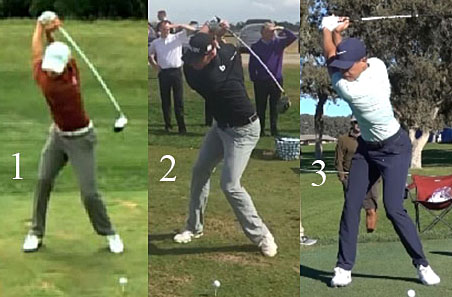
Image 1 shows Jamie Sadlowski at his end-backswing position, image 2 shows Tim Burke at his end-backswing position,
and image 3 shows Cameron Champ at his end-backswing position.
If you look at the alignment of their lumbar spine and lower thoracic spine, then I would classify them as having a rightwards-centralised upper torso loading position at their P4 position. They are also not arch-extending their upper thoracic spine to the left in a S&T pattern ("replacing forward bend with side bend" pattern), and they are simply continuing to rotate their upper thoracic spine in a clockwise direction because they have the requisite thoracic spine flexibility to allow that biomechanical phenomenon to happen. Many other PGA golfers (eg. Rickie Fowler), who want to get their hands farther back by their end-backswing position, also use that upper torso loading pattern and it makes perfect sense to me from a biomechanical perspective - if a golfer has the requisite flexibility of the thoracic spine.
The only other issue that was briefly discussed regarding this topic of "how can I increase distance" was related to Sasho's answer to the question that was asked by an audience member, who asked whether increasing clubhead lag is an useful way to increase clubhead speed at impact. Sasho answered that question very briefly by stating that it would likely increase clubhead speed, but "at the expense of finding the ball" and he therefore felt that it was a "method of last resort". I was very surprised by Sasho's expressed opinion that trying to increase clubhead speed via the utilisation of the club release phenomenon (called the release of PA#2 in TGM terminology) is a "method of last resort" - because in his initial presentation (see my discussion at the start of topic number 1) he stated that there is a high correlation between clubhead speed and wrist motion. Therefore, in his discussion of "how to increase distance" I would have expected him to expand on this issue of how wrist motion can increase clubhead speed at impact, and I was disappointed to note that he didn't discuss this "wrist motion" issue in much greater detail.
My personal opinions on this topic of "how to increase distance" are expressed in great detail in topic number 5 of my review paper called "Critical Review: Tyler Ferrell's Stock Tour Swing" where I discussed the topic of swing power generation in a very comprehensive manner. I will not again describe my personal opinions in such great detail in this review paper, but I will instead use some of those opinions to explain why I would have asked Sasho many more questions about the topic of "how to increase distance" if I were an audience member at that Seminar.
I firmly believe that most professional golfers are using a TGM swinging technique where swing power is generated between P4 and P5.5 via the sequential release of power accumulator #4 (PA#4) followed by the release of PA#2 (club release phenomenon). Basically, the release of PA#4 is simply the release (unloading) of the loaded left arm that is induced by the pivot action. The left arm is loaded during the backswing when the golfer elevates the left arm and adducts it across his upper torso. Then, during the downswing the left arm is swung forward-and-downward as a result of the pivot action that moves the left shoulder socket targetwards between P4 and P5.5, and the constantly moving left shoulder socket pulls the left arm downwards-and-forwards between P4 and P5.5 thereby inducing the release of PA#4. As the golfer approaches the P5.5 position the club will start to passively release according to the laws of physics that explain the release phenomenon of the double pendulum swing model (as happens in an Iron Byron golf club testing machine) and this represents the release of PA#2.
(* For interested readers, I have presented my personal interpretation of Homer Kelley's TGM power accumulator loading/unloading concepts in great detail in this short review paper)
Therefore, the first issue that has to be discussed when it comes to maximising the speed of release of PA#4 is how to increase the efficiency of the pivot action which is causally responsible for inducing the unloading of PA#4. To better discuss that issue let's consider Jamie Sadlowski's 3-D kinematic sequence graph.
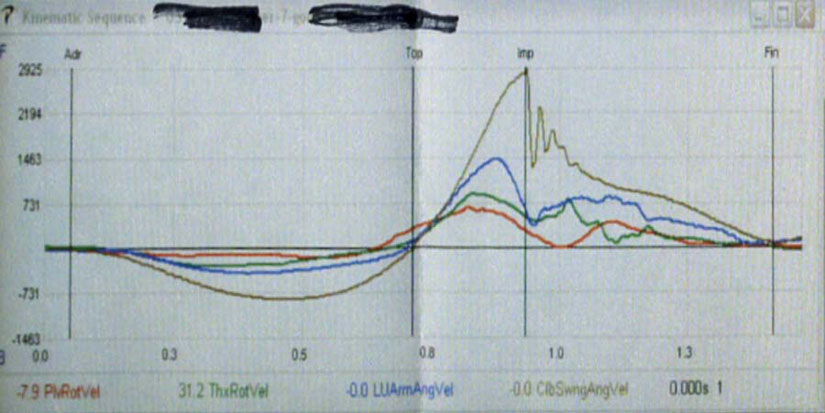
The vertical black line under the word "top" represents the end-backswing time
point, and the vertical black line under the word "imp" represents the impact
time point. The red graph represents the pelvic angular velocity graph, the
green graph represents the upper torso (thorax) angular velocity graph, the blue
graph represents the angular velocity of the left arm and the brown graph
represents the clubhead's angular velocity.
If you look closely at the red and green graphs in the later backswing, you will note that are superimposed on each other indicating that the pelvis and upper torso are traveling at the same rotational speed. Then, just before Jamie Sadlowski reaches the P4 position, his pelvis starts to rotate faster than his upper torso, which enables him to generate a greater degree of torso-pelvic separation (greater dynamic X-factor) at the start of his downswing action. Creating a greater degree of torso-pelvic separation stretches the mid-upper torso's core muscles (especially the abdominal oblique muscles) and that allows them to contract with a greater degree of muscular contractile force fractionally later in the early downswing, thereby causing the upper torso to start to rotate at a very fast rotational velocity. How does Jamie Sadlowski generate torso-pelvic separation at the start of his downswing? I can easily answer that question because I believe that the standard kinematic sequence involving the sequential rotation of the pelvis first, and the upper torso second, is induced by the sequential activation of different muscles. In particular, I believe that a skilled golfer can first induce a counterclockwise rotation of the pelvis by contracting his 6 right-sided lateral pelvic rotator muscles, and after a variable time period of delay he can secondly contract his core muscles (especially his abdominal oblique muscles) to rotate his upper torso. However, Sasho does not seemingly believe that the rotation of the torso (pelvis and upper torso) is primarily due to muscular forces and he preferentially uses the GRM explanation where ground reaction forces are causally responsible for rotating the torso around its COM. If GRMs (both horizontal and vertical) are the only "forces" that are causally responsible for rotating the torso around its COM (as asserted by Dr. Kwon), what causes Jamie Sadlowski's pelvis to rotate faster than his upper torso at the start of his downswing? I would be very interested in studying Sasho's answer to this question.
Another question that I would have asked Sasho at the Seminar relates to the role of the right arm in maximising the efficiency of release of PA#4. When I discussed this issue in topic number 5 of this review paper, I postulated that an active right arm adduction maneuver at the start of the downswing could allow the right palm to apply push-pressure at PP#1 (which is located over the base of the left thumb) in such a manner that the applied push-pressure could synergistically help the left hand to apply a greater degree of linear (pulling) force on the club handle as the left hand descends down the hand arc path between P4 and P5.5. To enable new readers, who have not read my website's review papers, to better understand this point, I will explain the TGM concept of pressure points (PPs) by using the following modified image of Ernie Els' grip on the club handle.
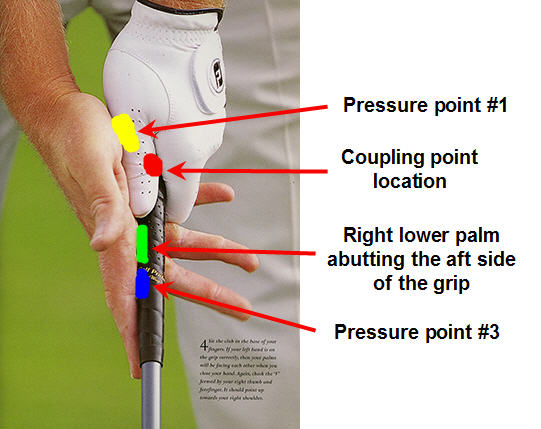
The coupling point is a point on the club handle which is
midway between the left hand and the right hand if a golfer adopts a split grip
(eg. baseball grip) and it will be located roughly opposite the knuckle of the
left hand's index finger. If a golfer adopts a split grip style (eg. baseball
grip) where the entire right hand is below the coupling point, then any
push-pressure being exerted by the right palm will be applied to the club handle
below the coupling point. Any push-pressure being applied by the right
index finger against the aft side of the club handle at PP#3 will also be
applied against the aft side of the club handle below the coupling point. That means that any push-pressure being
applied by the right hand can potentially produce undesirable casting if it is
injudiciously applied in the early downswing or it can potentially lead to
pre-impact flipping if it is injudiciously applied in the later downswing.
However, many professional golfers use an overlapping grip style where the right hand is positioned much higher and it overlaps the left hand - as seen in the above image of Ernie Els' adopted grip style. Under those conditions, note that any push-pressure being exerted by the base of the right palm will then be applied against the base of the left thumb at PP#1, which is above the coupling point. That means that any active push-pressure being applied by the base of the right palm during the early-mid downswing can synergistically cause the left hand to move faster in its direction of travel down the hand arc path, which means that it is potentially helping to increase the speed of release of PA#4. I strongly suspect that this phenomenon could be happening in many professional golfers, especially when they have a large degree of hand overlap as seen in Jim Furyk's grip style where he overlaps two fingers of his right hand over his left hand so that his right hand almost lies entirely over his left hand.
Here is a composite image showing Jamie Sadlowski's hand arc path.
The hand arc path is colored red. Point 1 is the point on the hand arc path
where his hands are located at his "high hands" end-backswing position. Point 2
is the point on his hand arc path at the end of his early downswing. Note that
his hands are moving in a relatively straight line direction (with little
curvature of the hand arc path) in a "downwards-and-slighly backwards away from
the target" direction during the early downswing between P4 and P5. Point 3 is
the position of his hands on the hand arc path at the P5.5 position and one can note that his hands
are now moving downwards-and-forwards between P5 and P5.5
Here are capture images showing Jamie Sadlowski's pivot and arm motion between the P4 position and the P5.5 position.

Image 1 is at his P4 position, image 2 is at his P4.5 position, image 3 is at
his P5 position, and image 4 is at his P5.5 position.
I have drawn a green circular ring marker over his left shoulder socket at his P4 position, a yellow circular ring marker over his left shoulder socket at his P4.5 position, a blue circular ring marker over his left shoulder socket at his P5 position, and a white circular ring marker over his left shoulder socket at his P5.5 position. Note that his left shoulder socket is moving mainly targetwards between P4 and P5 secondary to his pivot action, and it is likely responsible for pulling his left arm downwards so that his left hand moves down the hand arc path between P4 and P5.5 (as previously described).
Note that Jamie Sadlowski is actively adducting his right arm during that time period while maintaining the same degree of right elbow bend during that entire P4 => P5.5 time period - in particular, note how his right elbow is seen below his left elbow in image 3. If his active right arm adduction maneuver causes his right hand to simply travel at the same speed as the left hand down the hand arc path between P4 and P5.5, then his right palm may not be applying any significant amount of push-pressure against PP#1 and it may not synergistically help him to generate a high speed of left hand motion down the hand arc path during that P4 => P5.5 time period. However, if his right palm is applying a significant amount of push-pressure against PP#1 as a result of his active right arm adduction maneuver, then it can potentially help him to create a faster left hand speed down the hand arc path, which can potentially result in "increased driving distance". If I were attending the Seminar, I would have asked Sasho to comment on the question as to whether an active right arm adduction maneuver during the early-mid downswing time period can potentially result in a greater clubhead speed at impact - via its effect on the speed of left hand motion down the hand arc path between P4 and P5.5.
I can think of two other reasons why an active right arm adduction maneuver between P4 and P5.5 can potentially result in an "increased driving distance".
I have already stated that a major source of swing power in a TGM swinging action is the release of PA#4 (release of the left arm) that is induced by an active pivot action. However, a golfer can also obtain a significant amount of additional clubhead speed by starting to release his club in the mid-downswing and that is called the release of PA#2 in TGM terms. Note that Jamie Sadlowksi has a very flexible left wrist that allows him to get a lot of clubhead lag by his end-backswing position (see image 1 above). Note that he can retain most of his acquired clubhead lag all the way down to his P5.5 position (see image 4 above). A major factor that makes that large degree of clubhead lag retention possible is the fact that he actively adducts his right arm using a pitch elbow motion of his right elbow where his right elbow leads his hands during the P4 => P5.5 time period, and where he continuously maintains his bent right elbow alignment and bent-back (extended) right wrist alignment all the way down to P5.5. By contrast, if he straightened his right elbow +/- straightened his right wrist during his early-mid downswing it could promote casting and a significant loss of clubhead lag.
His active right arm adduction maneuver, that is combined with a right elbow pitch motion, also has a major influence on his hand arc path and it causes his hand arc path to be directed mainly downwards (and far less forwards) during the P4 => P5.5 time period creating a minimally curved hand arc path that is not "tightly" circular ( = having a small radius of curvature) during that early-mid downswing time period. The passive forces causing the club to release during a PA#2 release action operate according to the law of physics that explains the club release phenomenon in an Iron Byron type of golf club testing machine, which operates according to the principle of a double pendulum swing model. The best mathematical explanation that I have presently discovered to explain the club release phenomenon is this explanation, which is based on the D'Alembert principle. Note that it predicts that the club will acquire angular momentum if the hands move in a direction that is not straight line-aligned with the COG of the club, and that the club will acquire much more angular momentum if the hand arc path direction becomes more "tightly" circular (= hands moving in a circular direction where the radius of the circular hand arc path becomes smaller). During the P4 => P5.5 time period, the curvilinear hand arc path is not "tightly" circular, and therefore the passive forces inducing a club release phenomenon (according to the D'Alembert principle) is small. By the time Jamie Sadlowski's hands reach the P5.5 position, his hands are already below the level of his waist due to the marked downward direction of his hand arc path and his hands are still about 15" outside the outer border of his right thigh. After P5.5, Jamie Sadlowski's hands start to move much more forward in a targetwards direction and that creates a "tightly" circular hand arc path between P5.5 and P6, which induces a rapid release of the club.
Here is another example of that same hand arc pattern - featuring Dustin Johnson.
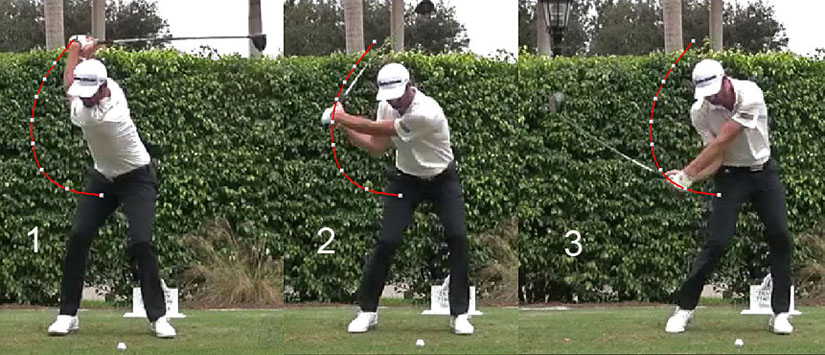
The red path represents Dustin Johnson's hand arc path.
Image 1 is at his P4 position, image 2 is at his P5 position and image 3 is at his P5.5 position.
Note that there is minimal curvature of his hand arc path between P4 and P5.5 and that allows Dustin Johnson to maintain his clubhead lag between P4 and P5.5 without any casting. Starting at roughly the P5.5 position, where his hands are about 12" outside his right thigh and already below waist level, his hands will start to move much more targetwards as he increasingly abducts his left arm during his later downswing. That radical change in hand arc path direction (where the hand arc path is mainly downwards between P4 and P5.5 and then much more forwards after P5.5) creates a "tightly" circular hand arc path in the P5.5 => P6 region, and that induces a rapid club release phenomenon. What factor makes it possible for Dustin Johnson to generate a hand arc path between P4 and P5.5 that is mainly directed downwards and not very much forwards? I believe that the correct answer is his active right arm adduction maneuver that is combined with a pitch elbow motion of his right elbow - note how Dustin Johnson actively drives his continuously bent right elbow downwards to its pitch location in front of his right hip area during his early-mid downswing action. Note that his right elbow is closer to the target than his hands at the P5.5 position (image 3) and that the angling back of his right forearm causes his hands to be positioned well outside his right thigh at that P5.5 position.
Sasho never mentioned this biomechanical phenomenon of an "active right arm adduction maneuver that is combined with a right elbow pitch motion", which can allow professional golfers to retain their clubhead lag during the P4 => P5.5 time period, and which then allows them to rapidly start releasing the club in the P5.5 => P6 region where the hand arc path becomes more "tightly" circular. I strongly suspect that use of this biomechanical phenomenon enables a professional golfer, like Dustin Johnson, to "increase his driving distance". I would be interested in studying Sasho's opinion on this issue, and if he is willing to send me his counterargument, then I will gladly post his unedited counterargument in the Page of Addendums that accompanies this review paper.
Topic number 3: How to passively square
the clubface.
Joe Mayo has very strong opinions on this issue and he stated that the most
valuable lesson that any audience member could learn as a result of attending
the Seminar is the "lesson" that a golfer should get his golf club's COM to lie
behind (below) his hand arc path during the early-mid downswing.
What does it mean to state that the club's COM should be behind (below) the hand arc path during the early downswing?
Here is a diagram produced by Sasho MacKenzie showing the relationship between the club's COM and the hand arc path.

If the golfer's left hand and club descends down the inclined plane during the early-mid downswing between P4 and P6, then one could imagine a plane along which the left hand descends and where the plane is aligned through the longitudinal axis of the lead arm - and that plane is colored in light blue in that diagram. If the golf club is "laid-off" relative to that left arm abduction plane, and the term "laid-off" means that the clubshaft is angled back so that the peripheral clubshaft and clubhead lies behind (below) the left arm abduction plane, then that represents a situation where the club's COM is behind (below) the plane of the hand arc path. If the left hand is pulling the club handle down that left arm abduction plane - as represented by the red arrow - then a moment arm for the component of the force acting at the end of the grip end of the club in the left arm abduction plane (see light brown dotted line) is created between the club's COM (which is located near the clubhead end of the club and it is represented by the larger light brown dot on the clubshaft) and the left arm abduction plane, which will produce an angular impulse ("force") that will induce the clubshaft to passively rotate in the direction of that solid brown arrow. In other words, the clubshaft will be induced to passively rotate counterclockwise so that it becomes increasingly aligned more straight-in-line with the direction of travel of the hands down the hand arc path. Why is the acquisition of this passive torque force potentially useful?
To understand why this passive torque force, which can induce the left hand to rotate counterclockwise in a left forearm supinatory direction during the downswing, is potentially useful, you first need to understand that for most golfers who adopt a weak, neutral or moderately strong left hand grip, it is biomechanically natural for those golfers to pronate their left forearm during the backswing in order to get their clubshaft to lie parallel to their desired end-backswing's inclined plane (swingplane) by their P4 position. How much left forearm pronation is required during a golfer's backswing action? I believe that two factors determine the amount of left forearm pronation required during the backswing action. The first factor is the strength of the left hand grip. If a golfer adopts a weak left hand grip, then he needs to use more left forearm pronation to get his clubshaft to lie parallel to a desired end-backswing plane by his P4 position than a golfer who adopts a stronger left hand grip (presuming that both golfers get their clubshaft to lie on the same inclined plane, in terms of its steepness, by the P4 position) - because a golfer, who adopts a stronger left hand grip, has already pronated his left forearm in order to adopt a stronger left hand grip (before he even gets to adopt his address positional alignment). In other words, the amount of left forearm pronation happening during the backswing action is inversely proportional to the strength of the left hand grip. The second factor that determines the amount of left forearm pronation happening during the backswing action is the steepness of the golfer's inclined plane (swingplane) on which his clubshaft lies at the P4 position. So, for example, if one considers two golfers who both adopt an equivalently neutral left hand grip, then the first golfer who gets his clubshaft to lie on a shallower inclined plane at his P4 position (like Rickie Fowler) will need to use more left forearm pronation during his backswing action than the second golfer who gets his clubshaft to lie on a steeper plane at his P4 position (like Bubba Watson). Why does a golfer need to supinate his left forearm during his downswing action? The simple answer is that he needs to reverse the left forearm pronation that happened during the backswing action if he wants to square the clubface by impact - presuming that there is no other phenomenon causing clubface closure other than a left forearm supination phenomenon that always happens in the later downswing. In other words, if a golfer opens the clubface during the backswing action secondary to performing a left forearm pronatory action of a certain magnitude, then he must reverse this process by performing a left forearm supinatory action of the same magnitude in order to exactly reverse the amount of clubface-opening that happened during the backswing due to his left forearm pronation - if he wants to get a square clubface by impact. How much torque force is required to perform a left forearm supinatory action during the later downswing action in order to get a square clubface by impact?
Sasho MacKenzie has done some theoretical calculations to calculate the amount of torque needed to square the clubface (via a biomechanical mechanism that will rotate the left hand counterclockwise during the later downswing) by using a forward dynamics computer model program, and he published his results in the following paper.
Here is a graph from that paper.
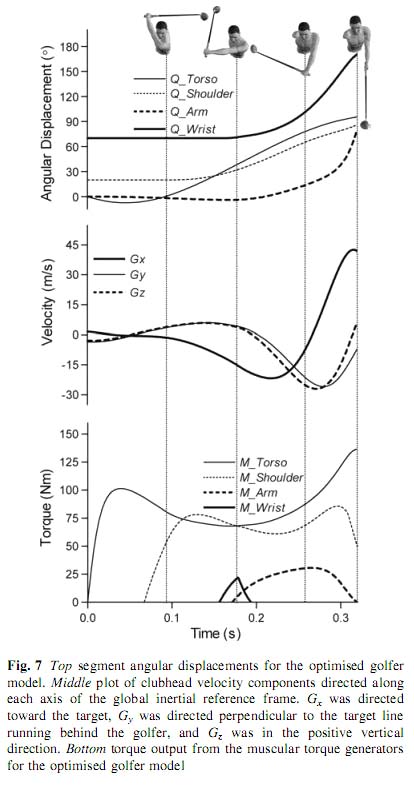
If you consider that model golfer stick-figure, note that he appears to have
adopted a neutral left hand grip where the clubface is parallel to the back of
his left hand (and also the watchface area of his left lower forearm) at his
end-backswing position, at his intermediate P5 and P5.5 downswing positions (middle
two images), and also at impact. Note that he must have pronated his left
forearm during his backswing action in order to get the back of his left hand to
become parallel to his end-backswing's swingplane - and one can see that the
back of his left hand is facing skywards at his P4 position. Note that his Q arm
graph shows that there is hardly any angular displacement of his left arm (and
therefore the back of his left hand) happening between the P4 and P5 positions,
which means that the back of his left hand is still facing skywards to
approximately the same degree at his P5 position (compared to his P4 position).
Note that there is only a small amount of counterclockwise rotation of his left
hand happening between his P5 position and his P5.5 position, and note that the
back of his left hand is still facing skywards to a large degree at his P5.5
position. Note that the back of his left hand is facing the target at impact,
and the Q arm graph shows that most of the counterclockwise rotation of his left
hand is happening between P5.5 and impact, and that the amount of
counterclockwise rotation of the back of his left hand (which is likely due to
left forearm supination) increases the closer he gets to impact. In other words,
the amount of left forearm supination happening between P6.5 and impact is
much greater than the amount happening between P6 and P6.5.
Sasho has calculated the amount of active muscular torque needed to rotate the back of the left hand counterclockwise, which mainly happens between P5.5 and impact - see the M arm torque graph. Note that the model golfer only starts to apply his M arm torque after he bypasses his P5 position and that he reaches his peak M arm torque value sometime in his later downswing (probably between P5.5 and P6.5), before his M arm torque decreases rapidly in his later downswing just before impact. I presume that in this particular computer model that the model golfer is not shallowing his clubshaft very much below his left arm abduction plane between P4 and P5.5, so the pertinent question then becomes - how much does shallowing the clubshaft (relative to the hand arc path) between P4 and P5.5 by an even larger amount reduce the amount of active M arm torque needed to square the clubface by impact? Surely, it must depend on how much the clubshaft is shallowed (relative to the left hand's hand arc path) during the P4 => P5.5 time period. I gained the impression when watching the Seminar's video presentation that Joe and Sasho were implying that by shallowing the clubshaft (relative to the hand arc path) during the P4 => P5.5 time period, that virtually no active M arm torque would be needed to square the clubface by impact and that the left forearm supinatory phenomenon could happen passively. How is that possible? I would like to see Sasho provide "evidentiary" proof where he demonstrates that shallowing the clubshaft by "x" amount between P4 and P5.5 can reduce the amount of active M arm torque needed by "y" amount, so that I can better understand how he calculates the magnitude of that "y" amount. I can readily envisage a "real life" scenario where a golfer (who adopts a weak or neutral left hand grip) shallows his clubshaft (relative to his hand arc path) by a finite amount during the P4 => P5.5 time period, and where that clubshaft shallowing phenomenon decreases the magnitude of the active M arm torque needed to square the clubface by impact, but I cannot personally envisage a scenario where that golfer (who adopts a weak or neutral left hand grip) can square the clubface passively without using any active M arm torque simply because he shallows the clubshaft (relative to his hand arc path) by a finite amount during his early-mid downswing time period.
Joe has also seemingly adopted the golf instructional opinion where he believes that all golfers must use a clubshaft-shallowing action during the early-mid downswing time period - where the COM of the clubshaft is shallowed behind (below) the hand arc path. I can certainly understand why his advice is advantageous for golfers who adopt a weak, or neutral, or slightly strong, left hand grip because all of those golfers are going to have to use a finite amount of left forearm supination in their later downswing in order to get a square clubface by impact. If they are going to have to use a finite amount of left forearm supinatory motion between P5.5 and impact in order to get a square clubface by impact, where that left forearm supinatory motion requires a finite amount of active muscular M arm torque, then it makes sense to shallow the clubshaft between P4 and P5.5 in order to decrease the amount of active muscular M arm torque needed to square the clubface. However, why should Joe's clubshaft-shallowing advice apply to a golfer, who adopts a very strong left hand grip - like Jamie Sadlowski.
Consider Jamie Sadlowski's later downswing between P5.5 and impact.
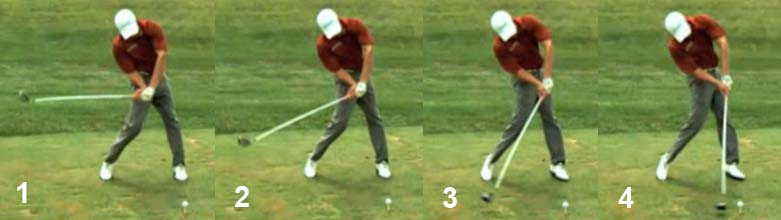
Image 1 is at the P6, image 2 is at the P6.2 position, image 3 is at the P6.5
position and image 4 is at impact.
Note that the back of Jamie Sadlowski's left hand faces the ball-target line at his P6 position (image 1) and that it continues to face the ball-target line to roughly the same degree all the way between P6 and impact, and that the ulnar border of his left hand faces the target at impact. That means that there is virtually no left forearm supination happening in his late downswing, and he therefore presumably does not need any M arm torque to square his clubface by impact. That may explain why Jamie Sadlowski does not have to shallow his clubshaft (relative to his hand arc path) between P4 and P5.5 (as recommended by Joe Mayo) in order to reduce his need for an active M arm torque.
Here are capture images from a DTL video of Jamie Sadlowski's driver swing.
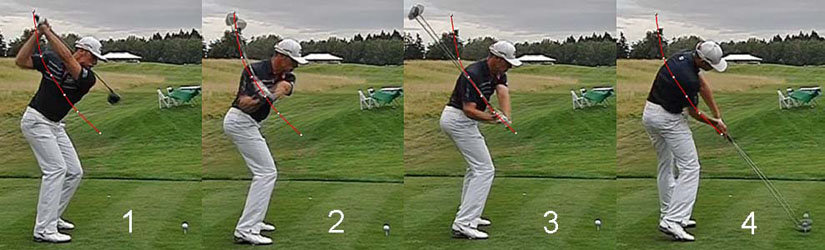
The red splined path represents Jamie Sadlowski's hand arc path.
Note that Jamie Sadlowski does not shallow his clubshaft (relative to his hand arc path) during his early-mid downswing between P4 and P5.5.
I would certainly agree with Sasho and Joe that it is advantageous to shallow the clubshaft (relative to the hand arc path) between P4 and P5.5 if the golfer uses a weak or neutral left hand grip - in order to decrease the M arm torque needed to perform a left forearm supinatory motion in the late downswing, which is mandatorily required in order to square the clubface by impact. However, I think that there is another important benefit that can be obtained by shallowing the clubshaft down to the hand plane by P5.5 that has nothing to do with any reduction in the M arm torque, and I think that this other benefit is even more advantageous than the benefit that can be obtained by reducing the M arm torque that is needed to perform a left supinatory motion in the later downswing. To explain the nature of this other benefit, I am going to compare two professional golfers who both use a neutral grip, but where the one professional golfer (Phil Mickelson) does not shallow his clubshaft down to the hand plane during his early-mid downswing, while the other professional golfer (Sergio Garcia) shallows his clubshaft down to the hand plane during his early-mid downswing.
I will start off by describing Phil Mickelson's downswing
action.
Here are DTL capture images of Phil Mickelson's clubshaft-shallowing action during his early-mid downswing.
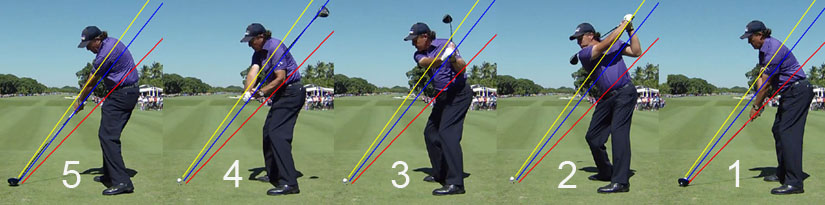
Image 1 is address, image 2 is at his end-backswing (P4) position, image 3 is at his P5 position, image 4 is at his P5.5 position and image 5 is impact.
I have drawn a red line along Phil Mickelson's clubshaft at address, and that represents his hand plane. I have drawn a blue line between the ball and his rear elbow at address and that line represents his elbow plane. I have drawn a yellow line between the ball and his rear shoulder socket when he is at his end-backswing position, and that line represents the turned shoulder plane (TSP). Note that there is very little difference in the degree of steepness of his elbow plane relative to his TSP.
Note that his lead arm is near-vertical at address and that an extension of the hand plane line drawn out from the butt end of the club points at his belt buckle.
Note that Phil Mickelson's lead hand and clubshaft are on the TSP at his end-backswing position (image 2).
Note that Phil Mickelson only shallows his clubshaft by a very small (and negligible) amount between P4 and P5 (image 3) as his clubshaft shallows down to the blue line, which is negligibly shallower than the yellow line.
Note that his clubshaft is still on the blue elbow plane line at P5.5 (image 4) and at impact (image 5). Note that Phil Mickelson basically does not shallow his clubshaft to any significant degree during his downswing action - note that his clubshaft is minimally shallower than the yellow TSP line at impact. Note how outstretched his lead arm is impact and note how his clubshaft is nearly straight-line-aligned with his lead arm at impact.
Here is another capture image showing how Phil Mickelson does not shallow his clubshaft relative to his hand arc path during his early-mid downswing.
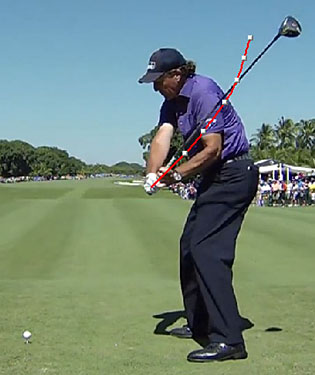
I have traced Phil Mickelson's hand arc path in red. In this image, where Phil
Mickelson is at the P5.5 position. note that he has not
shallowed his clubshaft at all relative to his hand arc path.
What effect does Phil Mickelson's lack of clubshaft shallowing between P4 and P5.5 have on his pattern of left forearm supination, which must mandatorily happen in his late downswing in order for him to acquire a square clubface by impact?
Consider these DTL images of Phil Mickelson's late downswing.
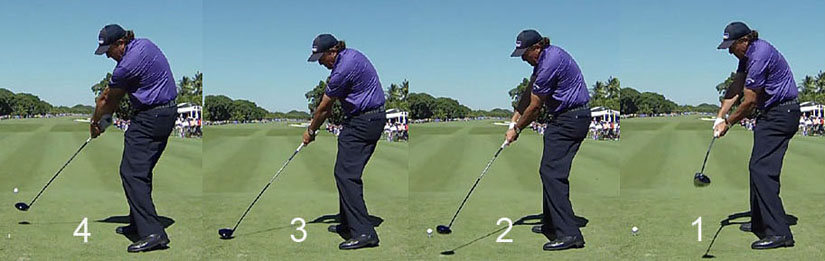
Image 1 is just bypassed the P6 position. Note that his clubface is still open to the clubhead arc and that the toe of his clubhead is pointing up (skywards) and that it is also tilted slightly backwards away from the ball-target line. Note that the clubface is parallel to the back of his lead hand and watchface area of his lead lower forearm because he has maintained an intact LFFW. Note that the back of his lead hand, and watchface area of his lead lower forearm, is parallel to the inclined plane, which has a degree of steepness roughly equivalent to the steepness of the TSP because he did not shallow his clubshaft during his early-mid downswing.
Image 2 is at the P6.7 position. Note that the clubface is still wide open relative to the ball-target line and also relative to the clubhead arc. Note that the back of his lead hand, and watchface area of his lead lower forearm, is still roughly parallel to the inclined plane, which has roughly the same degree of steepness as the TSP because he is not shallowing his clubshaft between P6 and P6.7. Note that there is no evidence that Phil Mickelson is significantly supinating his lead forearm between P6 and P6.7. Note that he has significantly uncocked his lead wrist and thereby released PA#2 (in the plane of his intact LAFW) between P6 and P6.7 and that the clubshaft has nearly caught up to his lead arm by P6.7.
Image 3 is at impact, where he has squared his clubface by supinating his lead forearm by the amount needed to acquire a square clubface by impact. In other words, Phil Mickelson delays his left forearm supinatory action and he only significantly supinates his lead forearm between P6.7 and impact (and this represents a PA#3 release action in TGM terminology). If virtually all of his lead forearm supinatory motion happens in that short pre-impact time period between P6.7 and impact, that means that the amount of clubface roll per unit degree of clubhead travel is very large as his clubhead travels along the last ~18" of his clubhead travel path just before impact. That large amount of ROC (rate-of-closure) of his clubface in the last ~18" of clubhead travel along the clubhead arc (just before impact) is potentially a great disadvantage because it makes it much more difficult for him to time his clubface roll so that the clubface can be guaranteed to be square at impact. What aggravates the timing of his clubface-squaring phenomenon is the fact that Phil Mickelson needs to use an active muscular force (M arm torque) to perform his PA#3 release action's left forearm supinatory motion. Why can Phil Mickelson not use passive forces to square his clubface by impact? Phil Mickelson cannot use the passive "torque force" (described by Sasho MacKenzie) because he does not shallow his clubshaft during his early-mid downswing. So, he is dependent on using an active muscle force (M arm torque) derived from an active muscular contraction of his lead forearm's supinator muscles (+/- his rear forearm's pronator muscles if they are used synergistically to assist in the clubface-squaring phenomenon). Although Phil Mickelson has to use an active M arm torque force, the amount of active muscular force required is actually very small because the *moment-of-inertia is very small - and that is due to the fact that his clubshaft has nearly caught up to his straight lead forearm by P6.7.
(* See the 15:10 minute time point of this Sasho MacKenzie and Chris Como video at https://www.youtube.com/watch?v=iuJaSM7Kexw if you want to better understand why his moment-of-inertia is small)
Although Phil Mickelson may not require a large amount of lead forearm supinatory muscular force (M arm torque) during his PA#3 release action between P6.7 and impact (because his moment-of-inertia is small), he still has to regulate that "muscular force" during a very short time period immediately pre-impact so that it does not continue to remain active post-impact (which will predispose to a roller hand release action immediately post-impact between P7 and P7.2). That requisite "turn-on" and then immediately "turn-off" phenomenon as it applies to his lead forearm's supinatory muscular force is obviously very difficult to achieve, and to also consistently time! Secondly, if he simultaneously "runs-out-of-right arm" then he cannot fruitfully use a controlled rear forearm pronatory motion during his rear arm's straightening action to synergistically assist him in smoothly, and controllably, performing his PA#3 release action. Phil Mickelson often "runs-out-of-right arm" during his later downswing's immediate pre-impact time period - as "evidenced" by the fact that his rear palm often loses close physical contact with PP#1 (that is located over the base of his lead thumb) between P6.8 and impact, or sometimes only just through impact.
Now, let's consider Sergio Garcia's pattern of left forearm supination that happens in his later downswing after he bypasses the P5.5 position.
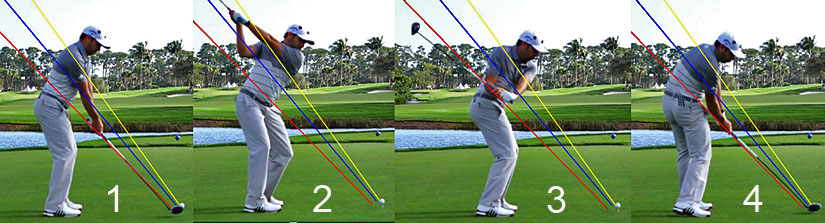
Image 1 is address, image 2 is at his end-backswing (P4) position, image 3 is at
approximately the P5.2 position and image 4 is at impact.
I have drawn a red line along Sergio Garcia's clubshaft at address, and that line represents his hand plane. I have drawn a blue line between the ball and his right elbow at address and that line represents his elbow plane. I have drawn a yellow line between the ball and his right shoulder socket when he is at his end-backswing position, and that line represents the turned shoulder plane (TSP).
Note that Sergio has a near-vertical left upper arm at address (image 1) and that an extension of the hand plane line drawn out from the butt end of the club points at his belt buckle.
Note that Sergio Garcia has his left hand and clubshaft just below the TSP at his P4 position (image 2).
Note how much Sergio Garcia shallows his clubshaft between P4 and P5.5 - by noting that his clubshaft has already shallowed down to the hand plane by P5.2 (image 3).
Note that Sergio Garcia's clubshaft is still on the hand plane at impact (image 4). Note that his left arm is more vertical at impact and that his hands are closer to his body - compared to his address position scenario.
Here is another capture image showing how much Sergio Garcia shallows his clubshaft relative to his hand arc path during his early-mid downswing.
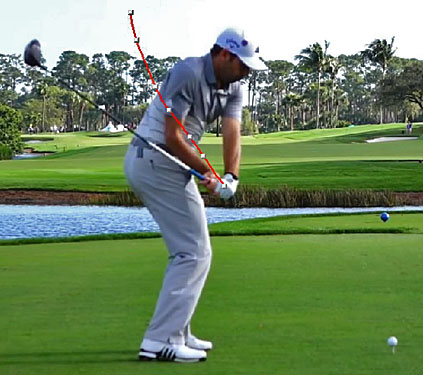
I have traced Sergio Garcia's hand arc path in red. Note that his hand arc path
is very steep initially during his early downswing and that it is slightly less
steep during his mid-downswing time period.
In this capture image, Sergio Garcia is at the P5.5 position. Note how much he has shallowed his clubshaft relative to his hand arc path between P4 and P5.5 and his clubshaft has shallowed down to his hand plane by P5.5. Note that to shallow his clubshaft that much relative to his hand arc path during his early-mid downswing, he had to increasingly pronate his left forearm between P4 and P5.5 because he is not bowing his lead wrist more (which can angle the clubshaft groundwards) during that time period. What benefit does Sergio Garcia achieve as a result of shallowing his clubshaft down to the hand plane by P5.5?
Consider these DTL capture images of Sergio Garcia's late downswing.
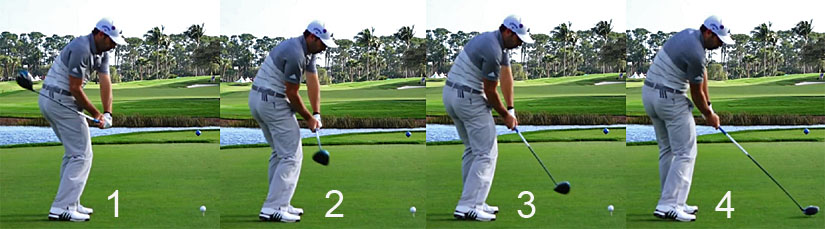
Image 1 is at the P5.5 position. Note that Sergio Garcia has already shallowed
his clubshaft down to his desired impact plane (= the hand plane) by P5.5.
Note that his clubface is wide open relative to his clubhead arc - but that his clubface is straight-line-aligned relative to the back of his left hand (GFLW), and the watchface area of his left lower forearm, because he has an intact LFFW.
Image 2 is at the P6 position. Note that the back of his left hand (GFLW), and watchface area of his left lower forearm, is more vertically oriented and that means that he has rotated his left forearm counterclockwise by a significant amount between P5.5 and P6. What makes it biomechanically easier for him to rotate his intact LFFW so much counterclockwise between P5.5 and P6, when he still has a large moment-of-inertia (due to the fact that he still has a large amount of clubhead lag present), is the "fact" that he can utilise the passive torque force (described by Sasho MacKenzie) that is secondary to the fact that his clubshaft's plane of motion is far below his hand arc path's plane of motion. Note how much he has squared his clubface relative to his clubhead arc by P6 due to his early left forearm supination phenomenon.
Image 3 is at P6.5. Note that he is continuously, and progressively, supinating his left forearm between P6 and P6.5, and that his clubface is becoming progressively more square to his clubhead arc.
Image 4 is at impact where he presumably has a square clubface.
During the P6 => P7 time period, his clubshaft is tracing a conical pendular path. Most importantly, note that the amount of clubface roll happening per unit amount of clubhead travel during his late downswing between P6.7 and impact is very small because his clubface rolling action (due to left forearm supination) happens very gradually, and very steadily, over a much longer time period of clubhead travel between P5.5 and impact - and that is potentially of great benefit to Sergio Garcia when it comes to consistently timing his late downswing's clubface-squaring action (compared to Phil Mickelson's delayed clubface-squaring action that happens very fast between P6.7 and impact).
In summary, I think that the greatest benefit obtained as a result of shallowing the clubshaft down to the hand plane by P5.5 is the "fact" that it allows the golfer to spread his left forearm supinatory action (which is mandatorily required in order to get a square clubface by impact) over a much longer period of clubhead travel between P5.5 and impact, and that results in a lower ROC of the clubface per unit amount of clubhead travel in the pre-impact time period between P6.7 and impact.
Here are comparative images comparing Phil Mickelson (image 1) to Sergio Garcia (image 2) at impact.
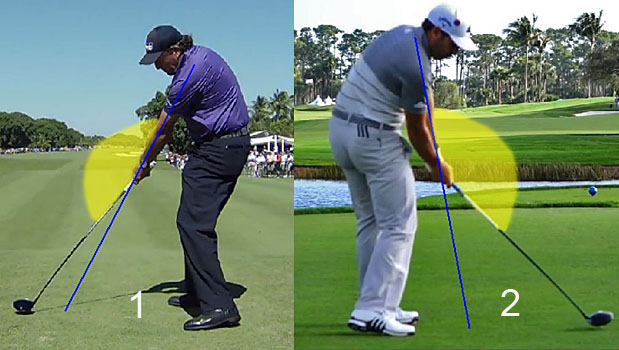
I have drawn a blue line down the longitudinal axis of their lead arm and
extended that line down to ground level. Note
that the angle between that blue line and Phil Mickelson's clubshaft is 10
degrees, while that same angle between Sergio's Garcia's blue line and his
clubshaft is 35 degrees. That angle between the clubshaft and the blue line
reflects the magnitude of the accumulator #3 angle. The
accumulator #3 angle (a TGM term) is actually the angle between the
left arm and the clubshaft (represented by that yellow colored arc that I drew
using Photoshop), and the magnitude of the accumulator #3 angle = 180
degrees minus that angle between the left arm and the clubshaft (which
is equal to 10 degrees in Phil Mickelson's swing and 35 degrees in Sergio
Garcia's swing). So, Phil Mickelson has a small accumulator #3 angle while
Sergio Garcia has a large accumulator #3 angle.
What is the primary benefit of having a large accumulator #3 angle at impact (like Sergio Garcia) if a golfer uses a weak or neutral left hand grip?
The primary benefit of coming into impact with a more vertical lead arm and a large accumulator #3 angle (like Sergio Garcia) is due to the fact that it is associated with a much slower ROC of the clubface happening per unit amount of clubhead travel during the P6.7 => impact time period - compared to a golfer who comes into impact with an outstretched lead arm and a small accumulator #3 angle (like Phil Mickelson), which is associated with a much higher ROC of the clubface during the P6.7 => impact time period.
To better visualize this phenomenon, grip a club in your
hands with a squared clubface as you would before any golf shot. Upcock or
radially deviate your left wrist so you have a large accumulator #3 angle,
similar to Sergio Garcia. Now, pronate and supinate your left forearm and note
how much the clubhead moves through space in order to open and close the
clubface. Note that this added distance in clubhead travel is what allows Sergio
Garcia to have a slower and more deliberate ROC of his clubface leading up to
impact. Conversely, take your grip again with a squared clubface and mimic Phil
Mickelson’s small accumulator #3 angle with your left wrist being much more
downcocked or ulnar deviated. Now, pronate and supinate your left forearm and
note how little the clubhead moves through space in order to open and close the
clubface. Note that this small distance in clubhead travel per unit amount of
left forearm supinatory roll is what causes Phil Mickelson to have a much faster
and potentially more unstable ROC of his clubface leading up to impact.
I have used Sergio Garcia and Phil Mickelson as extreme examples of contrasting clubshaft-shallowing styles when it comes to professional golfers who use a neutral left hand grip, but most PGA tour golfers (who use a neutral left hand grip) manifest an intermediate degree of clubshaft-shallowing action during their early-mid downswing and they come into impact with a moderate-sized accumulator #3 angle.
Consider three examples - Adam Scott (image 1), Justin Rose (image 2) and Rory McIlroy (image 3).
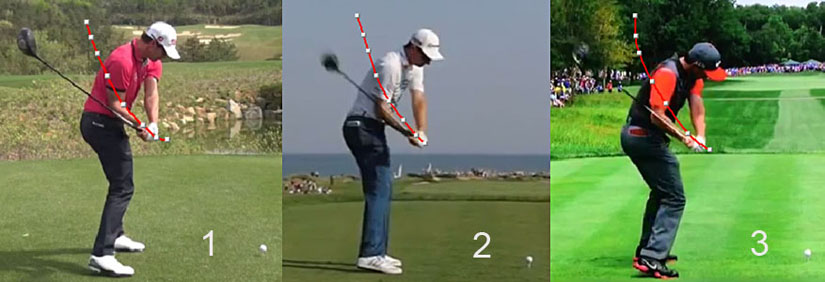
The red splined path arc represents their hand arc path. Note that all three
golfers shallow their clubshaft by a moderate amount during their early-mid
downswing, and that the amount correlates directly with the size of their
accumulator #3 angle at impact (see next series of capture images).
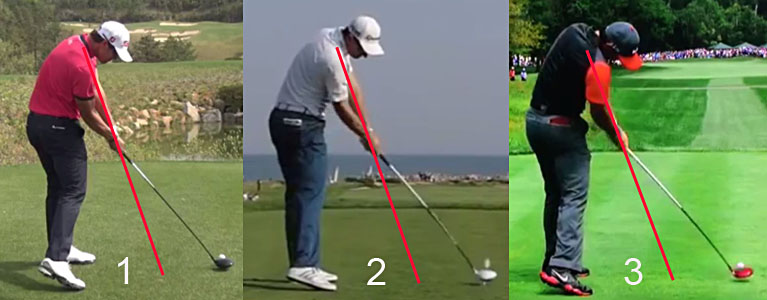
I have drawn a red line down the length of their left arm, and the angle between
that red line and their clubshaft demonstrates that they have a
moderate-sized accumulator #3 angle at impact. Note that their left arm
is also less vertically-oriented at impact when compared to Sergio Garcia, but
note that they do not outstretch their left arm far away from their body at
impact like Phil Mickelson.
If you are a student-golfer, who uses a weak or neutral left hand grip, you can choose how much to shallow your clubshaft during the early-mid-downswing between P4 and P5.5, knowing that it will greatly affect i) how extended your lead arm will be away from your body at impact and ii) the magnitude of your accumulator #3 angle. I have also described the potential benefits of shallowing the clubshaft (relative to the hand arc path) during the early-mid downswing in great detail and those major benefits are-: i) it potentially decreases the amount of active M arm torque needed to square the clubface by impact and ii) it potentially decreases the ROC of the clubface per unit amount of clubhead travel during the P6.7 => impact time period if the golfer comes into impact with a more vertical lead arm and a larger-sized accumulator #3 angle.
Although I have described the potential benefits of shallowing the clubshaft during the early-mid downswing between P4 and P5.5, I have not yet described how to shallow the clubshaft from a biomechanical perspective.
I noted that Joe never discussed the biomechanics of how to actually perform a clubshaft-shallowing action at the Seminar. Michael stated that it should happen without "laying-off" the club (in a way that George Gankas apparently teaches the technique), but Michael interestingly didn't offer an alternative biomechanical technique of performing the clubshaft-shallowing action. Sasho never talked about how a clubshaft-shallowing action should be executed from a biomechanical perspective, which means that none of the presenters at the Seminar actually explained to their audience of golf instructors how to perform a clubshaft-shallowing action from a biomechanical perspective.
I believe that a clubshaft-shallowing action must be performed via a "laid-off" maneuver, and I believe that there are two biomechanical techniques of "laying a club off" at the level of the left wrist/hand when the left hand descends down the hand arc path between P4 and P5.5. The left wrist can bow (palmar flex) and that will angle the clubshaft groundwards to a shallower plane relative to the left forearm. However, most PGA tour golfers, who shallow their clubshaft during the early-mid downswing, perform the clubshaft-shallowing action via increasingly pronating their left forearm while their left hand moves down the hand arc path from P4 to P5.5.
Consider an example - Rory Sabbatini.
Capture images from a Rory Sabbatini swing video.
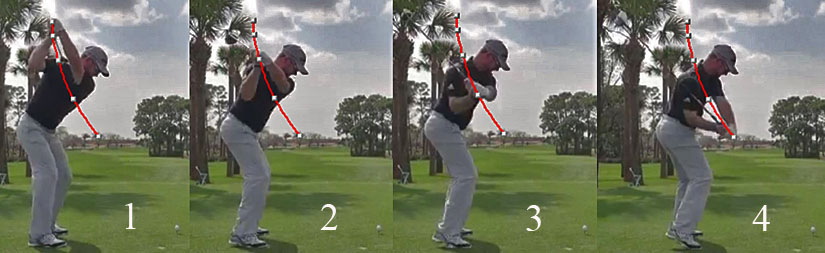
Image 1 is at his P4 position, image 2 is at his P4.5 position, image 3 is at
his P5 position and image 4 is at his P5.5 position.
The red splined path is his hand arc path.
Note that Rory Sabbatini has very "high hands" at his end-backswing position (image 1). Note how his clubshaft increasingly shallows to a position that is behind (below) his hand arc path between P4 and P5.5. Most importantly, note that he shallows his clubshaft without increasingly bowing his left wrist. Note that his left palm is nearly vertically-aligned relative to the ground at his P4 position (image 1) and it is much more horizontally-aligned relative to the ground at his P5.5 position (image 4), and the only way that this is biomechanically possible is the "fact" that Rory Sabbatini is increasingly pronating his left forearm while his left hand descends down his hand arc path. Note that his right palm is parallel to his left palm at the P4 position, and also at all time points between P4 and P5.5. What biomechanical actions must he perform with respect to his right arm/forearm to make this parallel relationship between his two palms biomechanically possible - where the right palm remains continuously parallel to an intact LFFW/GFLW that is moving downplane between P4 and P5.5?
To answer that question, first note that Rory Sabbatini's right humerus is not externally rotated at his P4 position and note that his right forearm is not supinated. Note that his right humerus becomes more externally rotated, while his right forearm becomes more supinated, as his right hand descends down the hand arc path between P4 and P5.5. So, what Rory Sabbatini is actually doing with his right upper limb between P4 and P5.5 is an active right arm adduction maneuver that is combined with a right elbow pitch motion - and that is the equivalent biomechanical motion performed when a person performs a "stone-skipping" motion or when a baseball pitcher performs an underhand pitch-throwing motion. Another mental image that may help a student-golfer understand the biomechanics of the right upper limb's motion (that involves an increasing degree of external rotation of the right humerus and an increasing degree of right forearm supination), which is happening during a clubshaft-shallowing action between P4 and P5.5, is to mentally imagine "losing an arm-wresting match" where the right palm is vertically-aligned relative to the ground at the start of the arm-wrestling match and then horizontally-aligned relative to the ground when one has finally lost the arm-wrestling match.
The amount of external rotation of the right humerus, and the amount of supination of the right forearm, required during a clubshaft-shallowing action depends on how vertical the right palm is at the P4 position and how horizontal it is at the P5.5 position. Rory Sabbatini's right palm is very vertically-aligned at his P4 position because he has a "high hands" position, so it is not surprising that he needs to use a large amount of external rotation of his right humerus + a large amount of right forearm supination to get his right palm to become much more horizontally-aligned at his P5.5 position. If his left arm was less steep at his end-backswing position, then the amount of "external rotation of the right humerus + right forearm supination" required would be far less in magnitude.
Consider yet again these capture images of Sergio Garcia's clubshaft-shallowing action.
Image 2 shows Sergio Garcia at his end-backswing position with his
hands/clubshaft positioned just below the TSP (turned shoulder plane). Note that
his left arm is more horizontally-aligned across his shoulder turn angle
(compared to Rory Sabbatini's steep left arm alignment) and note that his right
humerus is externally rotated to a small degree, while his right forearm is
supinated to a significant degree.
Image 3 shows Sergio Garcia at his P5.2 position when he has already shallowed his clubshaft down to his hand plane as a result of his active right arm adduction maneuver. Note that it only required slightly more right forearm supination to get his right palm to remain continuously parallel to his intact LFFW/GFLW, which is shallowing down from the TSP to the hand plane during his early-mid downswing.
Each individual student-golfer should realise that he can independently decide how much he wants to shallow his clubshaft during his early-mid downswing, and he should realise that it can be easy to learn how to perform a clubshaft-shallowing action from a biomechanical perspective if he mentally understands the "fact" that it is simply secondary to using an "active right arm adduction maneuver that is combined with a pitch elbow motion of his right elbow" during the P4 => P5.5 time period.
Topic number 4: Should a golfer keep his clubshaft
"on-plane" during the early-mid downswing between the P4 position and the P5.5
position?
At the 86 minute time point of the Seminar's video presentation, Joe Mayo stated
that the mental idea of a "swingplane" is a great destroyer of the golf swing. He
stated that trying to teach a student-golfer to pull the golf club handle
linearly down the swingplane (inclined plane) during the P4 => P5.5 time period, while aiming the butt end of the
club at the ball, will hurt 100 golfers for every golfer that it
helps.
Michael Finney expanded on this point by stating that "it is insanity on top of idiocy" to think that the clubshaft is single unit where the club handle, clubshaft and clubhead are all moving down a single plane during the early-mid downswing. Michael stated that the club handle and clubhead are independent of each other, and that they are "not doing the same thing".
I personally disagree with those opinions expressed by Joe and Michael and I believe that it is very advantageous to keep the clubshaft continuously "on-plane" during the entire downswing and early followthrough.
Note that I have bold-highlighted the word "clubshaft" when I am referring to an "on-plane" golf swing action, and I believe that the clubshaft is a single unitary structure where the club handle, clubshaft and clubhead are all straight-lined with each other. I therefore believe that when one refers to an "on-plane" clubshaft that one is talking about the club handle, clubshaft and clubhead all being simultaneously "on-plane" and I personally cannot envisage them moving independent of each other if the clubshaft is a rigid unitary structure that is "on-plane". I can easily imagine the clubhead moving on a different plane than the club handle if the clubshaft is very flexible. So, for example, I have watched trick shot golfers use a flexible shaft made of rope or a plastic hosepipe where the clubhead is attached to one end of the flexible rope (or hosepipe) and where a grip handle is attached to the other end, and where the flexible shaft is changing its shape throughout the downswing action. Under those conditions, I can agree that the idea of swinging the clubshaft down a swingplane during the early-mid downswing is not an useful golf instructional idea. However, that scenario does not pertain to a rigid clubshaft that is made of metal or graphite.
Let's consider a DTL view of Jamie Sadlowski's "on-plane" downswing action.
The red splined path represents Jamie Sadlowski's hand arc path.
Note that Jamie Sadlowski is pulling his hands down the hand arc path between P4 (image 4) and P5.5 (image 3) and one can clearly see that his clubshaft is moving at a tangent to his hand arc path in a linear manner between P4 and P5.5. Note that his clubshaft is roughly perpendicular to the front of the camera's lens (which is positioned at a DTL viewing position) in image 3 and that a straight line drawn down the length of his clubshaft is pointing at the ball-target line, which means that his clubhead, clubshaft and club handle are all straight-lined-aligned and they all appear to be simultaneously lying on an imaginary swingplane that has its base on the ball-target line. Although his hands are actually moving along a curvilinear hand arc path between P4 and P5.5, the hand arc path appears to be "planar" between P4 and P5.5 when viewed from a DTL viewing perspective and one can easily imagine that Jamie Sadlowski's hands, clubshaft and clubhead could all be moving down a single swingplane (that has its base positioned on the ball-target line) during his early-mid downswing.
However, although Jamie Sadlowski does not shallow his clubshaft during his early-mid downswing, which means that his clubshaft is descending down a single swingplane (in a similar manner to the single plane golf swing action of an Iron Byron type of golf robot machine), the majority of PGA tour golfers shallow their clubshaft to a variable degree during their early-mid downswing.
Consider an example of a golfer who shallows his clubshaft during the early-mid downswing - Henrik Stenson.
Capture images of Henrik Stenson's early-mid downswing.
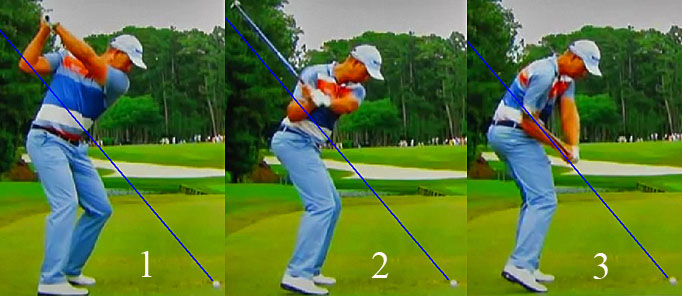
Image 1 is at Henrik Stenson's P4 position, image 2 is at his P5 position and image 3 is at his P5.5 position.
I have drawn a blue line upwards from the ball when Henrik Stenson was at impact and that blue line was drawn along the length of his clubshaft at impact. That means that at impact, Henrik Stenson's clubshaft is "on-plane" where the entire clubshaft (club handle, clubshaft and clubhead) are all on the same imaginary swingplane at impact and where the base of the swingplane is located on the ball-target line.
However, note that Henrik Stenson's clubshaft is on a steeper plane at his end-backswing position (image 1) and that he is shallowing his clubshaft down to that blue line between P4 and P5.5 so that his hands/clubshaft eventually reaches the plane of the blue line by P5.5. That means that Henrik Stenson's clubshaft is located on a considerable number of different planes (in terms of steepness) between P4 and P5.5 when viewed from a DTL viewing perspective. That bold-highlighted "fact" would make it appear to be impossible to mentally imagine that Henrik Stenson's clubshaft could be continuously "on-plane" at all moments during his early-mid downswing between P4 and P5.5. However, I firmly believe that Henrik Stenson's clubshaft is continuously "on-plane" at all moments between P4 and P5.5 if you consider the theoretical concept of the "clubshaft being on-plane" from a different definitional perspective - where the TGM definition of the clubshaft being "on-plane" simply means that a straight line drawn down the length of the longitudinal axis of the clubshaft always points at the ball-target line (except when the clubshaft is parallel to the ball-target line). So, when keeping that different TGM definition of being "on-plane" in mind, note that Henrik Stenson's clubshaft is "on-plane" in image 2 - because an imaginary straight line drawn down the longitudinal axis of his clubshaft is pointing at the ball-target line. However, where is that imaginary straight line (drawn down the longitudinal axis of his clubshaft) pointing in image 3 - is it actually still pointing at the ball-target line? One cannot accurately determine the potential truth of that "fact" from a 2-D image taken from a DTL viewing perspective, because the clubshaft is not perpendicular to the front of the camera lens in image 3. To solve that problem you need to use a clubshaft where there are two laser lights positioned at both ends of the clubshaft (so that they continuously point in a direction that is straight-line-aligned with the clubshaft) and where you can see where those two laser lights are pointing at every moment of the downswing and early followthrough.
Consider this video of Martin Hall demonstrating the TGM principle of "how to trace a straight plane line" (where the SPL is the ball-target line) during a golf swing action - https://www.youtube.com/watch?v=a5rYpfmAwo4 (and also demonstrated outdoors using an outdoor version of the "Smartstick wall" at https://www.youtube.com/watch?v=mX0-nvy2oFc )
If you look at Martin Hall tracing the straight plane line (= ball-target line) using a Smartstick training device, you will note that the Smartstick's clubshaft (which includes the club handle end, the clubshaft and the clubhead end) can be kept continuously "on-plane" during the entire backswing, downswing and early followthrough.
Here are capture images from the Martin Hall video.
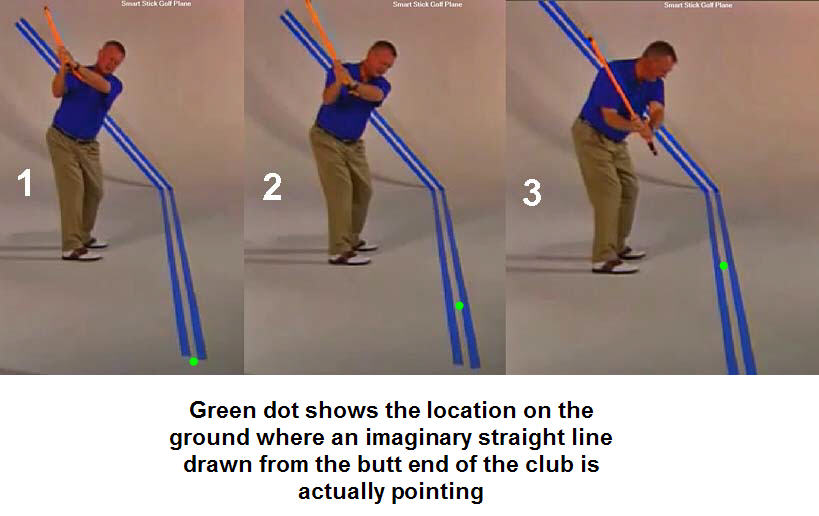
The blue line on the ground represents the ball-target line.
Image 1 is at a shortened end-backswing position where the clubshaft is still "on-plane" (where an imaginary straight line drawn down the length of the Smartstick's clubshaft points at that green dot that is located on the ball-target line).
Note that if the green laser dot continuously points at the ball-target line during Martin Hall's early-mid downswing action (image 2 is at P4.5 and image 3 is at P5.2), then that means that the clubshaft is continuously "on-plane".
I believe that learning how to trace the straight plane line (where the SPL = ball-target line) during the entire downswing and early followthough is a very useful TGM golf instructional concept, and both I and Jim George demonstrated how to use a Smartstick training device in order to learn how to keep a clubshaft continuously "on-plane" during the entire backswing and entire downswing in my part 2 video (watch the video at https://youtu.be/wJveJDoNzCw from the 10:50 minute to the 13:50 minute time points) of my 7-part video project on "How to Perform a Golf Swing Like a PGA Tour Golfer".
What is the advantage of keeping the clubshaft continuously "on-plane" during the entire downswing and early followthrough?
If a golfer can keep his clubshaft continuously "on-plane" throughout his entire downswing and early followthrough, then he can create a clubhead path that is perfectly symmetrical relative to the ball-target line - as demonstrated in the following diagram.
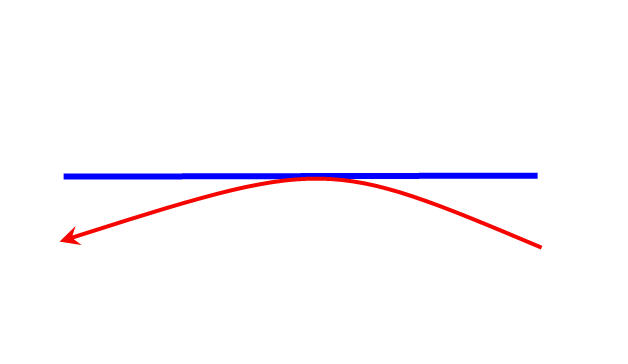
The straight blue line represents the ball-target line. The curved red arrowed
path represents a clubhead arc that is symmetrically "in-to-square-to-in"
relative to the ball-target line, and where the clubhead path is temporarily
square to the target at the exact point where it reaches the ball-target line.
If the golf ball is placed at that point where the clubhead arc is temporarily square
to the target, then it is possible to zero-out the clubhead path at impact,
which is critically important if a golfer wants to hit the golf ball straight
towards his intended target. To drive a golf ball straight down the middle of
the fairway using a straight ball flight with no fade/draw curvacture,
a golfer needs to zero-out both his clubhead path and his clubface angle at
impact, and simultaneously ensure that he hits the ball on the sweetspot of the
clubface with a level strike. By creating a symmetrical "in-to-square-to-in"
clubhead path relative to the ball-target line, a golfer can more easily solve
the first requirement (zeroing-out the clubhead path) needed to generate a
straight ball flight (with no/little side-curvacture) and then all that he
subsequently needs
to learn is how to consistently zero-out his clubface angle at impact (which I
will discuss in topic number 5).
Adam Scott is an example of a professional PGA tour golfer who uses Homer Kelley's TGM "on-plane" golf swing technique to generate his "in-to-square-to-in" clubhead path that is perfectly symmetrical relative to the ball-target line - as demonstrated in the following you-tube video at https://www.youtube.com/watch?v=qOwvteZr-3w
Here is a capture image from the Adam Scott video.
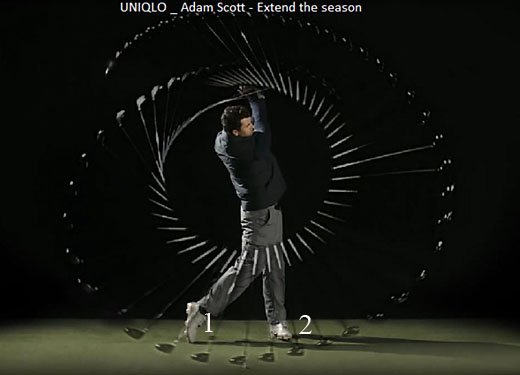
This capture image clearly shows that Adam Scott has generated a clubhead path that is symmetrical relative to the ball-target line and where the clubhead arc is "in-to-square-to-in" through the peri-impact zone between P6.8 (point 1) and P7.2 (point 2).
Here are close-up capture images from that same video, which demonstrates that Adam Scott's clubhead arc is not only "in-to-square-to-in" between P6.8 and P7.2, but it is also square to the target at impact.
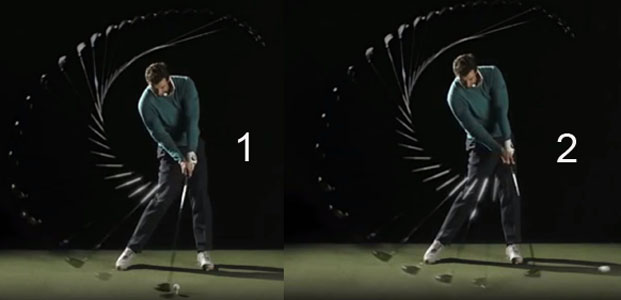
Image 1 shows that Adam Scott's clubhead path is square to the target at impact
and that his clubhead path immediately pre-impact was "in-to-square".
Image 2 shows that Adam Scott's clubhead path moves slightly inside-left after impact, which means that he has generated an "in-to-square-to-in" clubhead path through the peri-impact zone between P6.8 and P7.2 and that he has temporarily zeroed-out his clubhead path at impact.
In an
online interview article, Sasho MacKenzie expressed the following opinion in his
answer to the following question posed by the interviewer (Luke Kerr-Dinian)-:
LKD: With all this in mind, are there any swings on Tour that truly impress you?
SM: Yes, and they’re mostly the guys who are labeled as having a “homemade swing.” I like Matt Wolff. I like Sergio Garcia and Jon Rahm. I like the players with idiosyncratic moves that are also highly functional. There’s a reason that guys like Matt Wolff and Sergio get the shaft moving on different planes: They can swing it faster that way! I’ve got nothing bad to say about Adam Scott; lovely swing, and he’s managed to make everybody happy in terms of aesthetics. But the underlying mechanics aren’t as effective at moving the club with force. Scott is applying the same underlying mechanical principles, just to a lesser degree. You need to be very careful not mess-up the sound mechanics of an elite golfer to achieve an ‘on-plane look’. Same with all the other guys who work overly hard on staying on plane. I’d argue that trying to apply the principles evident in Sergio’s swing is better for the average golfer than trying to swing like Bryson DeChambeau.
Note that Sasho has expressed the opinion that achieving an "on-plane look" by trying to stay on-plane during the downswing is disadvantageous because it isn't "as effective at moving the club with force". I disagree with his opinion and I have noted that some of the longest drivers on the PGA tour in 2020 (eg. Cameron Champ and Luke List and Bryson DeChambeau) have an on-plane downswing action, as do the World Long-Drive Champions Jamie Sadlowski, Kyle Berkshire and Tim Burke. If Sasho would provide me with a more detailed explanation that provides more explanatory support for his opinion, then I will gladly post his unedited explanation in the Page of Addendums that accompanies this review paper.
I personally believe that the most optimum golf swing technique that can be efficiently used to consistently zero-out the clubhead path at impact (which is one necessary requirement for a straight ball flight) is to use Homer Kelley's TGM "on-plane" golf swing technique. If Michael Finney (or any other individual) disagrees with me, he can provide me with a counterargument where he explains why he disagrees with the utility of using Homer Kelley's TGM "on-plane" golf swing technique and where he provides a different explanation of how a student-golfer (who wants to generate a straight ball flight) can best learn how to zero-out his clubhead path at impact. I will gladly post Michael's (or another individual's) unedited counterargument in the Page of Addendums that accompanies this review paper.
Topic number 5:
What biomechanical actions can a golfer use to square his clubface (relative to
his clubhead arc) during his downswing action?
Many professional PGA tour golfers prefer to generate a straight ball flight,
where the ball flight has no-or-little side-curvacture as the ball tracks
straight towards its intended target. To generate a straight ball flight (that
has no/minimal fade-or-draw curvacture) a golfer needs to zero-out both his
clubhead path and his clubface angle at impact (while also striking the ball
with the sweetspot of the clubface). I personally believe that the optimum golf
swing technique that can be used to consistently zero-out the clubhead path at
impact is to use Homer Kelley's TGM "on-plane" golf swing technique (as explained in
topic number 4). If a golfer has learned how to consistently zero-out his
clubhead path at impact, then he still needs to learn how to consistently square
his clubface (relative to his clubhead arc) by impact. If the clubface is
squared relative to his clubhead arc at impact, and if his clubhead arc at
impact is square to the target, then he will have successfully zeroed-out both
his clubhead path and clubface angle at impact.
Which biomechanical technique do most professional golfers use to square their clubface relative to their clubhead arc during their downswing action?
I believe that most professional golfers use the standard TGM technique of a PA#3 release action in order to square their clubface by impact.
Consider the following diagram that demonstrates what happens to the clubface during a PA#3 release action.
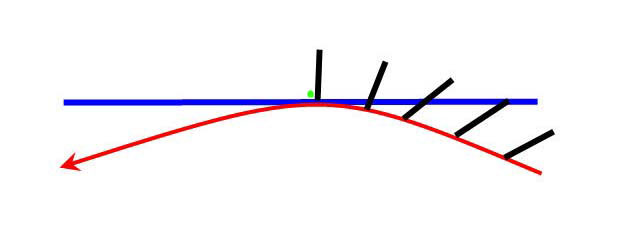
The straight blue line represents the ball-target line. The curved red arrowed
path represents a clubhead arc that is symmetrically "in-to-square-to-in"
relative to the ball-target line, and where the clubhead path is temporarily
square to the target at the exact point where it reaches the ball-target line.
The green dot represents the ball at impact. The short black line represents the
clubface. Note that the clubface angle has become square to the clubhead arc at
ball impact (presuming that the ball is placed at the exact point where the
clubhead arc reaches the ball-target line), and that means that the clubface
angle is also square to the target at impact if the clubhead arc is square to
the target at impact. Note that the clubface is open to the clubhead arc in the
early phase of the
later downswing and that it becomes progressively more square relative to the
clubhead arc as it gets progressively closer to impact, before becoming finally square
to the clubhead arc at impact. This clubface-closing phenomenon
(relative to the clubhead arc) that happens in the later downswing is called a
PA#3 release action in TGM terminology, and it is
biomechanically secondary to a left forearm supinatory action
that twists the club handle in a counterclockwise direction during the late
downswing's P6 => P7 time period. I personally believe that most
professional PGA tour golfers use the biomechanical phenomenon of performing a left
forearm supinatory motion in the late downswing as their primary method of
squaring the clubface relative to the clubhead arc by impact, and I believe that there is
no other useful biomechanical technique that can be used as a substitute technique.
Before I discuss the topic of other biomechanical techniques that can possibly be used to square the clubface relative to the clubhead arc during the downswing, let's first consider the scientific evidence that demonstrates that professional golfers actually use a left forearm supinatory motion in order to square their clubface relative to their clubhead arc during their downswing action.
Phil Cheetham's PhD dissertation paper was based on a research study that studied the "relationship of handle twist velocity to selected biomechanical characteristics of the golf drive" ( http://www.philcheetham.com/phd-dissertation-and-presentation ) and here are copies of two graphs from his research study on 94 professional golfers.
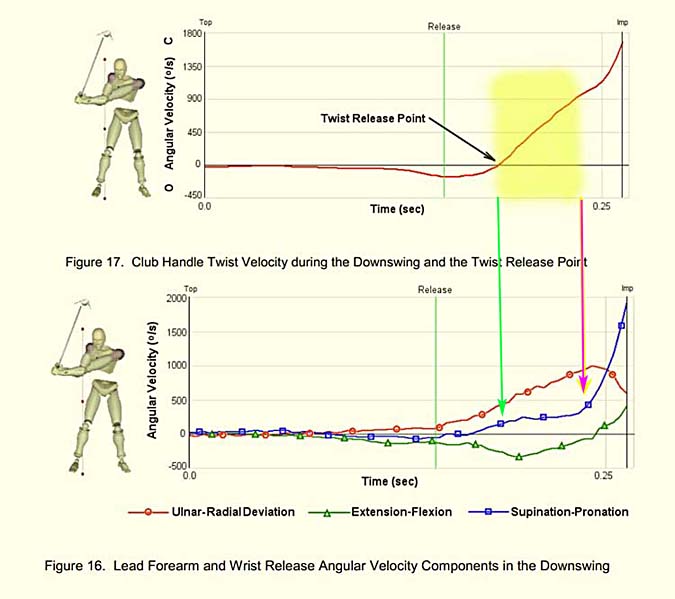
The top graph plots the handle twist velocity during the downswing. The green vertical line in the top graph represents the time point when the clubshaft first starts to release (representing the release of PA#2 in TGM terminology) and that happens before the twist release point (which usually happens a little later in the mid-downswing at-or-after P5.5). Note that there is a slow phase of handle twist velocity in the later phase of the mid-downswing and the early phase of the late downswing (see yellow-colored block) and note that the handle twist velocity rate then increases dramatically in the later downswing before reaching its peak velocity just before impact. The bottom graph shows the angular velocity of left wrist ulnar-radial deviation (red graph), the angular velocity of left wrist extension-flexion (green graph) and the angular velocity of left forearm supination-pronation (blue graph). The vertical green line represents the club release time point (PA#2 release time point) - when the club first starts to release due to left wrist ulnar deviation. Note that the left forearm only starts to supinate in the later mid-downswing (see vertical green arrow) and that the velocity of left forearm supination is slow between the vertical green arrow and the violet vertical arrow. Note that the speed of left forearm supination increases dramatically in the later downswing (representing the release of PA#3) and that it reaches its peak velocity at impact.
I have bold-highlighted those two sentences to emphasise the "fact" that left forearm supination, which is the major factor causing the club's handle to twist counterclockwise, only happens in the later downswing after P5.5, and it does not happen in the early-mid downswing (as many golfers incorrectly believe). The second important "fact" worth noting is that there is no evidence of any club handle twisting phenomenon happening in the early-mid downswing before the twist release point, which contradicts a "belief" held by many golf instructors that they should teach their student-golfers to twist their golf club's handle counterclockwise in the early-downswing between P4 and P5.5 (via the biomechanical phenomenon of a "motorcycle move" maneuver).
In summary, Phil Cheetham's research study demonstrates that professional golfers primarily use one biomechanical mechanism to twist their club handle counterclockwise during the downswing, and that is the biomechanical mechanism of left forearm supination.
Now, let's consider Michael Finney's opinions (as expressed in the Seminar's video presentation) on how a golfer should close his clubface (relative to the clubhead arc) during the downswing. At the 1 hour 46 minute time point of the video, Michael stated that clubface closure happens in the downswing as a result of a combination of three different torques (an alpha torque, a beta torque and gamma torque) and he stated that he has a personal theory that an alpha torque can independently close the clubface, although he did not expand on this topic by explaining how this phenomenon is even possible.
I personally disagree with some of those "beliefs" expressed by Michael Finney and I will now explain in great detail why I disagree with some of his opinions on the different biomechanical actions that he stated can cause the clubface to close (relative to the clubhead arc) during the downswing.
I will first start off by briefly defining what is meant by an alpha torque, a beta torque, and a gamma torque. An alpha torque is in-plane torque, a beta torque is an off-plane torque and a gamma torque is a torque that rotates the clubshaft about its longitudinal axis.
Michael stated in the Seminar's video presentation that he has a theory that can explain how an alpha torque can cause the clubface to close (relative to the clubhead arc) during the downswing, but I do not understand how this is even remotely possible in the absence of a pre-impact flipping phenomenon happening just before impact. Let's consider the alpha motion of a golf club during the downswing by examining Phil Mickelson's downswing action.
Here are capture images of Phil Mickelson's P4 => P6.3 downswing action.
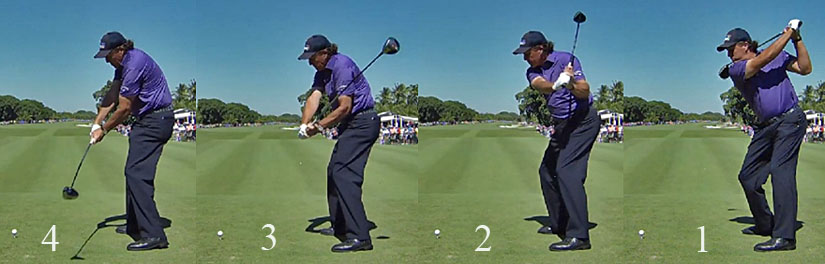
Image 1 is at his P4 position, image 2 is at his P5 position, image 3 is at his P5.5 position, and image 4 is at his P6.3 position.
Phil Mickelson uses a neutral lead hand grip, and he pronates his lead forearm during his backswing action in order to get the back of his lead hand parallel to his desired swingplane at his end-backswing position (image 1). Note that his clubface is parallel to the back of his back of his lead hand (GFLW) and also parallel to the watchface area of his lead lower forearm at his P4 position - but his clubface is wide open relative to his clubhead arc (secondary to the lead forearm pronatory motion that happened during his backswing action).
Phil Mickelson does not shallow his clubshaft during his downswing action, which means that he is not applying a negative beta torque in order to move his clubshaft to a shallower plane during his early-mid downswing action.
Note that his clubface remains parallel to the back of his lead hand (GFLW) and the watchface area of his lead lower forearm all the way between P4 and P6.3, and his clubface also remains wide open relative to his clubhead arc with no evidence of any clubface-closing phenomenon happening between P4 and P6.3. He is obviously applying an alpha torque to release his club (representing a PA#2 release action in TGM terminology) during his mid-downswing between image 3 and image 4 where the released club remains continuously "on-plane" (in the alpha plane of motion), but note that it does not produce any clubface-closing phenomenon (relative to his clubhead arc). If Phil Mickelson continued to release his club between P6.3 and P7 in his plane of alpha motion so that it catches up to his lead arm by impact, then he would hit the ball with the hosel/heel area of his clubhead because the club's alpha motion (in-plane motion) does not generate a clubface-closing phenomenon whereby the clubface closes more relative to his clubhead arc. The primary way that Phil Mickelson can square his clubface between P6.3 and impact is to use a lead forearm supinatory motion (as previously described in a particular subsection of topic number 2).
I cannot envisage how Michael can rationally theorise that an alpha motion (in-plane motion) of the clubshaft can produce a clubface-closing phenomenon (relative to the clubhead arc). If Michael is willing to send me an e-mail message that explains, using a counterargument, how it is possible for an alpha clubshaft motion to have a clubface-closing effect, then I will gladly post his unedited counterargument in the Page of Addendums that accompanies this review paper.
Michael also stated in the Seminar's video presentation that it is possible to close the clubface (relative to the clubhead arc) by applying a beta torque.
Here are capture images from the 108 minute time point of the Seminar's video presentation where Michael is demonstrating a positive beta torque motion of the clubshaft.
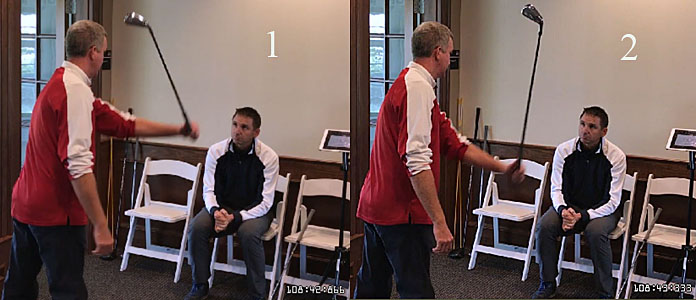
Image 1 shows Michael holding the clubshaft at an angle (relative to the ground) where the clubshaft can be considered to be on a plane (with respect to its degree of steepness relative to the ground) and it will be "on-plane" (in TGM terms) if an imaginary line drawn-out from the butt end of his club points at the ball-target line. Note that the clubshaft is straight-line-aligned with his left forearm, which means that he has an intact LFFW alignment. Note that his clubface is parallel to the back of his left hand (GFLW) and that it is wide open to his clubhead arc.
Image 2 shows Michael performing a positive beta torque action where he steepens his clubshaft by biomechanically performing a left forearm supinatory motion. That clubshaft-steepening action (which is an off-plane motion) is often called a "tumble action" because it tumbles the clubshaft over-the-plane. Note that his clubface still remains parallel to the back of his left hand (GFLW) but it is now more vertically aligned relative to the ground secondary to his positive beta torque motion. During his positive beta torque motion ("tumble action"), Michael is radically changing his clubhead arc path, but he is not really changing his degree of clubface-closure relative to his clubhead arc. Any change in his clubface angle relative to the ground during his "tumble action" is entirely due to his clubshaft-steepening action, and it does not mean that he has closed his clubface relative to his clubhead arc.
If a golfer performs a "tumble action" - as demonstrated by Michael - it would likely produce an "out-to-in" clubhead path during his late downswing action, but it would not produce a clubface-closing phenomenon where the clubface becomes more closed relative to the clubhead arc. To square his clubface relative to his clubhead arc by impact, the golfer would still need to perform a PA#3 release action in his later downswing. If he succeeded in squaring his clubface relative to his clubhead arc by impact as a result of successfully completing a PA#3 release action, then he would likely generate a "straight pull" ball flight pattern because his clubhead path would be "out-to-in" through impact (as a direct result of his off-plane positive beta torque action) and his clubface would be square to his clubhead path (as a result of his successfully-completed PA#3 release action).
I cannot personally envisage how a positive beta torque action (as demonstrated by Michael in the Seminar's video presentation) can have a clubface-closing effect where the clubface closes more relative to the clubhead arc (rather than closing more relative to the ball-target line secondary to an "out-to-in" clubhead path). If Michael can provide me with a detailed explanation that explains how a beta torque action can close the clubface more relative to the clubhead arc (without radically changing the clubhead path), then I will gladly post his unedited explanation in my Page of Addendums that accompanies this review paper.
I believe that the only biomechanical mechanism that a skilled golfer can realistically use to close the clubface relative to his clubhead arc in his "real life" golf swing action is to use a positive gamma torque method in order to twist the golf club handle counterclockwise during the downswing action. There are three biomechanical methods of executing a positive gamma torque action during the downswing - i) a left forearm supination method (called a PA#3 release action in TGM terminology) during the later downswing after P5.5 or ii) a "motorcycle move" method where a golfer bows the lead wrist when the lead wrist is radially deviated and which can happen in either the late backswing or early-mid downswing; and iii) a "twistaway maneuver" method in the early-mid downswing.
I have already discussed the left forearm supination method, which is the standard method that virtually all professional golfers use to square their clubface during their later downswing. The amount of left forearm supination required to square the clubface by impact is inversely proportional to left hand grip strength. The timing of the left forearm supinatory motion and its effect on the amount of clubface roll per unit amount of clubhead travel along the clubhead path depends on the golfer's accumulator #3 angle in the late downswing (as previously described in topic number 3 of this review paper when I compared Phil Mickelson's PA#3 release action to Sergio Garcia's PA#3 release action).
The golf instructor, Tyler Ferrell, is a strong advocate of the idea of routinely teaching student-golfers the "motorcycle move" and here is a copy of an image from his "The Stock Tour Swing" golf instructional book, where he demonstrates the "motorcycle move".

Note that the clubface is straight-in-line (parallel) to the watchface area on the back of his left lower forearm at his end-backswing position - image 1. That straight-in-line relationship is expected if a golfer adopts a weak-neutral left hand grip and if he does not deliberately cup/bow his left wrist at the end-backswing position. Note that the clubshaft is straight-in-line with his left lower forearm and that represents an intact LFFW (left forearm flying wedge) alignment. Note that his left wrist is slightly cupped (slightly dorsiflexed) and that is fully expected if a golfer has a neutral left hand grip, and that slightly dorsiflexed left wrist alignment (where the clubshaft is straight-in-line with the left lower forearm) is called a GFLW (geometrically flat left wrist) even though the left wrist does not look visually flat (anatomically flat). Note that his clubface is open to the clubhead arc even though it is neutral relative to the back of his GFLW (geometrically flat left wrist) and also relative to the watchface area on the back of his left lower forearm.
Note that his clubface is significantly more closed relative to his clubhead arc in image 2 (which is roughly at the P5.5 position) and that it is also similarly closed relative to the watchface area of his lead lower forearm. The cause of the clubface closure is the fact that he is bowing his lead wrist while his lead wrist is radially deviated.
Note that the clubface is about 20 - 30 degrees closed relative to the clubhead arc at the P6 position and it is tilted beyond vertical towards the ball-target line (image 3); and note that it is also closed relative to the watchface area of his left lower forearm by roughly the same amount.
What Tyler Ferrell is demonstrating in this series of images is the clubface-closing phenomenon that happens during a "motorcycle move" (also called a "reverse motorcycle move"). I have discussed the biomechanics underlying the "motorcycle move" in great detail in my review paper called "What effect does lead wrist bowing have on the clubface and clubshaft?" which is available at https://perfectgolfswingreview.net/LeadWristBowing.html
Golf instructors, who teach the "motorcycle move", often believe that it will eliminate, or at least decrease, the need for a PA#3 release action (which is causally due to lead forearm supination) in the later downswing, and they often assert that if a golfer has successfully closed his clubface relative to his clubhead arc by the P6 position as a result of using the "motorcycle move" in the earlier downswing, then that means that the golfer only needs to rotate his body into impact and the clubface will automatically/naturally become square to the clubhead arc by impact!!! However, the true "real life" reality is that the "motorcycle move" only closes the clubface relative to the clubhead arc by about 20 - 30 degrees at the P6 position, and those golf instructors who teach the "motorcycle move" do not take into full account the fact that maintaining a bowed lead wrist in the later downswing after P6, when the lead wrist becomes increasingly ulnar deviated, causes the clubshaft to become angled back away from the target relative to the lead forearm/hand, which opens the clubface relative to the ball-target line. That clubface-opening effect due to the clubshaft angulation phenomenon happening after P6 offsets the clubface-closing benefit obtained by performing the "motorcycle move" in the early-mid downswing before P6, and the net result is the fact that a golfer is still going to have use a lot of lead forearm supination in the later downswing in order to square the clubface by impact. To better understand these two offsetting clubface closing/clubface opening phenomena, which are both due to lead wrist bowing, you can read this previously recommended review paper and also read topic number 1 in the following review paper where I analysed Tyler Ferrell's opinions regarding the "motorcycle move".
The third method that can be used to close the clubface relative to the clubhead arc is the "twistaway maneuver" described by Brian Manzella, a golf instructor based in New Orleans.
Here are capture images, copied from Brian Manzella's vimeo-based video called "The Science of Smash".
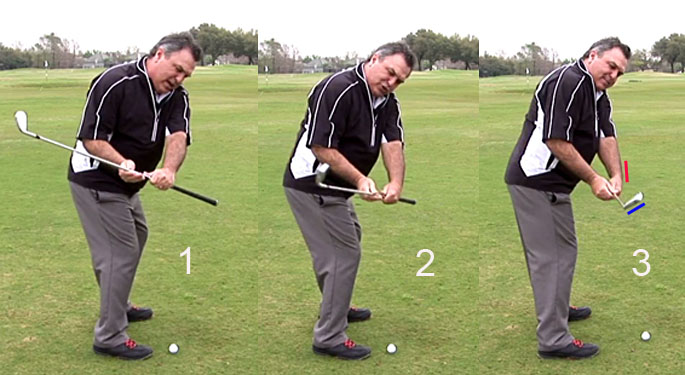
Image 1 shows Brian Manzella at a simulated mid-downswing position. Note that his clubshaft is straight-in-line with his lead lower forearm, and that geometrical alignment represents an intact LFFW (left forearm flying wedge) alignment. He also therefore has a GFLW, which is slightly cupped in appearance because he has adopted a neutral left hand grip. Note that his clubface is parallel to the back of his GFLW and also parallel to the watchface area on the back of his lead lower forearm, and it is also wide-open relative to the clubhead arc. Most importantly, note that the knuckles of his left hand are all in a straight-line-alignment.
Image 2 shows him starting to perform a "twistaway maneuver". Note how the knuckles of his left hand's 3rd, 4th and 5th fingers "curl-in" much more than the knuckle to his left hand's index finger and that is due to the muscular activation of the flexor digitorum profundus muscles to those three ulnar-side fingers. Note how the finger curling action twists the club handle counterclockwise and it causes the clubface to close relative to the clubhead arc. Note that the "twistaway maneuver" bows the lead wrist in a similar manner to the "motorcycle move", but it causes the ulnar half of the lead wrist to become much more bowed than the radial half of the lead wrist, and that causes the clubface to twist closed even more so that it is not only closed relative to the watchface area on the back of the lower lead forearm, but it is also closed relative to the radial half of his bowed lead wrist. Another biomechanical factor that causes the "twistaway maneuver" to produce more clubface closing (compared to the clubface closing effect of the "motorcycle move") is the additional element of left wrist circumduction. When a golfer performs the "twistaway maneuver", he not only twists the club handle counterclockwise with the finger tips of his lead hand's 3rd, 4th and 5th fingers; he also causes the palmar flexing ulnar-half of the lead wrist to move in an ulnar direction and the combination of "lead wrist palmar flexion + lead wrist ulnar deviation" produces a small degree of counterclockwise roll of the entire lead hand due to the biomechanical phenomenon of lead wrist circumduction, which adds to the clubface closing effect.
Image 3 shows what will happen if the twistaway maneuver is exaggerated even more. Note that it will increasingly palmar flex the lead wrist and it will even cause some lead forearm supination, which will close the clubface even more relative to the clubhead arc. Note that I have drawn a blue line along the clubface to show the clubface angle, and a red line along the back of the radial half of his bowed lead wrist, and one can clearly see that the clubface is very closed relative to the back of the radial half of his bowed lead wrist.
Now, the most important question becomes-: If a golfer successfully performs the "twistaway maneuver" at some time point between P4 and P6 in such a manner that it enables him to close the clubface relative to his clubhead arc by a moderate amount (eg. 30 - 40 degrees) will it decrease the amount of left forearm supination that is required in the later downswing between P6 and P7 in order to get a square clubface by impact?
Golf instructors, who teach the "twistaway maneuver", often believe that it will eliminate, or at least decrease, the need for a PA#3 release action in the later downswing, and they often assert that if a golfer has successfully closed his clubface relative to his clubhead arc by the P6 position as a result of using the "twistaway maneuver" in the earlier downswing, then that means that the golfer only needs to rotate his body into impact and the clubface will automatically/naturally become square to the clubhead arc by impact!!!
This "belief" is not science-based and it is seemingly based on a fallacious belief that it is physically possible to maintain a "twistaway action" all the way into impact when swinging a driver at clubhead speeds of >100mph. However, maintaining a "twistaway action" is not physically possible when swinging a driver at clubhead speeds of >100mph because the released club is exerting a large outward pull (centrifugal pull) of ~100 lbs in the later downswing and it will stretch the lead forearm's flexor digitorum profundus muscles, thereby eliminating the lead hand's ulnar-side fingers ability to twist the club handle counterclockwise within the lead hand's grip. The flexor digitorum profundus muscles to the lead hand's 3rd, 4th and 5th fingers may still be isometrically active at impact, but they do not have the finger torque-twisting power needed to keep the clubface closed relative to the back of the bowed lead wrist all the way into impact. I have never seen a professional golfer, who uses a "twistaway maneuver" in the early-mid downswing, arrive at impact where the clubface is still significantly closed relative to the back of his bowed lead wrist. The pro golfer may still have a bowed lead wrist at impact, but the small additional amount of clubface-closing benefit obtained by using the "twistaway maneuver" (rather than the "motorcycle move") during the early-mid downswing will have dissipated during the later downswing. Secondly, if the pro golfer maintains a significantly bowed lead wrist throughout the late downswing between P6 => P7, it will cause the clubshaft to angle backwards away from the target relative to the lead forearm/hand and that clubshaft angulation phenomenon will open the clubface relative to the ball-target line. The final end-result will be similar to the "motorcycle move" scenario - where the clubface-opening effect due to the clubshaft angulation phenomenon happening between P6 => P7 will offset the clubface-closing effect of the "twistaway maneuver" happening between P4 => P6, and the pro golfer will still have to use a lot of lead forearm supination in the later downswing between P6.5 => P7 in order to get the clubface square by impact.
Topic number 6: Clubface ROC
(rate-of-closure) through the immediate impact zone
The last topic that was discussed in the formal presentation section of Michael
Finney's Seminar was the topic of the ROC of the clubface through impact.
Michael started off his host presentation by stating that there are many different methods of measuring the clubface's ROC through impact (eg. speed that the toe of the clubhead rotates around the hosel of the clubhead, speed of clubface rotation relative to a reference stick that is placed on the ball-target line, clubface ROC relative to the clubhead arc) and he stated that there is no "gold standard" method of measuring the clubface ROC through impact.
Michael acknowledged the reality that some golf instructors teach a drive-hold (DH) hand release technique, which is reputed to decrease the ROC of the clubface through impact. Michael specifically talked about the golf instructor, Alex Saary, who supposedly teaches his student-golfers a DH-hand release technique, and he stated that Alex Saary claims that it decreases his student-golfers' dispersion rate (percentage of shots that land significantly left-or-right of the intended target). However, Alex Saary's method of teaching a DH-hand release action, and his claims about it increasing his student-golfers' ball flight accuracy from a consistency perspective, are not in the public sphere and there has been no other scientific study that has confirmed the "belief" that reducing the clubface's ROC through impact is beneficial in terms of ball flight accuracy.
The only other golf instructor that Michael referenced with respect to the golf instructional philosophy of teaching a DH-hand release action was Kelvin Miyahira. However, Michael did not provide any details on how Kelvin Miyahira defines the term "drive-hold" and he also apparently does not have any insight into the biomechanical fundamentals that Kelvin Miyahira prescribes for his DH-hand release action.
Although Michael seemingly has no knowledge of how a golfer should execute a DH-hand release action from a golf instructional perspective, he has a clear mental picture of how a DHer (= golfer who uses a DH-hand release action) would look like (from a visual perspective) during his early followthrough - compared to a non-DHer ( = golfer who uses a non-DH hand release action).
Here are capture images from the video presentation that show Michael demonstrating the biomechanical differences between a non-DH versus a DH-hand release action without even holding a golf club in his hands.
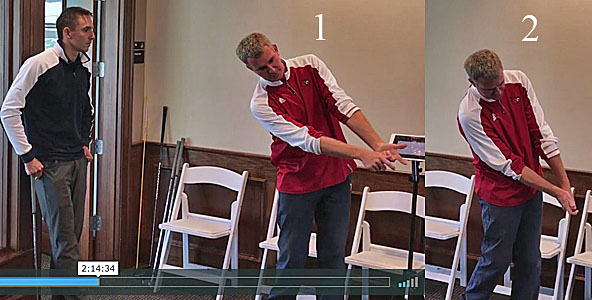
Image 1 shows Michael demonstrating his personal hand release action, which he
calls a "freewheeling" hand release action. Note that he has fully supinated his
left forearm so that the back of his left hand faces the ground, and he has also
fully pronated his right forearm so that his right palm also faces the ground
during the early followthrough time period. Note that he has fully straightened his
right wrist.
Image 2 shows Michael demonstrating how some PGA tour golfers look like soon after impact when they use a DH-hand release action. Note that he has not significantly supinated his left forearm or significantly bent (extended) his left wrist during his early followthrough time period. There has been some counterclockwise rotation of the back of the left hand, secondary to a certain amount of external rotation of the left humerus in the left shoulder socket that is happening between impact and ~P7.5, but the back of the left hand has not rolled so much counterclockwise that it faces the ground at that simulated ~P7.5 position. Note that he still has a significantly bent right wrist and an incompletely straightened right arm. Note that his right forearm has pronated by a smaller amount (compared to image 1), and only by the amount that is needed to allow him to keep his right palm continuously parallel to his left palm.
Here are two PGA tour golfers who look exactly like Michael's simulated non-DHer (image 1) and DHer (image 2) demonstration examples.
Capture images of Luke Donald's early followthrough action.
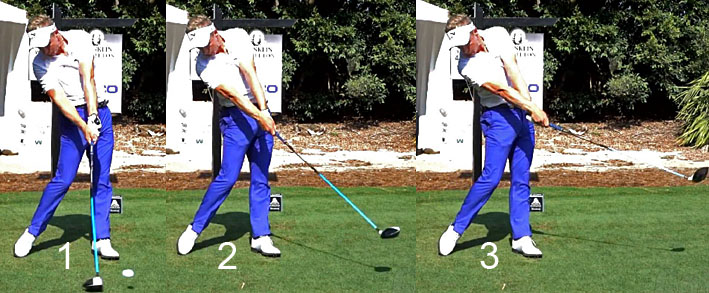
Image 1 shows Luke Donald at impact. Note his clubshaft is straight-in-line with
his left arm, and note that his left wrist is not bent (extended) or bowed
(palmar flexed). Note that his clubface is square to his clubhead arc (and also
square to the target because his clubhead path is square to the target at
impact).
Image 2 shows Luke Donald at approximately the P7.5 position. Note that he has significantly supinated his left forearm and pronated his right forearm, and that the biomechanical action of left forearm supination has caused his clubshaft to bypass his left arm (from an angular rotational perspective). Note that his clubface is not square to his clubhead arc, and his clubface has rolled more closed relative to his clubhead arc between impact and P7.5. This type of non-DH hand release action produces a high clubface ROC (relative to the clubhead arc and ball-target line) between impact and P7.2 (which I have arbitrarily labelled the "immediate impact zone"). I refer to this type of non-DH hand release action as a rolling subtype of non-DH-hand release action. Note that he has fully straightened his right elbow and fully straightened his right wrist.
Image 3 shows how Luke Donald is starting to perform his finish swivel action. The term "finish swivel action" is a TGM term that describes how a golfer swivels the clubshaft back up the inclined plane during his followthrough, and it requires a significant amount of left forearm supinatory motion in order to perform a finish swivel action. It is theoretically possible to maintain a flat (non-extended) left wrist when performing a finish swivel action, but most professional golfers will have a variable amount of left wrist extension happening when they perform a finish swivel action during their followthrough time period.
Capture images of Jordan Spieth's early followthrough action.
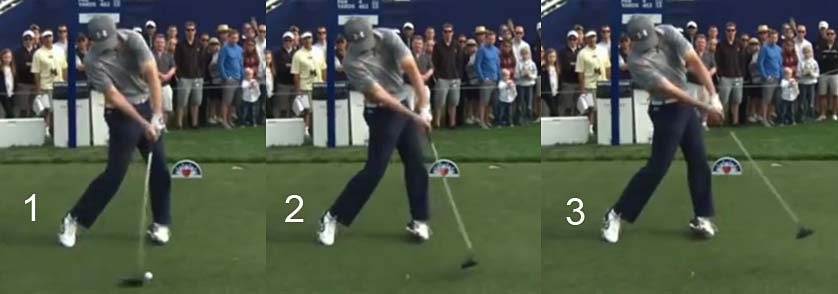
Image 1 shows Jordan Spieth at impact where his clubface is square to his
clubhead arc (and also square to the target because his clubhead path is square
to the target at impact). Note that Jordan Spieth has a slightly bowed left
wrist at impact, and that bowed left wrist alignment explains why he has a small amount of forward shaft lean at
impact. From a LAFW perspective, he has a non-intact LAFW because his left
wrist bowing phenomenon has moved his clubshaft slightly backwards (away from
the target) relative to his left forearm so that it is not perfectly
straight-in-line with his left forearm. However, the amount of forward shaft
lean present at impact is very small because he has used a slightly greater
amount of left forearm supination during his PA#3 release action in order to get
his clubface square by impact.
Image 2 is at P7.2 (which is the end of the immediate impact zone). Note that his clubface is square to his clubhead arc. Most importantly, note that his clubshaft has not bypassed his left arm (from an angular rotational perspective), which is an useful, although not a full-proof, visual marker that a golfer is using a DH-hand release action in the early followthrough. If Jordan Spieth's clubface is being kept square to his clubhead arc between impact and P7.2 then he obviously must have a lower clubface ROC (compared to Luke Donald's clubface ROC) during his clubhead's travel time through the immediate impact zone.
Image 3 shows Jordan Spieth at the P7.5 position and he is still keeping his clubface square to his clubhead arc and he is still preventing his clubshaft from bypassing his left arm (from an angular rotational perspective). Note that he still has a palmar flexed left wrist (although his left wrist is a few degrees less palmar flexed at P7.5 compared to impact). If his left wrist is less palmar flexed at P7.5 (compared to impact) that means that his left wrist is extending through impact as he transitions into his early followthrough. However, the amount of left wrist extension happening is insignificantly small and it is not enough to cause his clubshaft to bypass his left arm (as viewed from an angular rotational perspective). Note that he is not significantly supinating his left forearm between impact and P7.5, and he is controlling his clubface's ROC between impact and P7.5 by controlling the rate of external rotation of his left humerus in his left shoulder socket while his left shoulder socket is simultaneously moving inside-left due to his continued upper torso rotation, so that he can keep his clubface continuously square to his clubhead arc between impact and P7.5. If a golfer can keep his clubface square to his clubhead arc through the immediate impact zone between P7 and P7.2 while preventing the clubshaft from bypassing his left arm (from an angular rotational perspective), then that combination meets my personal definition of a DH-hand release action. Most importantly, note that Jordan Spieth maintains a slightly bent right wrist, and an incompletely straightened right arm, during the execution of his DH-hand release action. Jordan Spieth does eventually transition into a finish swivel action in his later followthrough after P7.5, but it does not happen in his early followthrough action between impact and P7.5.
These comparative capture images demonstrate that a DHer (like Jordan Spieth) has a lower clubface ROC through the immediate impact zone (compared to a non-DHer like Luke Donald) which may potentially decrease his ball flight's dispersion rate and result in consistently greater ball flight accuracy (over the long-term) - presuming that both of these professional golfers can consistently square the clubface by impact. Obviously, a golfer, who wants to generate a straight ball flight pattern, cannot benefit from having a lower ROC through the immediate impact zone between impact and P7.2 if he cannot consistently square his clubface during his pre-impact phase. It is obviously much more important to perfect one's PA#3 release action in order to zero-out one's clubface angle at impact if one wants to generate a straight ball flight pattern, and producing a low ROC after impact cannot be used as a substitute golf swing technique. A DH-hand release action, which can produce a low ROC of the clubface between impact and P7.2 if the golfer keeps his clubface continuously square to his clubhead arc, is only useful if the clubface has already been successfully squared relative to the clubhead arc at impact.
What is extremely interesting to me is how efficient many professional golfers are when it comes to maintaining a square clubface through impact where the clubface has a low ROC through the peri-impact zone.
Let's consider a few examples.
Here are capture images from a Kelvin Miyahira video ( https://www.youtube.com/watch?v=-bj2sWHW1Mg ) that shows that a skilled golfer can square the clubface a few inches before impact and keep it relatively square for many inches through impact.

Note that the clubhead appears to be traveling a distance of ~5" between image 1
and image 3, and the clubface appears to be *relatively square
to the target during this entire time period.
( * I use the qualifying term "relatively" because the clubhead path, and therefore the clubface angle, is obviously not perfectly square to the target during that entire peri-impact time period because the clubhead path is always curvilinear)
Here are capture images of Adam Scott's clubhead path and clubface orientation from the following swing video ( https://www.youtube.com/watch?v=qOwvteZr-3w )

Note that the clubhead moves slightly upwards through impact, which is fully
expected if Adam Scott places his tee at low point. Low point is the lowest
point of the clubhead arc and one would naturally expect the clubhead to start
to move in an upwards direction after low point. However, what really impresses
me is the fact that the clubface is so stable through impact from a clubface ROC
perspective. Image 1 is at
impact and image 4 is approximately 8" post-impact, and yet the clubface still
appears to be approximately facing the target with very little counterclockwise roll
of the clubface happening between image 1 and image 4.
How does Adam Scott achieve that desirably low ROC of his clubface through impact? The correct answer is that he uses a DH-hand release action - as demonstrated in the following capture images from that video.
Image 1 is at impact and image 2 is at P7.2 (which I arbitrarily define as the
end of the immediate impact zone, which is the peri-impact zone
of clubhead travel between impact and P7.2).
Note that Adam Scott has kept his clubface very stable from a clubface ROC perspective between impact (image 1) and P7.2 (image 2) even though the clubhead has traveled a distance of approximately 12" and he appears to be keeping the clubface square to the clubhead arc - but obviously not perfectly square to the target because that would require an artificial "straight line" clubhead travel pattern called "steering" by Homer Kelley - during this entire early followthrough time period. How does Adam Scott achieve the desirable goal of maintaining such a high level of clubface stability through impact? I believe that it is due to his efficient performance of a DH-hand release action - note that his clubshaft does not bypass his left arm between impact and P7.2.
Finally, here are capture images showing how Sergio Garcia keeps his clubface very stable through the peri-impact zone as a result of using a DH-hand release action.
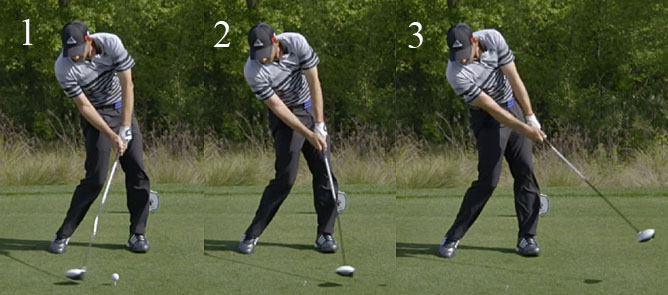
Image 1 shows that Sergio Garcia's clubface is relatively square to the target a
few inches before impact, and he keeps it relatively square all the way to P7.2
(image 2). Note that his clubshaft has not bypassed his left arm at P7.2, which
indicates that he is using a DH-hand release action between P7 and P7.2.
Note that Sergio Garcia starts to transition into a finish swivel action between P7.2 (image 2) and P7.5 (image 3) and that requires a greater amount of left forearm supinatory roll motion that will cause the clubshaft to start to bypass his left arm (from an angular rotational perspective).
I was very intrigued by the remarkable ability of professional golfers to keep their clubface relatively square to their clubhead arc through the peri-impact zone, so I decided to study Kelvin Miyahira's DH-hand release action ideas in great depth. After spending about 50 hours studying Kelvin Miyahira's approach to this topic, I eventually decided that I disagreed with his definition of a DH-hand release action and I also disagreed with his description of the biomechanical fundamentals that are needed to perform a DH-hand release action. I have since developed my own personal definition of a DH-hand release action, and I have also come to better understand the underlying biomechanics that many professional golfers use to most efficiently perform a DH-hand release action, and I will now present my personal opinions on this topic.
I think that the most optimal biomechanical technique that can be used to perform a DH-hand release action is to use the i) intact LAFW/GFLW technique or the ii) bowed left wrist technique.
I will first start off by describing the intact LAFW/GFLW technique.
The concept of an intact LAFW golf swing technique was first described by Homer Kelley in his TGM book, even though he only described the concept of the "flying wedges" in a very brief manner in his book (with his written description only being one paragraph in length under 6-B-3-0-1 in his TGM book). Homer Kelley was very vague about his use of the term FLW (flat left wrist) in his book and the abbreviated term FLW is actually in inverted commas in his book where it is written as follows-: "FLW". As a result of his poorly defined "FLW" terminology, many people have misunderstood what is meant by a "FLW" and they think that Homer Kelley only wanted a golfer to have a "FLW" at impact, when the true reality is that the left wrist must be geometrically flat throughout the entire downswing and early followthrough if a golfer chooses to use the intact LAFW/GFLW golf swing technique.
To understand the bold-highlighted assertion, I first need to provide my personal definition of a GFLW (geometrically flat left wrist).
Here is a capture image of me demonstrating a GFLW.

Note that I am holding my left arm vertically under my left shoulder socket and that the clubshaft is straight-in-line with my left arm. If the clubshaft is straight-in-line with the left arm that represents an intact LAFW (left arm flying wedge) alignment. Under those intact LAFW conditions, I have a geometrically flat left wrist even though the left wrist may not appear to be visually flat (anatomically flat). In fact, if one holds the club handle in a fist-like grip manner, the back of the left wrist will naturally appear to be scooped/cupped when one has a GFLW/intact LAFW alignment, and the physical appearance of the back of the GFLW will mainly depend on left hand grip strength.
It is critically important to understand that the visual presence of scooping/cupping of the back of the left wrist does not mean that the left wrist is extended. The true definition of left wrist extension means that the left wrist is bent (extended) so that the clubshaft is not straight-line-aligned with the left forearm.
Here is a capture image (from a Tyler Ferrell you-tube video) showing left wrist extension happening post-impact in an amateur golfer.
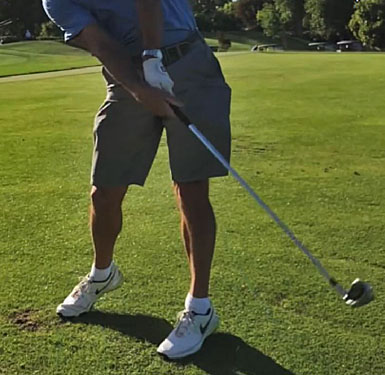
Note that the golfer's clubshaft is not straight-line-aligned with his left forearm due to the fact that he is bending his left wrist (extending his left wrist) after impact. That type of left wrist bending action (left wrist flipping action), which disrupts an intact LAFW alignment, is a frequent biomechanical cause of a non-intact LAFW alignment between impact and P7.2 in unskilled golfers.
Presuming that a reader can now understand the theoretical concept of an intact LAFW/GFLW alignment, let's continue to demonstrate what relevance the intact LAFW/GFLW concept has with respect to a full golf swing action.
I will first demonstrate how it is possible to maintain an intact LAFW/GFLW alignment throughout the entire backswing action, forward swing action and followthrough action of a backhanded tennis shot swing action.
Capture images from my part 1 video ( https://youtu.be/rNHIFy4dzIg ) of my 7-part video project on "How to Perform a Golf Swing Like a PGA Tour Golfer".
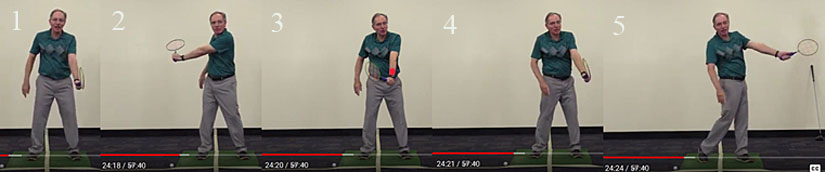
Image 1 shows me holding a badminton racquet (rather than a tennis racquet which has a longer shaft) using a weak left hand grip strength so that the racquet shaft (and racquet face) is straight-in-line with my left arm and that represents an intact LAFW alignment. Under those conditions, I must have a GFLW. Note that I have adopted a neutral left hand grip, but the back of my left hand is significantly scooped/cupped because the racquet's handle is wider than a golf club's handle.
Image 2 is at the end of my tennis-stroke backhanded action where I have competed the backswing motion of my left arm. Note that I have maintained an intact LFFW/GFLW alignment throughout my entire backswing motion. That means that I have never bent (extended) or bowed (palmar flexed) my left wrist during my entire backswing action. To get the back of my GFLW, and therefore racquet face, facing partially skywards at my end-backswing position, I had to pronate my left forearm by a finite amount. The biomechanical action of left forearm pronation does not disrupt an intact *LFFW/GFLW alignment because the biomechanical action of left wrist pronation is a forearm rotary motion that rotates the racquet's shaft/face at the same angular rotational speed as the back of the GFLW, and the watchface area of the left lower forearm, are rotating during my backswing action.
(* If the left forearm excessively pronates during the backswing action while still maintaining a GFLW, then the clubshaft will still be continuously straight-line aligned with the watchface area of the left lower forearm, which means that one still has an intact LFFW [left forearm flying wedge] alignment - even if one no longer has an intact LAFW alignment because the racquet's shaft will no longer be straight-line-aligned with the left upper arm due to the excessive amount of left forearm pronation, which moves the left lower radial bone out-of-alignment with respect to the left antecubital fossa. Click on this link if you want to learn more about the difference between a LFFW and a LAFW)
Image 3 shows me performing a forward swing tennis-stroke action where I intend to square my racquet face relative to an imaginary tennis ball that is located at that red dot (which is vertically in line with my left shoulder socket at impact). During that entire forward tennis stroke action, I am maintaining an intact LFFW/GFLW alignment and I am simply using a left forearm supinatory motion to increasingly square the racquet face relative to the racquet head's path during my forward swing motion so that it is finally square at impact. Note that the forward swing motion of my left arm is primarily due to a left arm abductory motion that is happening while I simultaneously rotate my upper torso counterclockwise.
Image 4 shows my racquet face soon after impact - at a position that is roughly equivalent to a P7.2 followthrough position. Note that I have maintained an intact LAFW/GFLW between impact and that P7.2 position, which is approximately 12" further along the racquet head's path in a followthrough direction. How did I keep the racquet face square to the racquet head's path between impact and P7.2? Note that I have continued to abduct my left arm during my followthrough action, but I am simultaneously rotating my left arm counterclockwise (while I am continuously abducting my left arm) by externally rotating my left humerus in my left shoulder socket by the exact amount needed to keep the racquet face continuously square to the racquet head path during the P7 => P7.2 time period. Note that I am not supinating my left forearm or bending (extending) my left wrist during the P7 => P7.2 time period.
Image 4 shows me at the P8 position where I still have an intact LAFW/GFLW alignment.
To better demonstrate the "fact" that I have maintained an intact LAFW/GFLW alignment all the way between impact and P8, consider these upline capture images.
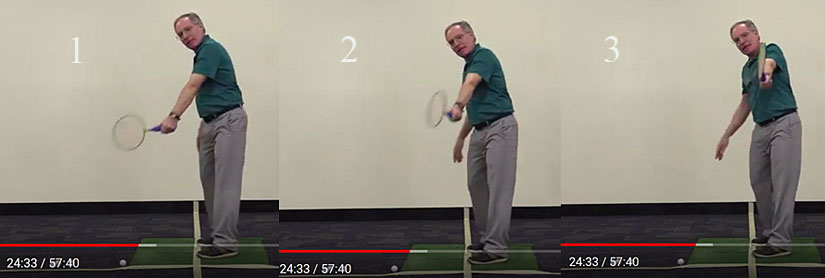
Image 1 shows me at a P7 position, image 2 is at a P7.5 position and image 3 is
at a P8 position.
Note that I am maintaining an intact LAFW/GFLW throughout my entire followthrough action between P7 and P8. During that followthrough time period, I am increasingly abducting my left arm and I am simultaneously externally rotating my left humerus in my left shoulder socket (which is moving inside-left due to a continued counterclockwise rotation of my upper torso).
During the P7 => P7.5 time period, I am abducting my left arm at an angular rotational velocity that must perfectly match the angular velocity of the racquet head along its curvilinear path if I want to keep my LAFW/GFLW alignment intact. If I abducted my left arm at too slow an angular velocity (relative to my racquet head's forward angular velocity along its curvilinear followthrough path) then my left wrist would bend (extend) thereby disrupting my intact LAFW/GFLW alignment. Also, to keep my racquet face continuously square to the racquet head's path between P7 and P7.5, I must rotate my entire LAFW/GFLW counterclockwise as a single unit at a specific rate-of-rotation, that is primarily determined by the rate of external rotation of the left humerus happening within the left shoulder socket during that P7 => P7.5 time period.
Is it theoretically possible to controllably, and reliably, rotate the intact LAFW/GFLW counterclockwise as a single unit during the early followthrough time period between P7 and P7.2 - where the entire intact LAFW/GFLW rotates at a rotational speed that keeps the racquet face continuously square to the racquet head's path between P7 and P7.2 - if one didn't continuously maintain an intact LAFW/GFLW alignment during the entire downswing time period? I guess that it is theoretically possible, but it would not be biomechanically easy to have a disrupted LAFW alignment in the early-mid downswing (eg. due to left wrist extension) and then have to solve this swing fault problem by trying to reconstitute an intact LAFW in the later downswing before impact! I believe that it is much easier to biomechanically maintain an intact LAFW/GFLW alignment during the early followthrough between P7 and P7.2 if one has already maintained an intact LFFW/GFLW throughout the entire downswing action. I am therefore not surprised that so many PGA tour golfers maintain an intact LAFW/GFLW during their entire downswing action, which makes it much easier to become a skilled DHer between P7 and P7.2!
Before I demonstrate that PGA tour golfers use the intact LAFW/GFLW technique - using Henrik Stenson and Adam Scott as prototypical examples - I first need to demonstrate how a golfer can maintain an intact LAFW/GFLW alignment during the entire downswing and early followthrough action.
Consider these capture images of Jim George performing a downswing action using an intact LAFW/GFLW technique - these capture images were captured from my part 1 you-tube video at https://youtu.be/rNHIFy4dzIg and you can see the video time points at the bottom of the capture images if you want to watch the video demonstration.

I have cut a piece of red cardboard in the shape of a wedge, which can be used
to more clearly show that the left lower forearm is straight-line-aligned with the
clubshaft at all times during the downswing and early followthrough - when
perceived from an angular rotational perspective.
Image 1 is at the P4 position, image 2 is at the P5 position, image 3 is at the P6 position, image 4 is at the P6.5 position, image 5 is at the P7 (impact) position, and image 6 is at the P7.2 position.
Note that Jim George continuously maintains an intact LFFW/GFLW throughout his entire downswing and early followthrough from P4 to P7.2.
Before I demonstrate that Henrik Stenson and Adam Scott also continuously maintain an intact LFFW/GFLW alignment throughout their entire downswing and early followthrough, I will first show you capture images of Kelli Oride's superb intact LFFW/GFLW golf swing technique.
Kelli Oride was a 16-year old student-golfer of Kelvin Miyahira when the following slow motion video of her downswing action was captured by Kelvin Miyahira. It is a very useful video (from a golf instructional perspective) because it was captured at a very slow motion speed that allows one to clearly see her arm, wrist and hand motions throughout her downswing and followthrough - and I would highly recommend that all readers view the following video.
Kelli Oride swing video - http://www.youtube.com/watch?v=p7hBadAiMcA
Here are capture images from the video showing her downswing and early followthrough swing action.
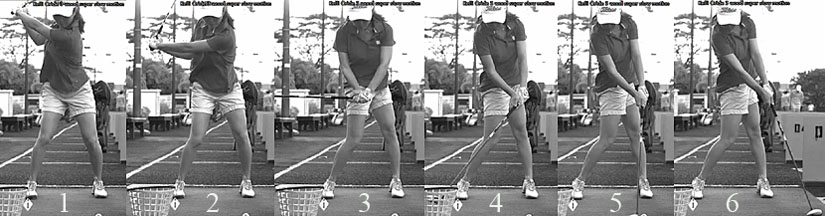
Image 1 is the P4 position, image 2 is at the P5 position, image 4 is at the P6
position, image 4 is at the P6.5 position, image 5 is at the P7 position, and
image 6 is at the P7.4 position.
Note that Kelli Oride continuously maintains an intact LFFW/GFLW alignment throughout her entire downswing and early followthrough.
Note that Kelli Oride is using a DH-hand release action where she keeps the clubface square to her clubhead path between impact (image 5) and P7.4 (image 6) and she does not allow the clubshaft to bypass her left arm from an angular rotational perspective.
It is much more difficult to biomechanically maintain an intact LFFW/GFLW between P5.5 and impact (compared to the P4 => P5.5 time period) because i) the golf club is releasing (representing the release of PA#2) during this time period and because ii) the left forearm is also continuously supinating in order to complete a PA#3 release action before impact.
Here are close-up images showing that Kelli Oride is continuously maintaining a GFLW and intact LFFW throughout her late downswing time period.
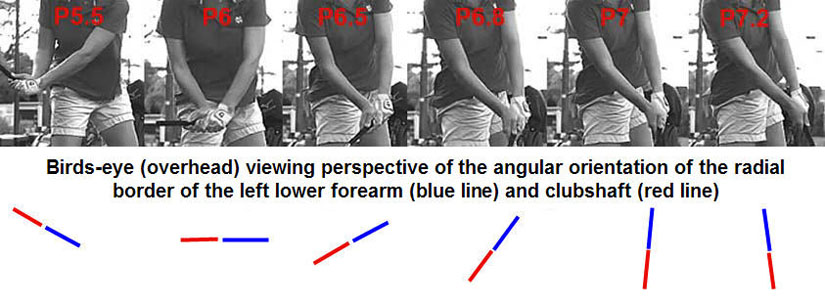
Image 1 shows Kelli Oride at the P5.5 position. Note that she has an intact
LFFW/GFLW. I have drawn a blue line below image 1 that is representative of an
imaginary straight line that is parallel to the back of her GFLW/lower left
forearm (watchface area). Note that it is straight-in-line with the red line,
which represents the clubshaft, and this straight-in-line relationship (when
perceived from an angular rotational perspective) is
characteristic of an intact LFFW alignment.
Image 2 is at P6, image 3 is at P6.5, image 4 is at P6.8 and image 5 is at impact (P7). Note that the back of her GFLW is rotating counterclockwise between P6 and impact, and note that she maintains a GFLW and an intact LFFW throughout her late downswing action (represented by the blue line always being continuously straight-in-line with the red line from an angular rotational perspective).
Image 6 is at P7.2 (end of the immediate impact zone), and she has an intact LAFW/GFLW.
If Kelli Oride maintains a GFLW alignment that means that she never has an overtly palmar flexed (bowed) left wrist, or overtly extended (bent) left wrist, at any time point during her downswing and early followthrough. In other words, overt left wrist palmar flexion (overt left wrist bowing) and/or overt left wrist extension (bending) does not happen at any time point during the downswing action of a skilled golfer who uses the intact LFFW/GFLW technique - because those biomechanical motions will cause the clubshaft to angle away from its straight-line-alignment relative to the lead lower forearm, and thereby disrupt the intact LFFW/GFLW alignment.
It is also critically important to understand that when Kelli Oride releases her club (representing the release of PA#2 in TGM terminology) between P5.5 (image 1 above) and P6.5 (image 3 above), that the club must release within the plane of the LAFW (in the plane of left wrist radial => ulnar deviation) and it must not release across the plane of the LAFW (in the plane of left wrist flexion => left wrist extension). That means that any golf instructor, who wants to successfully teach the LAFW/GFLW swing technique, must not only have a good knowledge of TGM mechanics - he must also have a very good knowledge of left wrist anatomy and left wrist biomechanics. I personally don't think that Joe Mayo has a sufficiently good knowledge of left wrist anatomy and left wrist biomechanics, which is a mandatory requirement if a golf instructor wants to successfully teach the intact LAFW/GFLW swing technique. Why do I harbor this opinion about Joe Mayo?
Consider these capture images from the Seminar's video - captured from the 2 hour 35 time point of the video.
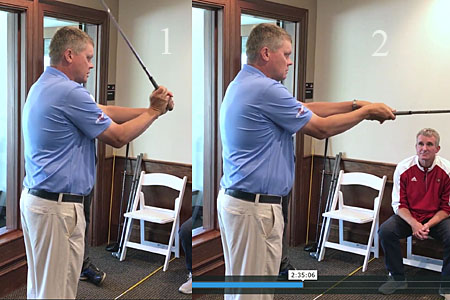
At the 2 hour 35 minute time point of the Seminar's video presentation, Joe Mayo
stated that it possible to keep the right wrist extended while the left wrist
moves from extension to flexion (or vice versa). He then demonstrated that
"claim" by moving his left wrist from being seemingly extended (image 1) to being
seemingly flexed
(image 2) while keeping his right wrist extended. It is true that he is keeping
his right wrist continuously extended (bent) between image 1 and image 2, but it is
not true that he is moving his left wrist in the plane of left
wrist extension => left wrist flexion in that video demonstration. What he is
actually doing is moving his left wrist from being radially deviated in image 1
to being ulnarly deviated in image 2, which means that the club is primarily moving in the
LFFW plane of left wrist radial => ulnar deviation. That allows him to move the
club more-or-less in the plane of his left lower forearm, which he is holding roughly parallel
to the plane of these 2-D images. In other words, his club is moving up-and-down
in a plane that is roughly parallel to the plane of these 2-D images. If Joe was
really moving the club in the plane of left wrist extension => flexion, then the
club would move across the plane of these 2-D images and the
clubhead would move much closer towards that far wall behind Michael Finney's
chair if Joe's left wrist was becoming significantly more extended (bent) - because the
watchface area on the back of Joe's left lower forearm is being held continuously parallel to
the plane of these 2-D images during his entire demonstration!
A pertinent question arises - if Joe Mayo is only moving his left wrist in the plane of left wrist radial-ulnar deviation, then why does the back of his left wrist look to be very cupped (dorsiflexed) in image 1 when his left wrist is radially deviated. and look to be borderline palmar flexed in image 2 when his left wrist is ulnar deviated? The answer relates to a natural biomechanical phenomenon, which can be discerned by studying the following capture images from my review paper on the effect of lead wrist bowing on the clubface and clubshaft.
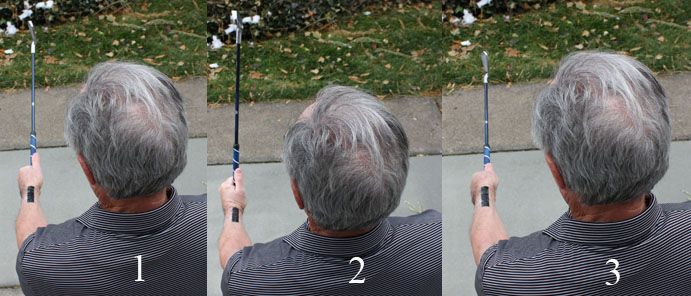
Image 1 shows a neutral position where I am holding my left wrist in a neutral cocked position approximately half-way between being fully upcocked (fully radially deviated) and fully uncocked (fully ulnar deviated). Note that the back of my left wrist looks to be slightly cupped (scooped) because I have adopted a weak left hand grip. Note that the clubshaft is straight-line-aligned with the black-taped area of my lower left forearm and that they are both in the same plane, and that presents an intact LFFW/GFLW alignment.
Image 2 shows my left wrist in an upcocked position (position of radial deviation where the clubshaft is roughly at a 90 degree angle relative to my lower left forearm) and one can see that the back of my left wrist looks to be more cupped. However, the increased degree of cupping appearance (scooped appearance) of my left wrist does not mean that my lead wrist is extending (bending) because that would cause the clubshaft to angulate to the left - note that my clubshaft is still straight-in-line with the black-taped area of my left lower forearm, which means that I still have an intact LFFW/GFLW alignment.
Image 3 shows my left wrist in an uncocked position (position of ulnar deviation that simulates the degree of ulnar deviation present at impact) and one can see that the back of my left wrist looks far less cupped and borderline anatomically flat or slightly bowed in appearance (minimally palmar flexed in appearance). However, the fact that the back of my left wrist looks less cupped (less scooped) does not mean that I am palmar flexing (bowing) my lead wrist because that would cause the clubshaft to angulate to the right - note that my clubshaft is still straight-in-line with the black-taped area of my left lower forearm, which means that I still have an intact LFFW/GFLW alignment.
If you, as a reader of this review paper, want to successfully learn how to perform the intact LAFW/GFLW swing technique, then you must definitely avoid Joe Mayo's significant error of mixing-up the two planes of left wrist motion, and you must fully understand that varying degrees of cupping appearance (dorsiflexion appearance) of the lead wrist is not equivalent to varying degrees of lead wrist bending/bowing, and that if the clubshaft remains straight-line-aligned with the lower lead forearm then the *varying degree of cupping appearance of the lead wrist is most likely due to varying degrees of radial-or-ulnar deviation of the lead wrist.
(* If you cannot fully understand this point, then I would highly recommend that you study the following review paper where I demonstrate the intact LFFW/GFLW concept using a different explanatory approach)
Now, let's consider the downswing and early followthrough of Henrik Stenson's driver golf swing action.
Here are capture images of Henrik Stenson's downswing and early followthrough.
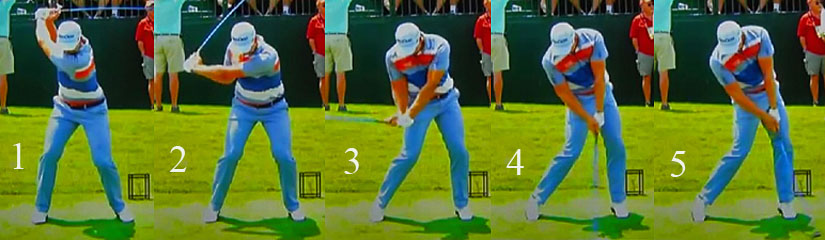
Image 1 is the P4 position, image 2 is at the P5 position, image 3 is at the P6
position, image 4 is at the P7 position, and image 5 is at the P7.2 position.
Note that Henrik Stenson continuously maintains a GFLW throughout his entire P4 => P7.2 time period, and that his clubshaft is continuously straight-line-aligned with his left lower forearm (watchface area) from an angular rotational perspective, which means that he continuously has an intact LFFW throughout his entire downswing and early followthrough. Note that Henrik Stenson's left wrist never becomes overtly palmar flexed at any time point during his downswing.
Now, consider Adam Scott's late downswing and early followthrough swing action.
Adam Scott driver swing video (showing close-up views of his hands) - https://www.youtube.com/watch?v=jbB8LaUIq1c
Here are a series of capture images from the video.
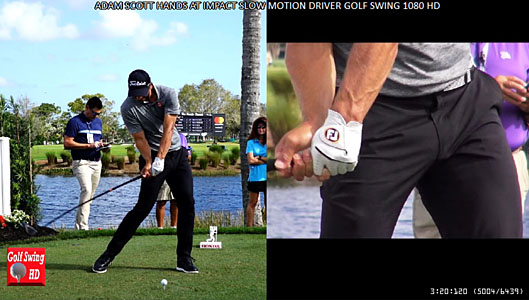
This capture image shows Adam Scott at the P6.2 position.
Note that his clubshaft is straight-line-aligned with his left lower radial bone at the level of his left lower forearm (from an angular rotational perspective), which means that he has an intact LFFW. Note that the back of his GFLW is slightly cupped and that he does not have an overtly palmar flexed left wrist.

This capture image shows Adam Scott at the P6.8 position.
Note that his clubshaft is straight-line-aligned with his left lower radial bone at the level of his left lower forearm (from an angular rotational perspective), which means that he has an intact LFFW. Note that the back of his GFLW is slightly cupped and that he does not have an overtly palmar flexed left wrist.

This capture image shows Adam Scott at the P7.2 position.
Note that his clubshaft is straight-line-aligned with his left lower radial bone at the level of his left lower forearm (from an angular rotational perspective), which means that he has an intact LFFW. Note that the back of his GFLW is slightly cupped and that he does not have an overtly palmar flexed left wrist.
Most importantly, these series of capture images demonstrate that Adam Scott never has an overtly palmar flexed left wrist during his later downswing or early followthrough time period - because he is using the intact LFFW/GFLW swing technique.
At the 2 hour 38 minute time point of Michael Finney's Seminar video, Sasho MacKenzie emphatically states that the lead wrist of all professional tour golfers gets into a condition of lead wrist palmar flexion (lead wrist bowing) at some time point in the downswing, and he therefore recommends that a golfer may as well get his lead wrist to become palmar flexed earlier in the downswing. Sasho appears to be TGM-illiterate and he is therefore seemingly unaware that many professional PGA tour golfers, who use the intact LFFW/GFLW swing technique, do not significantly palmar flex (bow) their lead wrist during their downswing action.
Here is a HackMotion graph of Henrik Stenson's downswing.
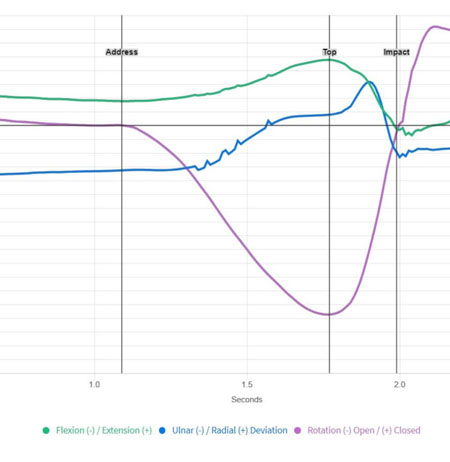
The black vertical line labelled "top" represents his end-backswing position while the black vertical line labelled "impact" represents his impact position and all downswing events involving the left wrist/hand occur between those two black vertical lines.
The green graph represents his lead wrist extension-flexion graph. Note that his lead wrist is maximally extended at his end-backswing position and that it remains relatively extended in the early downswing before it eventually becomes non-extended (neutral) by impact. At no time point during his downswing action between P4 and impact, does Henrik Stenson has an overtly palmar flexed (bowed) lead wrist.
Going back to the capture images of Adam Scott - if you look at this last capture image of Adam Scott at the P7.2 position, you will note that I have drawn a red line down the middle of his left antecubital fossa (elbow pit) and a blue line along the lower 3" of his left forearm's distal radial bone. Note that the two lines are closely approximated relative to each other from a rotational perspective, which means that the left forearm is reasonably neutral relative to the left humerus from an anatomical perspective. Then, if the golfer (who adopts a neutral left hand grip like Adam Scott) has a GFLW and intact LFFW alignment + a neutral left forearm alignment at P7.2, then he must also automatically/naturally have an intact LAFW alignment. However, at P5.5 it is easily possible to have an intact LFFW/GFLW alignment, but not have an intact LAFW alignment because the left forearm may be so pronated at the P5.5 position that the clubshaft will not be straight-line-aligned with the left humerus even if it is straight-line-aligned with the left lower forearm's lower radial bone (or the watchface area of the left lower forearm) due to the presence of a GFLW alignment. Even if you (as a reader) do not clearly understand this point, it is important to realise that during the late downswing between P5.5 and impact, that the left forearm supinatory phenomenon (that is responsible for a PA#3 release action) will get the left forearm to become increasingly more anatomically neutral relative to the left humerus and eventually close to being anatomically neutral by impact (presuming that one has adopted a weak-or-neutral left hand grip and presuming that the lead humerus is also relatively neutral at address/impact). That means that if a golfer continuously maintained an intact LFFW/GFLW throughout his entire downswing from P4 to P7, then he will automatically have an intact LAFW alignment at impact if his left forearm is reasonably neutral (relative to his left humerus) at impact. Why is this point so important?
It is very important to realise that the rapid left forearm supinatory motion needed to square the clubface in the late downswing between P6.5 and impact must stop at impact if you want to become an efficient DHer, who keeps the clubface square to the clubhead arc between impact and P7.2 (or even further to P7.4 and beyond). In other words, if one has successfully converted from having an intact LFFW/GFLW alignment at P6.5 to having an intact LAFW/GFLW alignment at impact (actually at low point which is closer to the P7.1 position) - secondary to the left forearm supination phenomenon that gets the left forearm to become increasingly more anatomically neutral relative to the left humerus by impact - then one simply needs to maintain the intact LAFW alignment unchanged during the early followthrough time period and one must avoid continuing to rapidly supinate the left forearm during the early followthrough time period. If one continues to significantly supinate the left forearm in an uninterrupted manner between impact and P7.4, then it will produce a non-DH hand release action where the clubshaft bypasses the left arm and where the clubface has a higher ROC during the P7 => P7.4 time period - as seen in Luke Donald's early followthrough action.
To make this point much clearer, let's consider Tommy Fleetwood's superb DH-hand release action.
Capture images of Tommy Fleetwood's followthrough action.
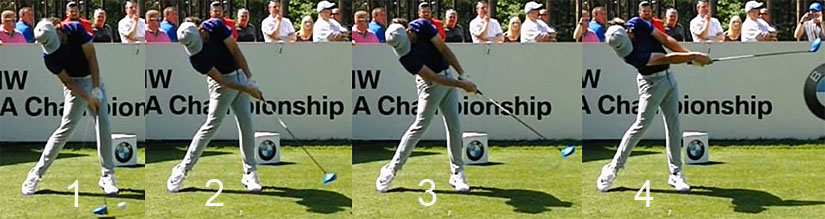
Image 1 is at impact, image 2 is P7.4, image 3 is at P7.6, and image 4 is at P8.
Note that Tommy Fleetwood is such an efficient DHer that he can keep his clubface square to his clubhead arc all the way to P7.4 (image 2), and that he does not allow his clubshaft to bypass his left arm (from an angular rotational perspective) during that P7 => P7.4 time period.
Note that Tommy Fleetwood transitions to a finish swivel action between P7.6 and P8, but he does not perform a finish swivel action earlier in his P7 => P7.4 time period (like Luke Donald).
How does Tommy Fleetwood keep his clubface square to his clubhead arc between P7 and P7.4 from a biomechanical perspective?
Consider these close-up views of Tommy Fleetwood's early followthrough action.
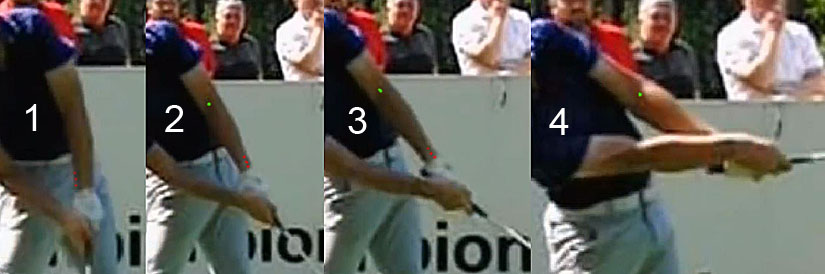
Image 1 is at impact, image 2 is at P7.4, image 3 is at P7.6, and image 4 is at P8.
Note that I have placed a green dot in the center of his left antecubital fossa and three red dots in a straight line over the most peripheral 3" of his left lower radial bone. That allows one to see if his left forearm is relatively neutral with respect to his left humerus. Also, if the red dots move significantly more counterclockwise than the green dot during his followthrough time period, that would indicate the presence of a significant amount of left forearm supination.
At impact (image 1) one cannot see Tommy Fleetwood's left antecubital fossa because his left humerus is internally rotated at impact. Note that he has a strong left hand grip, which explains why the red dots are aligned more clockwise relative to the ball-target line and why the back of his left hand faces the ball-target line at impact.
Note how much the back of his left hand rotates counterclockwise between impact (image 1) and P7.4 (image 2). What is causing that counterclockwise rotation of his left hand from a biomechanical perspective? The correct answer is that it is mainly due to external rotation of the left humerus, which causes the left antecubital fossa to rotate counterclockwise (as clearly seen in those capture images) - while there is very little left forearm supination happening during that P7 => P7.4 time period (as evidenced by the fact that the red dots are not rotating more counterclockwise than the green dot during that same time period).
So, to become a superb DHer, who maintains an intact LAFW/GFLW alignment between P7 and P7.4, Tommy Fleetwood needs to controllably rotate his entire LAFW (left arm + clubshaft) as a single unitary structure at a particular rate of counterclockwise rotation that will keep his clubface continuously square to the clubhead arc between P7 and P7.4 - while simultaneously avoiding any left wrist extension (which will disrupt his intact LAFW alignment) or any excessive left forearm supination.
To keep his clubshaft from bypassing his left arm between P7 and P7.4, Tommy Fleetwood has to carefully match the targetward angular velocity of his left arm so that it matches the targetward angular velocity of his clubshaft (which has acquired a tremendous amount of foward momentum in a targetwards direction by impact secondary to the sequential release of PA#4 => PA#2). Note how Tommy Fleetwood's left hand continuously moves targetwards between image 1 and image 3 and there is no stalling of the forward momentum of his left arm. If his left arm slowed down too much during that P7 => P7.4 time period, then his left wrist could breakdown (extend) and the clubshaft would bypass his left arm. So, the first biomechanical requirement for a DHer through impact is to maintain the forward (targetwards) momentum of the left arm, and avoid any stalling of the forward momentum of the left arm, during the early followthrough time period. The second biomechanical requirement is that a DHer needs to controllably rotate the left humerus (and therefore the entire LAFW) at a particular counterclockwise rotational speed that will allow him to keep his clubface continuously square to his clubhead path during that early followthrough time period. How is this biomechanical skill acquired? I believe that it is mainly based on an "acquired feel" that is rhythm-dependent. In other words, a golfer, who wants to become a superb DHer like Tommy Fleetwood, needs to practice this rhythm-based biomechanical motion so that he can ingrain it into his golf swing DNA!
An important secondary question then becomes - how can using the right arm (trailing arm) potentially assist a DHer in perfecting the execution of his DH-hand release action?
If you look at Tommy Fleetwood's right arm biomechanics between P7 and P7.4, you will note that he maintains a slightly bent right arm and significantly bent right wrist all the way between impact and P7.4 and he does not "run-out-of-right arm" (where the right elbow and right wrist fully straighten between impact and P7.4 - as seen in Luke Donald's followthrough action). To achieve that very desirable goal, a golfer needs to open up his body and drive his right shoulder under his chin in a targetwards direction between P7 and P7.4 - just look at how much Tommy Fleetwood's right shoulder is moving downplane in a targetwards direction during his entire followthrough time period. That "fact" allows the right hand to more easily keep up with the left hand during the entire P7 => P7.4 time period, and it allows the base of the right palm to potentially be applying a finite amount of push-pressure against PP#1 (which is located over the base of the left thumb) in a continuous manner throughout Tommy Fleetwood's entire P7 => P7.4 time period. If Tommy Fleetwood's right palm is actually applying a finite amount of push-pressure against PP#1 in a continuous manner between P7 and P7.4, then one can easily imagine that it can potentially help him to "stabilise" his left wrist (from a mechanical perspective) while synergistically helping the left arm/hand to more exactingly control its rate of counterclockwise rotation between P7 and P7.4.
If an individual golfer is very flexible and very athletic, then it is even possible for him to perform a DH-hand release action that goes well beyond P7.4.
Consider Charley Hoffmann's followthrough action.
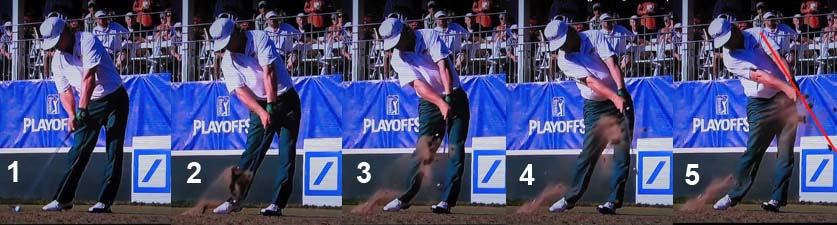
Image 1 is at P7, image 2 is at P7.1, image 2 is at P7.3, image 4 is at P7.5 and
image 5 is at P7.7.
Note that Charley Hoffmann is keeping his clubface square to his clubhead arc all the way between impact and P7.7 and he is not allowing the clubshaft to bypass his left arm (from an angular rotational perspective) during that time period.
Note how efficiently Charley Hoffmann is rotating his upper torso counterclockwise during his followthrough action and that allows him to keep his two arms in front of his rotating upper torso. The more a DHer rotates the upper torso, and therefore the two shoulder sockets, counterclockwise during the early followthrough, the easier it becomes to keep the butt end of the club handle pointing at the central torso during the followthrough action. Under those conditions, note that Charley Hoffmann can keep his clubface square to his clubhead arc without having to use any external rotation of his left humerus. Instead, he uses the continuous rotation of his upper torso, and therefore his two shoulder sockets, to rotate the entire LAFW as an unitary structure in an arc around his rotating upper body. It requires a very high level of torso flexibility to use this type of DH-hand release technique, which explains why most professional PGA tour golfers only use this type of DH-hand release technique for their short iron swings and not for their driver swings. Note that Charley Hoffmann is not "running-out-of-right arm" during his followthrough action and he maintains a slightly bent right arm and a significantly bent right wrist all the way to P7.7, which potentially enables him to use any push-pressure being exerted by the base of his right palm against PP#1 (which is located over the base of his left thumb) to better "stabilise" his left wrist joint during his followthrough action, and thereby prevent any left wrist breakdown (left wrist flipping).
I previously mentioned that a DHer could also use a bowed left wrist technique, and not a GFLW technique, to perform a DH-hand release action. I will now explain how it works.
Many professional golfers reach impact with a bowed left wrist alignment, rather than a GFLW alignment. There are basically two biomechanical patterns of acquiring a bowed left wrist by impact. The first biomechanical pattern is to bow the left wrist during the backswing action so that it is already bowed by the end-backswing position. Dustin Johnson, Jordan Spieth and Jon Rahm use this type of bowed left wrist technique. The second biomechanical pattern is to only start bowing the left wrist during the mid-downswing by using the combined technique of "early left forearm supination + left wrist palmar flexion". David Toms and Gary Woodland are two examples of professional golfers who use this type of bowed left wrist technique.
As a general observation, I have noted that most professional golfers, who use the bowed left wrist technique, seem to achieve their maximum degree of left wrist bowing at the end of their mid-downswing, which means that their left wrist may actually be extending slightly between P6 and impact. So, for example, a golf forum member, who claimed that he had access to Jordan Spieth's 3-D data, stated that Jordan Spieth has 23 degrees of left wrist palmar flexion present at P6 and only 9 degrees of left wrist palmar flexion present at impact. I cannot personally confirm that claim, but I would not dispute the general notion that many professional golfers, who use the left wrist bowing technique, have less left wrist palmar flexion present at impact (compared to the P6 time point of their downswing). What is much more important to discover is what happens to their left wrist during their early followthrough! Do they avoid left wrist breakdown (left wrist extension) and do they use a DH-hand release action where they keep the clubface square to the clubhead arc during their early followthrough, and where they also prevent the clubshaft from bypassing their left arm (from an angular rotational perspective)?
Let's re-examine Jordan Spieth's followthrough action.
Image 1 is at impact, image 2 is at P7.2 and image 3 is at P7.5.
Note that Jordan Spieth is a superb DHer who keeps his clubface continuously square to his clubhead arc all the way between impact and P7.5.
According to that online golf forum member, who claims that he had access to Jordan Spieth's 3-D data, Jordan Spieth only has 4 degrees of left wrist palmar flexion present at P7.5, which means that his left wrist is extending by ~5 degrees between P7 and P7.5. That's a very small amount of "left wrist extending" that is spread over a clubhead travel distance of about 3 - 4 feet along its followthrough clubhead arc, and it will therefore have no significant effect on a golfer's ability to execute a DH-hand release action during the early followthrough.
Let's look at another professional PGA tour golfer who uses the bowed left wrist technique.
Capture images of Jon Rahm's early followthrough action.
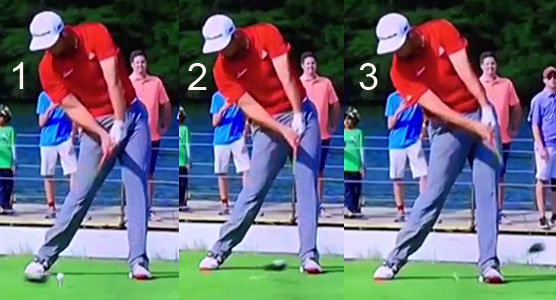
Image 1 is at impact, image 2 is at P7.2 and image 3 is at P7.4.
Note that Jon Rahm is a superb DHer who keeps his clubface continuously square to his clubhead arc between impact and P7.4, and he does not allow the clubshaft to bypass his left arm (from an angular rotational perspective) during that time period.
In contrast to Jordan Spieth, Jon Rahm maintains a much more significant degree of left wrist palmar flexion during his early followthrough.
Consider, yet again, this 3-D graph of Jon Rahm's golf swing action.
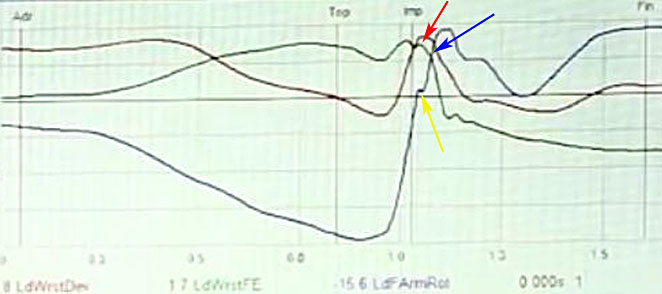
The green graph represents his left wrist flexion-extension graph.
Note that Jon Rahm's degree of left wrist palmar flexion reaches its maximum value in his later downswing, before decreasing by a few degrees just before impact. However, note that Jon Rahm maintains the same degree of left wrist palmar flexion through impact (see red arrow) and his left wrist is not moving rapidly towards left wrist extension in his early followthrough between P7 and P7.4.
It is important to appreciate the fact that professional golfers, who use the bowed left wrist technique, have to use the same drive-hold hand release principles between impact and P7.4 if they want to keep their clubface continuously square to their clubhead arc - i) they must ensure that they maintain the forward momentum of their left arm in a left arm abductory direction so that it matches the forward momentum of their clubshaft and they must avoid any left arm stalling action that will allow the clubshaft to bypass their left arm and ii) they must control their rate of external rotation of their left upper arm in their left shoulder socket so that they can keep their clubface continuously square to the clubhead arc during that P7 => P7.4 time period. In other words, they also have to acquire a "feel" of rhythm during their early followthrough where they conceptually rotate their left arm and clubshaft as a single unitary structure where the clubshaft remains reasonably straight-in-line with the left arm and where both the left arm and clubshaft rotate counterclockwise at the same rotational speed during their DH-hand release action. They also have to avoid any left wrist bending (extension), or any excessive amount of left forearm supination, from happening during their early followthrough if they want to execute an efficient DH-hand release action.
From a comparison perspective, I think that DHers who use the bowed left wrist technique, rather than the LAFW/GFLW technique, have one mechanical advantage that is useful from a DH-hand release action perspective - I think that a bowed left wrist alignment is probably more mechanically stable than a GFLW alignment and I suspect that the left wrist is less likely to breakdown (and significantly extend) if the clubshaft is traveling slightly faster than the abducting left arm during the P7 => P7.2 time period. Also, it is important to remember that both types of DHers can potentially use push-pressure exerted by their right palm against PP#1 to help them "stabilise" their left wrist during their DH-hand release action - as an additional left wrist stabilising factor.
I have previously stated that if a golfer wants to be a DHer between impact and P7.2 then he needs to avoid excessive left wrist extension, or an excessive amount of left forearm supination, from happening during that immediate impact zone time period. I will now discuss these two problematic issues, which can result in a non-DH hand release action, in greater detail starting with the problematic issue of excessive left wrist extension through impact.
Consider, yet again, this capture image of an amateur golfer flipping his left wrist immediately post-impact.
Note how his left wrist is bending (extending) by a large amount immediately
after impact.
Note how the clubface is far more closed relative to the clubhead arc (than would be seen in a DHer who keeps the clubface square to his clubhead arc) and that the clubshaft has bypassed the left arm (from an angular rotational perspective). I refer to this type of non-DH hand release action as a flipping subtype of non-DH hand release action. Why does the clubface often roll closed during a left wrist flipping action? It is theoretically possible to keep the clubface square to the clubhead arc when flipping the left wrist post-impact if the left wrist extends without simultaneously moving towards radial deviation during its flipping motion. However, it is very common to note that the left wrist moves in a radial direction while it extends thereby producing the left wrist roll motion called left wrist circumduction. That left wrist circumductory roll motion will increase the clubface's ROC during the immediate impact zone between P7 and P7.2 (as seen in the above image). When there is a large amount of left wrist circumductory roll motion happening during a left wrist flipping action, I refer to that subtype of non-DH hand release action as a flip-roll subtype of non-DH hand release action.
Another cause of an increased degree of clubface closure (relative to the ball-target line) that is automatically happening during a flipping subtype of non-DH hand release action is the fact that the shape of the clubhead arc is radically changed due to the fulcrum point of the clubhead's circular motion being located at the left wrist joint, and not at the left shoulder socket (as seen in a DHer). That means that the radius of the clubhead arc is radically shortened during the left wrist flipping motion, producing more clubface roll (relative to the ball-target line) even if the clubface remains square to the clubhead arc (which has become more tightly circular).
I personally think that left wrist flipping through impact, or immediately post-impact, is a major swing fault that should be avoided if a golfer wants to consistently have a reliably low clubface ROC during the clubhead 's travel time between P7 and P7.2.
Unfortunately, a surprisingly large number of golf instructors teach a deliberate left wrist flipping motion through impact.
Robert Baker recommends an active left wrist flipping action in the following video - https://www.youtube.com/watch?v=CDVu0M-8ipo
Here is a capture image from the video.

Robert Baker uses a specially designed club that has a flat disc attached to the
clubshaft at mid-shaft level, and that flat disc is colored in blue on the one
side and colored in white on the other side.
Image 1 shows Robert Baker coming into impact with the blue-colored side of the disc facing the camera. Note that he has a flat left wrist and slightly bent right wrist.
Image 2 is soon after impact - after he deliberately flipped his left wrist (which he calls "breaking" the left wrist) and after he simultaneously straightened his right wrist, so that the white-colored side of the flat disc faces the camera. Note how his hands have hardly moved forward in a targetwards direction during that post-impact time period, and note how his clubshaft has bypassed his stalled left arm by a huge amount.
Robert Baker is demonstrating how to deliberately (intentionally) perform a flipping sub-type of non-DH hand release action. In his video, Robert Baker states that he intentionally tries to minimise the targetwards motion of his hands through impact so that he can get the clubhead to whip through impact at a faster speed, and he wrongheadedly claims that this type of active flicking (whipping) motion of the clubshaft through impact can increase "speed and power". I believe that swing power (maximum clubhead speed) through impact is generated by the sequential release of PA#4 => PA#2 in a PGA tour golfer (who uses a standard TGM swinging action) and I think that it is irrational to believe that he can increase clubhead speed through impact by adding an active flicking motion of the left wrist through impact. What will more likely happen as a result of that superadded active left wrist flicking action is a non-stable clubface that has a large ROC through impact (between P7 and P7.2).
Here is Laird Small demonstrating an active slap hinge hand release action through impact - Laird Small's power release suggestion was published in the 2008 edition of Golf Magazine's soft-cover publication "The Best Golf Instruction Guide Ever", which includes golf tips from the 100 top golf instructional teachers.
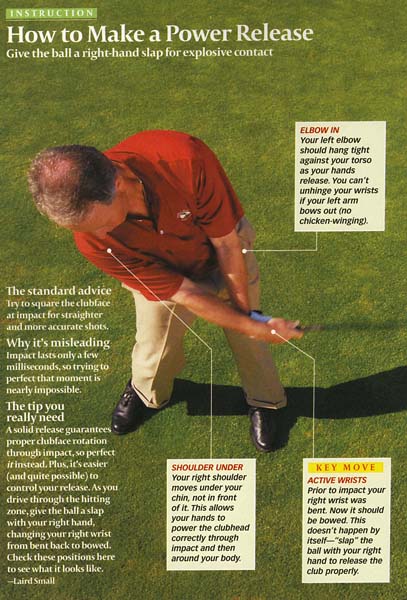
Note that Laird Small states that the key move is "active
wrists" and he obviously recommends an active wrist flipping motion
through impact where the right wrist actively straightens (in a slap hinge
manner) and where the left wrist bends. Any active flipping motion of the left
wrist through impact means that a golfer cannot hope to maintain a stable
clubface that has a low clubface ROC throughout the
immediate impact zone (between P7 and P7.2). If a golfer follows Laird Small's
"active wrists" recommendation, then the chance of having a square clubface at
impact depends on perfect timing and even professional golfers cannot hope to
perfectly time an active wrist flipping action consistently from
swing-to-swing, and that's why many professional golfers deliberately avoid
having any left wrist flipping motion through impact by maintaining an intact
LAFW/FLW throughout the late downswing and immediate impact zone.
Other golf instructors (like Brian Manzella, Richard Franklin and Michael Jacobs) also teach a deliberate left wrist flipping action through impact, when they use Brian Manzella's recommended hand release action called a rotation-about-the-coupling point hand release action.
Here is a video where Richard Franklin describes how to perform the rotation-about-the-coupling point hand release action.
Richard Franklin video - https://youtu.be/k0r3l0QdAqg
Here is a capture image from the video.
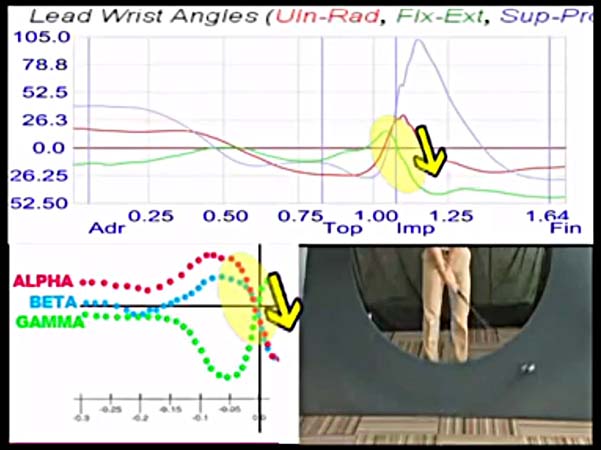
In this illustration, Richard Franklin is demonstrating a
rotation-about-the coupling point hand release action. The green graph
in the top "lead wrist angles" graph represents the left wrist flexion =>
extension graph and one can see how the left wrist extends rapidly through
impact (as also seen in the small photo image in the lower right hand corner).
In that flipping subtype type of non-DH hand release action a golfer is
encouraged to i) actively push against the aft side of the club handle with the right hand throughout the mid-downswing
and most of the late downswing (see alpha torque graph) and then ii) stall the forward
motion of the left hand through impact while the golfer simultaneously iii)
pulls the top of the club handle back (away from the target) with the left hand
so that the dual hand motions can induce a rotation of the club handle
around the coupling point (which is a point midway between the hands on
the club handle) through impact.
Note how a rotation-about-the-coupling point hand release action causes the clubshaft to bypass the left arm/hand (which is stalling its forward motion through impact) and it will invariably produce a flipping subtype of non-DH hand release action, which is frequently associated with a high clubface ROC through the immediate impact zone.
If you, as a reader of this review paper, want to learn how to perform a DH-hand release action, then you need to rigidly avoid using any deliberate left wrist flipping motion through impact between P7 and P7.2 - as recommended by Robert Baker, Laird Small and Richard Franklin.
I suspect that most professional PGA tour golfers do not deliberately try to flip their left wrist through impact, but it can sometimes unintentionally happen even in the best DHers.
Here are capture images from a Jordan Spieth driver swing video.

Image 1 is at impact, image 2 is at P7.2 and image 3 is at P7.5.
Note that his left wrist is bent, and not bowed, in this particular driver swing action. Note how the clubshaft is bypassing his left arm (from an angular rotational perspective) soon after impact and how his clubface has an unusually high ROC in his early followthrough. I strongly suspect that the cause of this flipping subtype of non-DH hand release action (which rarely happens in Jordan Spieth's full golf swing action) could be due an unintentional stalling of the forward motion of his left arm/hand through impact combined with an over-active right arm and right wrist straightening action.
Now, let's discuss how excessive left forearm supination during the clubhead's travel through the immediate impact zone between P7 and P7.2+ can produce a non-DH hand release action.
If the rate of left forearm supination happening in the early followthrough is relatively slow, then it will produce a rolling subtype of non-DH Hand release action (as previously shown in Luke Donald's followthrough action).
If the rate of left forearm supination happening in the early followthrough is much greater, then it will produce an even higher ROC of the clubface between P7 and P7.2+ and I refer to that subtype of a non-DH hand release action as a roller subtype of non-DH-hand release action.
A roller subtype of non-DH-hand release action can be deliberate or unintentional.
The golf instructor, AJ Bonar, teaches a deliberate type of roller hand release action, which he calls a hand-crossover release action.
Here is a capture image from a magazine article showing AJ Bonar performing a hand crossover release action.
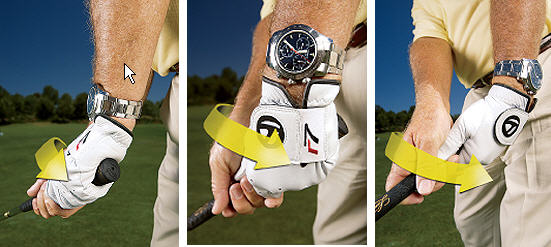
In his article, AJ Bonar stated-: ""Now the fun part! About two or three
feet before your hands reach impact, assertively rotate them toward the target.
Imagine you're gripping a screwdriver and turning it counterclockwise. This
closes the clubface, generating big-time power." His active "screwdriver
hand motion" through impact where the left forearm actively supinates through
impact, while the right forearm simultaneously pronates the right hand actively
over the left hand, producing an active hand-crossover release action
through impact, will definitely produce an undesirable roller sub-type of non-DH
hand release action through impact, which will invariably be associated with a
very high ROC of the clubface through impact.
However, it is important to realise that a roller subtype of non-DH-Hand release action can happen unintentionally, and I suspect that it frequently happens unintentionally in Phil Mickelson's driver swing action.
Here is an animated gif image of Phil Mickelson's driver swing action.
One can clearly see how fast Phil Mickelson's lead forearm is supinating through
impact, and how fast his rear forearm is pronating his straightened rear
wrist/hand so that his rear palm rolls over his lead hand through impact.
Why is Phil Mickelson so prone to often exhibiting an uncontrolled roller hand release action through impact with his driver swing? I personally don't believe that he intentionally wants to have a high clubface ROC through impact, and I believe that it is simply due to his sub-optimum hand release action.
The first factor that predisposes Phil Mickelson to an uncontrolled roller hand release action through impact is the fact that he uses an *active supination of his lead forearm in order to execute his PA#3 release action between P6.7 and impact - due to the fact that he has a small accumulator #3 angle at impact. If a golfer is actively supinating his lead forearm immediately pre-impact, then it is biomechanically very difficult to instantaneously "turn-off" that active lead forearm supinatory action immediately after impact.
(* I discussed this issue in great detail in topic number 3 when I compared Phil Mickelson's PA#3 release action to Sergio Garcia's PA#3 release action)
The second factor that makes it more likely that his lead hand will rotate too fast through impact is related to the fact that he often allows his rear palm to lose contact with PP#1 (which is located over his lead thumb) through impact - as demonstrated in the next capture image.
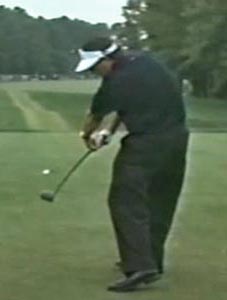
Note how Phil Mickelson's rear palm is no longer in contact with the club handle
or PP#1 (which is located over the base of his lead thumb). Note how much his
clubface has rolled closed (relative to his clubhead arc) by P7.4.
The timing of that "loss of rear palm contact" varies from swing-to-swing and if it happens immediately before impact, or through impact, then he loses the utility of being able to use any push-pressure that is being exerted by the base of his rear palm against PP#1 (which is located over the base of his lead thumb) in order to help him to more controllably limit his rate of lead forearm supination through impact and to also help him to "stabilise" his lead wrist through impact (as seen in a DHer like Tommy Fleetwood). Why does Phil Mickelson's rear palm often lose contact with his lead hand/club handle through impact when he is swinging his driver? I believe that it is due to a severe "running-out-of-right arm" problem. Note that Phil Mickelson's upper torso is relatively square to the ball-target line at impact and he does not open his body much through impact (like Sergio Garcia or Tommy Fleetwood). Note how far back his rear shoulder is located through impact and note that he doesn't drive his rear shoulder actively under his chin so that his rear shoulder can get much farther downplane during his early followthrough action. With his rear shoulder so far back, his rear arm and rear wrist invariably become fully straightened because he has a severe "running-out-of-right arm" problem.
What is especially surprising about Phil Mickelson's uncontrolled non-DH-hand release action that happens very frequently in his driver swing action is the fact that he is capable of being such a superb DHer when hitting a short iron.
Here is a copy of 3 DTL images and 1 face-on image from Phil Mickelson's "short-game" book where he demonstrates how to perform a flop shot.
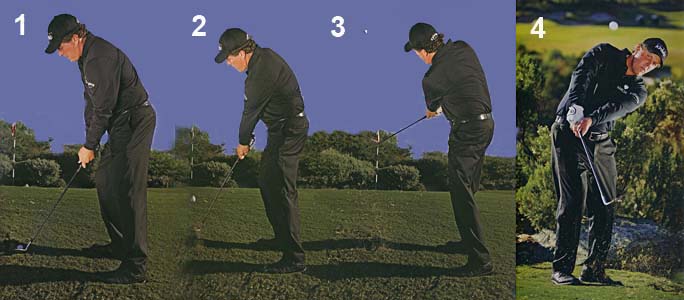
In his "short game" book, Phil Mickelson describes his "hinge and hold" golf swing technique, which is basically a DH-hand release action technique.
Note how he does not allow the clubshaft to bypass his lead arm (from an angular rotational perspective) and note how his superb DH-hand release action allows him to have a very low clubface ROC between impact and P7.4. Note that he still has a significantly bent rear wrist at P7.4, which probably helps him to "stabilise" his lead wrist and club handle through impact.
It is a pity that Phil Mickelson does not routinely use a DH-hand release action for his driver swing action. If he had much better "driving accuracy" stats during the past few decades, then he could have possibly won even more PGA tour competitions during his illustrious career.
Finally, I am going to comment on a wide-spread "belief" held by certain golf instructors, who believe that a DH-hand release action will limit the maximum clubhead speed that can be obtained at impact when swinging a driver.
I believe that their "belief" is unfounded and I suspect that that they are mixing-up a "DH-hand release action" golf swing technique with a "handle-dragging" golf swing technique. I have described the differences between these two very different golf swing techniques in this review paper, and if you understand those differences then you will more easily understand why a DH-hand release action does not limit a golfer's ability to drive the golf ball a very long distance.
Consider the superb DH-hand release action of Cameron Champ, who is presently one of the longest drivers of the golf ball in the PGA tour.
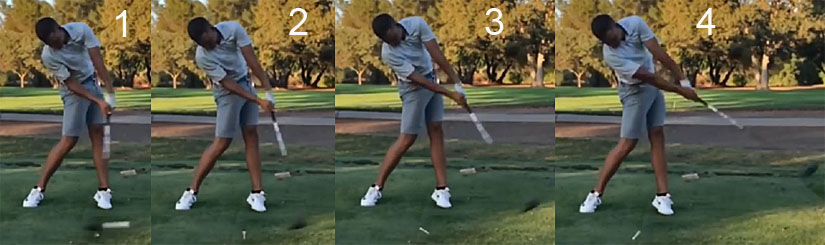
Image 1 is at P7, image is at P7.2, image 3 is at P7.4 and image 4 is at P7.6.
Note how Cameron Champ keeps his clubface square to his clubhead arc all they way between P7 and P7.4 and that he simultaneously prevents the clubshaft from bypassing his left arm (from an angular rotational perspective) during that early followthrough time period.
I know of no logical reason why using a DH-hand release action should limit a golfer's driving distance if he has the requisite athleticism and flexibility and skill needed to flawlessly perform a DH-hand release action (like Cameron Champ).
In conclusion, if any reader of this review paper disagrees with any of my personal opinions expressed in topic number 6 of this review paper, and if he believes that they are wrong-headed, then I would highly encourage him to send me a detailed explanation that explains why he believes that my opinions are wrong-headed. I will gladly post his unedited explanation in the Page of Addendums that accompanies this review paper. If I agree that the detailed explanation demonstrates that my opinions are wrong-headed, then I will effusively thank that person for teaching me "something" new about golf swing biomechanics, mechanics or kinetics.
Jeffrey Mann.
February 2019.
Note that topic number 5 was completely revised in December 2020.