Downswing
Click on any of the hyperlinks to rapidly navigate to another section of the golf swing review: Homepage (index); overview; grip; address setup; backswing; impact
Introduction:
This downswing chapter represents my 4th version of my downswing chapter. The original version of my downswing chapter was written in December 2006; my 1st revision (version 2) was written in 2009 and my 2nd revision (version 3) was written in 2012. This 3rd revision therefore represents my 4th version of my downswing chapter and it was authored in 2021 - which is 9 years after my 3rd version. This 4th version of my downswing chapter not only incorporates much more material due to the large number of insights that I have acquired during the past 9 years, but it also offers a new approach to presenting my informational material on golf swing biomechanics/mechanics. I realize that very few golf instructors and golfers visit my golf website and read my review papers, and one major reason for that fact is that my review papers are too lengthy and too boring to read. However, I am not willing to dilute/shorten the length of my review papers in order to attract a greater number of readers. From my perspective, writing about the golf swing is only a pet hobby interest that started after I retired from practicing medicine, and I do not earn a living by writing about the golf swing. I therefore do not have to produce a simplified version of my review papers in order to attract a larger audience, which many golf instructors are forced to do in order to earn a living income from their golf instructional books or videos. A second major reason why so few golfers are willing to read my review papers is that they are often very detailed and very complex, involving complicated theoretical concepts that require a relatively large amount of background knowledge regarding the fields of human anatomy, human golf biomechanics, golf swing physics and TGM mechanics. Finally, it is important to understand that I am a golf theorist, and not a golf instructor, and my review papers therefore do not contain any golf instructional drills. Many student-golfers are only willing to visit golf instructional websites that offer a large number of golf instructional drills, and they are therefore not likely to be interested in reading this downswing chapter. My true target audience is a very small number of golf instructors and serious golfers who want to better understand golf swing biomechanics/mechanics from an intellectual perspective, and I expect them to individually decide how to use my theoretical material to help them better teach/perform a full golf swing action.
There are many golf swing techniques used to perform a full golf swing action, and there is a plenitude of online golf instructors who often have a golf swing ideology that is very different to that of their fellow online golf instructors. Over the past 10 years, the number of golf instructors who have online golf websites, or online golf instructional video channels, has grown enormously, and it has made it very difficult for a student-golfer to decide which golf instructor's advice they should follow. I cannot offer a student-golfer any advice when it comes to the issue of choosing an online golf instructor because I have not a found an online golf instructor, whose thinking about golf swing biomechanics/mechanics is sufficiently similar to my own thinking. Another additional complicating issue is that different online golf instructors focus on different golf swing techniques - for example, some online golf instructors teach an active pivot-driven golf swing action where the pivot motion is causally responsible for the secondary motion of the arms/hands, while other online golf instructors teach an active arm motion golf swing action where the body's pivoting motion is a secondary reactive response to the biomechanical needs of the active arm/hand motion. To make it even more complex, an active arm motion golf swing action can be primarily driven by the lead arm, which pulls the golf club handle along during the downswing action; or it can be primarily driven by the trailing arm, which pushes/swings the club handle during the downswing action. In this downswing chapter, I am only going to write about the one type of full golf action that I personally believe is used by the majority of pro golfers, and that type of full golf swing action is a complex mixture of an active pivot action combined with an active arm motion, and it is fundamentally based on a TGM swinging action (also called a lead arm swinging action). Unfortunately, in order to perform a professional quality TGM swinging action in an efficient manner, a golfer must have a lot of flexibility and athleticism, and many amateur golfers (especially senior golfers) do not have the flexibility or athleticism required to efficiently perform the full golf swing action as will be subsequently described in this chapter, and they may therefore rationally decide that my described type of full golf swing action is not suitable for them.
Note that I will be frequently referring to P positions (eg. P5.5, P6, P7.4) in this downswing chapter, and if you are not familiar with the P system of classifying a golfer's position, then you can refer to this review paper for further clarification.
Links to previous versions of this downswing chapter
List of topics
Topic number 1: How to create a desirable in-to-square-to-in clubhead path, and avoid an "OTT move".
Topic number 8: Miscellaneous topics.
Topic number 1: How to create a desirable in-to-square-to-in clubhead path, and avoid an "OTT move".
There are two learning requirements that a developing student-golfer must obviously fulfill if he wants to perform a full golf swing action as efficiently as the pro golfers on the PGA tour - he must be able to hit the ball consistently straight towards his intended target and he must be able to generate enough swing power to hit the ball far enough to compete at their level. In this topic of this downswing chapter, I will be focusing my attention on the first requirement - hitting the ball consistently straight towards the intended target. To hit the ball straight at his intended target, a golfer must zero-out the clubhead path at impact so that the clubhead path is momentarily square to the target at impact. Secondly, he must zero-out his clubface angle so that his clubface also faces the target at impact, which means that it must be square to the clubhead path at impact. Thirdly, he must strike the ball on the sweetspot of his clubface and avoid an off-center strike that can produce excessive side-spin. If a golfer can get both the clubhead path and the clubface angle to momentarily face the intended target at impact, then he will far more likely be able to hit the ball straight if he strikes the ball in the center of his clubface. I will spend the remainder of this topic explaining how a golfer must perform the full golf swing action so that he can consistently zero-out the clubhead path at impact (which is the first necessary requirement), and where the clubhead path is momentarily directed straight at the target at impact.
Because the golf swing action is a side-arm sporting activity, where the golfer stands at address with his body aligned roughly parallel to the ball-target line and roughly perpendicular to the target, and where the lead hand (which is swinging the golf club) is moving in an arc around his body, there is only one rational method to ensure that the clubhead path is consistently square at impact, and that method requires that the golfer generate an in-to-square-to-in clubhead path where the clubhead approaches the ball from the inside, becomes momentarily square to the target at impact, and then moves inside again after impact.
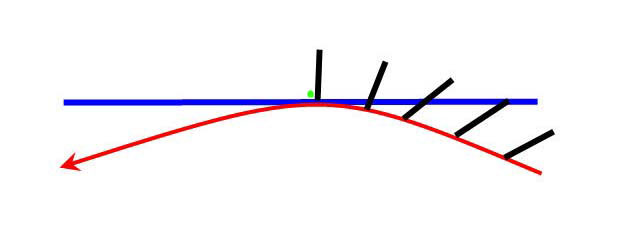
Here is a diagram depicting that required in-to-square-to-in clubhead path methodology.
The blue line represents the ball-target line. The curved red line represents the clubhead path. Note that the clubhead path approaches the ball-target line from the inside, and that the clubhead path is momentarily directed straight towards the target when it reaches the ball-target line, and that it then moves inside again in the followthrough. If the ball (green dot) is placed at the exact point where the clubhead path is momentarily facing the target, then the clubhead path would be zeroed-out at impact (which is the term used to describe a clubhead path that is square to the target at impact). The short black lines represent the clubface, which is continuously changing its angle relative to the clubhead path in the later downswing so that it is increasingly closing in the later downswing. To hit the ball straight, the continuously closing clubface must eventually become square to the clubhead path by impact, and if the clubhead path is square to the target at impact, then both the clubhead path and clubface angle will be square to the target at impact. If the ball is struck by the sweetspot (center) of the clubface, then the *ball flight should be directed straight at the target with no side-spin.
(* It is important to understand that it is possible to get the ball to land at the intended target using a non-straight (curved) ball flight pattern. So, for example, one can use a draw ball flight pattern where the ball flight starts off to the right of the target and then curves back towards the target, or one can use a fade ball flight pattern where the ball starts off to the left of the target and then curves back towards the target. Under those conditions, the clubhead path must be in-to-out at impact for a draw ball flight pattern and out-to-in at impact for a fade ball flight pattern. However, many pro golfers prefer to generate a straight ball flight pattern with minimal curvature, and that requires an in-to-square-to-in clubhead path)
Note that the degree of curvature of the clubhead path (relative to the ball-target line) in that diagram is the same post-impact as it was pre-impact, and that the clubhead path is very symmetrically aligned relative to the ball-target line. That symmetrically aligned clubhead path pattern is not a mandatory clubhead path requirement for a straight ball flight pattern because the only mandatory clubhead path requirement for a straight ball flight pattern is the absolute requirement that the clubhead path be zeroed-out at impact, and it does not necessarily affect the ball-flight if the clubhead path post-impact is directed slightly more inwards, or slightly less inwards, when compared to the pre-impact's clubhead path just before impact. However, many pro golfers learn how to generate a relatively symmetrical in-to-square-to-in clubhead path through impact by practicing how to trace a straight plane line when using a plane board device.
Here are capture images from a you-tube swing video (which is no longer available online) where the golf instructor, Mike Bender, is teaching Zach Johnson how to use a plane board in order to learn how to trace a straight plane line.
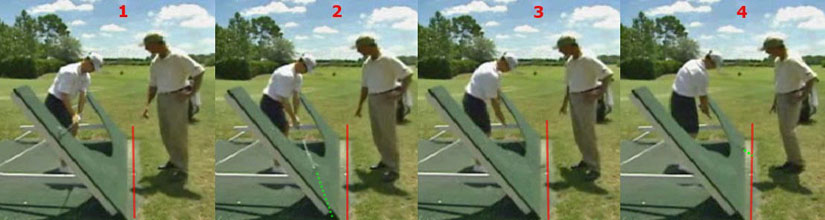
The drawn red line represents the ball-target line. Note that plane board is aligned parallel to the ball-target line. Note that the slope of the plane board is adjustable and that allows a golfer to adjust the slope of the plane board to match his clubshaft angle when his clubshaft is swinging between the P6 position (image 1) and impact (image 3). Note that when Zach Johnson is performing his late downswing action between P6 => impact, that his clubshaft is lying continuously against the surface of the plane board, which means that it is continuously on-plane. Note that if the clubshaft is continuously on-plane, that an imaginary line extended outwards from the clubhead end of the clubshaft (see green dotted line) continuously points at the ball-target line and that conceptual phenomenon is called tracing a straight plane line (where the SPL is the ball-target line).
Image 4 shows that Zach Johnson continues to trace the SPL of the ball-target line post-impact, and many pro golfers continue to trace the SPL (= ball-target line) all the way between P7 (impact) and P8 (when the clubshaft again becomes parallel to the ground and also parallel to the ball-target line). Because Zach Johnson is keeping his clubshaft continuously against the surface of the plane board post-impact (between P7 => P8) his clubhead path will have the same arc-shape post-impact as it had pre-impact (between P6 => P7). However, pro golfers can trace the SPL of the ball-target line between P7 => P8 in different ways because they can angle the clubshaft at a different angle relative to the ground between P7 => P8.
Here is an example of a golfer, John Erickson, who is tracing the SPL of the ball-target line post-impact in two different ways.
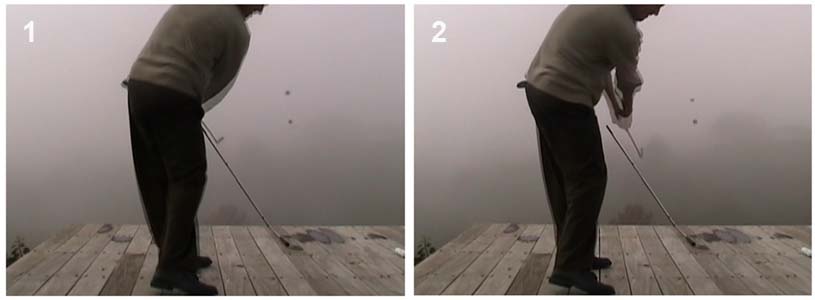
Note that there is an alignment stick embedded in his deck, and that the angle of the alignment stick is adjusted to be equal to the angle of his clubshaft's swingplane during the pre-impact time period between P6 => P7 when his clubshaft is continuously on-plane, and where he is therefore (by definition) tracing the SPL of the ball-target line.
In image 1, note that his clubshaft is moving between P7 => P8 along the same swingplane angle of that alignment stick, which means that the shape of his post-impact clubhead path between P7 => P8 would be identical to the shape of his clubhead path between P6 => P7. To achieve that goal from a biomechanical perspective, note that he is rotating his body more open and that he is moving his hands inside-left more abruptly after impact.
In image 2, note that he is also tracing the SPL of the ball-target line in a biomechanically different manner where he does not rotate his body open as much and where he allows his arms to move outwards away from his torso post-impact. That causes the clubshaft to be angled steeper than the alignment stick's angle as it travels between P7 => P8. That means that the clubhead path's shape between P7 => P8 will be different - even though his clubshaft is still on-plane, and even though he is still tracing the SPL of the ball-target line.
In summary, in order to generate a straight ball flight, a golfer must generate an in-to-square-to-in clubhead path where the clubhead path is zeroed-out at impact - but it is not mandatory for the post-impact's square-to-in clubhead path to be identical in shape to the pre-impact's in-to-square clubhead path.
The only mandatory requirement is that the clubhead path must be in-to-square between P6 => P7 if the golfer hopes to hit the ball straight - and it cannot be in-to-out, or out-to-in, through impact.
One of the most common swing faults in beginner golfers is a propensity to swing over-the-top (which is often called an "OTT move") during the early-mid downswing, which then results in an out-to-in clubhead path in the later downswing and through impact.
Here is a diagrammatic image from the "Swing Like a Pro" book by Ralph Mann and Fred Griffin, which shows the effect of an OTT move.
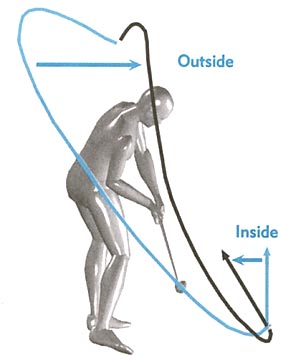
The above image shows the desirable clubhead path in blue. Note that the clubhead path moves back away from the target, and also away from the ball-target line, in the early downswing and it then descends downwards-and-forwards towards the ball along a shallower path where it will approach the ball along an in-to-out clubhead path. The clubhead path will be momentarily squared just before impact and it will then immediately start to move inside again after impact (although in this diagram the authors are not showing the clubhead moving to the inside after impact).
The above image shows the undesirable clubhead path, due to an "OTT move", in black. Note that the clubhead moves away from the target, but immediately outwards towards the ball-target line, at the very start of the downswing and it then subsequently moves downwards-and-forwards along a much steeper path that causes the clubhead to momentarily move outside the ball-target line in the later downswing before it is pulled back towards the body, thereby resulting in an out-to-in clubhead path through impact.
There are a number of biomechanical factors that can produce an OTT-move, and some of those biomechanical factors can be seen in this diagrammatic image from the "Swing Like a Pro" book by Ralph Mann and Fred Griffin.

The undesirable clubhead path is colored blue - note how the clubhead path moves outwards towards the ball-target line at the very start of the downswing, before it then moves steeply downwards to finally approach the ball along an out-to-in clubhead path. One cannot hit the ball straight towards the target using an out-to-in clubhead path. If the clubface is square to the clubhead path at impact, then it will result in a straight pull ball flight; and if the clubface is open to the clubhead path at impact, then it will result in a pull-fade ball flight.
What is causing the "OTT move"? Note that the golfer in that image appears to be rotating his upper torso counterclockwise very fast at the start of his downswing and that causes his trail shoulder to move outwards towards the ball-target line too soon, and too much, during the early-mid downswing, and that causes the hands to also move too much outwards towards the ball-target line. This "OTT move" is called an "upper body dive move" by the SLAP book authors. A key biomechanical feature of an "upper body dive move" golf swing action is the biomechanical feature where the upper torso (shoulders) is more open than the pelvis at the P5.5 position (as seen in that above image). The cause of this characteristic biomechanical feature can be multifactorial - and it can be due to starting the downswing's kinematic sequence with an upper torso rotation rather than a pelvic rotation; or it can be due to an excessive degree of upper torso rotation where the golfer starts the downswing's kinematic sequence correctly with a pelvic rotation, but where the upper torso actively rotates too fast, and too much, in the early-mid downswing causing it to outrace the pelvis (from a rotational perspective) before the golfer gets to the P5.5 position.
I believe that the major factor that causes an "OTT move" is a sub-optimal pivot motion, rather than a sub-optimal arm motion. To gain a good visual impression of how the body moves differently when performing an "OTT move", I am going to use capture images from the following Russell Heritage video on the topic of the right shoulder (which is available at https://youtu.be/zGsizrRQrvU ). I don't agree with Russell Heritage's opinions expressed in that video, but he does perform a very good visual demonstration of how the "OTT move" pivot motion differs from the more optimal pro golfer's pivot motion, which I will analyse in great detail later in this topic's subsection.
Here are face-on capture images of Russell Heritage performing an optimal pivot motion with an optimal kinematic sequence where the pelvis leads the upper torso from a counterclockwise rotational perspective.
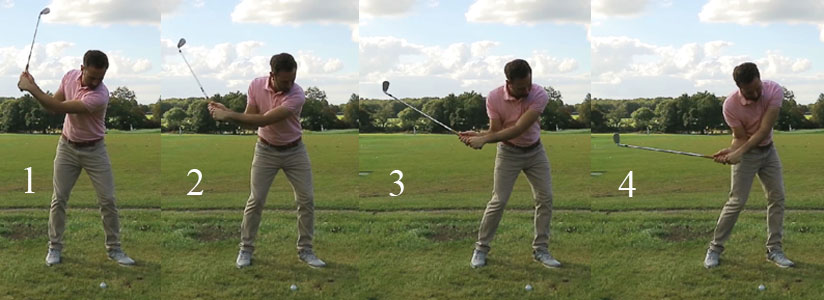
Image 1 shows a simulated "shortened end-backswing position". Unfortunately, he did not rotate his pelvis clockwise very much during his backswing action, so it not quite representative of his full golf swing action. Note that he only has about 30 degrees of clockwise pelvic rotation and about 70 degrees of upper torso rotation, so that he has a static X-factor (static torso-pelvic separation value) of ~ 40 degrees at his end-backswing position. Note that his upper back is facing towards the target.
If you look at his early-mid downswing action between P4 (image 1) => P6 (image 4), note that he is turning his pelvis and lumbar spine counterclockwise far more than his upper torso, so that when he gets to his P6 position (image 4) his pelvis is significantly more open than his upper torso. Note that his belt buckle (and navel area of his mid-abdomen) faces slightly to the right of the ball-target line at his P6 position, while it appears as if he is still keeping his upper back partially facing the target so that his shoulders are still slightly closed at his P6 position. Note how he acquires a finite degree of right lateral bend that shortens the distance between his right shoulder socket and his right hip joint area, and note that his right shoulder socket becomes much lower than his left shoulder socket by the end of his mid-downswing action (image 4). Note that when his pelvis rotates counterclockwise between P4 => P6 that he simultaneously shifts his pelvis left-laterally to a small degree and that allows him to maintain a rightwards-tilted spine where his head remains stationary behind the ball position.
Note how he successfully shallows his clubshaft by using an active right upper arm adduction maneuver that is combined with a pitch elbow motion of his right elbow. Note how he keeps his right palm continuously under the club handle so that his right palm faces the sky at his P6 position (image 4). From that P6 position, he can perform an under-hand motion (stone-skipping motion) with his right upper limb that will allow his clubhead to approach the ball along an "in-to-out" clubhead path when his club completes its release phenomenon between P6 => impact.
Now, consider these face-on capture images of Russell Heritage demonstrating an "OTT move" pivot motion.
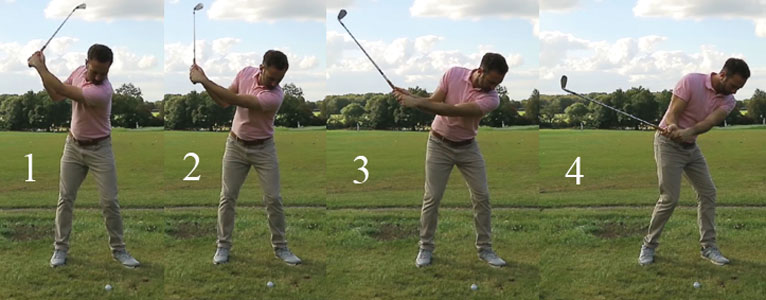
Image 1 shows a simulated "shortened end-backswing position". Unfortunately, he did not rotate his pelvis clockwise very much during his backswing action, so it not quite representative of his full golf swing action. Note that he only has about 30 degrees of clockwise pelvic rotation and about 70 degrees of upper torso rotation, so he has a static X-factor (static torso-pelvic separation value) of ~ 40 degrees at his end-backswing position. Note that his upper back is facing towards the target.
Note how he starts his downswing with a lot of upper torso motion, but with very little pelvic shift-rotary motion. In other words, his kinematic sequence is disordered - with his upper torso rotating before his pelvis. Note that when he moves his upper torso, it is not only causing his upper torso to rotate counterclockwise, but it is also causing his entire spine to angle leftwards in the direction of the target and that causes his head to move well ahead of the ball position. Note how his right shoulder socket remains higher than his left shoulder socket and note how the right side of his mid-upper torso remains extended. Note that his upper torso is more open than his pelvis as he reaches near the end of his mid-downswing action (image 4). Note that the "upper body dive" motion of his upper torso secondarily moves his pelvis back away from the target and it causes the navel area of his mid-abdomen to appear to be "sucked-in" as his entire upper body shift-rotates over his lead leg (which remains bent). Note that his right upper torso's chest area is moving outwards-and-forwards between image 2 => image 4, and that gives an outside observer the impression that he is trying to "cover" the ball with the right side of his upper torso.
Note that his right upper limb cannot perform a desirable combined "right upper arm adduction maneuver + right elbow pitch motion" during his early-mid downswing, and note how his right humerus internally rotates too much while his right forearm does not supinate enough, and that causes his right palm to get more on top of the club handle. Note that the resultant motion of his right arm/forearm/hand causes the clubshaft to move too much outwards in the direction of the ball-target line. Note his right arm/forearm/hand alignment at his P6 position (image 4) - from that aligned position he is invariably going to perform an over-hand motion with his right upper limb that will cause his clubshaft to secondarily "tumble" over-the-plane, which will then cause his clubshaft to come down far too steeply, and it will also cause his clubhead to descend in an "out-to-in" direction towards the ball when the club release phenomenon happens in his later downswing.
There are many factors that a golfer needs to avoid, and there are many factors that a golfer needs to execute, if he wants to not perform an "OTT move" type of golf swing action, and I will describe these factors in great detail using the golf swings of many pro golfers.
I think that the first, and most important, learning point that a student-golfer must understand is that he must think of the golf swing as being a lead arm swinging action (called a TGM swinging action using *TGM terminology), where swing power is generated mainly by the pivot motion.
(The abbreviation "TGM" refers to conceptual golf swing opinions described by Homer Kelley in his book called "The Golfing Machine")
How does the pivot motion produce swing power in a TGM swinging action? The correct answer, according to Homer Kelley, is that the lead arm is connected to the torso via the lead shoulder socket, and that the targetwards motion of the lead shoulder socket will pull the lead humeral head, and therefore the lead arm, along during the early-mid downswing. In the later downswing, the lead arm will end up traveling faster than the pivoting torso as a result of the swing power that was generated by the pivot motion between P4 => P6. To produce an in-to-square clubhead path between P4 => P7, the left arm must obviously move downwards-and-forwards and slightly outwards during the early-mid downswing, but it must not move too much outwards (in the direction of the ball-target line) because that will result in an "OTT move" type of golf swing action. To ensure that the left arm's motion is not directed too much outwards during the early-mid downswing action, a golfer needs to get a number of golf swing biomechanical factors correct. First of all, he must resist any tendency to start the downswing action with either i) an upper torso counterclockwise rotation or ii) any independent lead arm pulling action. If a golfer thinks of starting the downswing by pulling on the club handle with the lead hand in a targetwards direction, it can induce an "OTT move" for two reasons. One reason is that he may pull his lead arm/hand too much outwards (in the direction of the ball-target line) and away from its adducted position across the front of the chest, and that independent arm motion can produce an "OTT move" even if the upper torso does not start to rotate counterclockwise. If the golfer avoids that independent arm motion (which is independent of any pivot motion), he can still produce an "OTT move" if the "swing thought" of starting the downswing by pulling the club handle with the lead hand causes him to start his pivot motion by mainly rotating his upper torso around his mid-upper thoracic spine. If the upper torso starts to actively rotate first, and if most of the counterclockwise rotation of the upper torso happens due to a counterclockwise rotation of the mid-upper thoracic spine, it will cause the shoulder sockets to rotate too horizontally (too much in a "merry-go-round" manner) and that will cause the lead humerus to move too much outwards (in the direction of the ball-target line), and not enough downwards-and-forwards, and that undesirable upper torso motion can also result in an "OTT move" type of golf swing action.
To avoid an "OTT move", a golfer should optimally start the kinematic sequence with an active pelvic rotation while keeping the upper torso momentarily passive (quiescent). How does an active rotary pelvic motion produce a desirable in-to-out clubhead path during the early-mid downswing and avoid an "OTT move" type of swing action?
Ben Hogan, who is often considered to be the greatest golfer in the history of professional golf, only produced one major film-based lesson on the golf swing, and it is available as a short you-tube video at https://www.youtube.com/watch?v=QL_6M_xZvq0 . I would highly recommend that you view this video a few times because it contains one of most important golf instructional lessons that an aspiring pro golfer must learn.
Ben Hogan also wrote the most influential golf instructional book in the history of golf instructional books and it is called" Five Lessons: The Modern Fundamentals of Golf", and it was first published in 1957.
Here are still photographic images that were captured in preparation for his book.

The left-sided image shows Ben Hogan at a simulated end-backswing position and the right-sided image shows him at a simulated P5.5 position.
Note how much he has rotated his pelvis counterclockwise between P4 => P5.5 and note that his pelvis is leading his upper torso (which is also rotating counterclockwise) so that his pelvis is more open than his shoulders at the P5.5 position. Most importantly, note that his lumbar spine, and therefore his mid-torso (navel) area is rotating as much counterclockwise as his pelvis. However, his upper torso area (above the nipple zone area) is being held back so that it is less rotated open at the P5.5 position. Also, note that his pelvis is moving left-laterally while it is rotating counterclockwise and that causes his lumbar spine to move closer to the target between P4 => P5.5. If the lower lumbar spine moves towards the target while the head and upper thoracic spine remain stationary at their P4 position, it will automatically/naturally produce an increased degree of secondary axis tilt (increased rightwards tilt of the lumbar spine). Secondary axis tilt helps a golfer to lower the right shoulder between P4 => P5.5 - note that Ben Hogan's right shoulder, which was higher than the left shoulder at the P4 position, gets to become lower than the left shoulder at the P5.5 position. Another biomechanical factor that allows the right shoulder to get lower, and therefore more downplane (while the upper torso is rotating counterclockwise), is the biomechanical phenomenon of right lateral bend of the upper torso, which is biomechanically due to a lateral arch-bending motion of the thoracic spine to the right. The phenomenon of right lateral bend enables the right shoulder to more easily move downwards, rather than outwards, between P4 => P5.5 and that causes the shoulders to move more vertically (more like a "ferris-wheel") and less horizontally (less like a "merry-go-round") during the early-mid downswing. The combination of "increased secondary tilt + increased right lateral bend" allows Ben Hogan to more easily shallow his clubshaft between P4 => P5.5 and avoid an "OTT move". However, it is far too simplistic to think that Ben Hogan's pivot motion, which features an increased degree of secondary axis tilt and an increased degree of right lateral bend, is primarily responsible for allowing Ben Hogan to shallow his clubshaft, while avoiding an "OTT move", between P4 => P5.5, because he is also performing a particular pattern of right arm motion (*involving right upper arm adduction combined with a pitch elbow motion of the right elbow) that enables him to shallow his clubshaft during his early-mid downswing.
(* I will discuss the role of the right arm in shallowing the clubshaft, and avoiding an "OTT move", in much greater detail in topic number 3 of this downswing chapter)
To emphasise the correct biomechanical motions that must occur during the early-mid downswing in order to avoid performing an "OTT move" golf swing action, I will use the example of the long-drive world champion, Jamie Sadlowski.
Here is a 3D graph of Jamie Sadlowski's golf swing action.
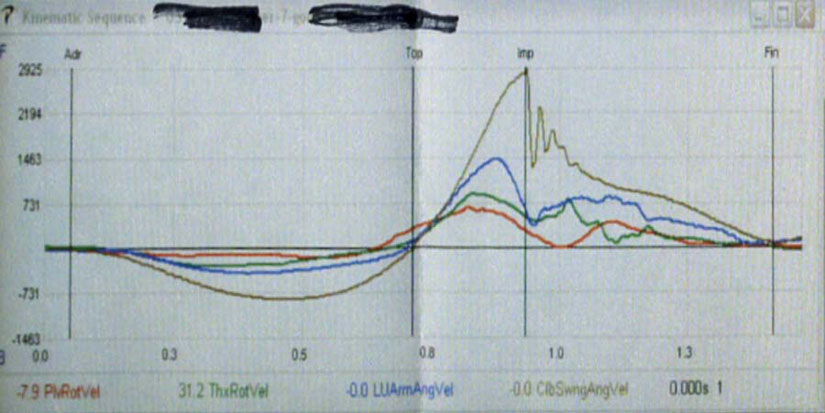
The vertical black line labelled "Top" represents the end-backswing position.
The vertical black line labelled "Imp" represents impact and the downswing happens between those two vertical lines.
The red graph represents his pelvic rotational angular velocity graph. The green graph represents his upper torso's (shoulders) rotational angular velocity graph. The blue graph represents the angular velocity of his lead arm (in its own rotational plane).
The horizontal black line represents the zero line.
Note that the red graph crosses the zero line before his end-backswing position (which is defined as the exact time point when the clubhead reverses direction) while the green graph only crosses the zero line at about P4, and that means that Jamie Sadlowski is first rotating his pelvis counterclockwise before his upper torso starts to rotate counterclockwise. Note that his upper torso's rotational angular velocity graph, and his lead arm's angular velocity graph, are moving at the same speed in the early downswing and that are moving slower than the pelvis for a very short time period. Note that the slope of the blue graph quickly becomes steeper than the slope of the green graph during the early downswing, which means that the left arm is traveling faster than the upper torso very soon after the start of the downswing.
Consider these capture images of Jamie Sadlowski's early-mid downswing action, which visually demonstrate those same facts.
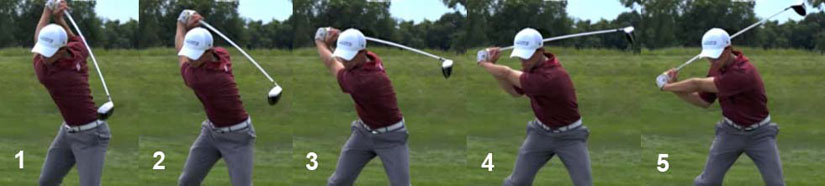
Image 1 is at his P4 position and image 5 is at his P5 position (end of his early downswing).
Note that Jamie Sadlowski has about 60 degrees of clockwise pelvic rotation, and about 135+ degrees of clockwise upper torso (shoulder) rotation at his end-backswing position. Note that his hands are high above the level of his head because he has a very steep lead arm angle and that his lead arm is at the 12 o'clock position.
Note that Jamie Sadlowski rotates his pelvis counterclockwise very fast between P4 => P5 and that his pelvis is square to the ball-target line by P5. Note that his shoulders (upper torso) is also rotating a lot counterclockwise between P4 => P5, but it does not catch up to his pelvis (from a rotational perspective) by P5, which means that his pelvis is more open than his shoulders throughout his early downswing action.
Note that the angle between his lead arm and his anterior chest wall (front of his chest) does not increase between P4 => P5, which means that he is not independently pulling his lead arm outwards away from his rotating upper torso during his early downswing action. However, note the large distance that his lead hand has traveled in the vertical dimension between P4 => P5, being well above his head at the P4 position to becoming roughly level with his nipples at the P5 position. What is causing his lead hand to travel so much downwards (and not outwards) between P4 => P5? I think that there are two biomechanical factors in play. The first biomechanical factor is the motion of his lead shoulder socket in a targetwards direction between P4 => P5. Note how much his lead shoulder socket is moving targetwards between P4 => P5. It must be pulling his lead humeral head, and therefore his lead upper arm, in the same targetwards direction. However, the targetwards motion of his lead shoulder socket is also producing a downwards force on his lead upper arm because his lead arm is angled vertically at his P4 position. I also strongly suspect that an active muscular contraction of some of his lead shoulder girdle muscles (eg, left latissimus dorsi muscle) is actively helping him to move his lead arm in a downwards direction. The second biomechanical factor that causes the lead hand to move a large distance downwards during the early downswing is the way he uses his right upper limb during his early downswing time period. Note that his right upper arm is abducted away from the right side of his torso at his P4 position, while he has roughly a 90 degree bend of his right elbow. Note that he maintains that same 90 degrees of right elbow bend between P4 => P5, but he is actively adducting his right upper arm towards the right side of his torso during that P4 => P5 time period, and that causes his right elbow to become visible below his left elbow at his P5 position. These biomechanical actions performed by the right upper limb are clearly visible in DTL capture images.
DTL capture images of Jamie Sadlowski's early downswing action.

Image 1 is at the P4 position and image 3 is at the P5 position.
Note that Jamie Sadlowski uses a very steep lead arm motion during his backswing action so that his lead arm is much steeper than his shoulder turn angle at the P4 position. That results in his hands being very high above the level of his head at his P4 position. To get his right hand that high above the level of his head at the P4 position, he obviously has to abduct his right upper arm a significant amount away from the right side of his upper torso.
Note how much his lead hand drops downwards between P4 => P5, being high above his head at the P4 position to becoming level with his nipples at his P5 position. I strongly suspect that a significant amount of the "force" causing the lowering of his lead hand between P4 => P5 is due to an active right upper arm adduction maneuver combined with a pitch elbow motion of his right elbow (where his right elbow bend remains unchanged, but where his right elbow leads his right hand) - note how much he has adducted his right upper arm towards the right side of his upper torso between P4 => P5 while maintaining a roughly 90 degree right elbow bend angle. Also, note how his right elbow drops below the level of his left elbow during the early downswing.
There are a number of useful golf instructional insights that can be learned from observing Jamie Sadlowski's early downswing action. One of the major golf instructional insights worth learning is that it is far too simplistic to believe that the golf swing of a skilled pro golfer is powered solely by the pivot motion, which moves the lead arm, and it is important to appreciate the fact that the downward motion of the lead arm in the early-mid downswing is likely also powered by an active right upper limb motion. Most importantly, one needs to understand that the very specific manner in which the right upper limb moves biomechanically in the early-mid downswing of a pro golfer also has other additional benefits. The one benefit that is very useful is that it can help the golfer to shallow his clubshaft between P4 => P6. Secondly, by maintaining an unchanged right elbow bend angle of ~90 degrees between P4 and ~P5.5 where the right elbow leads the hands (by using a pitch elbow motion of the right arm), it can help a golfer maintain his maximum degree of clubhead lag during that P4 => P5.5 time period and it also helps to create a more U-shaped (rather than a V-shaped) hand arc path between P4 => P5.5. A more U-shaped hand arc path helps a golfer to maintain the maximum degree of clubhead lag until ~P5.5 and it is also more conducive to a more efficient release of the club (called the release of PA#2 in TGM terminology) that happens between P5.5 => P7.
Consider Jamie Sadlowski's hand arc path between P4 => P5.5.
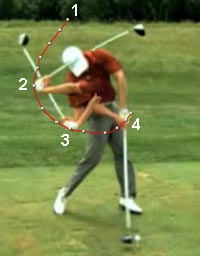
The red splined path represents Jamie Sadlowski's hand arc path. Point 1 is where his hands are located at the P4 position, point 2 is where his hands are located at the P5 position, and point 3 is where his hands are located at the P5.5 position.
Note that his hands move away from the target between P4 => P5 while they descend downwards from being high above the level of his head at the P4 position to becoming level with his nipples at the P5 position. Why do his hands move further away from the target between P4 => P5? The simple answer is that it is due to the change in the degree of elevation of his left arm, which moves from being more vertically positioned at the 12 o'clock position at the P4 position to becoming more horizontally positioned at the 9 o'clock position at the P5 position.
Most importantly, note that although his hands have dropped down a very large amount between P4 (point 1) and P5.5 (point 3), his hands are not closer to the target at his P5.5 position than they were at his P4 position. How is that biomechanically possible? The answer is that it is biomechanically possible because of the complex interaction of a number of biomechanical phenomena (which I will explain shortly). The advantage of Jamie Sadlowski's hand arc path shape, where the hand arc path looks U-shaped between point 2 and point 3, is that it is very conducive to allowing a golfer to maintain his maximum degree of clubhead lag for longer into the mid-downswing - note that Jamie Sadlowski still has >90 degree of clubhead lag at his P5.5 position.
Note that Jamie Sadlowski's hands are about 12" outside the outer border of his right thigh at the P5.5 position - even though they have descended to a position that is well below his waist level. What enables Jamie Sadlowski to position his hands so far outside his right thigh at his P5.5 position? There are two major biomechanical factors in play - i) the characteristic nature of his pivot motion during his early-mid downswing and ii) the characteristic nature of his right arm's pitch elbow motion.
Consider the following diagrammatic image, which depicts three biomechanical phenomena - 1) shoulder elevation/depression due to elevation/depression of the lateral end of the clavicle and 2) secondary axis tilt, right lateral bending of the mid thoracic spine and right clavicle depression.
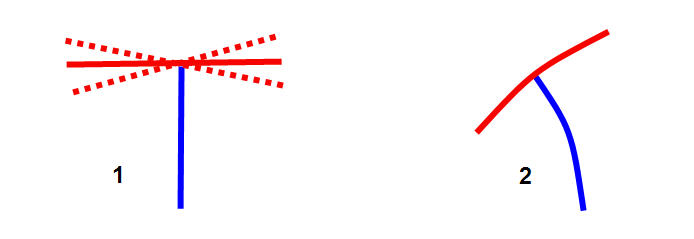
Diagram 1 depicts the spine from a face-on view if the golfer stands erect with a straight spine (colored in blue). The shoulders are normally oriented perpendicular to the upper thoracic spine if the clavicles are horizontal to the ground - see solid red line. The red dotted lines show the range of depression/elevation of the shoulders that can occur if a golfer deliberately depresses/elevates the shoulders by moving the lateral end of his clavicles downwards/upwards, and this phenomenon can occur unilaterally or bilaterally thus causing the affected shoulder to move at a non-perpendicular angle relative to the upper thoracic spine.
Diagram 2 depicts a face-on view of a golfer who has i) secondary axis tilt causing the lower spine (lumbar spine) to become more rightwards-tilted and ii) lateral bending of the mid-upper thoracic spine to the right (relative to the lumbar spine) and iii) a certain amount of right outer clavicle depression that all synergistically interact to cause the right shoulder to move along a slightly more steeper downward path during the early-mid downswing.
Consider these capture images of Jamie Sadlowski's pivot motion during the early-mid downswing time period.
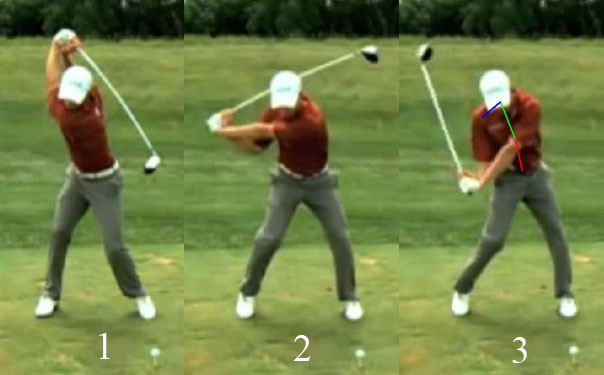
Image 1 is at the P4 position, image 2 is at the P5 position and image 3 is at the P5.5 position.
Note that his right shoulder is higher than his left shoulder at the P4 position.
Note that his right shoulder becomes slightly lower by his P5 position, while his upper torso is rotating counterclockwise, and that is mainly due to depression and protraction of the right scapula that happens during the P4 => P5 time period, and it is not due to an increased degree of right lateral bend that happens slightly later between P5 => P5.5.
Note that his right shoulder continues to get lower between P5 => P5.5 and that is due to the combination of i) increased secondary axis tilt (increased rightwards tilt of the lumbar spine - see red line); ii) increased right lateral bend (increased rightwards arch-bending of the mid-upper thoracic spine - see green line); and depression of the lateral end of the right clavicle (see downward tilted blue line).
The lowering of his right shoulder socket by P5.5 allows Jamie Sadlowski to get his right elbow down to waist level, and that allows him to more easily get his right hand below waist level without having to straighten his right elbow a lot between P5 => P5.5.
Note that his right elbow is positioned alongside his right hip joint area at the P5.5 position, but his right hand is positioned about 12" outside his right thigh. What makes this bold-highlighted fact possible? The answer is that he is using a pitch elbow motion of his right arm while he adducts his right upper arm towards the right side of his torso between P5 => P5.5 - and that requires the maintenance of a neutral right humerus, which is not internally or externally rotated, and that will angle the right forearm backwards away from the target. Many golf instructors incorrectly teach their student-golfers to internally rotate their right humerus during the P5 => P5.5 mid-downswing time period, but that biomechanical action will cause the right hand to prematurely bypass the right elbow (and that undesirable motion is referred to as a punch elbow motion in TGM terminology). Also, if the right forearm simultaneously starts to pronate at the same time, then the right palm will get more on top of the club handle between P5.5 => P6, which is very undesirable. Note that Jamie Sadlowski's right palm is under the club handle at his P5.5 position, and his right palm is facing skywards. That requires a pitch elbow motion of the right arm - where the right humerus is neutral, and where the right forearm is fully supinated, during the P5 => P5.5 mid-downswing time period.
A very important golf instructional insight that a student-golfer must fully understand is that it is much easier, from a biomechanical perspective, to acquire right lateral bend during the mid-downswing time period if the pelvis more open than the shoulders (upper torso). Look at image 2/3 above - note that Jamie Sadlowski's pelvis is becoming more open relative to the ball-target line during his mid-downswing action, but his shoulders are still aligned significantly closed relative to the ball-target line. That desirable biomechanical relationship between an open pelvis alignment, but a closed shoulder alignment, during the mid-downswing makes it much easier to acquire right lateral bend where the head remains behind the ball and where the right side of the chest is kept back away from the ball-target line. Many golf instructors teach their student-golfers to actively "cover" the ball with the right side of their chest during the mid-downswing action, but I think that it is incorrect advice that will undesirably promote too much outward motion of the right shoulder, which can result in an undesirable "OTT move" golf swing action. I think that it much better to instruct a student-golfer to keep the right side of the chest back and passive. The word "passive" means that a student-golfer should not think of actively contracting any core muscles on the right side of his mid-upper torso during the downswing because that will more likely induce an "OTT move" where the spine may twist to the left causing the head to move ahead of the ball, and/or where the right shoulder moves too much outwards in the direction of the ball-target line. It is much better if a student-golfer learns to ingrain the "feel" of allowing the right side of the upper torso to acquire right lateral bend in a passive manner where the right shoulder "feels" like it is passively dropping downwards while the left side of the body actively extends. Look at images 2/3 above - and note what is happening to Jamie Sadlowski's left shoulder between P5 => P5.5. Note that Jamie Sadlowski kept his left shoulder low between P4 => P5 while his left shoulder was moving targetwards. However, note that he is starting to significantly elevate his left shoulder between P5 => P5.5 due to a combination of two active biomechanical actions - i) increasingly straightening his left leg (which will elevate the left side of the pelvis) while simultaneously ii) increasingly extending the left side of his mid-upper torso. In other words, to get the left shoulder to become higher than the right shoulder between P5 => P5.5 +, the left side of the body must be actively extending while the right side of the body passively becomes more "crunched-in" (more compressed). Any golf instructional advice to actively "crunch-in" the right side of the torso during the early-mid downswing action (by activating core muscles on the right side of the mid-upper torso) puts a student-golfer at considerable risk of unintentionally inducing an undesirable "OTT move" golf swing action.
Because it is so important to learn how to perform a pivot motion in an optimum manner, where a student-golfer can consciously avoid performing pivot motions that will predispose to an "OTT move" type of golf swing action, I am going to laboriously repeat my golf instructional advice by analysing the downswing action of another pro golfer - Dustin Johnson.
Consider these capture images of Dustin Johnson's downswing action and hand arc path.
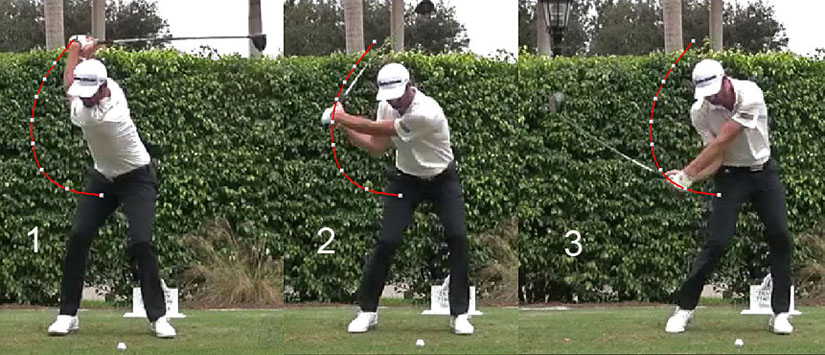
Image 1 is at his P4 position, image 2 is at his P5 position and image 3 is at his P5.5 position.
The red splined path represents his hand arc path. Note that his hands move mainly downwards between P4 => P5.5 and that his hands are no closer to the target at P5.5 than they were at P4, but his hands have reached well below waist level at the P5.5 position. Note that to get his hands that far down by P5.5, without them moving closer to the target, that his lead arm is lowering in a groundwards direction without moving outwards away from his rotating upper torso in the horizontal plane of adduction => abduction. Also, note that he manifests the same biomechanical pivot features seen in Jamie Sadlowski's golf swing action, which allow him to move his right shoulder downplane without moving his right shoulder too much outwards in the direction of the ball-target line - i) he starts the downswing with a pelvic rotary motion and he gets to the P5.5 position with his pelvis open to the ball-target line while his shoulders (upper torso) is still slightly closed relative to the ball-target line; and ii) he shift-rotates his pelvis in such a manner that he acquires an increased degree of secondary axis tilt by P5.5, which is simultaneously combined with an increased degree of right lateral bend of his mid-upper thoracic spine. Note that this pivot motion pattern allows him to keep his head behind the ball even though his lower body (pelvis) is moving targetwards so that his belt buckle gets ahead of the ball position at his P5.5 position. Note how his left shoulder moves upwards between P5 => P5.5 due to elevation of his left pelvis (as he starts to straighten his left leg), which is simultaneously combined with an active extension of the left side of his mid-upper torso.
Note how he keeps his right humerus neutral, and his right forearm fully supinated, between P5 => P5.5 when he performs a pitch elbow motion with his right upper limb, and that allows him to get his right hand positioned about 15" outside his right thigh at the P5.5 position. Note that his right palm is under the club handle at P5.5 and it is facing skywards.
One can obtain additional insights regarding the biomechanical nature of Dustin Johnson's pivot action by observing his early-mid downswing action from a rear-view perspective.
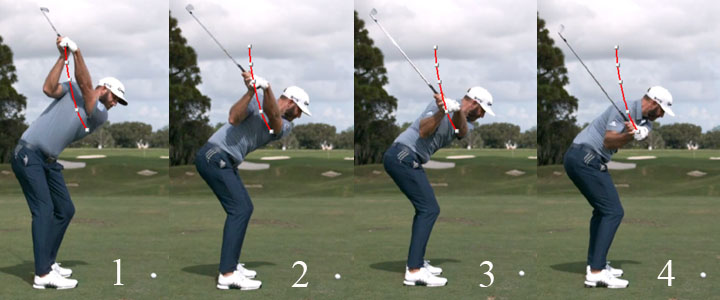
Capture images of Dustin Johnson's early-mid downswing action as viewed from a rear-view perspective.
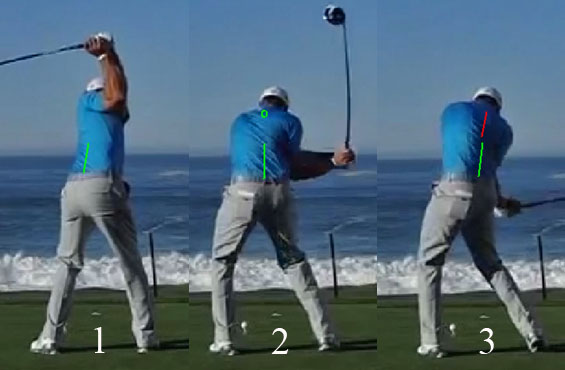
Image 1 is at his P4 position, image 2 is at his P5 position, and image 3 is at his P5.8 position.
I have drawn a green line along his lumbar spine in image 1 to show that he has a small degree of rightwards tilt of his mid-upper torso at his P4 position. One cannot see his thoracic spine because it is obscured by his right scapula, which is retracted and elevated.
I have drawn a green line along his lumbar spine in image 2 to show that he still has a minimal degree of rightwards tilt of his lumbar spine at his P5 position. I have drawn a green circle-mark at the top of his thoracic spine, which is still partially obscured by his right scapula and his medial peri-scapular musculature. However, if you look at the vertical aligned relationship between the green circle-marker and the green line, it does demonstrate that he does not yet have right lateral bend at his P5 position. Note that his right shoulder has lowered significantly between P4 => P5 because his right scapula is continuously lowering and protracting during that P4 => P5 time period.
I have drawn a green line along his lumbar spine in image 3 and one can see that is tilted more rightwards due to his acquisition of secondary axis tilt. I have drawn a red line along his thoracic spine and it is tilted even more rightwards due to his acquisition of right lateral bend. Note that the development of increased secondary axis tilt plus right lateral bend allows him to lower his right shoulder even more (without his right shoulder moving outwards in the direction of the ball-target line in an "OTT move" manner). Note that his left shoulder is moving upwards between P5 => P5.8 due to elevation of his left pelvis, which is combined with increased extension of the left side of his mid-upper torso.
I can imagine a student-golfer becoming confused about how best to perform an optimum downswing action, while avoiding an "OTT move" golf swing action, because I have provided so much detailed information on the motion of so many different body/arm parts, which can result in the mental phenomenon of "paralysis by analysis" where a student-golfer cannot efficiently initiate his downswing action because his mind is mentally clouded by too many swing thoughts. Therefore, to make it easier for a student-golfer to mentally think about how best to perform an optimum downswing action, I think that he should primarily concentrate his mental thoughts on simultaneously performing two global biomechanical actions - one global biomechanical action involving the pivot motion and one global biomechanical action involving the motion of the two arms.
Consider Dustin Johnson's early-mid downswing action as presented in these capture images from a swing video, where the camera was positioned partially face-on, and partially upline, so that it is viewing Dustin Johnson from a face-on angle of about 45 degrees upline.
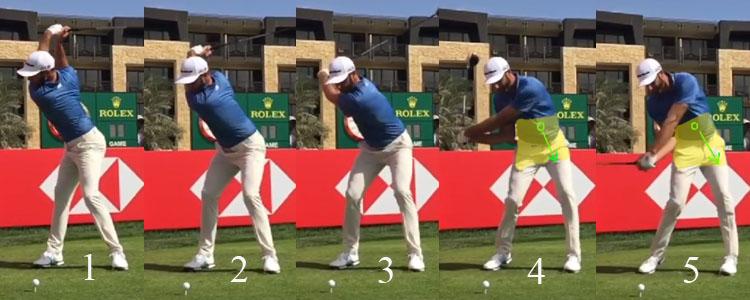
Image 1 is at the P4 position, images 2/3 are at about the P4.2/P4.5 position, image 4 is at the P5.3 position and image 5 is at the P6 (end of the mid-downswing) position.
Note that Dustin Johnson starts his pivot motion with a very active counterclockwise pelvic rotary motion and that it happens so fast that his pelvis is already square to the ball-target line by P4.5 (image 3). Note that Dustin Johnson continues to rotate his pelvis and mid-torso counterclockwise non-stop so that it becomes overtly open relative to the ball-target line before P5.5. Note that I have drawn a small green circle-marker over the navel area of his mid-abdomen, and the accompanying green arrow shows that his navel area is pointing well to the right of the target by ~45 degrees by the time he reaches his P6 position (image 5). Note that I have used a faint yellow color layer, that is superimposed on part of this Photoshopped image, in order to highlight his pelvis and mid-torso area. So, the primary swing thought that a student-golfer should think about when starting his downswing's pivot motion is the swing thought of actively rotating his pelvis and lumbar spine/mid-torso (yellow highlighted area) counterclockwise as a single rotating unit where his navel area/belt buckle will both end up facing about 45-60 degrees to the right-of-the-target by his P6 position. In other words, a golfer must mentally believe that the swing power "engine" of his pivot motion resides within that yellow highlighted area of his lower-mid torso. There should be no attempt to actively rotate the upper torso above that yellow highlighted zone during the early downswing because that will more likely promote an "OTT move" type of golf swing action. If a student-golfer actively performs that described pivot motion involving the lower-mid torso in an optimum manner (as demonstrated by Ben Hogan in the Ben Hogan video), then he should eventually acquire the "feel" of how he passively acquires an increased degree of secondary axis tilt and right lateral bend that will allow him to continuously keep his head behind the ball position. It is very important to ensure that the mid-torso (mid-abdomen area) rotates at the same rotational speed as the pelvis and one should not allow the pelvis to out-run the mid-torso area from a rotational perspective. A golfer who has a lot of hula hula flexibility (which is a term that I use to describe a high degree of flexibility of the lumbar spine zone that can allow a golfer to rotate his pelvis independently without simultaneously rotating his mid-upper torso - as seen in hula hula dancers) can potentially rotate his pelvis so fast between P4 => P6 that the mid-upper torso cannot keep up from a rotational perspective. Under those non-optimum conditions, the golfer will develop an excessive amount of torso-pelvic separation, where the upper torso/arms are too far back (relative to the pelvis) at the ~P5.5 position. That biomechanical predicament can potentially result in two different non-optimum pivot motion events that can resultantly happen between P5.5 => P7. The first resultant possibility that can happen if the pelvis out-races the mid-upper torso between P4 => P5.5 is that the upper torso/arms "hang back" far too much and the golfer will then approach impact with his clubshaft angled far back behind his hands, which can repeatedly result in push-sliced shots. The second resultant possibility is that the golfer will unconsciously try to compensate for his excessive degree of torso-pelvic separation by activating his right-sided mid-upper torso muscles during his mid-downswing, and that can produce an "OTT move" type of golf swing action that happens in the mid-downswing (and not at the very start of the early downswing). This mid-downswing variant of the "OTT move" type of golf swing action will produce a "tumble action" where the golfer "tumbles" the clubshaft over the swingplane during his mid-downswing time period, thereby resulting in an undesirable out-to-in clubhead path through impact.
I previously stated that a student-golfer should mentally think about two global biomechanical motions - one global biomechanical motion involving the pivot and the other global biomechanical motion involving the arms. In the previous paragraph, I described the primary swing thought related to the pivot motion. In this paragraph, I will describe the secondary swing thought related to the global biomechanical motion of the arms. The secondary swing thought that a student-golfer should mentally think about during his early-mid downswing action is the swing thought of swinging the two arms downwards towards an aiming point that is in front of the body, but further away from the target than the right thigh/leg. If you look at those capture images of Dustin Johnson above, note that his hands move from being positioned above his head, but also to the right of his head, at his P4 position (image 1) to becoming positioned below his waist level, but also rightwards of his right thigh, at his P6 position (image 5). In other words, he is pulling his hands downwards to a position in front of his body, but also further away from the target than his right thigh, between P4 => P6 by using an independent arm motion, while he is simultaneously performing his optimised pivot motion.
An insightful clue on how to mentally think about the process of performing this independent arm motion can be found in these you-tube videos ( https://www.youtube.com/watch?v=JXGSFxOf-Iw and https://www.youtube.com/watch?v=M1cOHh6zaSw and https://www.youtube.com/watch?v=dE8JvXR_MeY ) produced by Justin Rose.
Note that Justin Rose talks about keeping his back facing towards the target, so that he can maintain a closed upper torso alignment during his early downswing, while he simultaneously pulls his hands downwards to below waist level. In the one video, Justin Rose even talks about the "feel" of pulling his hands downwards in a direction that is slightly further away from the ball-target line, and slightly behind his right thigh, but he correctly states that his hands will actually end up being more in front of him in his "real life" golf swing action because he is actively rotating his upper torso, and therefore his two shoulder sockets, between P4 => P6 in such a manner that the hands will end up being more in front of his torso by P6 (when viewed from a DTL viewing perspective). Most importantly, you need to appreciate the fact that this "Justin Rose Move", which he often rehearses in his pre-shot routine, is simply the conceptual idea of moving the hands downwards as an "independent arm motion" phenomenon, which is simultaneously integrated with an optimised pivot motion, as I have thoroughly detailed in my analysis of Ben Hogan's, Jamie Sadlowski's and Dustin Johnson's early-mid downswing action.
Consider these capture images of Dustin Johnson's early downswing action.
The red splined path represents Dustin Johnson's hand arc path during his P4 => P5 time period.
Note the large vertical distance Dustin Johnson's hands descend between image 1 and image 4. Note how much he adducts his right upper arm towards the right side of his torso between image 1 => image 4 while his upper back is still partially facing the target, and that causes his hands to move steeply downwards and very little outwards in the direction of the ball-target line - note the steepness of his hand arc path. After P5 (image 4) his hands will move more outwards as his upper torso rotates more counterclockwise and that will get his hands more in front of his body by his P6 position (as described by Justin Rose). However, the correct "feel" should be that one is directing the hands to move mainly downwards, and not outwards in an "OTT move" manner, during the early downswing action.
Thinking about the independent arm motion as a separate swing thought may be particularly useful for inflexible golfers who have very little (or zero) hula hula flexibility, because their upper torso will start to rotate counterclockwise as soon as they start rotating their pelvis counterclockwise, and their lack of torso-pelvic separation will therefore naturally predispose to an "OTT move" golf swing action. If they think about the "idea" of getting their hands down to waist level as fast as possible (using the described technique of "right arm adduction combined with a pitch elbow motion") starting from the very instantaneous moment that they first start to initiate their downswing's pelvic rotary motion, then they may more likely get their hands downwards to waist level before their hands are thrown too much outwards in an "OTT move" manner due to the counterclockwise rotation of their upper torso.
Topic number 2: How to optimally perform a rotary pelvic motion during the early downswing's hip-squaring phase, and how to continue to move the pelvis all the way to impact.
In topic number 1, I described how pro golfers start the downswing's pivot motion with a pelvic rotary motion, and not an upper torso rotation, and I stated that this standard kinematic sequence has the advantage that it can help avoid an "OTT move" type of golf swing action. The standard kinematic sequence, which starts with a pelvic motion, allows a golfer to more easily shallow the clubshaft during the early-mid downswing and also generate an in-to-out clubhead during the later downswing. However, even if a student-golfer agrees that the downswing's kinematic sequence must start with a pelvic motion, the fundamental question remains - what is the optimum technique of performing a pelvic motion during the early-mid downswing between P4 => P6? There are many online golf instructors who promote different pelvic motion techniques eg. a pelvic shift-then-rotate pelvic motion, a pelvic motion produced by generating ground reaction forces (both vertical GRFs and horizontal GRF's) that will produce early extension and/or a right hip spinning motion. I am very opinionated regarding this topic, and I believe that the optimum pelvic motion technique must be a particular pattern of pelvic motion that is primarily rotary and that only secondarily produces a small degree of lateral pelvic shift towards the target, which only happens while the pelvis is simultaneously rotating counterclockwise. Many pro golfers use my preferred pelvic motion technique and I will describe the technique in great detail in this topic's subsection of my downswing chapter.
One of the characteristic biomechanical features of my prescribed pelvic motion technique is the fact that the trail buttocks must remain abutted against the tush line during the hip-squaring phase of the rotary pelvic motion, while the lead buttocks is pulled back towards the tush line. To understand this point, consider the pelvic motion technique used by Jamie Sadlowski during his early downswing action.
Capture images of Jamie Sadlowski's early downswing action.
Image 1 is at the P4 position, image 2 is at the P4.5 position and image 3 is at the P5 position.
Note that Jamie Sadlowski rotated his pelvis clockwise by 60+ degrees during his backswing action (image 1). Note that I have drawn a red line against the back side of his right buttock at the P4 position, and I call that red line the tush line.
Note that Jamie Sadlowski rotates his pelvis counterclockwise between P4 => P5 and that his pelvis becomes square to the ball-target line by the time he reaches his P5 position (image 3). Note that Jamie Sadlowski keeps the back of his right buttock continuously abutted against the tush line during his hip-squaring phase, which means that he is essentially pulling his left buttock back towards the tush line during his hip-squaring phase.
The same pelvic motion pattern is seen in Dustin Johnson's early downswing action.
Capture images of Dustin Johnson's early-mid downswing action.
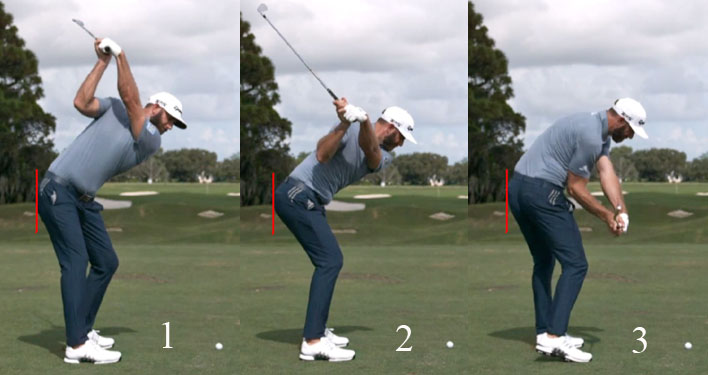
Image 1 is at the P4 position, image 2 is the P4.5 position and image 3 is at the P6 position.
Note that I have drawn a red line against the back of Dustin Johnson's right buttock at his P4 position and that it represents the tush line, and note that he rotated his pelvis about 50+ degrees clockwise during his backswing action.
Note that Dustin Johnson performs a super-efficient pelvic rotary motion during his early downswing so that his pelvis is already square to the ball-target line by P4.5. Note that Dustin Johnson keeps the back of his right buttock continuously abutted against the tush line during his hip-squaring phase, which means that he is essentially pulling his left buttock back towards the tush line during his hip-squaring phase.
Note that Dustin Johnson's right buttock only leaves the tush line during his mid-downswing action between P5 => P6 and that allows him to get his pelvis open to the ball-target line by the end of his mid-downswing action (image 3).
Both Jamie Sadlowski and Dustin Johnson maintain their spinal bend inclination angle, and a large degree of anterior pelvic tilt, during their hip-squaring phase, which requires that they maintain (or even slightly increase) their degree of hip joint flexion during the hip-squaring phase.
The fundamental question that arises from observing Jamie Sadlowski's and Dustin Johnson's pelvic motion technique is the following-: How do they keep their right buttock continuously against the tush line during their hip-squaring phase (which also means that they are avoiding any early pelvic extension or right hip spinning motion where the right hip prematurely moves outwards in the direction of the ball-target line)? I believe that if a student-golfer wants to learn how to precisely mimic their pelvic motion pattern, that he should learn how to perform a pelvic motion technique that is primarily muscular-based and that is primarily based on the efficient use of the right-sided lateral pelvic rotator muscles.
Consider the anatomy of the 6 lateral pelvic rotator muscles by viewing this superbly animated you-tube video Anatomy Zone you-tube video (watch the first 7:29 minutes) - https://www.youtube.com/watch?v=kXg3akhbrrg
Here is a capture image (from that video) showing the 6 lateral pelvic rotator muscles.
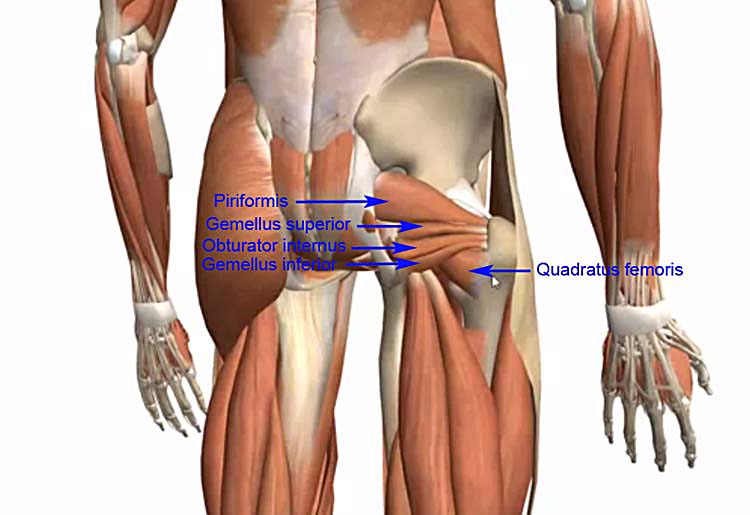
I have highlighted the 6 relatively small, but effective, 6 lateral pelvic rotator muscles-: i) the piriformis muscle, the ii) gemellus superior muscle, the iii) gemellus inferior muscle, the iv) obturator internus muscle, and the v) quadratus femoris muscle. The vi) obturator externus muscle cannot be seen in this illustration because it is hidden beneath the overlying 5 lateral pelvic rotator muscles.
When these 6 right-sided lateral pelvic rotator muscles contract at the start of the downswing, presuming that the right leg/foot is stabilised, they cause the pelvis to rotate counterclockwise away from a pressure loaded, and thereby "stabilised", right leg/foot. How does it work from a biomechanical perspective?
If the pelvis is rotated clockwise during the backswing action while the right femur is prevented from significantly rotating clockwise, this action will drive the right (trailing) hip joint into a condition of significant internal rotation by P4. This, in turn, stretches or elongates the right-sided lateral pelvic rotator muscles as illustrated in the image below.
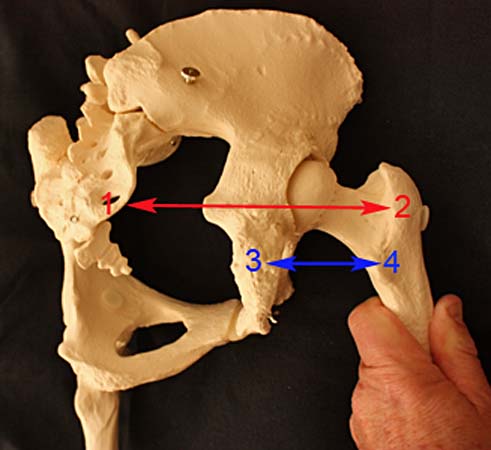
Note that I have rotated the plaster-cast pelvis model about 50 degrees clockwise before I took this photograph. Note that I have simultaneously prevented the right femur from rotating clockwise by the same amount, and that will cause the right femur to become internally rotated in the right hip joint. When the right femur becomes internally rotated in the right hip joint, that means that the points of insertion of the lateral pelvic rotator muscles (points 2 and 4) are further away from their points of origin (points 1 and 3). The points 1 - 2 represent the points of origin and insertion of the piriformis muscle and the points 3 - 4 represent the points of origin and insertion of the quadratus femoris muscle. I am only referring to those two lateral pelvic rotator muscles as examples, but all the 6 lateral pelvic rotator muscles on the right side are similarly stretched (elongated) at the end-backswing position when the right femur is internally rotated in the right hip joint.
When the 6 right-sided lateral pelvic rotator muscles are stretched at the end-backswing position, they are primed and ready to contract during the early downswing. If they contract and shorten (thereby decreasing the distance between their points of origin and their points of insertion) they will cause external rotation of the right femur in the right hip joint as the pelvis rotates counterclockwise away from the right femur (assuming that the right femur is kept stabilized and immobile). This is a critical point that one needs to fully understand, so I will discuss this issue in greater detail.
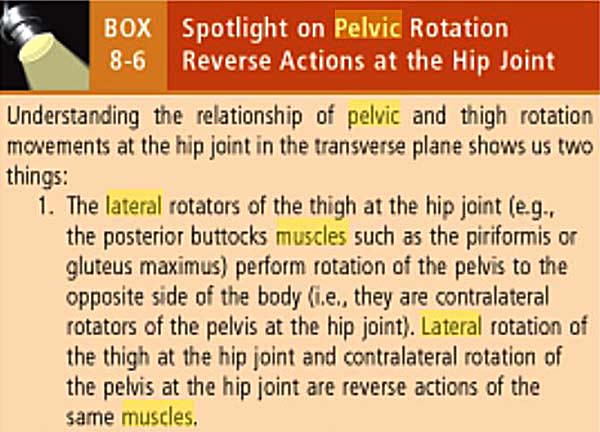
Note that the author astutely states that the lateral pelvic rotator muscles can cause lateral (external) rotation of the thigh at the level of the hip joint and also a contralateral rotation of the pelvis at the hip joint, and that these two motions are merely reverse actions of the same muscles.
Now, consider an illustration of those differential (reverse) actions in the diagram below.
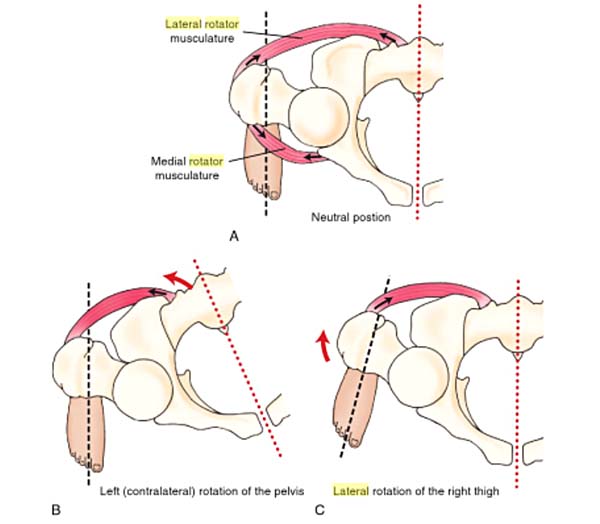
Diagram A shows the pelvis and ipsilateral (same sided) femur in a neutral position. The black arrows show that when the muscles contract and shorten, they will cause the muscle's origin (on the pelvis or sacrum) and the muscle's insertion (on the upper femur) to move closer towards each other. Diagram B shows that when the right femur is "stabilised" that contraction of the right-sided lateral pelvic rotator muscles will cause the pelvis to rotate counterclockwise away from the "stabilised" right femur. Diagram C shows that when the pelvis is "stabilised" that contraction of the right-sided lateral pelvic rotator muscles will cause the right femur to laterally (externally) rotate in the right hip joint. It should be noted that diagram B is most applicable to the right hip joint/femur during the time period between P4 and P4.5 of the golf swing, assuming that the pressure loading of the right leg (due to the golfer actively pushing down into the ground under the right foot) causes the right leg to become "stabilised". At the end-backswing position, if a golfer has roughly 70-90% of his overall center-of-pressure measurement (COP-measurement) under his right foot, and if he momentarily maintains, or even slightly increases, his degree of pressure-loading of his right leg/foot at the start of the early downswing, then he can very effectively stabilise the position of the right femur in space between P4 and P4.5. Then, when the right-sided lateral pelvic rotator muscles contract, they will cause a counterclockwise rotation of the pelvis away from the "stabilised" right femur.
The key point that a golfer needs to understand if he wants to use the active muscular technique of inducing a counterclockwise pelvic rotation between P4 and P5 (by using the 6 right-sided lateral pelvic rotator muscles) is that he needs to keep his right buttock stably abutted against the tush line during that early downswing time period. He must specifically not attempt to generate any Horizontal Ground Reaction Moment (pivoting GRM) under the right foot by pushing away from the ball-target line (by using horizontal ground reaction forces being exerted under the right foot) as recommended by Dr. Kwon and Sasho MacKenzie - because that would likely induce a premature motion of the right buttocks away from the tush line. Any pressure being exerted under the right foot must be directed straight down vertically into the ground and a golfer must avoid pushing backwards away from the ball-target line (which can induce a right hip spinning motion), or pushing sideways in a direction that is directed away from the target (which can induce too much pelvic slide motion in a targetwards direction). However, it is perfectly permissible, and even desirable, to simultaneously generate a horizontal GRM (pivoting GRM) under the left forefoot during the hip-squaring phase between P4 and P5 by pushing in a direction towards the toes (toward the ball-target line) and that horizontal GRM being generated under the left forefoot can synergistically help to move the left buttock back toward the tush line (while the right buttock remains in close contact with the tush line). While pushing his left forefoot in a direction towards the toes of the left foot, a golfer should also be contracting his left quadriceps muscles, which will straighten the left knee and cause the left knee to move backwards away from the ball-target line while the left buttock simultaneously moves backwards towards the tush line. When the left knee moves backwards away from the ball-target line, it will become *straight-in-line (as viewed from a DTL viewing perspective) with the right knee, which has remained relatively stationary during the hip-squaring phase.
(* Note how Dustin Johnson's left knee moves backwards away from the ball-target line to become straight-in-line with his right knee during his hip-squaring motion)
It is also important to understand that the active muscular contraction of the 6 right-sided lateral pelvic rotator muscles only cause a counterclockwise rotation of the pelvis during the hip-squaring phase between P4 and P5, and contraction of these muscles do not cause any further pelvic motion during the mid-late downswing when other pelvic girdle muscles and thigh muscles are primarily responsible for any further pelvic motion.
If you would like to see how a golfer uses the active muscular contraction of the 6 right-sided lateral pelvic rotator muscles to rotate the pelvis counterclockwise between P4 and P5, watch how Jim George (my model golfer for my video projects) demonstrates the technique in this part 4 video - https://youtu.be/gsX-o6ZWeOw - from my 7-part video project on "How to Perform a Golf Swing Like a PGA Tour Golfer". Watch the video between the 10:28-10:44 minute time point for a face-on view of Jim's hip-squaring action; between the 12:00-12:15 minute time point for a DTL view of Jim's hip-squaring action; and between the 16:46-17:05 minute time point for an upline view of Jim's hip-squaring action. Note how Jim keeps his right buttock against the tush line during the entire hip-squaring phase while he rotates his left buttock back towards the tush line. Notice how he acquires the "Sam Snead sit-down look" squat posture at P5, and note that he does not first shift his pelvis left-laterally before he rotates his pelvis.
Here is a capture image from the part 4 video showing how Jim George rotates his left buttock back towards the tush line without allowing his right buttock to prematurely leave the tush line.
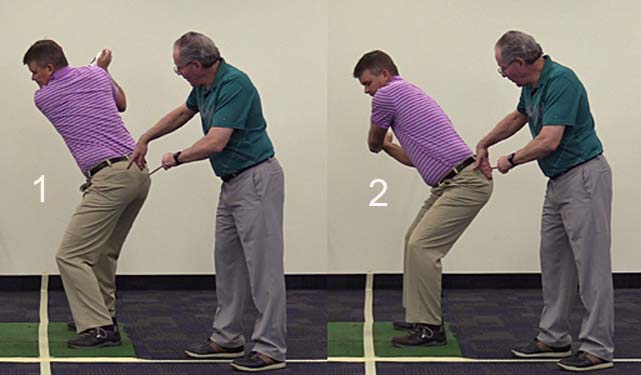
Image 1 shows Jim George at his simulated end-backswing position after he has rotated his pelvis about 50 degrees clockwise during his backswing action. I have placed a red rod against the back of his right buttock and this rod represents the tush line. Note that I am pointing my right index finger at his left buttock, which is far away from the tush line at his end-backswing position.
Image 2 shows Jim George at his P5 position (which is defined as the end of the early downswing). Note that he has efficiently rotated his pelvis counterclockwise so that his left buttock is now in contact with the tush line (while he still keeps his right buttock also in contact with the tush line). Note how his left knee has moved back away from the ball-target line so that it becomes straight-in-line with his right knee (as viewed from a DTL viewing perspective).
In summary, here are the chief golf instructional points that a student-golfer must grasp if he wants to efficiently use this prescribed pelvic rotary motion technique that is based on the active muscular contraction of the right-sided lateral pelvic rotator muscles. First of all, he must pre-load (pre-stretch) those right-sided lateral pelvic rotator muscles during his backswing action by driving his right hip joint into a state of internal rotation. Secondly, he must pressure-load his right leg/foot at P4, and also momentarily during the immediate transition to the downswing, so that he can stabilise his right leg/foot, and thereby induce the pelvis to rotate counterclockwise away from the stabilised right leg/foot when he activates the right-sided lateral pelvic rotator muscles. Thirdly, he must understand that he can significantly increase the efficiency of getting the left buttock to rotate counterclockwise back towards the tush line, while the right buttock remains momentarily abutted against the tush line, if he simultaneously generates a *horizontal GRM under his left forefoot.
(* if you want to learn much more about ground reaction forces, and ground reaction moments, as described by Dr. Kwon and Sasho Mackenzie, then I would highly recommend that you read the following review paper called "Critical Update: How to Optimally Rotate the Pelvis During the Downswing" and also read topic number 1 in the following review paper)
Consider yet again these capture images of Dustin Johnson's early-mid downswing action.
Note that Dustin Johnson pre-loaded (pre-stretched) his right-sided lateral pelvic rotator muscles during his backswing action by driving his right hip joint into a state of internal rotation by P4 (image 1). Then, note how he rotates his pelvis counterclockwise between image 1 and image 3 by contracting his right-sided lateral pelvic rotator muscles and note that he reaches the end of his hip-squaring phase by image 3. Note that he does not shift his pelvis left-laterally before he performs his hip-squaring action, and note that the small degree of left-lateral pelvic shift that is happening between image 1 => image 3 occurs while he is performing his counterclockwise pelvic rotary motion.
Note that Dustin Johnson's head drops by a small amount between image 1 (end-backswing position) and image 3 (end of his hip-squaring phase where he manifests the "Sam Snead sit-down look" squat posture) due to a small increase in his degree of hip joint flexion, and that is likely due to the bilateral contraction of his iliopsoas muscles. Pro golfers vary considerably in the amount of squat motion (due to increased hip joint and/or knee joint flexion), which can simultaneously happen during the hip-squaring phase, and there is no rule on how much a golfer should squat during his hip-squaring phase.
Note that Dustin Johnson continues to rotate his pelvis counterclockwise in a continuous (non-interrupted) manner after the end of his hip-squaring phase (image 3), so that his pelvis becomes wide open at his P6 position (image 5).
What can cause the pelvis to continue rotating counterclockwise after the end of the hip-squaring phase, when the right-sided lateral pelvic rotator muscles have already completed their muscular contraction? I think that there are two major biomechanical actions that can be causally responsible for ensuring that the pelvis continues to rotate counterclockwise in the mid-late downswing between P5 and impact.
The first biomechanical action that can cause the left hip joint to move back towards the tush line in the mid-late downswing is due to the straightening of the left leg that will increase the distance between the left foot (which is grounded) and the left hip joint (which is mobile). If the left leg straightens, it will cause the left hip joint to move upwards causing elevation of the left pelvis and it will also cause the left pelvis to move backwards away from the ball-target line if the left gluteus maximus muscle also contracts at the same time.
Consider this image of the left vastus lateralis muscle, which is the largest muscle in the left quadriceps muscle group in the anterior left thigh.
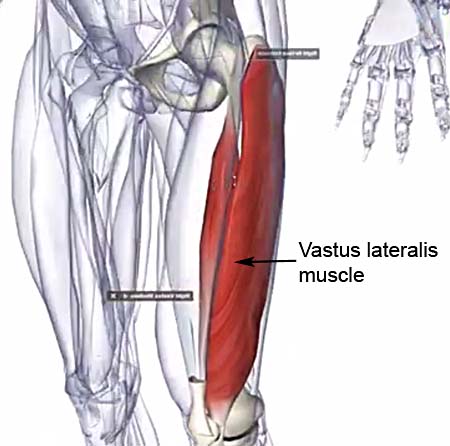
Starting in the mid-downswing, a golfer can contract the left vastus lateralis muscle, which will cause the left leg to extend, and that muscular action will drive the left hip joint upwards, and backwards away from the ball-target line. The left gluteus maximus muscle can contract at the same time, and that muscular action will pull the left upper femur (and therefore the left hip joint) upwards +/- medially (away from the target).
Here is an image of the left gluteus maximus muscle.
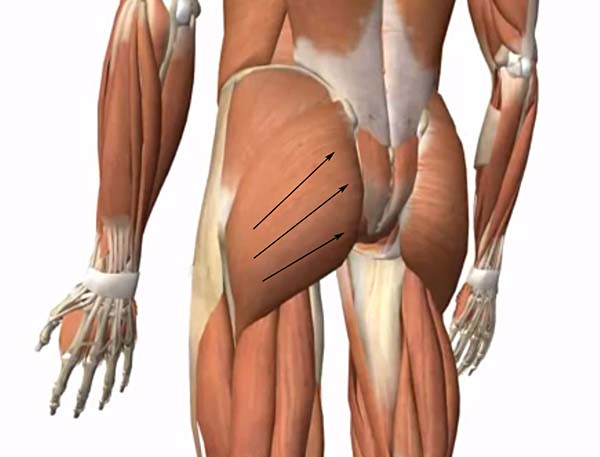
The muscle lying under the black arrows is the left gluteus maximus muscle, and it is attached medially (at its origin) to the outer (lateral) left edge of the sacrum and to a significant section of the posterior pelvic crest and it inserts at the back of the upper left femur. When that muscle contracts (and shortens in the direction of the black arrows) it pulls the left upper femur towards the sacrum (midline) and thereby contributes to the counterclockwise rotation of the left hip joint away from the ball-target line as the left hip joint extends.
Consider these capture images of Dustin Johnson's mid-late downswing's pelvic motion.
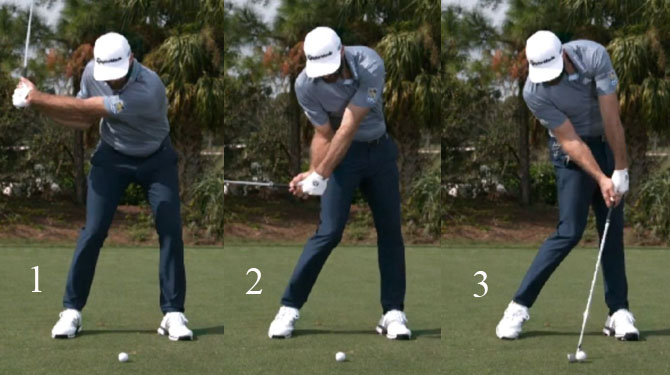
Image 1 is at his P5 position, image 2 is at his P6 position and image 3 is at impact.
Note that Dustin Johnson manifests the "Sam Snead sit-down look" squat posture in image 1 - where his pelvis is level and also square relative to the ball-target line, where both hip joints are in a dual state of symmetrical external rotation and where both knee joints are slightly flexed to roughly the same degree.
Note how Dustin Johnson straightens his left leg in his mid-downswing between P5 => P6. That causes elevation of his left pelvis. Note that his left leg becomes maximally straight by impact (image 3). Note that his pelvis does not shift left-laterally between P5 and impact, and that is due to his straightening left leg which is pushing the left foot solidly into the ground, combined with the simultaneous contraction of his left gluteus maximus muscle, which is helping him to brace the left side of his pelvis and thereby prevent any pelvis swaying motion in a targetwards direction.
Note that his pelvis continues to rotate counterclockwise between P5 => P7, and that is causally due to the simultaneous contraction of his left vastus lateralis muscle and left gluteus maximus muscle, which will cause the left hip joint to move away from the ball-target line as the left leg progressively straightens. I strongly suspect that his continued counterclockwise pelvic rotation in his late downswing is also partly due to the *isotonic contraction of his left adductor magnus muscle in his left thigh, which pulls the left anterior pelvis towards the left femur causing the left hip joint to become progressively more internally rotated by impact.
(* I discussed the role of the left adductor magnus muscle in rotating the pelvis counterclockwise in the following review paper)
Consider Dustin Johnson's pelvic motion during his mid-late downswing - when viewed from a DTL viewing perspective.
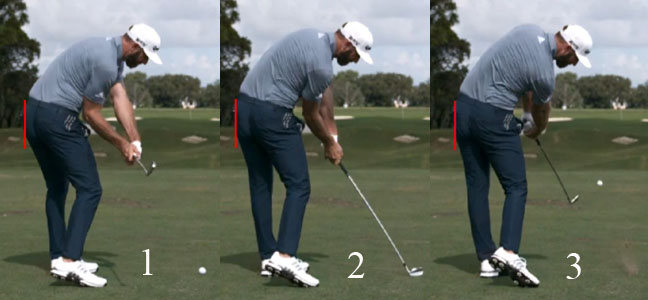
Image 1 is at his P6 position, image 2 is at his P7 position, and image 3 is at his P7.5 followthrough position.
The red line represents the tush line.
Note that his pelvis is already slightly open to the ball-target line by P6, and that is due to his straightening left leg which moves the left pelvis upwards and also back away from the ball-target line (and towards the tush line). Note that his pelvis is even slightly more open at impact and I believe that it is mainly due to the continued effect of the muscular contraction of his left vastus lateralis and left gluteus maximus muscles. Note that his left leg is straighter, and his left pelvis higher, at impact (image 2) than it was P6 (image 1).
Most importantly, note that his right pelvis remains lower than his left pelvis all the way between P6 => P7.5, and that his right knee increasingly bends while he increasingly elevates his right heel and simultaneously invert-rolls his right ankle inwards. I strongly suspect that Dustin Johnson is not actively contracting his right gluteus maximus muscle and that his right pelvis is being passively pulled around into impact. Many golf instructors teach their student-golfers to maximally contract their right (trail) gluteus maximus muscle during their mid-late downswing action. However, I disagree strongly with that advice!!! I believe that over-activation of the right gluteus maximus muscle in the later downswing can potentially produce many deleterious biomechanical effects. For example, it can cause right hip joint extension, which can produce an undesirable right hip joint elevation and/or an exaggerated thrusting motion of the right pelvis that can result in an exaggerated degree of posterior pelvic tilt of the right pelvis and it can also even cause the golfer to "stand-up" through impact, thereby causing a golfer to lose his spinal bend inclination angle. Note how Dustin Johnson can efficiently maintain his spinal bend inclination angle throughout his late downswing, and also through impact into his early followthrough, and I think that he is a perfect role model for a student-golfer.
In recent years, there has been a new fad among golf instructors, who now use force-plate measurement devices (eg. Swing Catalyst or Boditrak) to measure the ground reaction forces being exerted under the feet during the downswing. These devices can measure the magnitude of ground reaction forces being exerted under the feet in both the vertical and horizontal planes. Many golf instructors believe that they can use these measurements to instruct a student-golfer on how to improve his downswing's pelvic motion. I personally believe that this golf instructional approach represents pseudo-science because they incorrectly presume that the ground reaction forces being generated under the feet are primarily responsible for causing the pelvis to rotate and shift during the downswing action. However, they totally fail to take into account the role of the pelvic girdle muscles in producing a pelvic rotary motion. I have studied their golf instructional teaching, which is based on different patterns of ground reaction force measurements, and I personally find their teaching approach to be of no practical value.
I will now explain, using a few examples, why I harbor this biased opinion.
Sasho MacKenzie, a biomechanist working at St. Francis Xavier University in Nova Scotia, published the following graph.
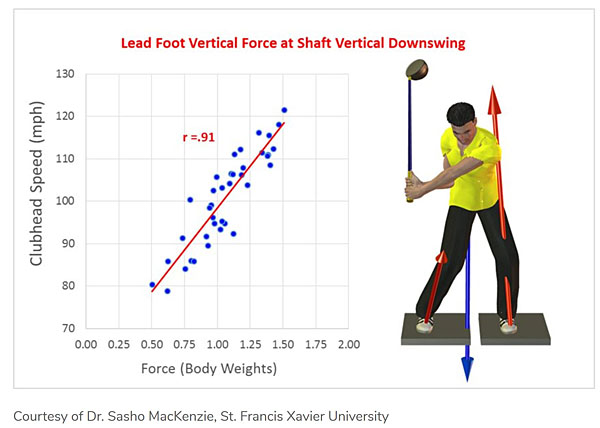
Note that the results of Sasho's study demonstrates that there is a high correlation between the magnitude of the clubhead speed at impact and the magnitude of the vertical force under the lead foot at shaft vertical (which usually happens between P5 and P5.5). Based on these results, Sasho advises golfers to maximise the vertical force under the lead foot at the shaft vertical position.
Sasho also uses a sledgehammer demonstration example to further encourage golfers to maximize the vertical force under the lead foot by the shaft vertical position.
Here is an image from an article ( https://boditrakperformance.com/cheat-codes-how-to-improve-club-head-speed-by-increasing-vertical-force-at-a-specific-point-in-the-downswing/ ) showing Sasho performing a golf swing type of downswing motion using a sledgehammer.
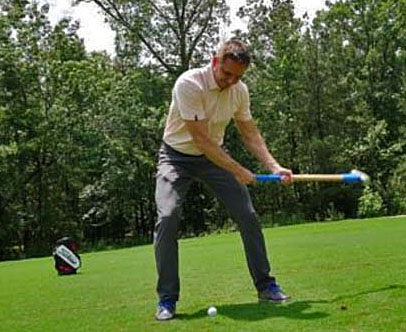
Here is an unedited copy of what Sasho stated in that article regarding his sledgehammer example-:
"When we’re swinging a golf club, we have a “learned understanding” of the amount of vertical ground reaction force required to counteract the momentum of the club and keep our body stable. Though it isn’t a conscious thought, we know that we have to push into the ground to keep from falling forward in the swing. If we handed you a much heavier implement like a sledgehammer, there is a decent chance that on the first swing you would underestimate the vertical force required to maintain balance and would end up falling forward. As you became more familiar with swinging a heavier weight like a sledgehammer, you’d do more to prepare for the increased momentum by bracing against the ground (increasing vertical ground reaction force) earlier. This is an extreme example, but it’s a representation of what we’re doing in the golf swing. Before we even begin the downswing, we begin building pressure under our left leg (evidenced by a lateral shift in center of pressure towards the target). Shaft vertical downswing doesn’t represent a peak in this pressure, but it represents a key moment in preparing ourselves for impact."
Sasho MacKenzie essentially states that a golfer needs to increase the vertical pressure (COP measurement) under his lead foot as fast as possible at the start of the downswing in order to better brace the lead foot against the ground in preparation for counteracting the increased momentum of the arms and golf club towards the ball that is going to happen in the later downswing. Sasho believes that it will decrease the chance that the golfer will become unbalanced and fall forward towards the toes during the remainder of the downswing.
I regard Sasho MacKenzie's reasoning as being highly flawed. I can agree that a golfer needs to brace his body during the later downswing when the arms/club are swinging very fast towards impact, but I do not believe that it requires that a golfer increase the pressure (vertical ground reaction force) under his lead foot very fast during the early downswing action. If you consider my pelvic girdle muscular-based technique of performing a pelvic motion during the downswing, I recommend that a golfer actively straighten the left leg by activating his left vastus lateralis muscle and left gluteus maximus muscle starting immediately after the end of the hip-squaring phase (which usually ends at ~P5 - P5.2). That biomechanical left leg straightening action will produce a large amount of vertical force under the left foot, which together with the resultant movement of the left buttock back away from the ball-target line, will adequately brace/stabilise a golfer and prevent him from falling forward towards his toes during his later downswing. Therefore, there is no imperative need to move the overall COP measurement from the right foot to the left foot as fast as possible at the start of the downswing.
Consider the Swing Catalyst's COP measurements of the pro golfer, Luke List, during his early downswing action.
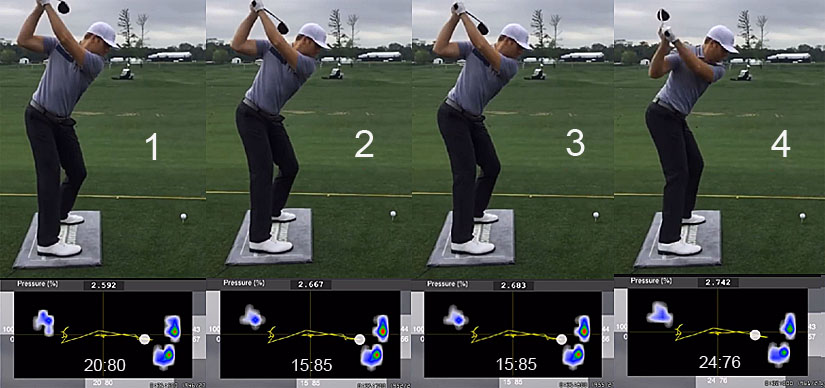
The numerical measurements in white below the capture images of Luke List represent his COP measurements (vertical force measurements) under each foot (expressed as a percentage of his overall COP measurement) with the right foot COP measurement being on the right side of each image.
At his P4 position (image 1), Luke List has 80% of his overall COP measurement under his right foot. Note that the COP measurement under his right foot actually increases when he starts his hip-squaring pelvic rotary motion, and I think that it probably helps him to better stabilise his right leg/foot when he activates his right-sided lateral pelvic rotator muscles, which then induce his pelvis to rotate counterclockwise away from his stablised right leg/foot. Note that Luke List has almost completed his hip-squaring phase by image 4, at which time he has only 24% of his COP measurement under his lead foot.
Here are Luke List's COP measurements in his mid-late downswing.
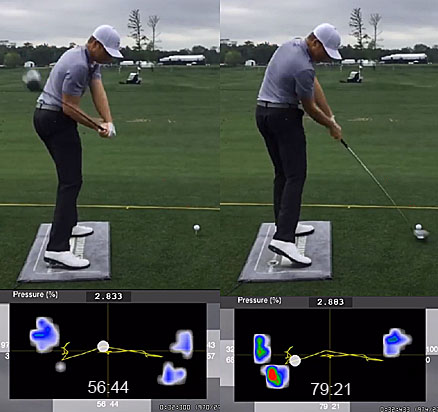
Image 1 is at the P5.5 position and image 2 is at impact.
Note that Luke List has only 56% of his COP measurement under his left foot at his P5.5 position. Then, note that the COP measurement (vertical force measurement) being exerted under his left foot increases to 79% by impact. Why does the vertical force being exerted under his left foot increase in his mid-late downswing to reach its peak value at impact? From my perspective, it makes perfect sense if he is using his pelvic girdle and left thigh muscles in the manner that I have recommended - where a golfer starts to actively straighten the left leg very soon after he has reached the end of his hip-squaring phase, and where the peak left leg straightening action happens at impact.
This pattern of COP measurement where the COP measurement under the lead foot peaks at impact is characteristic of a group of pro golfers, who I categorise as front-foot golfers. My recommended, muscular-based, technique of performing a pelvic motion during the downswing will naturally result in a golfer becoming a front-foot golfer (like Luke List) where the vertical force measurement under the left foot will increase steadily between ~P5.2 => impact. However, although the vertical force measurement under the lead foot peaks at impact, with most of the vertical pressure/force being exerted under the heel area (rather than the forefoot area) at impact, it is important to realise that it is simply the natural end-result of performing the pelvic motion in the biomechanical manner that I have described. I do not believe that it is advantageous to even know what's the absolute value of the COP measurement under the lead foot at impact, because I do not believe that it will help a student-golfer learn how to perform the downswing's pelvic motion in a biomechanically more optimum manner.
There are a large number of pro golfers who manifest a different lead foot COP measurement pattern, where the COP measurement under the lead foot peaks in the mid-downswing and then decreases dramatically by impact. I categorise this COP measurement pattern as the reverse-foot golfer pattern. There are even some pro golfers who have a near-zero COP measurement under the lead foot at impact, because their lead foot is essentially air-borne at impact with the lead foot floating in the air, and no longer touching the ground. However, I personally do not favor teaching a student-golfer how to become a reverse-foot golfer, even though it is indeed possible to become a skilled PGA tour golfer if one chooses to use the reverse-foot golfer pattern. I also do not believe that pro golfers, who uses the reverse-foot golfer pattern, are destined to drive the ball a greater distance than pro golfers (eg. Dustin Johnson, Luke List, Cameron Champ and Bryson DeChambeau), who are using the front-foot golfer pattern.
Here is an example of the pelvic motion of a professional long-drive competitor, Justin James, through impact (capture images derived from an Instagram video)
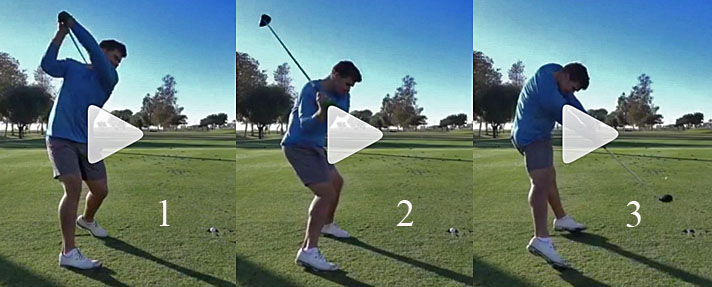
Image 1 is at the P4 position, image 2 is at the P5 position, and image 3 is through impact.
Note that has the typical squat "Sam Snead sit-down look" posture at the end of his hip-squaring phase (image 2). Then, note how he is airborne through impact where he has jumped up-and-away from the ball-target line. Note that he is not performing a rotary pelvic motion and his pelvis is square to the ball-target line in image 3. Note that he has a marked degree of early pelvic extension and posterior pelvic tilt in image 3 that produces an exaggerated "standing-up" posture and a loss of his spinal bend inclination angle.
Uninformed golfers may believe that this "jumping up-and-away" pelvic motion pattern is needed to drive the ball >400 yards. However, I believe that it is readily possible to drive the ball >400 yards using the standard pelvic motion technique that I have described, combined with a front foot golfer pattern of COP measurements at impact as previously described.
Here are capture images of the pelvic motion of another long-drive competitor, Tim Burke (World Long Drive Champion), through impact.
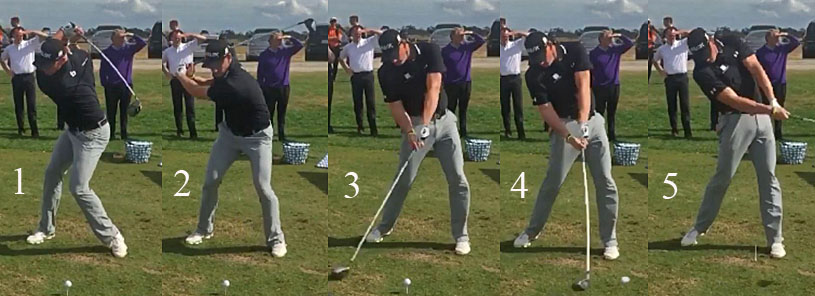
Image 1 is the P4 position, image 2 is at the P5 position, and image 4 is at impact.
Note that he has loaded his right-sided lateral pelvic rotator muscles very efficiently during his backswing action by driving his right hip joint into a state of internal rotation by P4 (image 1).
Note that he has squared his hips by P5 (image 2). Note that he continues to rotate his pelvis counterclockwise between P5 => P7 so that he has an open pelvis at impact, while he increasingly straightens his left leg and elevates his left pelvis. Note that his left heel is solidly grounded at impact, and during his followthrough, and that there is no "jumping up-and-away" phenomenon, or left heel spinning motion, through impact.
Topic number 3: How, and why, should a golfer shallow the clubshaft during the early-mid downswing action.
Many pro golfers shallow their clubshaft during the early-mid downswing between P4 => P6, and in this topic I will discuss three questions -:
i) How do we define the phenomenon of clubshaft shallowing during the early-mid downswing?
ii) What biomechanical actions are needed to shallow the clubshaft during the early-mid downswing?
iii) Why do some pro golfers choose to shallow their clubshaft during the early-mid downswing?
I think that the best definition of the phenomenon of clubshaft shallowing in the early-mid downswing is the phenomenon where the clubshaft shallows relative to the golfer's hand arc path during the P4 => P6 time period.
Consider a few examples.
Consider Jamie Sadlowski's hand arc path.
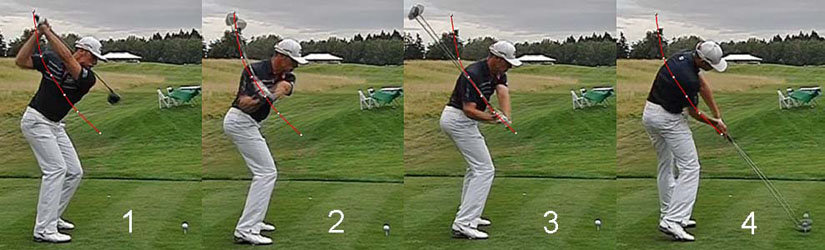
The red splined path represents Jamie Sadlowski's hand arc path. Note that his hand arc path is steeper in the early downswing between P4 (image 1) => P5 (image 2) and that it then becomes less steep after P5. However, note that his clubshaft does not shallow relative to his hand arc path between P4 (image 1) => P5.5 (image 3).
Consider Dustin Johnson's hand arc path.
The red splined path represents Dustin Johnson's hand arc path. Note that his hand arc path is even steeper than Jamie Sadlowski's hand arc path because Dustin Johnson bends over more at address due to an increased degree of hip joint flexion and he therefore has a larger spinal bend inclination angle at address. Note that his left arm is also more vertical at his end-backswing position because he also angles his left arm steeper than his shoulder turn angle. Note that Dustin Johnson chooses to shallow his clubshaft relative to his hand arc path during his early downswing between P4 (image 1) and P5 (image 4).
Consider Rickie Fowler's hand arc path.
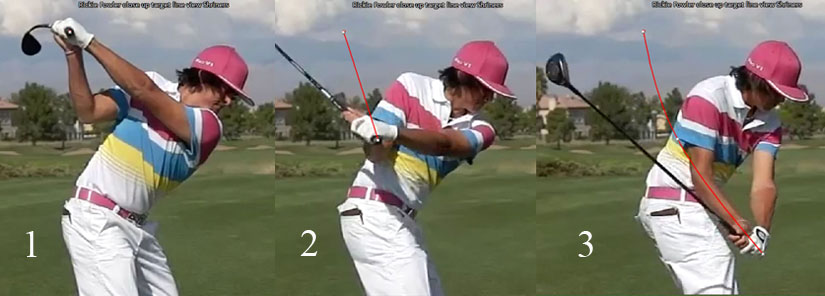
The red splined path represents Rickie Fowler's hand arc path. Note that Rickie Fowler has his lead arm just below his shoulder turn angle at his end-backswing position (image 1), which means that the starting point of his hand path at P4 is lower than Dustin Johnson's at his comparable P4 position. Note that Rickie Fowler's hand arc path is steeper between P4 (image 1) and P5 (image 2) than it is between P5 (image 2) and P5.5 (image 3). Note that Rickie Fowler shallows his clubshaft relative to his hand arc path during his early downswing between P4 => P5 (like Dustin Johnson) and roughly by the same comparable amount. Rickie Fowler's clubshaft angle (relative to the ground) at his P5 position is shallower than Dustin Johnson's clubshaft angle (relative to the ground) at his P5 position, but that does not mean that he is shallowing his clubshaft more than Dustin Johnson relative to his hand arc path, and his clubshaft is shallower (relative to the ground) at his P5 position mainly due to the fact that his hand arc path is less steep during his early downswing action.
What is causing Jamie Sadlowski's, Dustin Johnson's, and Rickie Fowler's hand arc path to be very steep in the early downswing between P4 => P5, and what are Dustin Johnson/Rickie Fowler doing differently to Jamie Sadlowski that allows them to shallow their clubshaft relative to their hand arc path?
All of those 3 pro golfers have a steep hand path between P4 => P5 and I think that it is due to the fact that they all actively adduct their right upper arm (humerus) towards the right side of their right upper torso during their early downswing, while they simultaneously i) avoid abducting their left arm away from their anterior chest wall (in an OTT manner) and while ii) they also avoid moving their right shoulder too much outwards in the direction of the ball-target line (in an OTT manner).
However, what are Dustin Johnson and Rickie Fowler doing differently to Jamie Sadlowski from a biomechanical perspective that allows them to shallow their clubshaft relative to their hand arc path between P4 => P5, considering the fact that they all actively adduct their right arm while continuously maintaining a bent right elbow angle?
I believe that the major biomechanical factor that causes clubshaft shallowing relative to the hand arc path during the early-mid downswing's active right arm adduction maneuver is a greater degree of right forearm supination, which allows the right palm to become more horizontal relative to the ground. To keep the left palm parallel to the right palm during this clubshaft shallowing time period, the left forearm has to passively pronate to a small degree.
Here is an animated gif (created by Kelvin Miyahira) showing how Alvaros Quiros shallows his clubshaft between P4 => P5.
Note how Alvaros Quiros shallows his clubshaft between P4 => P5 while he adducts his right arm towards the right side of his right upper torso, and note that it requires no increased degree of internal rotation of the right humerus, but an increased degree of right forearm supination to accomplish that goal. Another biomechanical factor that can allow the right palm to more easily become more horizontal (relative to the ground) between P4 => P5 is an increased degree of right wrist bending (extension) that is associated with a right wrist circumductory roll motion, and that biomechanical phenomenon is seen in some pro golfers who shallow their clubshaft during the P4 => P5.5 time period. Note that Alvaros Quiros' right shoulder drops groundwards between P4 => P5, and that is due to depression/protraction of his right scapula and not due to right lateral bending, which happens later in his downswing action. The downplane motion of the right shoulder makes it easier for the hand arc path to become steeper during the early downswing's right upper arm adduction maneuver, but it does not independently cause clubshaft shallowing.
Once you understand what biomechanical actions are needed to shallow the clubshaft during the early-mid downswing time period, you still have to consider the following fundamental question-: Why do some pro golfers shallow their clubshaft during their P4 => P6 time period?
Many golf instructors believe that the major reason why a golfer should shallow the clubshaft during the early-mid downswing is based on their perception that it will decrease the amount of active left forearm supinatory muscular force required to square the clubface in the later downswing.
Here is a graph from Sasho Mackenzie's paper detailing his forward dynamics computer modelling of the golf swing.
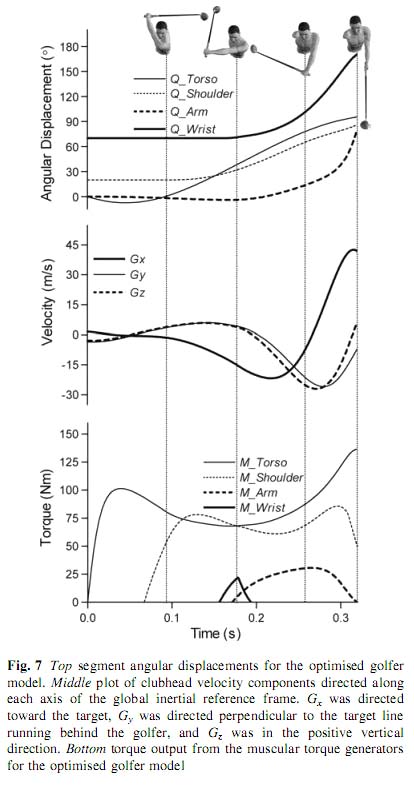
The M arm torque graph demonstrates that Sasho MacKenzie believes that a finite amount of active muscular torque is needed during the later downswing in order to rotate the lead forearm counterclockwise in a supinatory direction, so that the clubface can be squared by impact.
Sasho MacKenzie also believes that a golfer can reduce the amount of active M arm torque needed if he shallows the clubshaft during the early-mid downswing.
Here is Sasho MacKenzie's diagram showing that phenomenon.

This diagram shows a golfer where the clubshaft is shallowed below the arm abduction plane. The golfer is pulling the club handle down the arm abduction plane (which is instantaneously parallel to the constantly changing hand arc path plane during the early-mid downswing). Note that a moment arm is created by the component of the force acting at the grip end of the club in the arm abduction plane, and that moment arm will passively produce an angular impulse on the club that will rotate the clubshaft counterclockwise towards the arm abduction plane. In other words, this passive angular impulse phenomenon should decrease the amount of active muscular torque (M arm torque) needed to rotate the lead forearm in a supinatory direction during the later downswing in order to get the clubface square by impact.
I don't disagree with Sasho MacKenzie's theoretical reasoning, but a relevant question then becomes-: Which type of golfer will most benefit from this passive angular impulse phenomenon that is secondary to shallowing the clubshaft during the early-mid downswing? I believe that this passive angular impulse phenomenon will be most beneficial to a golfer who uses a weak-neutral lead hand grip strength, because he will require the greatest amount of lead forearm supination in the later downswing in order to square the clubface by impact. By contrast, a golfer, who uses a very strong lead hand grip strength (like Jamie Sadlowski), will require very little lead forearm supination in his later downswing in order to get a square clubface by impact, and it therefore seemingly makes sense that Jamie Sadlowksi does not shallow his clubshaft during his early-mid downswing.
However, there is a problem with this line of reasoning because some pro golfers, who adopt a very strong lead hand grip strength (like Jamie Sadlowski), still choose to shallow their clubshaft during their early-mid downswing.
Here is an example - featuring Hunter Mahan, who uses a very strong lead hand grip strength.
Capture images of Hunter Mahan's downswing action.
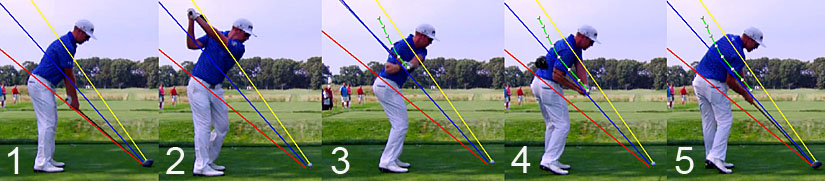
The yellow colored plane line = Turned shoulder plane (TSP).
The blue colored plane line = Elbow plane.
The red colored plane line = Hand plane.
Note that Hunter Mahan prefers to stand at address with his lead arm near-vertical, and with his clubshaft on the hand plane (image 1).
At his P4 position (image 2), Hunter Mahan has his lead hand/clubshaft near the TSP.
The green splined path represents Hunter Mahan's Hand arc path, and you can see that Hunter Mahan shallows his clubshaft below his hand arc path during his early-mid downswing (image 3 is at P5 and image 4 is at P5.5).
Note that Hunter Mahan reaches impact with his clubshaft just below the elbow plane and with his lead arm near-vertical.
Now consider Jamie Sadlowski's lead arm/clubshaft angles at impact.
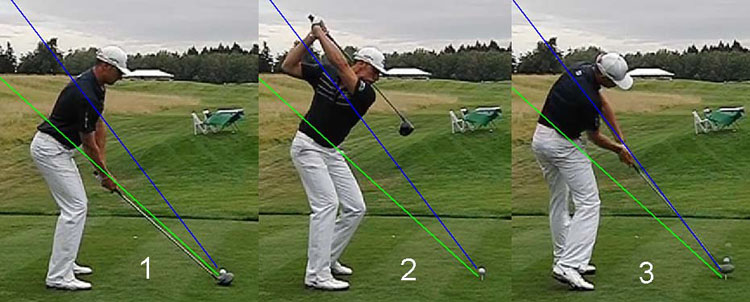
The blue-colored plane = Turned shoulder plane (TSP).
The green colored plane = Hand plane.
Note that Jamie Sadlowski prefers to stand at address with his lead arm near-vertical, and with his clubshaft on the hand plane (image 1).
At his P4 position (image 2), Jamie Sadlowski has his lead hand/clubshaft well above the TSP.
Jamie Sadlowski does not shallow his clubshaft relative to his hand arc path during his early-mid downswing (see previous image), and his lead hand/clubshaft are both positioned fractionally below the TSP at impact (image 3). Note that Jamie Sadlowski's lead arm is angled away from his body at impact, and his clubshaft is nearly straight-in-line with his lead arm, which means that he has a very small accumulator #3 angle at impact. By contrast, Hunter Mahan has his lead arm near-vertical at impact and he has a much larger accumulator #3 angle at impact. In other words, the phenomenon of clubshaft shallowing during the early-mid downswing is very closely correlated with a golfer's lead arm angle and clubshaft angle at impact, where the golfer has a near-vertical lead arm and a large accumulator #3 angle at impact, and it does not correlate with the fact that it can potentially decrease the active M arm torque needed to supinate the lead forearm in the later downswing in order to get a square clubface by impact (because a golfer with a very strong lead hand grip strength does not need to use very much M arm torque to enable him to square the clubface by impact).
To reinforce my bold-highlighted claim, let's consider pro golfers who use a neutral lead hand grip strength. Theoretically, according to Sasho MacKenzie's postulated reasoning, they should all want to shallow their clubshaft during their early-mid downswing so that they can decrease the amount of active M arm torque needed to square their clubface by impact. However, not all pro golfers, who use a neutral lead hand grip strength, shallow their clubshaft during their early-mid downswing.
Consider Phil Mickelson's downswing action.
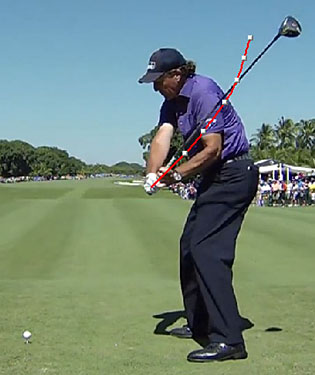
The red splined path represents Phil Mickelson's hand arc path. Note that his clubshaft is coming down the same plane as his hand arc path and that he does not shallow his clubshaft relative to his hand arc path during his early-mid downswing.
The following capture images also demonstrate that Phil Mickelson's clubshaft comes down the same plane as his lead hand during his early-mid downswing action, and that he does not shallow his clubshaft relative to his hand arc path.
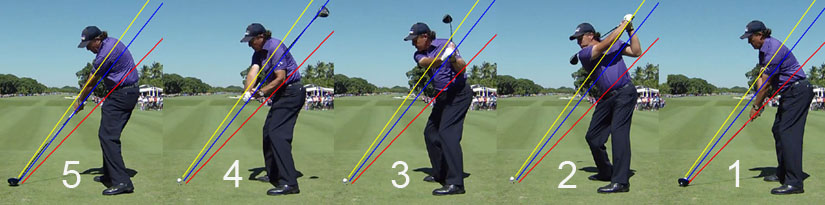
Image 1 is address, image 2 is at his end-backswing (P4) position, image 3 is at his P5 position, image 4 is at his P5.5 position and image 5 is impact.
I have drawn a red line along Phil Mickelson's clubshaft at address, and that represents his hand plane. I have drawn a blue line between the ball and his rear elbow at address and that line represents his elbow plane. I have drawn a yellow line between the ball and his rear shoulder socket when he is at his end-backswing position, and that line represents the turned shoulder plane (TSP). Note that there is very little difference in the degree of steepness of his elbow plane relative to his TSP.
Note that his lead arm is near-vertical at address and that an extension of the hand plane line drawn out from the butt end of the club points at his belt buckle.
Note that Phil Mickelson's lead hand and clubshaft are on the TSP at his end-backswing position (image 2).
Note that Phil Mickelson only shallows his hand arc path and his clubshaft by a very small (and insignificant) amount between P4 and P5 (image 3) as his clubshaft shallows down to the blue line, which is negligibly shallower than the yellow line. Note that he does not shallow his clubshaft to a plane that is shallower than his hand arc path's plane during his early-mid downswing.
Note that his clubshaft is still on the blue elbow plane line at P5.5 (image 4) and also at impact (image 5). Note how outstretched his lead arm is at impact and note that his clubshaft is nearly straight-line-aligned with his lead arm at impact (which means that he has a small accumulator #3 angle at impact).
Now, consider the clubshaft shallowing action of another pro golfer, Sergio Garcia, who also uses a neutral lead hand grip strength (like Phil Mickelson).
Capture image of Sergio Garcia's early-mid downswing action.
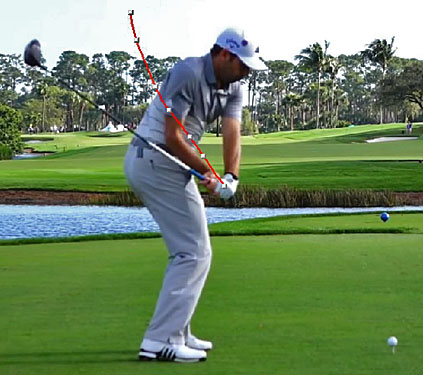
The red splined path represents Sergio Garcia's hand arc path. Note that his hand arc path is very steep initially during his early downswing and that it is slightly less steep during his mid-downswing time period.
In this capture image, Sergio Garcia is at the P5.5 position. Note how much he has shallowed his clubshaft relative to his hand arc path between P4 and P5.5 and his clubshaft has already shallowed down to his hand plane by P5.5. Note that to shallow his clubshaft that much relative to his hand arc path during his early-mid downswing, Sergio Garcia had to keep his right humerus neutral and his right forearm fully supinated during his active right arm adduction maneuver and he also had to passively pronate his left forearm between P4 and P5.5 because he is not bowing his lead wrist more (which can angle the clubshaft groundwards) during that time period.
Here are additional capture images of Sergio Garcia's downswing action.
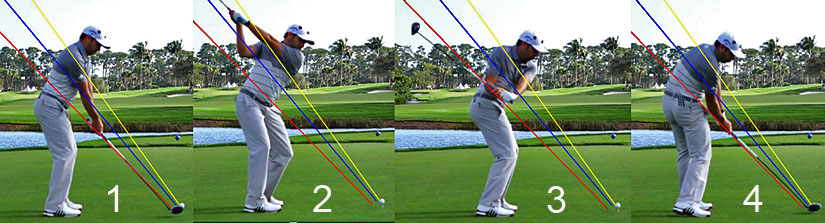
Image 1 is address, image 2 is at his end-backswing (P4) position, image 3 is at approximately the P5.2 position and image 4 is at impact.
I have drawn a red line along Sergio Garcia's clubshaft at address, and that line represents his hand plane. I have drawn a blue line between the ball and his right elbow at address and that line represents his elbow plane. I have drawn a yellow line between the ball and his right shoulder socket when he is at his end-backswing position, and that line represents the turned shoulder plane (TSP).
Note that Sergio has a near-vertical left upper arm at address (image 1) and that an extension of the hand plane line drawn out from the butt end of the club points at his belt buckle.
Note that Sergio Garcia has his lead hand and clubshaft just below the TSP at his P4 position (image 2).
Note how much Sergio Garcia shallows his clubshaft during his early-mid downswing - by noting that his clubshaft has already shallowed down to the hand plane by P5.2 (image 3). Note how Sergio Garcia uses an active right arm adduction maneuver to adduct his right upper arm towards his shirt seam on the right side of his mid-upper torso between P4 => P5.2. Most importantly, note how much his right humerus is not internally rotated and how much his right forearm is supinated at his P5.2 position and those two biomechanical actions allow him to get his right palm to become much more horizontal relative to the ground, which is biomechanically necessary if a golfer wants to shallow his clubshaft a lot during his early-mid downswing's active right arm adduction maneuver.
Note that Sergio Garcia's clubshaft is still on the hand plane at impact (image 4). Most importantly, note that Sergio Garcia's lead arm is near-vertical at impact and note that he has a large accumulator #3 angle at impact.
To better understand what's meant by the term "accumulator #3 angle" consider these comparative images of Phil Mickelson and Sergio Garcia at impact.
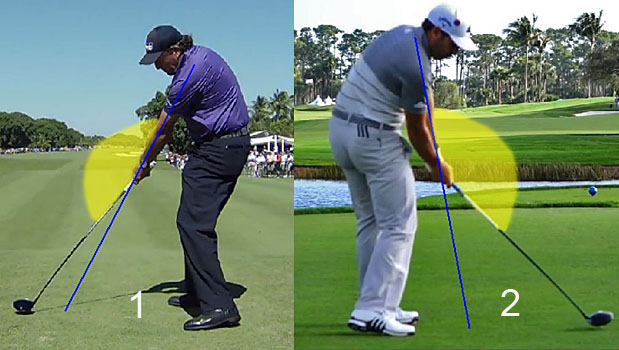
I have drawn a blue line down the longitudinal axis of their lead arm and extended that line down to ground level. Note that the angle between that blue line and Phil Mickelson's clubshaft is 10 degrees, while that same angle between Sergio's Garcia's blue line and his clubshaft is 35 degrees. That angle between the clubshaft and the blue line reflects the magnitude of the accumulator #3 angle. The accumulator #3 angle (a TGM term) is actually the angle between the left arm and the clubshaft (represented by that yellow colored arc that I drew using Photoshop), and the magnitude of the accumulator #3 angle = 180 degrees minus that angle between the left arm and the clubshaft (which is equal to 10 degrees in Phil Mickelson's swing and 35 degrees in Sergio Garcia's swing). So, Phil Mickelson has a small accumulator #3 angle at impact while Sergio Garcia has a large accumulator #3 angle at impact.
Note that the phenomenon of a large degree of clubshaft shallowing (relative to the hand arc path) during the early-mid downswing is very closely correlated with a golfer's lead arm angle and clubshaft angle at impact, where the golfer has a near-vertical lead arm alignment and a large accumulator #3 angle at impact - and that this close correlation applies irrespective as to whether the golfer uses a weak/neutral lead hand grip strength or a very strong lead hand grip strength.
In other words, if a golfer wants to reach impact with a near-vertical lead arm alignment and a large accumulator #3 angle (like Hunter Mahan and Sergio Garcia), then he needs to shallow his clubshaft relative to his hand arc path by a large amount during his early-mid downswing action. By contrast, if a golfer wants to reach impact with an outstretched lead arm alignment and a very small accumulator #3 angle (like Jamie Sadlowski and Phil Mickelson), then he does not need to shallow his clubshaft relative to his hand arc path during his early-mid downswing time period.
Most professional golfers, who use a weak/neutral left hand grip strength, shallow their clubshaft relative to their hand arc path by a small-to-moderate amount during their early-mid downswing and they come into impact with a slightly outstretched lead arm and a moderate-sized accumulator #3 angle.
Here are a few pro golfer examples - featuring Adam Scott, Justin Rose and Rory McIlroy.
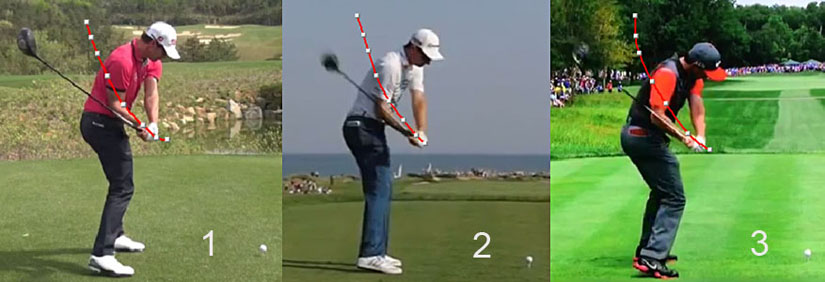
The red splined path represents their hand arc path.
Note that all of the 3 pro golfers shallow their clubshaft relative to their hand arc path by a moderate amount during their early-mid downswing action.
Here are capture images of their impact alignments.
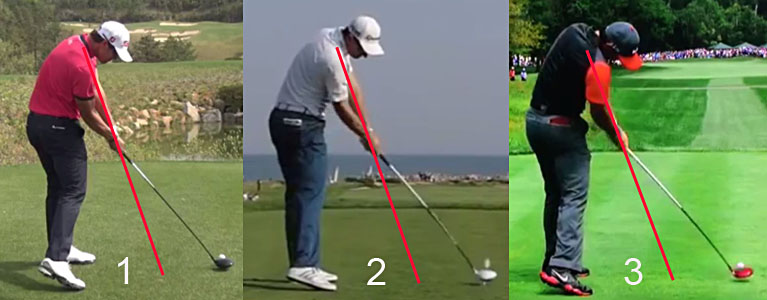
Note that the 3 pro golfers have their lead arm slightly outstretched away from their body at impact and that they have a moderate-sized accumulator #3 angle at impact.
There is no law (biomechanical rule) that can rationally specify how a golfer should look at impact - with respect to i) the degree of lead arm outstretching away from the body at impact, and ii) the magnitude of the accumulator #3 angle at impact - and it depends on an individual golfer's body shape, spinal bend inclination angle, lead hand grip pattern (finger/low palmar lead hand grip versus a high palmar lead hand grip), body flexibility and a variety of different biomechanical movement patterns. Each individual student-golfer should remain open-minded regarding this clubshaft-shallowing issue and he should be willing to explore the issue as to whether he should shallow his clubshaft relative to his hand arc path during his early-mid downswing.
Topic number 4: How should a golfer close his clubface relative to his clubhead arc during his late downswing action?
The first question that I need to answer is why does a golfer have to close his clubface relative to the clubhead arc during the later downswing? I can imagine that some golfers believe that if a golfer keeps the clubface continuously square to the clubhead arc throughout the entire backswing action, and then keeps the clubface continuously square to the clubhead arc throughout the entire downswing action, that there would be no need to perform any specific clubface-closing action in the later downswing. This golf swing technique of keeping the clubface continuously square to the clubhead arc throughout the entire backswing, entire downswing and early followthrough action is called the "square-to-square" method and some golf instructors teach that golf swing methodology.
Here is a diagram showing how the clubface would behave between P6.5 and P7.5 if a golfer uses the "square-to-square" method of performing a golf swing action.
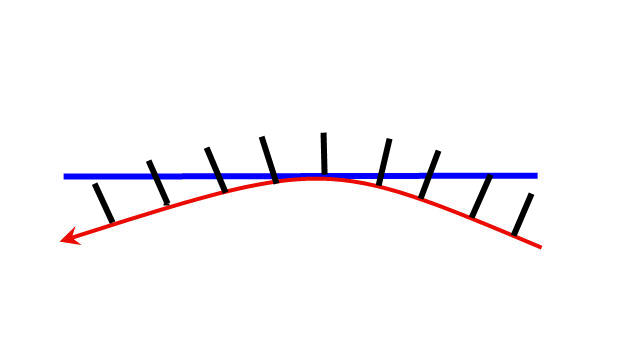
The blue line represents the ball-target line. The curved red line represents the clubhead arc, which has an "in-to-square-to-in" pattern relative to the ball-target line.
The black lines represent the clubface, which is continuously square (perpendicular) to the clubhead arc. If the clubhead arc becomes momentarily square to the target at impact, then the clubface will automatically also be square to the target at impact, and that will allow a golfer to hit the ball straight towards the target if he hits the ball with the sweetspot (center) of his clubface.
Any reasonably flexible golfer should be able to perform the "square-to-square" method if he performs a markedly shortened golf swing action where the clubshaft remains below waist level. The problem is that most pro golfers, who want to hit the ball reasonably far, take a much longer backswing where the lead arm gets to the 10 - 12 o'clock position, and it then becomes biomechanically impossible to keep the clubface square to the clubhead arc during the entire backswing if one adopts a weak/neutral lead hand grip strength. Virtually all pro golfers, who adopt a weak/neutral lead hand grip strength, will rotate their lead forearm clockwise in a pronatory direction during their backswing action, and that will open the clubface relative to the clubhead arc. The amount of lead forearm pronation happening during the backswing between P1 => P4 will be greater if the backswing's lead arm motion is flatter (as seen in Rickie Fowler's driver golf swing action) than if the backswing's lead arm motion is steeper (as seen in Dustin Johnson's driver golf swing action). The closest that a pro golfer can get to keeping the clubface continuously square to the clubhead arc during the entire backswing and entire downswing of a full-length golf swing action, will happen if he uses a very strong (4+ knuckle grip) lead hand grip as seen in Jamie Sadlowski's driver golf swing action. However, even Jamie Sadlowski performs a pronatory lead forearm motion in his backswing action and a supinatory lead forearm motion in his downswing (as I will soon demonstrate).
If a pro golfer performs a lead forearm pronatory motion during his backswing action, then it will automatically/naturally open the clubface relative to the clubhead arc as the golfer twists the club handle in a clockwise rotary direction during his lead forearm pronatory motion. To get the clubface square to the clubhead arc by impact, a golfer must twist the club handle in a counterclockwise direction during his downswing action. The major method that pro golfers use to twist the club handle counterclockwise during the downswing is to use a lead forearm supinatory motion, which only happens in the later downswing after ~P5.5. To better understand these facts, consider the following 3D graphs produced by Phil Cheetham.
Phil Cheetham, a TPI biomechanist, studied the golf swings of 92+ pro golfers using a 3D motion capture device and here are the graphical results of his study.
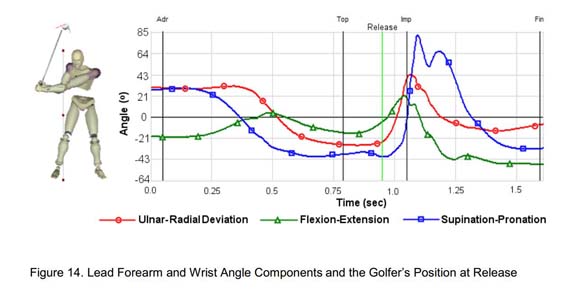
The blue graph shows the lead forearm supination-pronation in terms of angular displacement. Supination is above the horizontal zero black line, and pronation is below the zero line.
The vertical black line labelled "add" represents the P1 position; the vertical black line labelled "top" represents the P4 position; and the vertical black line labelled "imp" represents impact. The green vertical line labelled "release" represents the start of the club release phenomenon (called a PA#2 release action in TGM terminology), which is biomechanically due to a lead wrist uncocking motion where the lead wrist starts to move from being radially deviated to eventually becoming ulnar-deviated by impact (see red graph).
Note that the blue graph (which presumably is a representative "average" graph of a generic pro golfer) shows that the lead forearm is about 30 degrees supinated at address. Note that the pro golfer rotates his lead forearm in a clockwise pronatory direction during his backswing action and that his lead forearm is ~40 degrees pronated at his P4 position. Note that his lead forearm remains ~40 degrees pronated during his early-mid downswing until just after the "release" point, and note that his lead forearm first rotates slowly in a supinatory direction for a very short time period before it rotates very rapidly in a supinatory direction in the later downswing to eventually become slightly supinated (~0 - 10 degrees supinated) at impact.
Note that the above graph shows that the lead forearm pronates very gradually, and progressively, during the backswing action. However, the pattern of lead forearm pronation during the backswing varies considerably in pro golfers being faster between P1 => P2.5 in golfers who use a Right Forearm Takeaway methodology, but only happening faster after P2.5 in golfers who use the One-Piece Takeaway methodology. During the downswing, the pattern of lead forearm supination is very similar among different pro golfers (who use a non-strong lead hand grip strength) and the rapid phase of lead forearm supination only happens in the later downswing after P6.2.
To gain a better impression of the rotary speed of lead forearm supination happening during the later downswing in a pro golfer, consider the following Phil Cheetham graph where he plots the angular velocity, and not the angular displacement, on the Y axis.
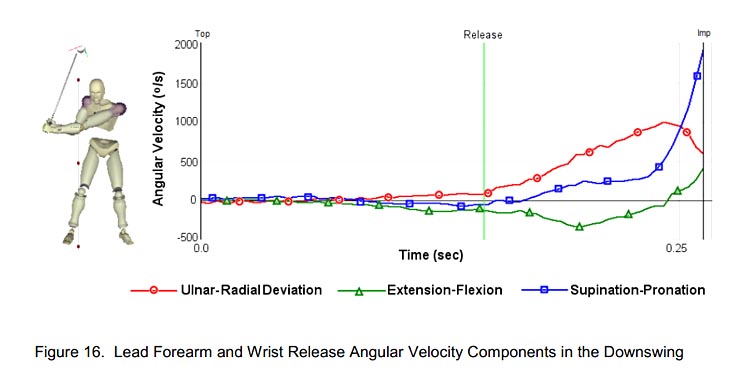
This graph only shows the downswing time period between the P4 ("top") and P7 ("imp") positions.
Note that the blue graph (lead forearm supination-pronation graph) shows that the lead forearm does not start to rotate counterclockwise during the early-mid downswing, and that it first starts to rotate counterclockwise in a supinatory direction just after the release point. Note that the angular velocity of lead forearm supination is very slow when the club is first starting to rapidly release (see red graph showing the angular velocity of lead wrist ulnar-deviation that starts to happen just after the vertical green "release" line) and that the angular velocity of lead forearm supination rapidly increases in the later downswing when the angular velocity of lead wrist ulnar-deviation is starting to slow down (representing the end phase of the release of PA#2). This rapid phase of lead forearm supination is called a PA#3 release action in TGM terminology, and it allows a golfer to square the clubface relative to the clubhead arc by impact.
The above Phil Cheetham graph is presumably a representative "average" graph of a pro golfer, and Phil Cheetham does not state whether it is mainly reflective of a pro golfer who uses a weak/neutral lead hand grip strength (rather than a very strong lead hand grip strength) and he also does not state whether it is mainly reflective of a golfer, who uses a non-strong lead hand grip strength, and who also comes into impact with a small accumulator #3 angle (like Phil Mickelson) or whether it is more reflective of a golfer who comes into impact with a large accumulator #3 angle (like Sergio Garcia).
What effect does adopting a very strong lead hand grip strength (like Jamie Sadlowski's) have on the PA#3 release action?
Here is Jamie Sadlowski's 3D graph.
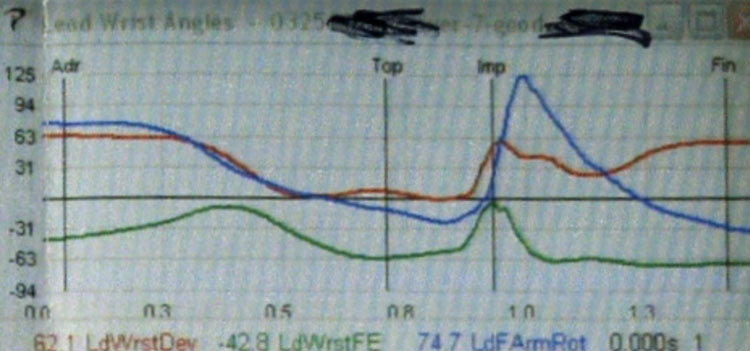
The blue graph is Jamie Sadlowski's lead forearm supination-pronation graph.
Note that Jamie Sadlowski's lead forearm is ~75 degrees supinated at address. Note that he pronates his lead forearm by a large amount during his backswing action and that his lead forearm is ~15 degrees pronated at his P4 position. Note that he then pronates his lead forearm slightly more during his early-mid downswing by about ~10 degrees (due to his hand arc path becoming less steep between P5 => P5.5). Note that he then starts to rotate his lead forearm clockwise in a supinatory direction during his mid-late downswing so that his lead forearm gets to become ~10 degrees supinated at impact. Most importantly, note that the angular velocity of his lead forearm's counterclockwise rotation in a supinatory direction that is happening in his later downswing is much slower than that seen in the Phil Cheetham lead forearm supination graph - by looking at the comparative slopes of the lead forearm supination-pronation graphs just before impact. That is one significant advantage that adopting a very strong lead hand grip strength at address has over adopting a weak/neutral lead hand grip strength at address - one does not have to use as much lead forearm supination during the PA#3 release action, and the speed of any lead forearm counterclockwise rotation happening just before impact is significantly slower.
The difference in the pattern of lead forearm supination that happens between P6 => P7 in pro golfers, who use different lead hand grip strengths, is visually apparent if you examine capture images from their swing videos.
Ernie Els uses a neutral lead hand grip strength, and here are capture images of his late downswing action.
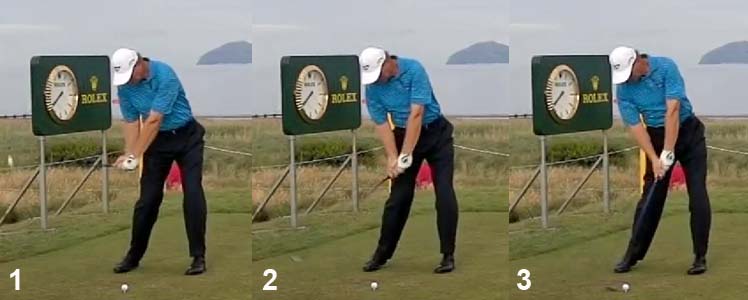
Image 1 is at the P6 position, image 2 is at the P6.5 position and image 3 is at impact.
Note that the back of Ernie Els lead hand is facing the ball-target line at his P6 position, and it is parallel to the swingplane. Note that the toe of his clubhead is facing upwards and that his clubface is parallel (neutral) relative to the back of his lead hand.
Note that the back of Ernie Els lead hand is facing the target at impact, and it is roughly perpendicular to the ball-target line - and that suggests that his lead hand has rotated about ~90 degrees between P6 => P7, and it is mainly due to a lead forearm supinatory motion.
Jamie Sadlowski uses a very strong lead hand grip strength, and here are capture images of his late downswing action.
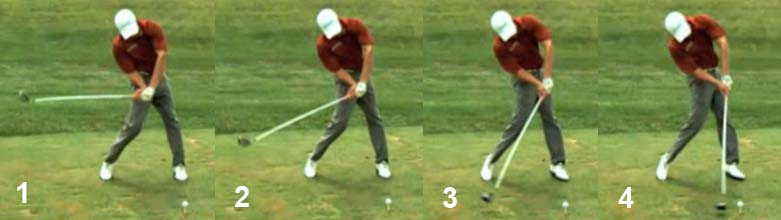
Image 1 is at the P6 position, image 2 is at the P6.3 position, image 3 is at the P6.7 position and image 4 is at impact.
Note that the back of Jamie Sadlowski's lead hand is facing the ball-target line at his P6 position (image 1), and it is parallel to the swingplane. Note that the toe of his clubhead is tilted outwards in the direction of the ball-target line and that his clubface is closed by >45 degrees relative to the back of his lead hand (which is naturally expected if a golfer adopts a very strong lead hand grip strength at address).
Note that the back of Jamie Sadlowski's lead hand is still facing the ball-target line at impact (image 4) and it is still roughly parallel to the swingplane, which suggests that there has been very little counterclockwise rotation of his lead forearm happening between P6 => P7.
I previously mentioned that if a golfer adopts a weak-or-neutral hand grip strength at address, that he will have to use a significant amount of lead forearm supination during his late downswing's PA#3 release action in order to get a square clubface by impact.
Here is a lead forearm supination 3D graph from a pro golfer showing the late downswing's lead forearm supination phenomenon.
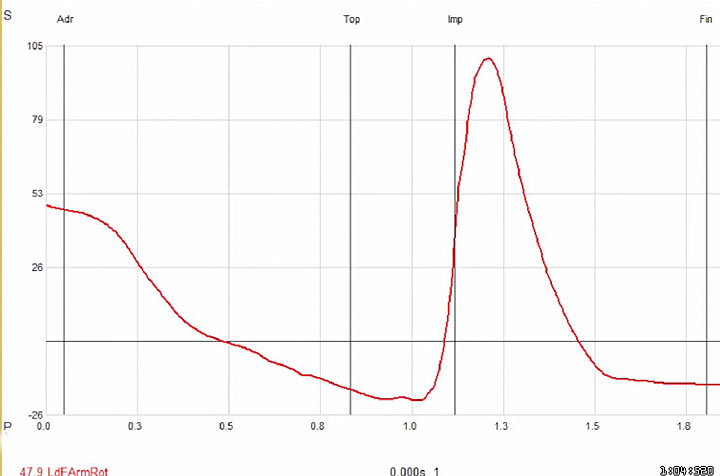
Supination is above the horizontal axis's zero line, and pronation is below that line. The vertical axis shows the angular displacement in degrees.
Note that this golfer's lead forearm is pronated about 18 degrees at his P4 position, and that it then pronates a few more degrees during his early-mid downswing, and this minimal lead forearm pronation phenomenon is most likely due to a shallowing motion of his lead hand arc path. Then, note that his lead forearm starts to rotate in a supinatory direction at a slow speed for a short time period before it starts to rapidly rotate counterclockwise by a large amount in the later downswing. Different pro golfers, who use a neutral lead hand grip strength, will have different patterns of lead forearm supination in their later downswing, and a major factor that influences the pattern of lead forearm supination during a PA#3 release action is the accumulator # 3 angle that the pro golfer manifests at impact.
As I previously demonstrated, Phil Mickelson has a very small accumulator #3 angle at impact, and here are capture images of Phil Mickelson's late downswing action.
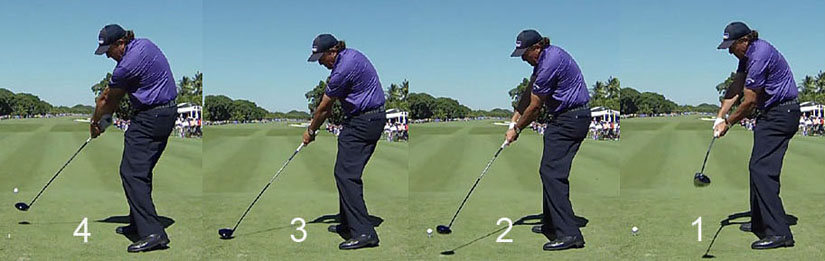
Image 1 is just bypassed the P6 position. Note that his clubface is still open to the clubhead arc and that the toe of his clubhead is pointing up (skywards) and that it is also tilted slightly backwards away from the ball-target line. Note that the clubface is parallel to the back of his lead hand and watchface area of his lead lower forearm because he has a neutral lead hand grip strength and he has maintained an intact LFFW/GFLW alignment. Note that the back of his lead hand, and watchface area of his lead lower forearm, is parallel to the inclined plane, which has a degree of steepness roughly equivalent to the steepness of the TSP because he did not shallow his clubshaft during his early-mid downswing.
Image 2 is at the P6.7 position. Note that the clubface is still wide open relative to the ball-target line and also relative to the clubhead arc. Note that the back of his lead hand, and watchface area of his lead lower forearm, is still roughly parallel to the inclined plane, which has roughly the same degree of steepness as the TSP because he is not shallowing his clubshaft between P6 and P6.7. Note that there is no evidence that Phil Mickelson is significantly supinating his lead forearm between P6 and P6.7. Note that he has significantly uncocked his lead wrist and thereby released PA#2 (in the plane of his intact LAFW) between P6 and P6.7 and that the clubshaft has nearly caught up to his lead arm by P6.7.
Image 3 is at impact, where he has squared his clubface by supinating his lead forearm by the amount needed to acquire a square clubface by impact. In other words, Phil Mickelson delays his lead forearm supinatory action and he only significantly supinates his lead forearm between P6.7 and impact (and this represents a PA#3 release action in TGM terminology). If virtually all of his lead forearm supinatory motion happens in that short pre-impact time period between P6.7 and impact, that means that the amount of clubface roll per unit degree of clubhead travel is very large as his clubhead travels along the last ~18" of his clubhead travel path just before impact. That large amount of ROC (rate-of-closure) of his clubface in the last ~18" of clubhead travel along the clubhead arc (just before impact) is potentially a great disadvantage because it makes it much more difficult for him to time his clubface roll so that the clubface can be guaranteed to be square at impact. What aggravates the timing of his clubface-squaring phenomenon is the fact that Phil Mickelson needs to use an active muscular force (M arm torque) to perform his PA#3 release action's left forearm supinatory motion. Why can Phil Mickelson not use passive forces to square his clubface by impact? Phil Mickelson cannot use the passive "torque force" (as described by Sasho MacKenzie) because he does not shallow his clubshaft during his early-mid downswing. So, he is dependent on using an active muscle force (M arm torque) derived from an active muscular contraction of his lead forearm's supinator muscles. Although Phil Mickelson has to use an active M arm torque force to supinate his lead forearm during his PA#3 release action, the amount of active muscular force required is actually very small because the *moment-of-inertia is very small - and that is due to the fact that his clubshaft has nearly caught up to his straight lead forearm by P6.7.
(* See the 15:10 minute time point of this Sasho MacKenzie and Chris Como video at https://www.youtube.com/watch?v=iuJaSM7Kexw if you want to better understand why his moment-of-inertia is small)
Although Phil Mickelson may not require a large amount of lead forearm supinatory muscular force (M arm torque) during his PA#3 release action between P6.7 and impact (because his moment-of-inertia is small), he still has to regulate that "muscular force" during a very short time period immediately pre-impact so that it does not continue to remain active through impact, which will predispose to a roller hand release action through impact. That requisite "turn-on" and then immediately "turn-off" phenomenon as it applies to his lead forearm's supinatory muscular force is obviously very difficult to achieve, and also difficult to consistently time with the requisite degree of precision! Secondly, if he simultaneously "runs-out-of-right arm" then he cannot fruitfully use a controlled trail arm straightening motion to synergistically assist him in smoothly, and controllably, performing his PA#3 release action. Phil Mickelson often "runs-out-of-right arm" during his later downswing's immediate pre-impact time period - as "evidenced" by the fact that his trail palm often loses close physical contact with PP#1 (that is located over the base of his lead thumb) between P6.8 and impact, or sometimes only just through impact. If Phil Mickelson "runs-out-of-right arm" while the trail palm remains in physical contact with his lead thumb and club handle, then it can result in an uncontrolled roller hand release action through impact - as seen in the following animated gif.
Note how fast Phil Mickelson's lead forearm is supinating through impact, thereby causing a high clubface closure rate through impact.
Note that Phil Mickelson's trail arm is fully straight at impact, and the biomechanical phenomenon where the trail arm has become fully straight by impact is called a "running-out-of-right arm" phenomenon and it is usually due to the fact that the trail shoulder has not moved far enough downplane by impact. When the trial arm straightens fully by impact, it is very common for the trail forearm to unintentionally over-pronate, and that causes the trail hand to rotate over a supinating lead hand, which significantly increases the likelihood that a golfer will manifest an uncontrolled roller hand release action through impact.
By contrast to Phil Mickelson who has a small accumulator #3 angle at impact, Sergio Garcia has a large accumulator #3 angle at impact and here are capture images of his late downswing action.
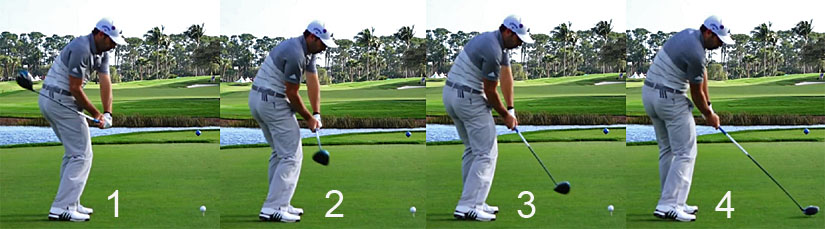
Image 1 is at the P5.5 position. Note that Sergio Garcia has already shallowed his clubshaft down to his desired impact plane (= the hand plane) by P5.5.
Note that his clubface is wide open relative to his clubhead arc - but note that his clubface is straight-line-aligned relative to the back of his left hand (GFLW), and the watchface area of his left lower forearm, because he has an intact LFFW/GFLW alignment.
Image 2 is at the P6 position. Note that the back of his left hand (GFLW), and watchface area of his left lower forearm, is more vertically oriented and that means that he has rotated his left forearm counterclockwise in a supinatory direction by a significant amount between P5.5 and P6. What makes it biomechanically easier for him to rotate his intact LFFW so much counterclockwise between P5.5 and P6, when he still has a large moment-of-inertia (due to the fact that he still has a large amount of clubhead lag present), is the "fact" that he can utilise the passive torque force (described by Sasho MacKenzie) that is secondary to the fact that his clubshaft's plane of motion is significantly shallower his hand arc path's plane of motion. Note how much he has squared his clubface relative to his clubhead arc between P5.5 => P6 due to his early left forearm supination phenomenon.
Image 3 is at P6.5. Note that he is continuously, and progressively, supinating his left forearm between P6 and P6.5, and that his clubface is becoming progressively more square to his clubhead arc.
Image 4 is at impact where he presumably has a square clubface.
During the P6 => P7 time period, his clubshaft is tracing a conical pendular path. Most importantly, note that the amount of clubface roll happening per unit amount of clubhead travel during his late downswing between P6.7 and impact is very small because his clubface rolling action (due to left forearm supination) happens very gradually, and very steadily, over a much longer time period of clubhead travel between P5.5 and impact - and that fact is potentially of great benefit to Sergio Garcia when it comes to consistently timing his late downswing's clubface-squaring action (compared to Phil Mickelson's delayed clubface-squaring action that happens very fast between P6.7 and impact).
Phil Mickelson and Sergio Garcia both use a neutral lead hand grip strength, but they are polar opposites when it comes to the timing and speed of lead forearm supination happening during the later downswing between P6 => P7. Most pro golfers, who use a weak-or-neutral lead hand grip strength, have a moderate-sized accumulator #3 angle at impact, and they therefore have a lead forearm supination pattern during their later downswing that is intermediate between the polar extremes of Phil Mickelson and Sergio Garcia.
Henrik Stenson shallows his clubshaft by a moderate amount during his early-mid downswing and he manifests a moderate-sized accumulator#3 angle at impact.
Here are capture images of Henrik Stenson's late downswing PA#3 release action.
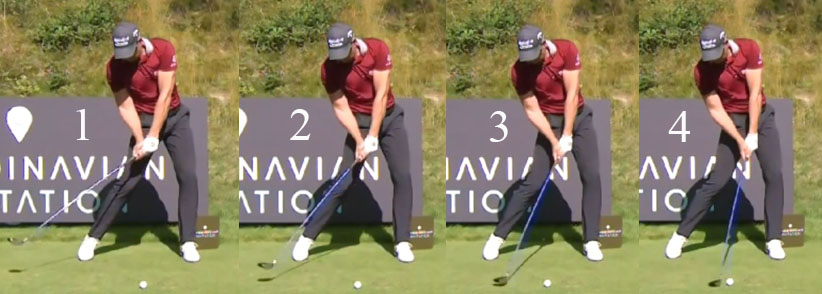
Image 1 is at the P6.2 position, image 2 is at the P6.5 position, image 3 is at the P6.8 position and image 4 is at impact.
Henrik Stenson uses a neutral lead hand grip strength, and an intact LFFW/GFLW technique, so his clubface remains straight-in-line (from an angular rotational perspective) relative to the back of his GFLW, and also the watchface area of his lead lower forearm, throughout his entire downswing action.
Note that Henrik Stenson's clubface is still open to his clubhead arc at P6.2 and that it steadily, and progressively, closes during the later downswing between P6.2 => P7 so that it can become square to the clubhead arc and also the ball-target line at impact. Note how the back of his left hand, and the watchface area on the back of his left lower forearm, are closing at the same closing rate as the clubface (from an angular rotational perspective), and this phenomenon is mainly due to a lead forearm supinatory motion, which is happening steadily, and progressively, throughout his late downswing time period.
A very interesting intellectual quandary arises when you realise that all pro golfers, who use a weak-or-neutral lead hand grip strength, are going to need to perform a PA#3 release action during their late downswing in order to square their clubface relative to their clubhead arc by impact. The fundamental biomechanical phenomenon that is the true basis of a PA#3 release action is lead forearm supination. Lead forearm supination causes a counterclockwise rotation of the lead palm during the late downswing (as can be readily seen in the above capture images of Henrik Stenson's PA#3 release action). If a golfer adopts a neutral lead hand grip strength, and also a neutral right hand grip strength, at address (like Henrik Stenson), then the two palms are facing each other throughout the entire golf swing action. That means that when Henrik Stenson's lead palm is rotating counterclockwise between P6.2 => P7 during his late downswing's PA#3 release action, that his trail palm must be rotating in the same direction by exactly the same amount - as seen in the capture images above. What biomechanical actions must the trail arm/forearm/wrist perform to make this possible?
Many golf instructors, and analytical golfers, would likely answer the above question by stating that if the lead forearm is supinating by a finite amount during a pro golfer's late downswing's PA#3 release action, then that means that the trail forearm must be pronating by the same amount in order to allow the two palms to keep facing each other during the late downswing's PA#3 release action. However, the true "real life" reality is very different! In most pro golfers, who use a neutral lead hand grip strength and a neutral trail hand grip strength, both the lead forearm and the trail forearm are supinating during the first half-phase of the PA#3 release action!
Jon Sinclair has performed many 3D studies on pro golfers, and he has a Wrist Angles Video (for sale at https://www.sinclairgolf.com/ProShop/Product/tabid/33192/rvdsfpid/video-club-membership-546/Default.aspx ) in which he has demonstrated that pro golfers exhibit a dual-forearm supination phenomenon during their later downswing.
Here is a copy of one of Jon Sinclair's images from that Wrist Angles video.
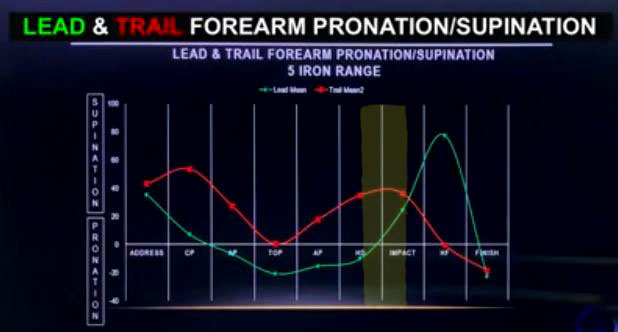
The abbreviation "top" represents the P4 position, the abbreviation "AP" is presumably the P5 position, the abbreviation "MD" is presumably the P6 position and the term "impact" represents the P7 position.
Supination is above the horizontal zero line, and pronation is below that line.
The green graph represents the lead forearm supination graph. Note that I have used Photoshop to add a faint yellow highlighted zone that starts when the lead forearm starts to rapidly rotate counterclockwise in a supinatory direction beginning in the late phase of the mid-downswing and that yellow highlighted zone ends at impact when the lead forearm is frankly supinated. The yellow highlighted zone represents the PA#3 release zone.
The red graph represents the trail forearm supination graph. Note that the trail forearm starts to supinate during the early-mid downswing and that it continues to increasingly supinate during the first half of that yellow highlighted zone and that the degree of supination peaks just before impact. The trail forearm then becomes slightly less supinated by impact, but it is still frankly supinated at impact.
Capture images of pro golfers demonstrate the same fact that the trail forearm is supinated during the late downswing between P6 => P7 and that a counterclockwise roll motion of the trail forearm in a less-supinatory (pronatory) direction only happens just before impact.
I will use capture images of Henrik Stenson's late downswing to demonstrate that fact.
Capture images of Henrik Stenson's PA#3 release action.
Note that Henrik Stenson's trail forearm is frankly supinated at his P6.2 position (image 1) - note that his lower trail radial bone just above his trail wrist crease is rotated significantly clockwise relative to his trail ante-cubital fossa (elbow pit).
Note that his trail forearm remains supinated all the way to impact (image 4) although it is slightly less supinated at P7 than it was at P6.2.
If Henrik Stenson's trail forearm is not rapidly rotating in a pronatory direction between P6.2 => P7, then how does he ensure that his trail palm continuously faces his lead palm throughout the entire P6.2 => P7 time period? I believe that the correct answer is that Henrik Stenson rolls his trail palm in a counterclockwise direction (at exactly the same speed as his lead palm rotates counterclockwise) by simultaneously performing a trail wrist circumductory roll motion.
Note that his trail wrist is markedly bent back (extended) at his P6.2 position (image 1) and that it is far less bent back at his P7 position (image 4), which means that he is straightening his right wrist during his PA#3 release action. While he is moving his trail wrist in a straightening (palmar flexing) direction, he is also moving his trail wrist in an ulnar direction and the combination of those two wrist movements produces a circumductory roll motion of his trail wrist, which allows him to continuously keep his trail palm facing his lead palm during his PA#3 release action (while his trail forearm simultaneously becomes less supinated).
Note that Henrik Stenson keeps his right arm partially bent all the way to impact, which means that he does not have a "running-out-of-right arm" phenomenon, which can predispose to excessive counterclockwise rotation of the trail forearm in a pronatory direction during the later downswing. By controlling his speed of right arm straightening, and his speed of right wrist straightening, during his late downswing, Henrik Stenson can potentially be using his trail arm's motion to synergistically modulate the speed of his PA#3 release action so that it happens more controllably and in a smoother, less jerky, manner.
I could provide you with many examples that show the same dual-forearm supination phenomenon happening in other pro golfers, but I will only provide one more example featuring Dustin Johnson.
Capture images of Dustin Johnson's PA#3 release action.
Image 1 is the P5 position, image 2 is at the P6 position and image 3 is at impact.
Note that the back of Dustin Johnson's lead hand is facing the ball-target line at P6 and that it is facing the target at impact, which suggests that a lot of lead forearm supination must have happened between P6 => P7. Note that his trail forearm is very supinated at his P6 position, and still supinated at impact, but to a lesser degree. Note that his trail wrist is very bent bent-back (extended) at his P6 position and far straighter at impact. I believe that his trail palm continuously rotates counterclockwise to the same degree as his lead palm between P6 => P7 due to the combination of i) a small degree of trail forearm rotation in a less-supinatory (pronatory) direction during his right arm's straightening action plus ii) a small degree of trail wrist circumductory roll motion happening during his right wrist straightening action.
Note the motion of Dustin Johnson's right upper limb between P5 => P6. Note that he is actively adducting his right upper arm towards the right side of his torso while he is simultaneously performing a pitch elbow motion of his right arm where his right elbow is closer to the target than his right hand between P5 => P6. That pitch elbow motion requires that the right humerus be relatively neutral, and not internally rotated, during the P5 => P6 time period, which will angle the right forearm away from the target. Note that his right forearm is also considerably supinated during this time period and that his right palm is under the club handle at the P6 position. Note that when his right arm/wrist straightens between P6 => P7 that his right palm gets to eventually face the target at impact, but his right palm never gets to face the ground at any time point between P5 => P7.
There are two biomechanical actions involving the right upper limb that should not be performed during this P5 => P6 mid-downswing time period - i) internal rotation of the right humerus and/or ii) pronation of the right forearm that will cause the right palm to get partially on top of the club handle.
Consider this anonymous amateur golfer's right upper limb motion during his mid-downswing.
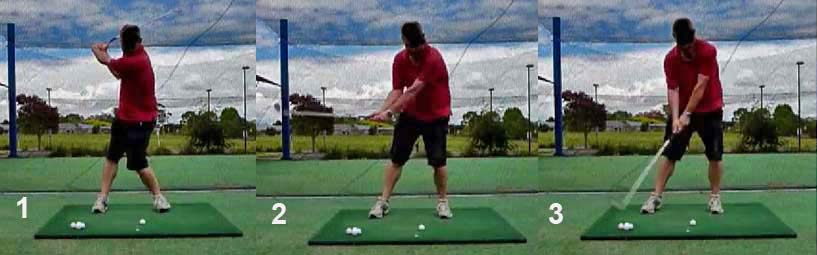
Image 1 is the P4 position, image 2 is at the P6 position, and image 3 is at the P6.5 position.
Note that the amateur golfer has reached the P6 position with the "appearance" of performing a right elbow pitch motion where his right humerus is neutral and his right forearm is supinated. However, he has already straightened his right arm too much and he has already lost a significant amount of clubhead lag.
Then note what happens between P6 and P6.5. Note that he i) is internally rotating his right humerus and ii starting to pronate his right forearm while iii) he continues to straighten his right arm. Note that he has lost all his clubhead lag by P6.5 and his right palm is more on top of the club handle (rather than being more under the club handle as seen in the Dustin Johnson capture images). This undesirable right upper limb motion is called a punch elbow motion in TGM terminology.
Why is this amateur golfer performing this sub-optimal punch elbow motion? The likely answer is that, as a student of the golf instructor, Brian Manzella, he was simply trying to follow the golf instructional advice Brian Manzella promoted in his video called "Ideas about the Release" where he stated-:
"To achieve it, from the top pull the club in the direction of the shaft CONTINUOUSLY as you begin to straighten your right arm (and your left arm slightly if it was bent) out away from you away from the target WHILE you preserve as much of your FULL shoulder turn as you can. About half-way down, WHILE YOUR CHEST IS FACING YOUR HANDS, use your right shoulder and right arm to re-position themselves to help you rotate the club about a point between your hands. When the club has some speed from this rotation, and the clubhead is level or slightly lower than your hands, use everything you have to pull the grip off of the club as your hips move left, open, and you lose all of your forward bend."
Note what Brian Manzella advises a student-golfer to perform starting at the P5 position - see the bold-highlighted statements. Brian Manzella wants a golfer to actively use his right upper torso and right upper limb to apply a positive torque to the club handle in order to induce the release of PA#2. I think that it's *terrible golf instructional advice that will more likely cause a premature release of PA#2 and also more likely produce a punch elbow motion that can potentially "tumble" the clubshaft over-the-plane between P5 => P6 or potentially cause excessive right forearm pronation that will cause the right palm to get on top of the club handle.
(* If you want to learn much more regarding my critical analysis of Brian Manzella's "Ideas about the Release", you can read the following review paper - Critical Review: Brian Manzella's Release Ideas )
Many other golf instructors also wrongheadedly teach golfers to perform a punch elbow motion during their mid-downswing, and another representative example of that golf instructional approach is Mike Malaska's "Malaska Move".
In this you-tube golf instructional video ( https://www.youtube.com/watch?v=1FvE9RbNaFY ) Mike Malaska demonstrates a drill where he demonstrates the fundamentals of his "Malaska Move".
Here are capture images of Mike Malaska demonstrating his pivot drill.
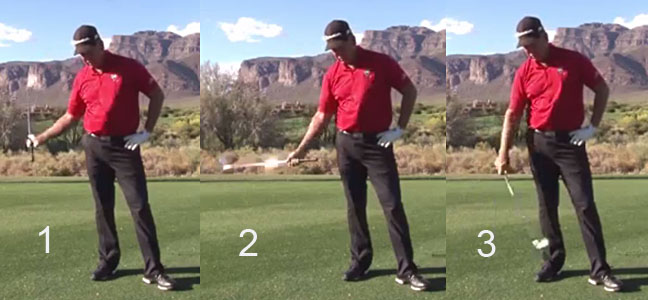
Image 1 shows Mike Malaska at the ~P5.5 position. Note that his clubshaft is seemingly "on-plane" (where the butt end of the club points at the ball-target line). Note that his right forearm is frankly supinated in image 1. In this face-on presentation, he is not starting to pronate his right forearm at the P5 position, and he is delaying it to the P5.5 position.
Image 2 shows Mike Malaska performing his "pivot action" where he internally rotates his right humerus and pronates his right forearm so that the clubshaft can "tumble" over-his right hand as it bypasses the pivot point of his right hand. Note his right hand does not move targetwards very much during his "pivot action". Note that his right palm has moved from being under the handle (in image 1) to being behind the handle (in image 2) as a result of that right forearm pronatory motion.
Image 3 shows the completion of the "Malaska Move" where the right forearm is frankly pronated to such a large degree that his right palm faces the ground. Note that his right hand has not moved targetwards during the time period between image 2 and image 3, and that he is rotating the handle of his club around his right hand's near-stationary pivot point so that the butt end of the club moves away from the target (and also moves backwards under the ventral surface of his right wrist, which is facing the ground).
It is important to understand that his personal video demonstration is only a drill designed to ingrain the "feel" of rotating the right forearm in a pronatory direction so that it can "tumble" the clubhead over the right hand's pivot point and allow it to move from being behind-the-hand (being further away from the ball-target line than his right hand) to being in front-of-his-hand (becoming closer to the ball-target line than his right hand). During the drill, Mike Malaska keeps his right hand relatively stationary at the pivot point, and he conceives of the club rotating around the pivot point during the transitional time period between the clubhead being behind-his-hand to then becoming in front-of-his-hand.
Mike Malaska states at the end of his video that when performing a "real life" golf swing, that the combination of using "two hands and body motion" during the later downswing will make it look more like the late downswing capture images often seen in videos of professional golfers.
Here are capture images of Mike Malaska demonstrating a full golf swing (which happens at the very end of his video) - where he performs the "Malaska Move" using two hands, while simultaneously performing the natural body motions usually performed during a professional-quality downswing action.
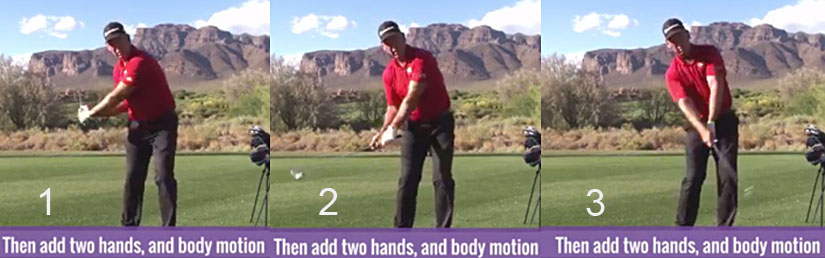
Mike Malaska is demonstrating the mid-late downswing action when "adding two hands and body motion".
Image 1 is at the P5.5 position. Note that he has an intact LFFW and that his clubshaft is seemingly "on-plane" (where the butt end of the club points at the ball-target line). Note that his right palm is parallel to the undersurface of the inclined plane on which his intact LFFW lies, which biomechanically means that his right forearm must be frankly supinated. Note that his right palm is facing skywards and it is positioned under the club handle.
Image 2 is at the P6 position. Note how he is pronating his right forearm so that it becomes more neutral by P6, and that causes his right palm to move from being under the club handle to being more behind and partly on-top of the club handle.
Image 3 is at a late downswing position. Note that he is not driving his right elbow targetwards to a position that is more in front of the right hip area by using a pitch elbow motion (as seen in Dustin Johnson's pitch elbow motion images) and that he is keeping his right elbow positioned alongside his right shirt-seam. Note that he is internally rotating his right humerus so that his right antecubital fossa faces inwards towards his body, and note that he is pronating his right forearm to well beyond the neutral position, so that his right palm is partially facing groundwards. I think that this punch elbow motion, which combines internal rotation of the right humerus together with pronation of the right forearm, does not often happen in professional golfers, and their right forearm only rotates in a pronatory direction to a much smaller degree much later in their late downswing so that their right forearm rotates from being frankly supinated at P5.5 to becoming less-supinated by impact (where the right palm faces the target, but is still partially under the club handle). However, at no time point during their mid-late downswing does their right palm face partially groundwards!
There is another golf instructor, A J Bonar, who offers even more terrible golf instructional advice!
Here are capture images from an article featuring A J Bonar's golf instructional advice.
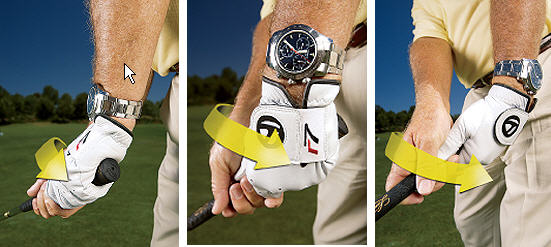
A J Bonar makes the following comments to accompany these images seen in that article -: "Now the fun part! About two or three feet before your hands reach impact, assertively rotate them toward the target. Imagine you're gripping a screwdriver and turning it counterclockwise. This closes the clubface, generating big-time power".
What A J Bonar is recommending is an active hand-crossover hand release action, where the right forearm actively pronates by such a large amount that it rotates the right hand over a supinating left hand through impact. I think that this recommended active hand-crossover release action is terrible golf instructional advice and it will invariably lead to a roller hand release action through impact, which is undesirably associated with a very high clubface ROC through impact!
Although I believe that very little muscular torque is needed to perform a PA#3 release action in the late downswing in order to ensure that the clubface gets square to the clubhead arc by impact, I still obviously believe that a PA#3 release action is necessary (with the amount of required lead forearm supination being inversely proportional to lead hand grip strength).
An interesting question then arises - can a pro golfer fruitfully use an alternative technique of twisting the club handle closed during the downswing that will eliminate, or at least decrease, the need for the pro golfer to use a significant amount of lead forearm supination during the later downswing in order to square the clubface by impact?
There are two alternative clubface-closing techniques, which are based on a handle twisting phenomenon, that some golf instructors enthusiastically recommend - i) the "Motorcycle Move" and ii) the "Twistaway Maneuver".
Tyler Ferrell is a golf instructor, who enthusiastically promotes the "Motorcycle Move" (which is also called the "Reverse Motorcycle Move").
Here is a capture image from one of Tyler Ferrell's videos where he demonstrates the "Motorcycle Move".
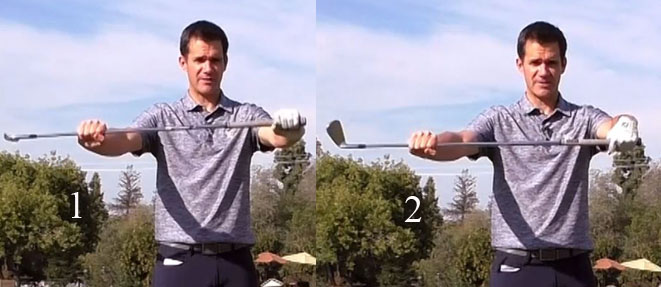
Image 1 shows Tyler Ferrell holding a golf club handle with his left hand as if he were grasping the handle grip of a motorcycle with his left hand. Note that the clubshaft is horizontal to the ground and that the clubshaft is at a roughly 90 degree angle relative to his left forearm, which means that his left wrist is radially deviated (upcocked).
In image 2, he is actively palmar flexing his left wrist while using his right arm/hand to keep the clubshaft stationary so that it does not angulate. Note that the clubface rotates counterclockwise in a clubface closing direction. It would be more accurate to label this maneuver the "Reverse Motorcycle Move" because a motorcyclist usually rotates the motorcycle's handle grip clockwise when twisting the motorcycle's handle grip. However, I will use Tyler Ferrell's "Motorcycle Move" term in this downswing chapter to describe the true factual reality that palmar flexion of the lead wrist will cause the clubshaft to rotate counterclockwise about its longitudinal axis if the lead wrist is radially deviated, and that it will close the clubface relative to the clubhead arc, and also relative to the watchface area of the back of the left lower forearm, by ~30 degrees if the golfer adopts a weak-neutral lead hand grip.
I have written about the topic of "What effect does lead wrist bowing have on the clubface and clubshaft?" in the following review paper at https://perfectgolfswingreview.net/LeadWristBowing.html and if you look at the capture images of my visual demonstration in that review paper, you will note that I have confirmed the fact that lead wrist bowing twists the club handle about its longitudinal axis so that the clubface will close by ~30 degrees, but only if the lead wrist is radially deviated.
Tyler Ferrell has stated that if a golfer closes the clubface by ~30 degrees relative to the clubhead arc by performing the "Motorcycle Move" in the early downswing (or even earlier in the late backswing), when the lead wrist is radially deviated, that it will allow a golfer to get to the P5.5/P6 position with a clubface that is already closed relative to the clubhead arc by that amount.
Here are capture images from Tyler Ferrell's "Stock Tour Swing" book where he demonstrates the "Motorcycle Move".

The first image on the left side shows Tyler Ferrell at his end-backswing position. Note that his lead wrist is slightly cupped, and that his clubface is open to the clubhead arc, but neutral relative to the watchface area on the back of his lead lower forearm (which is expected if a golfer adopts a weak-neutral lead hand grip strength). Note that his lead wrist is radially deviated and that the clubshaft is at a ~90 degree angle relative to his lead forearm.
The second image shows Tyler Ferrell at his P5.5 position. Note that his lead wrist is overtly bowed (palmar flexed) and that it closes the clubface relative to his clubhead arc by ~ 20-30 degrees because the lead wrist bowing maneuver that he is performing between P4 => P5.5 is happening when his lead wrist is radially deviated. Note that the clubface is closed relative to his clubhead arc, and also closed relative to the watchface area on the back of his lead lower forearm, by ~20-30 degrees at his P5.5 position (and also at his P6 position in the third image).
What is the implication of that true factual reality? Tyler Ferrell has implied that early clubface closing of ~30 degrees secondary to the use of a "Motorcycle Move" maneuver (that is performed during the early-mid downswing) means that a golfer can simply rotate his torso counterclockwise into impact without having to use any further clubface closing in the later downswing secondary to the use of lead forearm supination (which is called a PA#3 release action in TGM terminology). To support his personal opinion, Tyler Ferrell presented the following comparative handle twist velocity graphs in one of his Golf Smart Academy videos.
Composite image created from two copied graphs.
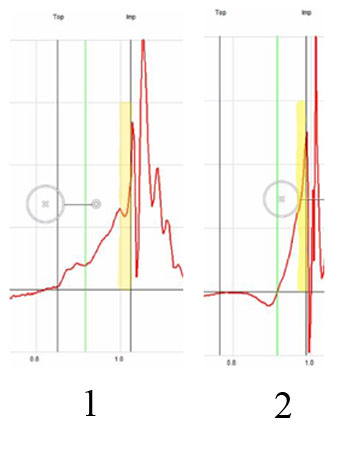
The red graph is a measure of the handle twist velocity of the golf club handle during the downswing. The vertical black line labelled "top" represents the end-backswing position and the vertical black line labelled "imp" represents the impact position, and the downswing happens between the two vertical black lines.
Image 1 shows the handle twist velocity graph of a pro golfer who apparently uses the "Motorcycle Move" in the early downswing. Note that the graph shows a low level of handle twist velocity happening in the early downswing between the vertical "top" black line and the green vertical line, and that is presumably due to the "Motorcycle Move" maneuver.
Image 2 shows the handle twist velocity graph of a skilled amateur golfer who does not use the "Motorcycle Move" maneuver. Note that his handle twist velocity graph does not rise above the zero horizontal black line in his early downswing. Note that his handle twist velocity starts to increase in the mid-downswing and that it then continues to increase in a smooth, non-interrupted manner all the way to impact, reaching its maximum axial twist velocity at impact.
Now, look again at image 1's handle twist velocity graph. Note that the handle twist velocity is not fast in the mid-downswing, but it does increase very rapidly in velocity just before impact (see the yellow-colored zone). In fact, if you look at the handle twist velocity graph near/at impact in image 1 it is just as fast as the handle twist velocity graph seen near/at impact in image 2 (see the yellow-colored zone). Why is the handle twist velocity so fast just before impact in image 1 - thereby contradicting Tyler Ferrell's claim that using a "Motorcycle Move" maneuver in the early downswing means that a golfer will not have to twist the club handle very fast in the later downswing near impact? The answer is related to the fact that the golfer is maintaining a bowed lead wrist throughout the entire downswing into the early followthrough, and it is causally due to the fact that maintaining a bowed lead wrist into the later downswing, when the lead wrist becomes increasingly ulnar deviated, causes clubshaft angulation without clubface closing. I discussed this "clubshaft angulation effect due to lead wrist bowing happening when the lead wrist is ulnar-deviated" phenomenon in great detail in my review paper called "What effect does lead wrist bowing have on the clubface and clubshaft?"
I believe that many golf instructors do not understand that maintaining a bowed lead wrist "Motorcycle Move" maneuver into the later downswing will cause backwards angulation of the clubshaft relative to the bowed lead wrist/hand, so that the golfer will approach impact with a lot of forward shaft lean (where the lead hand is well ahead of the clubhead).
Here is an example featuring the pro golfer Collin Morikawa.
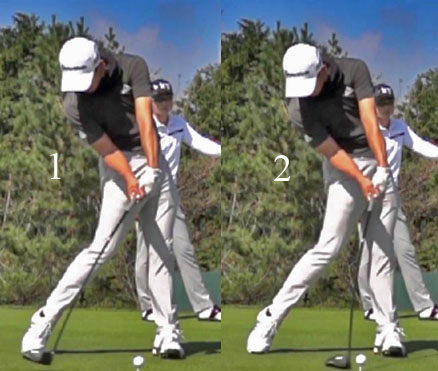
Image 1 shows Collin Morikawa at his P6.7 position and image 2 shows him at impact.
Note that Collin Morikawa has a markedly bowed lead wrist that angles his clubshaft back away from the target relative to his lead hand. Now, although Collin Morikawa closed his clubface relative to his clubhead arc by ~30 degrees by bowing his lead wrist at his P4 position when his lead wrist was radially deviated, his clubface is still open relative to the ball-target line at his P6.7 position because his clubshaft is angled so much backwards relative to his bowed lead wrist/hand. Look at how much Collin Morikawa has to rotate his lead hand, and therefore his clubface, counterclockwise between P6.7 => impact - i) by looking at the degree of counterclockwise rotation of the back of his lead hand, or ii) by looking at the degree of counterclockwise rotation of his lower radial bone in his lower lead forearm, or iii) by looking at the degree of counterclockwise rotation of the watchface area on the back of his lead lower forearm. To get a square clubface by impact, Collin Morikawa has to use a finite amount of counterclockwise rotation of his lead humerus and a finite amount of lead forearm supination between P6.7 => P7, and Tyler Ferrell is not taking that fact into account. Note that Collin Morikawa's lead hand has already reached the ball position by P6.7 and that there is only about 2" of targetwards travel of his lead hand happening between P6.7 => impact. That means that the degree of counterclockwise rotation of his clubshaft (due to lead arm/forearm counterclockwise rotation) happening per unit amount of lead hand travel distance is going to be larger near impact, which will likely result in a larger clubface ROC near impact - even if the overall amount of counterclockwise rotation of his clubshaft is smaller in amount between P6 => P7 due to the fact that his clubface is already closed relative to his clubhead arc by ~30 degrees at the P6 position.
Jon Rahm is a prototypical example of a golfer who uses the bowed lead wrist "Motorcycle Move" technique, and here are capture images showing how he uses the "Motorcycle Move" during his early-mid downswing golf swing action.
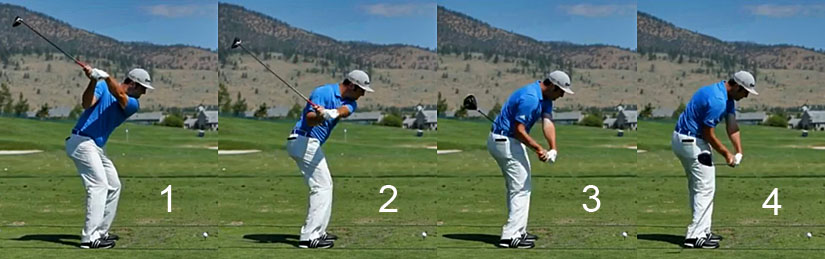
Image 1 is at the P4 position, image 2 is at the P5 position, image 3 is at the P5.5 position and image 4 is at the P6 position.
Note that Jon Rahm bowed his lead wrist during his backswing action, and that it caused his clubface to be slightly closed relative to his clubhead arc, and also relative to the watchface area on the back of his lead lower forearm, at the P4 position.
Note that the degree of lead wrist bowing is less at the P5 position, but it then increases significantly in amount between the P5 => P6 positions due to Jon Rahm's use of the "combined lead wrist palmar flexion + early lead forearm supination" maneuver. Note that Jon Rahm's clubface is closed by >30 degrees relative to his clubhead arc, and also relative to the watchface area on the back of his lead lower forearm, at the P6 position.
Now, although proponents of the "Motorcycle Move" maneuver (like Tyler Ferrell) believe that early clubface closing due to use of the "Motorcycle Move" between P4 => P6 implies that the golfer can simply turn his body into impact without having to rotate the lead forearm counterclockwise during the later downswing, the true "real life" reality does not support their opinion.
Here is a copy of Jon Rahm's 3D graphs.
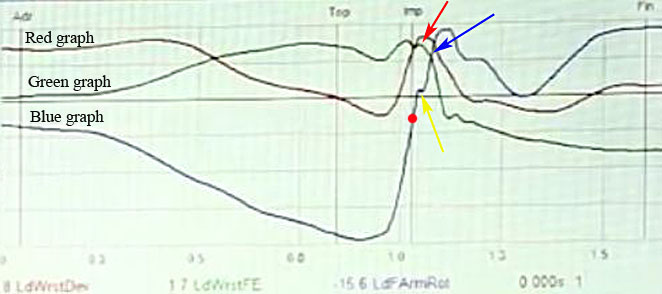
The green graph represents Jon Rahm's lead wrist flexion-extension graph. Note that Jon Rahm's lead wrist is bowed at the P4 position. Then, note that his degree of lead wrist bowing decreases slightly in the early downswing before increasing again in the later downswing and that he reaches impact with a markedly bowed lead wrist.
The blue graph represents Jon Rahm's lead forearm supination-pronation graph. Note that Jon Rahm's lead forearm is pronated at his P4 position, and that his lead forearm pronates slightly more during his early-mid downswing when he shallows his clubshaft between P4 => P6. Then, note how much, and how rapidly, Jon Rahm supinates his lead forearm in his later downswing after P6. The reason why Jon Rahm still has to use a large amount of lead forearm supination in his later downswing in order to square his clubface by impact is due to the fact that his marked amount of lead wrist bowing, which is happening between P6 => P7, angles his clubshaft backwards away from the target and thereby opens the clubface relative to his ball-target line - and like Collin Morikawa, he needs to rotate his lead hand counterclockwise by a significant amount between P6.5 => P7 in order to get his clubface square to the ball-target line by impact.
Here are capture images of Jon Rahm's late downswing action.
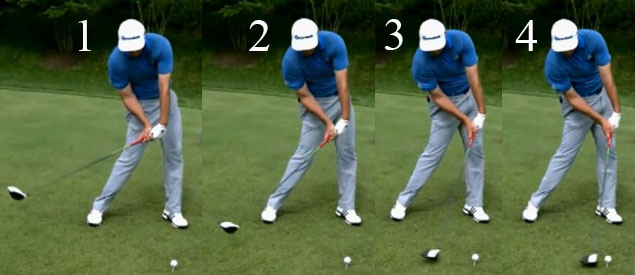
Image 1 is at the P6.2 position, image 2 is at the P6.5 position, image 3 is at the P6.8 position and image 4 is at impact.
At the P6.5 position, Jon Rahm's clubface is presumably closed relative to his clubhead arc by ~30 degrees because he performed the "Motorcycle Move" in his backswing and early-mid downswing when his lead wrist was radially deviated. However, his clubface is still very open relative to his ball-target line because he has such a large degree of backwards clubshaft angulation - note that his lead hand has already reached the ball position while his clubhead is still about 30" away from impact. Note that his lead hand only moves targetwards by a few inches between P6.5 => P7 and during that time period his clubface has to rotate counterclockwise by a significant amount in order for the clubface to become square to the ball-target line at impact. It is therefore not surprising that Jon Rahm's 3D lead forearm rotation graph shows a large amount of lead forearm supination rapidly happening between P6.5 => P7. In fact, it would appear that his use of the "Motorcycle Move" has not necessarily decreased the amount/speed of lead forearm supination that he requires during his late downswing's PA#3 release action.
I am personally not opposed to the use of the "Motorcycle Move" maneuver, but I think that it is a fallacy to believe that it will diminish the need to perform a rapid lead forearm supinatory motion in the later downswing, which is routinely required to square the clubface relative to the clubhead arc by impact if a golfer uses a non-strong lead hand grip strength. I know of no scientific evidence that demonstrates that a pro golfer, who uses the "Motorcycle Move" maneuver, is better at getting his clubface square to the target by impact - compared to an equally skilled pro golfer who does not use the "Motorcycle Move". Therefore, I am not surprised that so many skilled pro golfers (eg, Tiger Woods, Adam Scott, Rory McIlroy, Justin Rose, Sergio Garcia and Henrik Stenson) do not use the "Motorcycle Move".
What is the difference between the "Motorcycle Move" and the "Twistaway Maneuver"?
Here are capture images from Brian Manzella's vimeo video called "The Science of Smash", where he demonstrates the "Twistaway Maneuver".
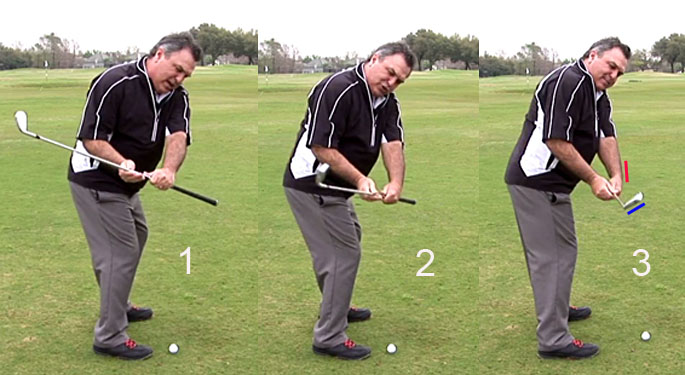
In image 1, note that Brian Manzella has a cupped lead wrist. Note that the clubface is parallel to the back of his lead wrist and also the watchface area of his lead lower forearm because he is using a neutral lead hand grip. Note that his lead wrist in a condition of radial deviation so that there is a ~90 degree angle between the lead forearm and the clubshaft.
In image 2 and image 3, note that he is bowing his lead wrist and one can see that his clubface is closing, but that his clubshaft is not angling significantly backwards relative to his lead forearm. Most importantly, note that the clubface appears to be closed relative to the radial half of the back of his lead hand, and that is due to the fact that he is twisting the club handle primarily with the 4th and 5th fingers of his lead hand. An important visual clue that signifies that a "Twistaway Maneuver" is being performed is the fact that the 4th and 5th knuckles are more curled-in compared to the 2nd knuckle. What causes the 4th and 5th knuckles to be so exaggeratedly curled-in? I believe that it is due to increased activation of the flexor digitorum profundus muscles (finger flexor muscles) to the lead hand's 4th and 5th fingers that torque the club handle counterclockwise within his lead hand's grip. That allows Brian Manzella to close the clubface (relative to the clubhead arc) by an even greater amount than could be obtained by performing the "Motorcycle Move's" lead wrist bowing maneuver where all of the lead hand's 4 fingers only torque the club handle counterclockwise in direct proportion to the degree of lead wrist bowing - because by mainly bowing the ulnar-half of his lead wrist, he is adding an element of lead wrist circumductory roll motion that will automatically/naturally happen when one performs the "Twistaway Maneuver". That additional element of left wrist circumductory roll motion will close the clubface even more relative to the clubhead arc. However, from a practical perspective, the "Twistaway Maneuver" is not going to decrease the total amount of lead forearm supination routinely required in the later downswing between P6 => P7 to get a square clubface by impact - because it is physically impossible to maintain excessively contracted flexor digitorum muscles to the 4th/5th fingers in the later downswing when the club is releasing and where there is a large outward pull (centrifugal pull) due to the club release phenomenon that stretches the lead forearm's flexor digitorum profundus muscles. In other words, a golfer can optionally choose to perform a "Twistaway Maneuver" during the early-mid downswing to temporarily close the clubface (relative to the clubhead arc), but there is no reason to believe that it will decrease the amount of lead forearm supination routinely required to close the clubface in the later downswing (and where the amount of required lead forearm supination is inversely proportional to lead hand grip strength). I am therefore not surprised that very few pro golfers use the "Twistaway Maneuver".
In conclusion, I believe that the optimum way to square the clubface relative to the clubhead arc during the downswing is to perform a PA#3 release action, which is biomechanically due to lead forearm supination, in the later downswing after P6. To decrease the amount of lead forearm supination required in the later downswing, a golfer has the option of adopting a very strong lead hand grip strength at address. If a golfer prefers to adopt a weak-neutral lead hand grip strength at address, then he can produce a more gradually progressive lead forearm supination motion in his later downswing by shallowing his clubshaft during his early-mid downswing so that he can approach impact with a moderate-or-larger sized accumulator #3 angle. He can also potentially use his trail arm's motion to synergistically modulate his speed of lead forearm supination by avoiding a "running-out-of-right arm" scenario. Additionally, in order to perform his trail arm's motion in a similarly efficient manner to that seen in many professional golfers on the PGA tour, he should use a pitch elbow motion, and not a punch elbow motion, as he transitions between the mid-downswing to the late downswing and he should never allow his trail forearm to over-pronate. A golfer's trail palm should optimally be positioned under the club handle at the P6 position, to eventually become positioned partially behind the club handle, and partially under the club handle, at impact. At no time point in the downswing should the trail palm ever face the ground, or get more on top of the club handle. I do not personally perceive that there is any advantage to using the "Twistaway Maneuver", but I do think that it is very acceptable to perform the "Motorcycle Move" if a golfer chooses to use a bowed lead wrist technique, rather than the intact LFFW/GFLW technique, during his downswing action. Using the 'Motorcycle Move", which will close the clubface relative to the clubhead arc by 20-30 degrees by P6, will not necessarily decrease a golfer's need to perform a rapid lead forearm supinatory motion in his later downswing if he adopts a weak-or-neutral lead hand grip strength, but the bowed lead wrist technique does have the advantage of better ensuring that the golfer reaches impact with forward shaft lean; and by continuously maintaining a bowed lead wrist alignment through impact into the early followthrough, a golfer can also potentially ensure that the lead wrist is more biomechanically stable through impact so that it will be less prone to undergo an undesirable lead wrist flipping motion through impact.
Topic number 5: How does a pro golfer, who uses a TGM swinging technique, generate swing power during his driver's downswing?
I think that Homer Kelley's power accumulator (PA) loading/unloading approach, which he described in his TGM book called the "The Golfing Machine", is one the most useful ways of thinking about how swing power is generated during a golf swing action. Homer Kelley described three different golf swing techniques - i) TGM swinging (also called "lead arm swinging" or "left arm swinging") which is based on the loading/unloading of PA#4 => PA#2; ii) TGM hitting which is based on the loading/unloading of PA#1 and iii) Right arm swinging, which is based on the loading/unloading of PA#5 (which is a PA-term that I personally coined). I have described these three different golf swing techniques in two review papers called "How to Power the Golf Swing" and "Power Mechanics of Swinging, Hitting and Swing-hitting". Readers who are interested in these alternative golf swing techniques can choose to read those review papers.
I believe that the majority of pro golfers on the PGA tour are using a TGM swinging technique (lead arm swinging technique), and I will be discussing how to optimally perform a TGM swinging action for a driver swing in this topic.
Here is a "pure" example of a TGM swinging action - https://www.youtube.com/watch?v=w57n1m_Nd3g - where Logan Aldridge drives the ball 300 yards using only one-arm.
Here are capture images from the video.
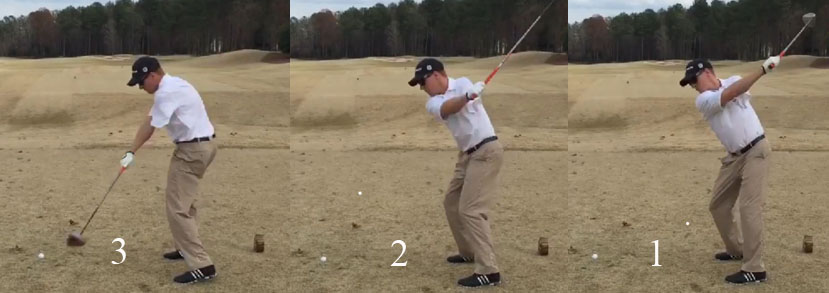
Logan Aldridge has an amputated left arm and he plays golf using only his right arm, which is his lead arm.
Image 1 shows him at his end-backswing position - where he has his lead arm at the 11 o'clock position. Note that he has rotated his pelvis about 50 degrees, and his upper torso about 90 degrees, during his backswing.
Image 2 shows him at the end of his hip-squaring phase and image 3 shows him at his ~P6.5 position.
How is he powering his golf swing so that he can drive the ball 300 yards using only a lead arm swinging technique?
Before I describe the biomechanics of performing a lead arm swinging action, let's consider the forces/torques that are produced during a TGM swinging action.
The golf club only moves in space in a TGM swinging action because forces/torques are applied to the club handle by the lead hand.
Sasho MacKenzie, a golf biomechanist at St. Xavier University in Nova Scotia, has used the theoretical technique of inverse dynamics modelling to calculate the forces/torques that are produced by the lead hand at the level of the club handle in the driver golf swing of a major tour winner, who has a clubhead speed of 122.5mph at impact.
Here is a vimeo video - https://vimeo.com/162015461 - where Sasho MacKenzie calculates the forces/torques applied at the level of the club handle, and also the amount of linear and angular work performed by a pro golfer during his driver golf swing action.
If you watch the video, you will note that most of the work performed to move the golf club is linear work, which is due to the lead hand pulling the club handle down the hand arc path. The amount of linear work (energy) = "Average" lead hand pulling force required to move the lead hand down the hand arc path X the distance the lead hand travels down the hand arc path. Therefore, one can rationally conclude that a golfer can increase his clubhead speed at impact by either increasing his "average" lead hand pulling force (by swinging faster) and/or lengthening the distance that the hands travel down the hand arc path by lengthening the backswing's lead arm motion (eg. from the 11 o'clock position, as seen in Stuart Aldridge's driver swing, to the 12 o'clock position, as seen in Jamie Sadlowski's and Dustin Johnson's driver swings).
One can gain further interesting insights into a TGM swinging action by examining these graphs showing the amount of linear force being applied at the level of the club handle by the lead hand and by noting its effect on clubhead speed.
Here is a capture image from Sasho MacKenzie's video.
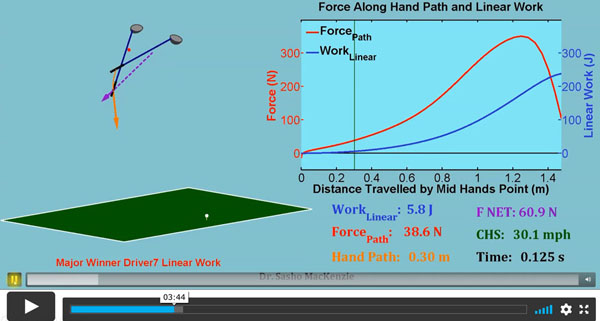
This image represents the early downswing after the lead hand has moved about 1 foot down the hand arc path and it shows the lead hand arc path in orange. The orange arrow shows the instantaneous direction of the hand arc path. The force being applied by the lead hand = 38.6N. The clubhead speed is 30.1 mph.
Here is a capture image at the ~P5.3 position after the lead hand has moved about 2.5 feet down the hand arc path.

Note that the force produced by the lead hand moving down the hand arc path is now 167.5N and that is due to the lead arm/hand traveling faster. Note that clubhead speed has already reached 67.6mph.
Here is a capture image at the P6 position.
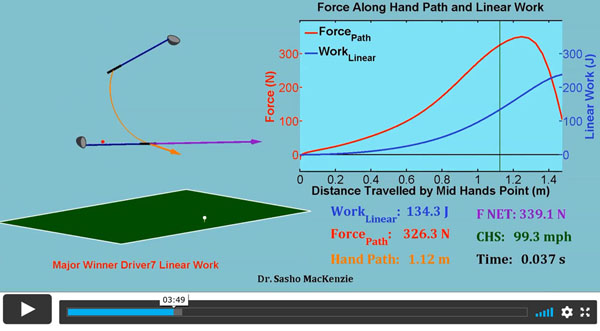
Note that the force produced by the lead hand moving down the hand arc path is now 326.3N and note that clubhead speed has already reached 99.3mph.
From my perspective, these theoretical calculations show that most of the pro golfer driver's clubhead speed (99.3mph out of 122.5mph) is already achieved by the P6 position, and that it is primarily due to the force produced by the lead hand pulling the club handle down the hand arc path (326.3 N out of 339N). Note that the lead hand's force pulling the club handle down the hand arc path is reaching near its peak value at ~P6 and that the force decreases in the later downswing before impact.
Here is a capture image showing the angular work being performed during the pro golfer's driver swing.
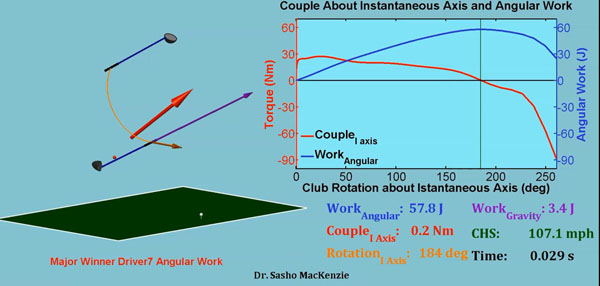
Angular work is performed to change the angular position of the golf club in space.
Note that this capture image is just passed the P6 position, and that the clubshaft has rotated about ~180 degrees in space between P4 => P6.2. The amount of torque energy required to rotate the clubshaft by ~180 degrees is the area under the red torque graph between the start of the downswing and the vertical green line (where the torque is now at zero). The torque is being applied by the hand couple (which I will explain later), and it is only positive between P4 => ~P6, and it then becomes negative after ~P6. The amount of work being done by the hand couple torque by ~P6 is ~60J (which is ~50% of the120J of linear work being done by ~P6). *In the later downswing between P6 => P7, when the club is releasing (representing the release of PA#2 in TGM terminology), the amount of linear force being exerted by the lead hand pulling the club handle along the hand arc path is markedly decreasing and the amount of torque being applied by the hand couple is actually negative.
(* I will discuss the force/torque factors causing the release of PA#2 later in this topic).
From my perspective, Sasho MacKenzie's theoretical calculations are very compatible with my personal perception of how a pro golfer generates swing power in his driver swing action - and it is mainly due to moving the lead arm, which is called the release of PA#4 in TGM terminology.
To understand Homer Kelley's PA-concept as it applies to a TGM swinging action, it is important to understand that a golfer's only connection with the golf club is through his two hands, which are basically the end-extension of his two arms. To generate swing power, and to maximise clubhead speed at impact, a golfer (who uses a TGM swinging technique) essentially powers the golf swing during the downswing by a swinging motion of the lead arm, which will pull the golf club down the hand arc path via the lead hand's attachment to the grip handle. At address, the lead arm usually hangs down near-vertically (or slightly extended away from the body) and it is connected to the body at the level of the lead shoulder socket, which is the fulcrum point of the lead arm swinging motion. During the backswing, the lead shoulder moves backwards away from the target by a finite amount due to torso rotation, while the lead arm is simultaneously elevated and adducted across the upper body. At the end-backswing position, the lead arm is adducted to a variable degree across the front of the upper torso, and it may be closely adducted against the lead pectoral area or there may be a significant gap between the lead upper arm and the lead upper chest wall. Also, when the lead arm is elevated, it can be elevated to a level where the lead hand is roughly at the level of the trail shoulder socket at the end-backswing position, or the lead hand can end up being slightly below, or significantly above, the level of the trail shoulder socket. Positioning the lead arm at its end-backswing position, where the lead arm is elevated and also adducted across the upper chest, represents the loading of PA#4 (which Homer Kelley called the "master" power accumulator - presumably because it supplies most of the swing power during a TGM swinger's full golf swing action).
Here is an image from Homer Kelley's TGM book showing the loaded/unloaded position of PA#4.
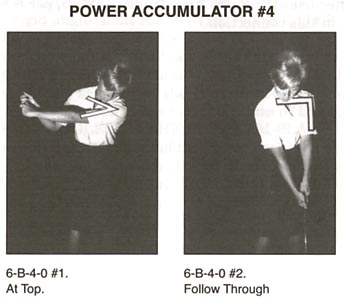
At the end-backswing position (top) one can see that the lead arm has been elevated to a level that is roughly parallel to the shoulder turn angle, and that it is also adducted across the front of the upper torso at roughly the level of the pectoral area. Note that Homer Kelley has drawn two lines - one line representing the front of the upper torso (and that line is drawn from the left shoulder socket towards the right shoulder socket) and the second line represents the left upper arm - and that there is an acute angle between those two lines, which meet at the position of the left shoulder socket. At that end-backswing position, a golfer has a loaded PA#4. During the downswing, the left arm will move downwards, and also away from its adducted position at P4 to become significantly abducted away from the body at impact. Note that the angle between those two drawn lines changes to a less acute angle during the downswing, and the change in that drawn angle between the left arm relative to the upper body reflects the unloading (release) of PA#4. Many TGM literalists think of PA#4 unloading as being due to a change in that acute angle between the left arm and the upper chest wall in the plane of adduction => abduction, and they think of swing power being generated during the downswing by the left arm moving away from its adducted (loaded) position at P4 to its abducted (unloaded) position at impact. I personally hold a significantly different opinion regarding the specific direction of the unloading of PA#4, and I prefer to think of the left arm's PA#4-unloading motion happening three-dimensionally in "real life" 3-D space due to the left arm unloading motion happening simultaneously in two planes - i) moving from the left arm being adducted at P4 to the left arm becoming more abducted at impact and ii) moving from the left arm being elevated at P4 to the left arm becoming near-vertical by impact. To best measure the degree of PA#4 unloading at any time point during the downswing, I prefer to think of the distance traveled by the left hand in 3-D space away from its end-backswing position (where it was close to the right shoulder socket area) towards its impact position (where it is far away from the right shoulder socket area) and I do not only think of the change in that acute angle drawn between the left upper arm and the front of the upper chest (as depicted in that 2-D representational image from the TGM book). If one thinks of the PA#4 release (unloading) action as happening when the lead hand moves further away from its end-backswing position, then when does the start of the PA#4 release action first happen?
It is obviously possible for PA#4 to start being released from the very start of the downswing if the left arm is pulled away from its adducted/elevated P4 position - as happens in Leslie King's left arm swinging methodology where the left arm is swung independently down-and-forwards towards the ball and where the golfer uses a reactive pivot action. That type of driver golf swing action is limited in power because it only uses muscular power derived from the shoulder girdle muscles to swing the left arm across the front of the reactively rotating body. By contrast, most PGA tour golfers use an active pivot action-induced TGM swinging action, which starts with a lower body (pelvis) counterclockwise rotation followed shortly thereafter by an upper torso counterclockwise rotation. When the upper torso starts to rotate counterclockwise around the rightwards-tilted spine, the left shoulder socket primarily moves in a horizontal (targetwards) direction during the early downswing and it pulls the left humeral head in the same targetwards direction, but it also pulls the left upper arm in a downwards direction if the left arm is angled upwards relative to the left shoulder socket at the P4 position.
Here is Jamie Sadlowski's (a previous world long drive champion's) hand arc path.
The red splined path is Jamie Sadlowski's hand arc path.
Point 1 is the position of his hands at his end-backswing position. Point 2 is the position of his hands at the P5 position (when the left arm is parallel to the ground) and point 3 is the position of his hands at the P5.5 position.
Note the shape of Jamie Sadlowski's hand arc path between the P4 position (point 1) and the P5 position (point 2) - note that the hands move a lot downwards, but also away from the target. During this time period, Jamie Sadlowski maintains a fully bent trail elbow and he retains all his clubhead lag (angle between the clubshaft and his lead arm).
Note that his hand arc path is very U-shaped between the P5 position and the P5.5 position, and that his hands continue to move a lot downwards from being at nipple level at P5 to being at mid-thigh level at the P5.5 position; but they do not move a lot targetwards - note that his hands are no closer to the target at the P5.5 position than they were at the P4 position. That long length of his hand arc path between P4 (point 1) => P5.5 (point 3) is a major factor in his ability to generate considerable clubhead speed, especially if he can increase the "average" linear pulling force being exerted by his lead hand as it moves down the hand arc path by increasing the speed of his lead hand motion during the P4 => P5.5 time period. Note that Jamie Sadlowski has less clubhead lag at the P5.5 position, which means that he is already starting to release his club (representing the release of PA#2 in TGM terminology) and that phenomenon allows the club to travel faster than his lead arm. Although the club first starts to release before P5.5, the main PA#2 release time period happens between P5.5 (point 3) and impact (point 4).
Now, let's consider some of the biomechanical factors that can increase the speed of the release of the lead arm (release of PA#4).
Here are capture images of Jamie Sadlowski's early-mid downswing action.

Image 1 is at his end-backswing (P4) position where he has a fully loaded PA#4 and a fully loaded PA#2 and where he also has a fully loaded pivot action, which he is going to use as the "workhorse" that will unload PA#4 very fast between P4 (image 1) and P5.5 (image 4).
Let's first analyse his pivot action that must have happened during his backswing in order for him to acquire a fully loaded pivot action by his P4 position (image 1). During his backswing, Jamie Sadlowski rotated his pelvis clockwise by approximately 60+ degrees while he rotated his upper torso (shoulders) much more clockwise. According to some 3-D data that I have seen, Jamie Sadlowski can rotate his upper torso (shoulders) to ~140 - 160 degrees, which means that he has acquired a static X-factor of approximately 80 - 100 degrees by his P4 position. That prodigious amount of static X-factor is due to the fact that he has a remarkable degree of thoracic spine flexibility that allows him to rotate each thoracic vertebra by about 6 - 8 degrees relative to its neighboring thoracic vertebra. That remarkably high degree of acquired static X-factor by P4 is a great advantage from a swing power perspective - because it pre-stretches his abdominal oblique muscles and paraspinal muscles to their maximum stretchable length. Those optimally pre-stretched core muscles can then be used during his downswing in order to rotate his mid-upper torso with maximum efficiency and speed. Note that he has rotated his pelvis by 60+ degrees during his backswing thereby driving his right hip joint into internal rotation, and it is very likely that his right-sided lateral pelvic rotator muscles are optimally pre-stretched by his P4 position (image 1). Accordingly, he can therefore optimally activate these muscles during his downswing in order to rotate his pelvis with maximum efficiency and speed.
It is incredible how much Jamie Sadlowksi adducts/elevates his left arm during his backswing to get his left arm to approximately the 12 o'clock position by P4. That represents a fully loaded PA#4 scenario. He also simultaneously prefers to elevate his left arm to a P4 position on a steeper plane than his shoulder turn angle, where his hands are high above his right mid-clavicle area. Many long-drive competitors use this "high hands" P4 position because it allows them to position their clubshaft behind their back to achieve an even greater degree of clubhead lag. And, because Jamie Sadlowski has an extremely flexible left wrist (which allows for a much greater degree of radial deviation), he is able to point his clubshaft toward the ground at his P4 position, and achieve much more clubhead lag than most professional golfers. Having an increased degree of clubhead lag (> 90 degrees) allows a golfer to produce more angular work during the downswing.
Note that I have placed a green circle marker over his left shoulder socket area when he is at the P4 position (image 1) to show the position of his left shoulder socket. Note that I have placed a yellow circle marker over his left shoulder socket area when he is at his P4.5 position (image 2), and that I have placed a blue circle marker over his left shoulder socket area when he is at his P5 position (image 3). If you look at the motion of his left shoulder socket between P4 and P5, you can see that it is moving in a relatively horizontal direction towards the target. The amount of left shoulder socket motion (in a targetwards direction) happening between P4 and P5 is a major swing power factor when it comes to a golfer's ability to unload PA#4 with maximum efficiency because the targetwards motion of his left shoulder socket is causally responsible for pulling his left humeral head, and therefore his left upper arm in a targetwards-and-downwards direction. However, the targetwards range of motion of the left shoulder socket happening between P4 and P5 is only one swing power factor that determines the speed of release of PA#4 and it is also very important to move the left shoulder socket, and therefore the left upper arm, very fast between P4 and P5. The speed of left shoulder socket motion happening between P4 and P5 is directly proportional to the speed of rotation of the upper torso happening during that time period. Jamie Sadlowski, like most professional golfers, uses an optimised kinematic sequence, that allows him to maximise his speed of upper torso rotation between P4 and P5.
Here is Jamie Sadlowski's 3D kinematic sequence graph.
The black vertical line at "top" represents his P4 position, while the black vertical line at "imp" represents his P7 position.
The red graph represents his pelvic rotation's angular velocity graph, the green graph represents his upper torso (thorax) rotation's angular velocity graph, and the blue graph represents his left arm angular velocity graph. The brown graph represents his clubshaft's angular velocity. The horizontal black line represents the zero line.
Note that Jamie Sadlowski's red graph gets above the zero horizontal black line before the red graph reaches the "top" vertical black line, which means that he is starting to rotate his pelvis counterclockwise while his arms and clubshaft are still moving back to their final end-backswing position. Note that his green graph crosses the horizontal zero line fractionally later, which means that there is a slight delay in the counterclockwise rotation of his upper torso (relative to the counterclockwise rotation of his pelvis) and that "fact" allows Jamie Sadlowski to generate a greater degree of torso-pelvic separation (greater degree of dynamic X-factor) at the start of his downswing. Many golf instructors believe, probably correctly, that generating a larger degree of dynamic X-factor can increase the speed of upper torso rotation that happens during the early downswing, which is causally responsible for moving the left shoulder socket in a targetwards direction at a fast speed. The steepening slope of the red graph line during his late backswing and early downswing illustrates a very fast moving pelvic rotation, which is most likely being driven by the very efficient contraction of his right-sided lateral pelvic rotator muscles. Jamie Sadlowski uses the "rotate-and-shift" pattern of pelvic motion during his early downswing between P4 and P5 and he acquires the "Sam Snead sit-down look" of a square pelvis with a symmetrical degree of external rotation of his right and left thighs at his P5 position (image 3). When he is rotating his pelvis counterclockwise between P4 and P5 using an active rotary pelvic motion with very little left-lateral pelvic shift, he is rotating his lumbar spine counterclockwise by roughly the same amount as his pelvis between P4 and P5. The counterclockwise rotation of his thoracic spine and upper torso is fractionally delayed, but by the time he gets to the P4.5 position, he is already contracting his core muscles very actively and that causes his thoracic spine and upper torso to start rotating very fast. By the P5 position, his upper torso has rotated fractionally more counterclockwise than his pelvis has rotated counterclockwise during the same P4 => P5 time period, and the rotational speed of motion of his upper torso is now likely the major factor that is causally responsible for the speed of targetwards motion of his left shoulder socket during the early downswing's P4 => P5 time period. Note that his blue left arm graph is not rotating faster than his green upper torso (thorax) rotation graph between P4 and P4.5, and that his clubshaft (brown graph) has the same angular velocity as his lead arm during his early downswing. To ensure that the clubshaft does not travel faster than his lead arm during his early downswing, he must retain his clubhead lag by maintaining the same degree of right elbow bend of his right arm and he must avoid any right arm straightening action. He must also ensure that he is actively adducting his right upper arm towards the right side of his torso in perfect synchrony with his speed of left arm motion so that the right hand can keep up with his left hand, which is pulling the club handle down the hand arc path. Note that his blue graph/brown graph starts to rotate faster than the green graph after ~P4.5 and that is likely due to the fact that Jamie Sadlowski starts off with a very elevated left arm at his P4 position, and his left hand moves downward by 18" between his P4 position and his P5 position. Part of the downward motion of his left arm between P4 => P5.5 is due to the targetward motion of his left shoulder socket, which pulls the left humeral head along with it thereby causing lowering of the left arm angle; and part of it is likely due to the muscular contraction of his left/right shoulder girdle muscles (eg. latissimus dorsi muscle) which pull the two upper arms downwards. I know of no scientific research study that can quantify how much the shoulder girdle muscles contribute to the downward motion of the club handle down the hand arc path between P4 => P5.5, at which time point the left arm/hand speed often reaches its maximum value. Note that the brown graph (clubshaft) starts to travel faster than the blue graph (left arm) before the left arm reaches its peak angular velocity and that happens between P5.1 => P5.4 in most pro golfers, and it represents the start of the release of PA#2.
It is difficult to assess how much the phenomenon of torso-pelvic separation (dynamic X-factor) contributes to the pivot action's rotary power in terms of efficiently moving the left shoulder socket very fast in a targetwards direction between P4 and P5.5. Professional golfers vary considerably with respect to the amount of torso-pelvic separation that they generate during the early downswing between P4 and P5, and I am not convinced that a golfer should try to maximise his degree of torso-pelvic separation during that time period because it is possible for the pelvis to "out-run" the upper torso if one has an inordinate amount of spinal flexibility. This phenomenon is often seen in LPGA golfers who have a lot of spinal flexibility (often called hula-hula flexibility) and who are often also very supple and lithe. I think that if the pelvis "out-runs" the upper torso, that it may actually decrease the efficacy of the pivot action's contribution to swing power and it may even cause the arms/club to get trapped behind the right hip area of the pelvis during the mid-downswing. Professional golfers also vary as to when they first start to rotate their pelvis counterclockwise. Many pro golfers (like Jamie Sadlowski) start to rotate the pelvis counterclockwise during the late backswing (eg. between P3.5 => P4) while others prefer to only start to rotate their pelvis counterclockwise after reaching the P4 position. I regard these two biomechanical options as being equally acceptable, although the first option will likely increase the dynamic X-factor by a slightly greater amount, which may/may not be biomechanically significant.
When I refer to a golfer's upper torso rotation (thoracic spine zone rotation), I sometimes use the terms "shoulder rotation" and "upper torso rotation" interchangeably, and I usually equate the two terms "upper torso rotation" and "shoulder rotation". However, it is actually possible to get the shoulders to move slightly faster than the upper torso's rib cage because of a golfer's ability to slide the scapula across his back independently of the rotation of his rib cage.
John Dunigan discusses this issue in the following vimeo video - https://vimeo.com/172824002
In this video, John Dunigan states that there are independent scapula motions happening at the level of the shoulders due to the fact that the scapula can move independently of the rib cage - and that these scapular motions include scapula retraction, scapula protraction, scapula elevation and scapula depression. He also talks about flexion and extension, but they are due to motions of the humeral head within the shoulder socket and they are not due to scapula motions. John Dunigan mainly focuses his attention on the right scapula, and he states that a golfer can "correct a power leak" by retracting his right scapula during his backswing action. However, it is difficult for me to understand how increasing the degree of right scapula retraction can increase swing power in a TGM swinger's golf swing action unless it somehow helps to promote a bigger left shoulder turn due to left scapula protraction - with the left shoulder socket moving farther away from the target by the end-backswing position. One can actually see that increased degree of left shoulder joint motion away from the target, due to left scapula protraction, happening in Jamie Sadlowski's backswing action (see image 1 above). I would also advise a student-golfer to be very cautious about adopting John Dunigan's suggested idea of markedly retracting the right scapula during the backswing action because it could possibly "trap" the right upper arm and right elbow too far behind the right-side of the upper torso at the end-backswing position, and that could make it more difficult to get the right elbow to move fluidly/efficiently down to its pitch right elbow position during the early-mid downswing action. I think that the right upper arm should be slightly separated away from the right shirt seam area of the right upper torso at the end-backswing position, and I think that the right elbow should be positioned more in front of the right upper body at the P4 position, rather than being too "tucked-in" behind the right upper body at the P4 position.
John Dunigan also shows this graph obtained from his mySwing 3-D system in his video presentation.
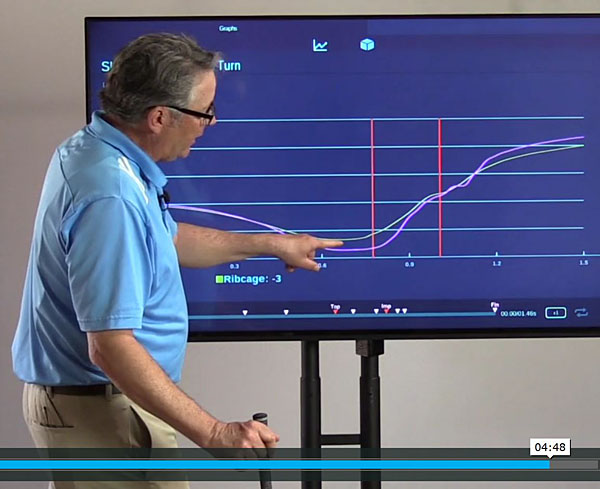
The vertical pink line represents the end-backswing position while the thicker vertical red line represents the impact position. The green graph line represents the rate and direction of rib cage rotation during the swing, while the violet graph line represents the rate and direction of shoulder rotation during the swing. In the photo, John Dunigan is pointing out how the graphs separate during the later backswing due to the biomechanical combination of right scapula retraction and left scapula protraction that causes the shoulder sockets to rotate more clockwise than the upper torso's rib cage. Note that the gap between the two graphs narrows during the early-mid downswing due to right scapula protraction combined with left scapula retraction. Also, note that Jamie Sadlowski's left scapula retracts between P4 and P5 (see image 3 above), and that causes his left shoulder socket's range of motion in a targetwards direction to be slightly greater during the early downswing's P4 => P5 time period. Whether this increased range of targetwards motion of the left shoulder socket during the early downswing can increase the speed of release of PA#4 is unknown, but I am willing to accept the generic "idea" that left scapula retraction during the early downswing should be considered to be a biomechanical movement that could potentially increase swing power to a very small degree in a TGM swinger's action.
I previously stated that it is best to think of the release of PA#4 (release of the left arm) as happening in a three dimensional space, where the left arm not only moves targetwards, but also downwards (groundwards). The targetwards motion of the left arm happens secondary to the left arm's abduction-motion, while the groundwards motion is due to the left arm's downwards-motion - with both of these motions happening simultaneously during a PA#4 release action. However, when you look at Jamie Sadlowski's hand arc path, you will note that his left hand moves slightly farther away from the target between P4 and P4.5. Why does his left hand move further away from the target at the start of the early downswing?
Consider yet again these capture images of Jamie Sadlowski's early downswing action.
Note that Jamie Sadlowski's left hand is vertically positioned above his head at his end-backswing position (image 1) when his left arm is at the 12 o'clock position, and that it then moves well to the right of his head at the P4.5 position (image 2). This indicates that his left hand is moving away from the target between P4 and P4.5. But what is causing that motion of his left hand away from the target at the start of his downswing action?
In a video called "Ideas About the Release", Brian Manzella demonstrates his recommended "out-toss maneuver".
Here are capture images from the video showing Brian Manzella demonstrating his "out-toss maneuver".
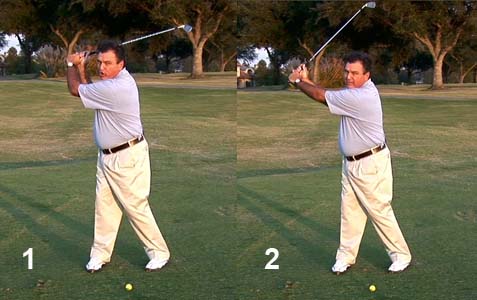
Image 1 shows Brian Manzella at his end-backswing position with a slightly bent left arm.
Image 2 then shows Brian Manzella straightening his left arm by pushing his left hand outwards away from his body (and away from the target) - as a result of a deliberate straightening action of his bent right elbow. I think that his right elbow straightening action is an "artificial maneuver" that has no value, and it has the great disadvantage that a premature right elbow straightening action can possibly lead to casting and a premature release of PA#2 if the right hand pushes against the aft side of the clubshaft below the coupling point.
I think that there is a simple explanation that can easily explain why Jamie Sadlowski's left hand moves farther away from his head, and the target, between P4 and P4.5 - and it has nothing to do with an artificial "out-toss maneuver". When Jamie Sadlowski is at his end-backswing position, his left arm is near-vertical, and it is at the 12 o'clock position relative to his left shoulder socket (image 1). During the P4 => P5 time period he is lowering (depressing) his left arm in his left shoulder socket and that must cause his left hand to automatically/naturally move farther away from the target so that it is much farther away from the target when his left arm becomes progressively more parallel to the ground - note how far his left hand is away from his head in image 3 when his left arm is horizontal relative to the ground (and therefore at the 9 o'clock position relative to his left shoulder socket). Although his left hand has moved away from his head in a horizontal direction between P4 and P5 as a result of lowering (depressing) his left arm, it has not moved his left hand equally far away from the target during that same time period. Why? To correctly answer that question, you must take into account the fact that his left shoulder socket is simultaneously moving targetwards by ~15" during that same left arm-lowering time period - as a result of the counterclockwise rotation of his upper torso that is happening between P4 and P5.
So, look again at these capture images of Jamie Sadlowski's early downswing action.
Image 1 is at his end-backswing position (P4 position). Note that his hands are vertically above his left shoulder socket (see green circle marker) because his left arm is at the 12 o'clock position relative to his left shoulder socket. If he then lowered his left arm so that it became parallel to the ground at his P5 position (image 3) while keeping his left shoulder socket in the same position as the green circle marker, then the extra distance that his hands would be further away from the target would be equal to the length of his left arm. However, his left shoulder socket has moved targetwards between P4 and P5 in his "real life" golf swing action and it is now at the blue circle marker position at his P5 position. That means that the extra distance that his left hand has moved further away from the target between P4 and P5 is equal to the length of his left arm minus the length of the distance between the green circle marker and the blue circle marker.
What biomechanical actions cause Jamie Sadlowski's left arm to lower (depress) during the P4 (image 1) => P5.5 (image 4) time period? I believe that three biomechanical phenomena play a role in Jamie Sadlowski's left arm-lowering action that happens during his early-mid downswing. First of all, when Jamie Sadlowski's upper torso rotates counterclockwise around his rightwards-tilted thoracic spine, thereby causing his left shoulder socket to move targetwards, it produces a targetwards pull on the left arm because the left humeral head must move along with the left shoulder socket. Because Jamie Sadlowski's left arm is near-vertical at the P4 position, the pulling motion due to the targetwards motion of the left shoulder socket passively pulls the left arm downwards as well as targetwards. Secondly, I can well imagine that Jamie Sadlowski is activating his left shoulder girdle muscles (eg. left latissimus dorsi muscle) and that its isotonic muscular contraction can synergistically assist him in lowering (depressing) his left arm. Thirdly, I can readily imagine that Jamie Sadlowski's right palm may potentially be applying a finite amount of push-pressure against pressure point #1 (PP#1), which is located at the base of the left thumb, in a downwards direction when he actively adducts his right arm during the early downswing's P4 => P5 time period.
Here is an image showing PP#1, PP#3 and the position of the coupling point.
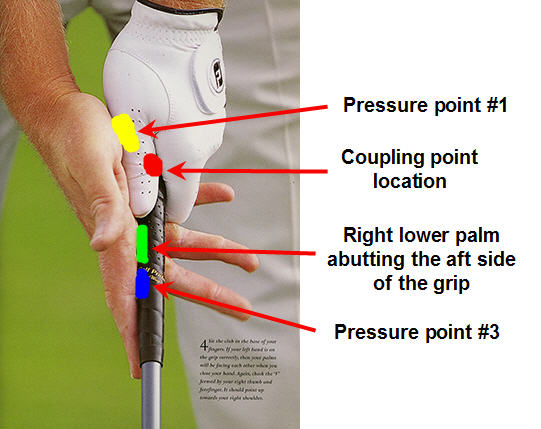
The coupling point (red dot) is a point on the club handle that is midway between the two hands and if the golfer adopts a baseball style grip, where the two hands are not overlapping, the coupling point is located just below the position of the left hand's left 2nd knuckle, and the entire right hand will be positioned below the coupling point. However, many professional golfers adopt a Vardon, or overlapping, grip style (rather than a baseball grip style) and that means that the right hand is positioned further up the grip in such a manner that the base of the right palm abuts against the base of the left thumb at PP#1 (yellow area). That means that any push-pressure being applied by the right palm is primarily being applied above the coupling point against PP#1, and it is not mainly being applied against the aft side of the club handle below the coupling point. Any push-pressure being applied by the lower right palm, or right index finger, is being applied against the aft side of the club handle below the coupling point, and it can predispose to a casting-flipping motion of the clubshaft if it is wrongly applied during the early downswing action.
Note that Jamie Sadlowski actively adducts his right upper arm during his early-mid downswing between P4 and P5.5, while maintaining an unchanging bent right elbow and unchanging bent right wrist, and I can readily imagine that his right palm could be applying a finite amount of push-pressure against PP#1 in a partially groundwards direction, and that this push-pressure could synergistically help him to efficiently lower (depress) his left arm during his PA#4 release action. Unfortunately, it is unknown how much push-pressure is being exerted by the right palm against PP#1 during the early downswing in professional golfers because no golf researchers have placed pressure sensors at PP#1 and PP#3 in order to study this phenomenon. Therefore, it is unknown to what degree the active right upper arm adduction maneuver that most pro golfers are performing between P4 => P5.5 is contributing to the speed of lead hand motion down the hand arc path during the early-mid downswing, and it is unknown whether it is significantly contributing to the pulling force that the left hand is exerting on the club handle during the PA#4 release phase that is happening between P4 => P5.5+.
Consider Phil Cheetham's discussion of the kinematic sequence frequently seen in professional golfers - http://www.mytpi.com/articles/biomechanics/the_linear_kinematic_sequence
Here is a copy of his rotational kinematic sequence graph that he featured in that article.
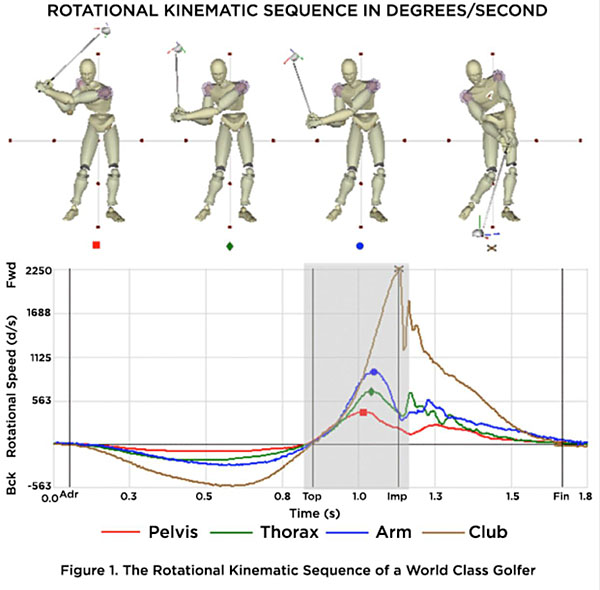
Note that the pelvis, thorax and left arm graphs have the same rotational speed during the early downswing, and if you look at the slope of the graphs during the early downswing they appear to be identical. As the downswing proceeds, the slope of the left arm graph (blue graph line) gets steeper, which means that the left arm is now moving faster than the thorax (green graph line). That kinematic sequence pattern is seen in many pro golfers, but Jon Rahm manifests a slightly different kinematic sequence.
Here is a link to a you-tube video - https://www.youtube.com/watch?v=P9ddiGd_xUQ - where the TPI "experts" Greg Rose and Dave Philips analyse Jon Rahm's golf swing action.
Now, let's examine Jon Rahm's kinematic sequence graph (which I copied from that TPI video).
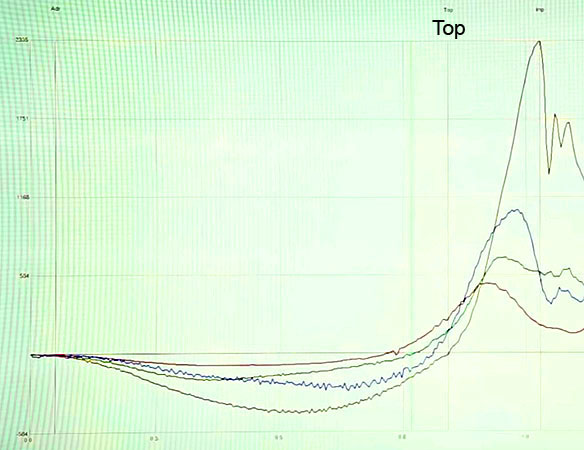
The vertical line under the word "top" represents the start of the downswing. The red graph line represents pelvis motion. The green graph line represents thorax (upper torso) motion. The blue graph line represents left arm motion.
Note that the pelvis starts to rotate counterclockwise during the late backswing (before the P4 position) so that the pelvis is rotating faster than the upper torso at the start of the downswing. That phenomenon increases Jon Rahm's dynamic X-factor, which many golf instructors believe is a desirable phenomenon. However, that degree of torso-pelvic separation is not unusual in a professional golfer.
Note that his left arm and thorax are rotating at the same speed at the P4 position, and therefore at the very start of the transition to the downswing. However, note that the blue graph line (representing left arm motion) immediately becomes much steeper than the green graph line (representing thorax motion), which means that the left arm is accelerating much faster than the thorax from the very beginning of his downswing. This observation suggests to me that his left arm is not being exclusively pulled downward-and-forward by the pivoting thorax via the left arm's attachment to the upper torso at the left shoulder socket, and that it is moving somewhat independently, and faster, than the left shoulder socket. This observation suggests to me that his left arm's downward motion at the start of his downswing is possibly mainly being powered by his shoulder girdle muscles (both right and left) that are both causally responsible for moving the left arm in a mainly downwards direction between P4 and P5.2 (as seen in Jon Rahm's hand arc path image below) and that it is not necessarily due to the pivot action's counterclockwise rotation of the upper torso that passively pulls the left arm via the left arm's connection to the upper torso at the left shoulder socket. It also suggests to me that his peak speed of his left arm motion (which probably happens at ~P5.5) may better correlate with the efficiency/speed of contraction of his shoulder girdle muscles rather than the efficiency/speed of rotation of his pelvis and upper torso.
Here are capture images of Jon Rahm's hand arc path.
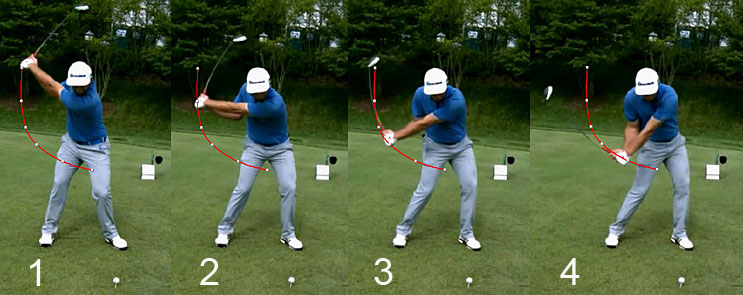
Note that Jon Rahm's hand arc path is shorter than Jamie Sadlowski's hand arc path because he only gets his lead arm to the 10:30 o'clock position at his P4 position (image 1).
Note that his hand arc path is very steep between P4 (image 1) and P5.2 (image 3). Jon Rahm is capable of driving the ball very far (>300 yards) despite having a shorter length of hand arc path than other pro golfers (eg. Dustin Johnson) and I strongly suspect that he makes up for that fact by having a significantly larger "average" lead hand linear club handle pulling force during his early-mid downswing. How much of that is due to having a faster pivot action that moves his left shoulder socket targetwards very fast between P4 => P5.2, and how much is due to a very active use of his shoulder girdle muscles that pull his two upper arms downwards very fast during that same time period, is unknown, and I personally suspect that both factors contribute to his speed of release of PA#4, and therefore the speed of his lead left hand's linear club handle pulling force down the hand arc path, between P4 (image 1) and P5.5 (image 4).
Now that I have discussed a number of factors that can affect the speed of release of PA#4, and therefore the amount of linear work that the lead hand does when it pulls the club handle down the hand arc path between P4 => P5.5+, I will now discuss how a pro golfer performs angular work, and also how he induces the release of PA#2, in a driver swing action.
To understand how a golfer performs angular work during the downswing, I am going to use Sasho MacKenzie's and Dr. Young-Hoo Kwon's theoretical opinions on the hand couple phenomenon. Please note that the following hand couple explanation represents my personal, and therefore potentially biased second-hand explanation, and I encourage readers to consult the primary sources for an unbiased opinion.
For example, I would encourage readers to watch the following Sasho MacKenzie vimeo videos on this topic.
In-Plane Couple and Moment of Force During the Golf Swing
Golfer Applied Torque and Club Angular Velocity
Linear and Angular Work during Downswing of a PGA Tour Major Winner
You can also read this Dr. Kwon paper on inverse dynamics.
Hand-club interaction 1: Inverse dynamics
The following explanation represents my provisional understanding of how the hand couple phenomenon produces angular work.
Consider this following image that I copied from Dr. Kwon's presentation at a zoom conference hosted by Michael Finney.
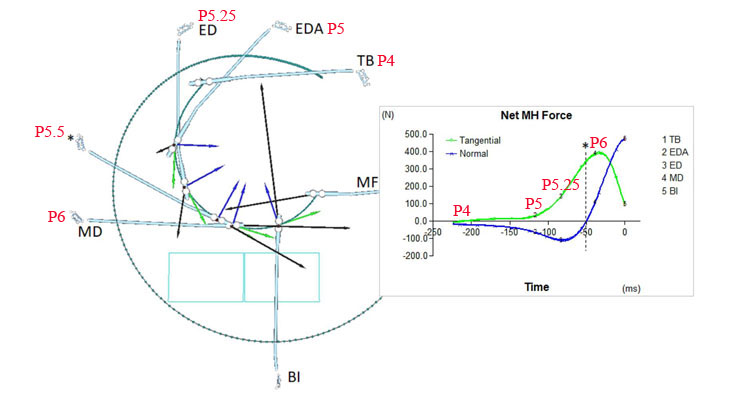
First of all, note that Dr. Kwon does not use the P system to show the position of the club in space and he uses his own system, which is as follows-:
TB = End-backswing position (P4 position).
EDA = Early downswing Arm position (P5 position when the left arm is parallel to the ground).
ED - Early downswing position when the clubshaft is vertical (P5.25 position).
MD = Mid-downswing position (P6 position).
BI = Impact position (P7 position).
Note that I have added the P positions in red to the image.
This image shows the forces that the lead hand is exerting as it moves down the hand arc path.
I previously mentioned that a golfer can produce linear work due to the force produced by the lead hand pulling the club handle down the hand arc path. However, when the lead hand moves down the hand arc path in a pro golfer's driver swing it is actually producing a pulling net force that can be divided into two components - a tangential force that is at a tangent to the circular hand arc path and a radial force (normal component) that is perpendicular to the hand arc path. In the left-sided diagram, the green arrow represents the tangential force component and the blue arrow represents the radial force component. The black arrow represents the net force (which is the combination of the two forces).
The graph on the right side of the image shows the magnitude of the tangential and radial forces during the downswing. Note that the magnitude of the tangential force is very small at the start of the downswing between P4 => P5, and that it increases in magnitude between P5 => P6 reaching its peak value at P6. Note that the magnitude of the tangential force component then decreases dramatically between P6 => P7.
Note that the radial force is negative between P4 => P5.5 (position of that dotted vertical line), which means that it is directed outwards (in a centrifugal direction). Note that the magnitude of that outward radial force is maximum at P5.25 and that it drops to zero by P5.5. After P5.5, the radial force is directed inwards (in a centripetal direction) and its magnitude increases considerably between P6 => P7, reaching its peak value at P7.
What effect does this net force (which is the summation of the two forces) have on the club from the perspective of angular work, which causes the club to acquire angular momentum, and which causes the club to rotate in space? If this net force (black arrow force) is directed along the longitudinal axis of the clubshaft then it would be straight-line-aligned with the COM (center-of-mass) of the club, which is located near the clubhead end of the club, and it would not induce the club to rotate in space. However, if the net force is at angle to the COM, it will cause the club to rotate. If a force causes the club to rotate that force is called a moment (torque) and the amount of torque force (MoF = force producing angular rotation) that is produced at every instantaneous moment during the downswing is due to an interplay between the magnitude of the instantaneous net force and the angle between the direction of the net force relative to the clubshaft.
Here is a Dr. Kwon diagram showing the effect of that torque (moment).
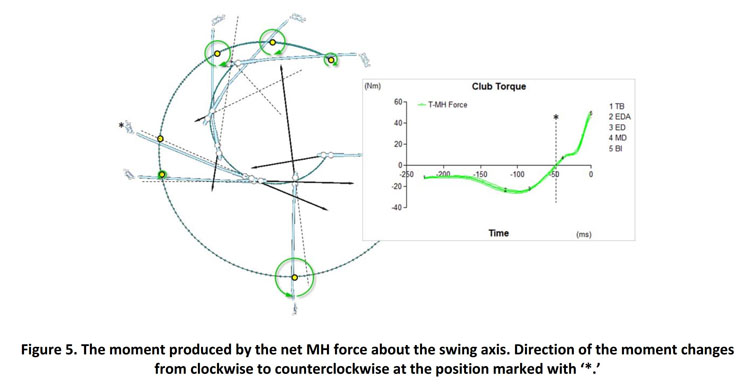
The black arrow represents the net force acting on the club handle, and its instantaneous magnitude is reflected by the length of the black arrow.
Note that Dr. Kwon has drawn a dotted line that is straight-line-aligned with each black arrow. By looking at the angle between that dotted line and the clubshaft at each instantaneous point on the hand arc path, you can get an idea of the magnitude of the moment arm at each time point during the downswing. According to a law of physics, the MoF (acting through the moment arm) causes the COM-end of the clubshaft to want to align itself with the dotted line and that causes the clubshaft to rotate clockwise around its COM between P4 and P5.5, and counterclockwise after P5.5.
The graph on the right side of the image shows the magnitude of the torque. The dotted line (with an * point) reflects the zero point when the torque is zero and it happens at roughly the P5.5 position. Note that the torque is negative between P4 => P5.5 because it causes the clubshaft to rotate clockwise, and that it is positive after P5.5 because it causes the clubshaft to rotate counterclockwise.
Note that the torque produced by the moment of force (MoF) is only slightly positive between P5.5 => P6, but it becomes rapidly more positive in the later downswing. In fact, it is this strongly positive MoF which causes the clubshaft to rapidly catch up to the lead arm between P6 => P7 in a "real life" pro golfer's driver swing, because it is causing the clubshaft to rapidly rotate in a counterclockwise direction towards the target (thereby accounting for the release of PA#2). In other words, the positive MoF has tremendous club-releasing power between P6 => P7 because the length of the black arrow is increasing a lot during that time period, and it is also becoming increasingly directed centripetally in a radial direction (because the radial component of the net force is increasing dramatically while the tangential component of the net force is simultaneously decreasing). This explanation, based on physics, correlates well with the biomechanics of a pro golfer's driver golf swing action where the hand path between P6 => P7 has a slight upsloping element in the later downswing due to the fact that the left shoulder is moving significantly upwards between P5.5 and P7 (as the lead leg straightens and the lead side of the mid-upper torso becomes more extended). I believe that it is the upwards motion of the lead shoulder socket between P5.5 => P7 that is causally responsible for markedly increasing the centripetally-directed radial force between P6 => P7, and it acts on the club handle via the lever of the straight lead arm, which does not usually change its length during the late downswing.
Now, let's consider what effect the negative MoF produces between P4 => P5.5. It would cause the clubshaft to want to rotate clockwise, and that would potentially increase the degree of clubhead lag in a float-loading manner where the clubshaft would want to jack-knife towards the lead arm. However, that jack-knifing phenomenon does not routinely happen in a pro golfer's driver swing, and most pro golfers keep the clubhead lag angle (angle between the lead arm and the clubshaft) unchanged between P4 => P5.5. How is that possible? It is possible because of the hand couple phenomenon where the trail hand is producing an outward directed force ( = an across-the-shaft force) that counters the effect of the negative MoF that must naturally be present between P4 => P5.5.
Here is a copy of Dr. Kwon's diagram showing that hand couple force.
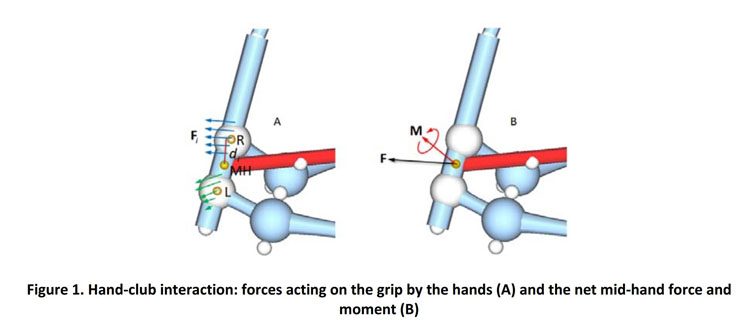
The image A shows the hand couple forces being produced by the two hands. The left hand is producing a force that is directed downwards-and-outwards. Note that the right hand part of the couple is producing a force-across-the shaft that is outwards directed.
Image B shows the effect of these hand couple forces - they produce a moment (torque) around the mid-hand point that is in a counterclockwise direction, and that hand couple torque can prevent the clubshaft from jack-knifing inwards.
Here is Dr. Kwon's diagram showing the hand couple torque phenomenon during the downswing.
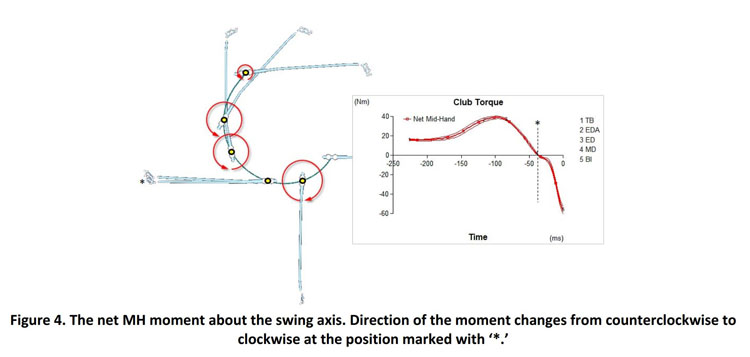
Note that the hand couple torque causes the clubshaft to rotate counterclockwise between P4 => P6 because it is positive during the early-mid downswing. Note that the peak magnitude of the positive hand couple torque happens between P5 => P5.2 and that it then decreases between P5.2 => P6. After P6, the hand couple torque becomes negative, which means that it is promoting a clockwise rotation of the clubshaft, and that means that it actually resisting the release of PA#2, which is causally due to the large MoF existing between P6 => P7.
All these conceptual ideas about a hand couple and the direction/magnitude of the torques that they produce is based on theoretical inverse dynamics calculations, so we cannot know if they are truly present in the "real life" driver golf swings of pro golfers. Interestingly, neither Dr. Kwon or Sasho MacKenzie can explain how a golfer should produce these hand couple torques from a biomechanical perspective. In fact, Dr. Kwon stated that they are simply the end-result of a good quality golf swing action. However, I would obviously like to know what aspects of a good quality pro golf swing action are causally responsible for producing these hand couple torques, and in the absence of instructive help from either Dr. Kwon or Sasho MacKenzie, I have come up with my own provisional explanation of how to produce, and fruitfully use, a positive hand couple torque phenomenon during the early-mid downswing between P4 => P6.
Consider these rear view capture images of Dustin Johnson's downswing action.
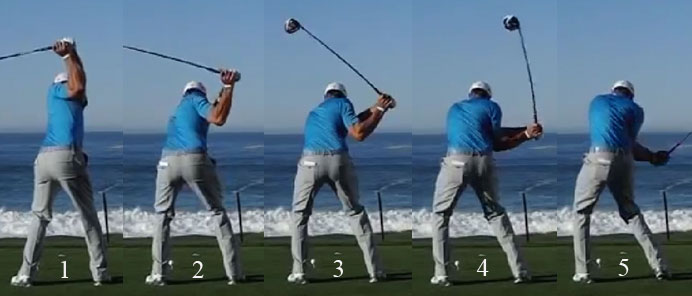
Image 1 is at the P4 position, image 2 is at the P4.3 position, image 3 is at the P4.7 position, image 4 is at the P5 position, and image 5 is at the P5.5 position.
Note that Dustin Johnson's hands move downwards-and-away from the target during his early downswing and that they reach a point that is furthest away from the target at P5. If you imagine his lead hand arc path's direction between P4 => P5 it must be producing a net force that is downwards-and-away from the target (as shown by the black arrows in Dr. Kwon's diagram). That should result in a MoF torque that would tend to rotate the clubshaft clockwise (as seen from a face-on view) and potentially increase his degree of clubhead lag. However, note that Dustin Johnson maintains the same clubhead lag angle between P4 => P5. That means that he must be producing a positive hand couple torque during that time period, that promotes a counterclockwise rotation of the clubshaft. The positive hand couple torque must be at least as large as the MoF torque, and it is likely to be slightly larger (according to Dr. Kwon's calculations). However, the positive hand couple torque cannot be too large, because that would likely result in casting (premature loss of the clubhead lag angle), which is not happening in Dustin Johnson's driver swing action. What biomechanical actions would likely result in casting between P4 => P5? I think that straightening of the right elbow, and/or straightening of the right wrist, and/or downcocking of the upcocked right wrist could result in casting; and none of those motions are happening in Dustin Johnson's early downswing between P4 => P5.
So, if Dustin Johnson does not straighten his right elbow or right wrist and if he keeps his right wrist continuously upcocked between P4 => P5, then what biomechanical phenomena produce his positive hand couple torque that peaks at ~P5? I think that three biomechanical phenomena could produce a positive hand couple torque between P4 => P5 where the right hand will produce a positive force-across-the-shaft (as shown in Dr. Kwon's diagram). i) Note that Duston Johnson's right scapula protracts and depresses between P4 => P5 and that moves his right shoulder socket downwards-and-away from the target. ii) Note that Dustin Johnson is simultaneously rotating his upper torso counterclockwise between P4 => P5 and that will move his right shoulder socket away from the target. iii) Note that Dustin Johnson is actively adducting his right upper arm between P4 => P5, while keeping his right elbow bend unchanged, and while keeping his right humerus neutral, and that causes his right forearm's angle to change from being more vertical at his P4 position to becoming more horizontal at his P5 position. The combination of the right shoulder socket's motion away from the target that is due to the biomechanical effects of i) and ii), which is combined with the right forearm angle becoming increasingly more horizontal due to his efficient right arm adduction maneuver that is combined with a pitch elbow motion of the right arm, should enable Dustin Johnson to produce a small degree of positive force-across-the-shaft with his right hand - even though he is not changing his right elbow bend angle, or changing his degree of right wrist extension or his degree of right wrist upcocking.
Note what happens between P5 => P5.5 in Dustin Johnson's driver swing - see image 5. Note that his hands move closer to the target as the hand arc path moves more targetwards while it continues to move downwards. That would naturally cause his right hand couple to produce less force-across-the-shaft and therefore a less positive hand couple torque (as can be seen in Dr. Kwon's diagram). According to Dr. Kwon, the hand couple torque becomes zero at about ~P5.5 - P6. Note what biomechanical actions allow Dustin Johnson's positive hand couple torque to steadily diminish between P5 => P6, and they include i) the fact that his right elbow is now moving targetwards by moving across the front of his right hip area and that moves the hands targetwards while they continue to move downwards and ii) the right elbow is straightening and that will angle the right forearm less away from the target, thereby allowing the hands to move targetwards while they continue to move downwards.
If I am correct about my provisional explanation, then it demonstrates how important the correct movements of the right shoulder and right upper limb are with respect to creating a small amount of positive hand couple torque in the early downswing that will steadily diminish in the mid-downswing to finally become negative in the later downswing. Most importantly, a golfer should maintain his bent right elbow unchanged during his right arm adduction maneuver and he should avoid any premature right arm straightening action, or premature right wrist straightening action, or premature right wrist uncocking action in his early downswing between P4 => P5. He should also not tilt his right shoulder too much groundwards in his early downswing by prematurely bending his upper torso into an exaggerated degree of right lateral bend before P5. He should also avoid stalling his right elbow alongside his right shirt seam between P5 => P6 and then start using a punch elbow motion during his mid-downswing action between P5 => P6, and he should rather use a pitch elbow motion where the right humerus remains neutral during the right arm adduction maneuver and where the right elbow leads the hands during the mid-downswing time period (as can be seen in those Dustin Johnson capture images above).
If the hand couple torque becomes negative after P5.5 - P6, then how does a pro golfer complete the release of PA#2 so that the clubshaft catches up to the left arm by impact? According to both Dr. Kwon and Sasho MacKenzie, the main force causing the release of PA#2 is the MoF, which steadily increases between P5.5 => P7 and where the radial component (acting centripetally) of the MoF is the major component of the MoF. How is this achieved biomechanically?
Consider these capture images of Dustin Johnson's driver swing action.
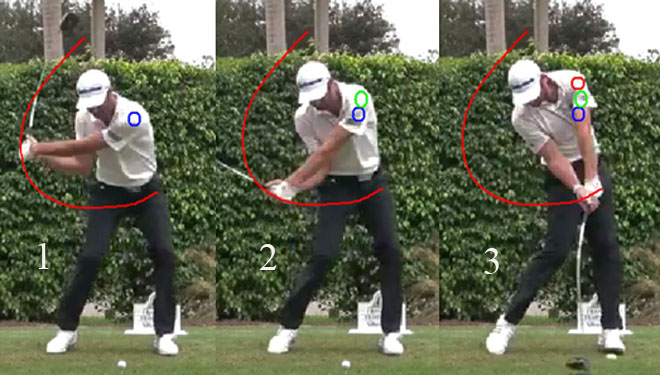
Image 1 is at the P5.2 position, image 2 is at the P5.5 position and image 3 is at impact.
The red curved path represents Dustin Johnson's hand arc path.
I have drawn a blue circle marker over his left shoulder at his P5.2 position, a green circle marker over his left shoulder socket at his P5.5 position and a red circle marker over his left shoulder at impact.
According to Dr. Kwon, the hand couple's positive torque peaks at P5 - P5.2 (image 1) and it then diminishes to zero by P5.5 (image 2) and it then becomes negative in the later downswing after ~P5.5 - P6. So, if Dustin Johnson is no longer applying a positive torque across-the-shaft between P5.5 and impact, what causes his club to complete the release of PA#2 and catch-up to his left arm by impact?
Look at the shape of Dustin Johnson's hand arc path between P5.5 => P7 - note that his lead hand is traveling roughly parallel to the ground, but with a slight upslope in the later downswing. That small degree of upsloping of his hand arc path is due to the progressive elevation of his left shoulder socket, which is secondary to the progressive straightening of his left leg and the progressively increased degree of 'stretching-out' of the left side of his mid-upper torso.
During the P5.5 => P7 time period, his lead arm speed is decreasing by ~25%, but it is still traveling fast enough to generate an increasing MoF that peaks at impact (as seen in the following Dr. Kwon diagram).
Note that the club torque that is produced by the MoF increases in the late downswing and peaks at impact, and that the resultant torque causes the club to rotate counterclockwise in a PA#2 releasing direction. Note that the black arrow representing the magnitude and direction of the force, which is due to the lead hand moving along the hand arc path, shows that the force (responsible for the MoF's torque action) is increasing in magnitude between P5.5 => P7 and that the direction is mainly targetwards at P6 and then becoming nearly straight upwards (mainly centripetal) by impact.
In other words, I believe that a pro golfer optimises his release of PA#2 in his driver swing by shaping his hand arc path between P5.5 => P7 as a result of performing a number of optimum body and lead arm movements (as just described), which then resultantly produce the required MoF-induced club torque that is needed to complete the release of PA#2 by impact. I also believe that the release of PA#2 is not due to the trail arm/hand applying a positive torque across-the-shaft (often called a positive alpha torque) all the way between P5.5 => P7.
Here is a link to a vimeo video - https://vimeo.com/121990372 (which is probably no longer available online) - where Brian Manzella describes the concept of a positive alpha torque ( = a positive in-plane torque due to the trail hand applying a force-across-the-shaft) between the 0:30 - 2:40 minute time point of the video. In particular, note what he states between the 2:00 - 2:38 minute time point of the video, where he suggests that if a golfer does not start applying a positive alpha torque at about the P5 position - by pushing against the aft (back) side of the club handle with the trail hand while the lead hand pulls the club handle - that the club will not catch-up to the left arm by impact. In other words, Brian Manzella, does not believe that the club will automatically/naturally catch-up to the left arm due to a passive PA#2 releasing action based on the shape of the hand arc path between P5.5 => P7 and the resultant MoF being produced during that time period (as I have just described). Instead, he believes that a golfer must apply a positive alpha torque via the biomechanical mechanism of the trail hand continuously applying a push-force against the back of the shaft during the mid-late downswing. The theoretical basis of this golf instructional advice is derived from Steve Nesbit, who wrote an article called "Work and Power Analysis of the Golf Swing", which you can read at https://www.ncbi.nlm.nih.gov/pmc/articles/PMC3899668/ . Steve Nesbit studied the golf swings of 4 amateur golfers (a male scratch handicap golfer, a male 5-handicap golfer, a male 13-handicap golfer and a female 18-handicap golfer) and he then used a theory-based "inverse dynamics modeling" concept to calculate the likely alpha, beta and gamma torques that those 4 golfers were producing during their downswing. In this article, this is what Steve Nesbit stated with respect to the positive alpha torque produced by the two male golfers with the lowest handicaps.
Copy of a small section of that article containing Steve Nesbit's quote.
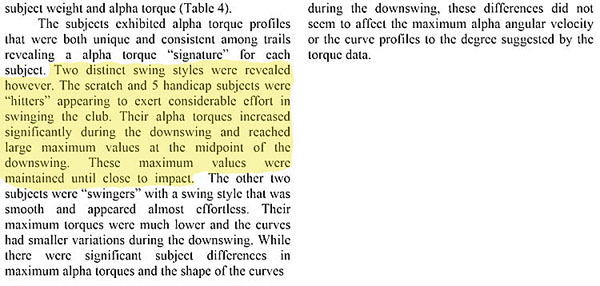
Read the yellow highlighted sentences, and note that Steve Nesbit stated that two golfers (the scratch golfer and the 5-handicap golfer) were "hitters", who were producing a positive alpha torque during their downswing, where the alpha torque reached its maximum value during the midpoint of the downswing, and where they continuously maintained these maximum positive alpha torque values until the clubshaft was close to impact.
Here is a copy of the alpha torque graph from Steve Nesbit's paper.
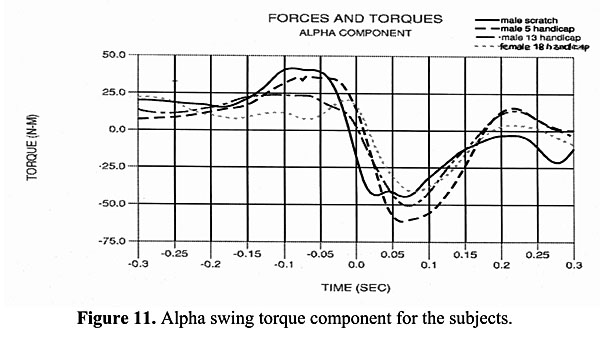
Note that the two golfers with the lowest handicap (male scratch golfer and male 5-handicap golfer) produced the largest positive alpha torque values during their mid-downswing (see "hump" at 0.1 seconds prior to impact) and note that they then maintained these high values until close to impact. From my perspective, if a golfer starts to apply a positive alpha torque during the mid-downswing by applying push-pressure with his trail hand against the aft (back) side of the club handle, and if he then continuously maintains that positive alpha torque during most of the late downswing, then he is using a swing-hitting or TGM hitting technique, and not a TGM swinging technique.
Are PGA tour professional golfers using a TGM swinging technique where the alpha torque is negative throughout the later downswing between P6 and impact, or are they using a swing-hitting technique where the alpha torque is positive during most of the late downswing and where it only decreases just prior to impact? I am not aware of any golf researcher having actually measured any positive alpha torque being applied to the aft side of the club handle, via the trail hand applying push-pressure against the shaft, during any golf research study. Dr. Nesbit's opinion is based on theoretical interpretative reasoning, which has been widely criticised by many other golf researchers. Prominent golf physicists (like David Tutelman) and golf biomechanists (like Sasho MacKenzie and Dr. Kwon), have concluded that professional golfers are not applying a positive alpha torque during their late downswing - based on theoretical reasoning and also based on research evidence derived from using an instrumented grip handle. Here is a link to an article written by David Tutelman - https://www.tutelman.com/golf/swing/nesbitKwon1.php - where he provides a very detailed argument to bolster his opinion that professional golfers do not have a positive alpha torque at impact. The article is very complicated to understand, and I personally cannot understand the explanations based on mathematical calculations, but I think that the most important golf instructional element that one should try to understand are the implications of the following diagram.
Here is a copy of a diagrammatic image from David Tutelman's article.

Note that if a golfer's proximal clubshaft is straight-line-aligned with his peripheral clubshaft during a golf swing action, then that means that no alpha torque (either negative or positive) is being applied by the golfer's hands at the grip handle. By contrast, if the peripheral clubshaft is bent backwards relative to the proximal clubshaft, then that implies that the golfer is applying a positive alpha torque at the grip handle. Finally, if the peripheral clubshaft is bent forward relative to the proximal clubshaft, then this means that a negative alpha torque is being applied at the club handle. Expressed differently, a negative alpha torque means that the peripheral end (clubhead end) of the clubshaft is traveling faster than the proximal end (central end) of the clubshaft and that the golfer's hands are not quite keeping up with the club, which means that a negative clockwise alpha torque will be experienced at the level of the hands.
Now, let's examine capture images from the downswing of two professional golfers.
Rory McIlroy
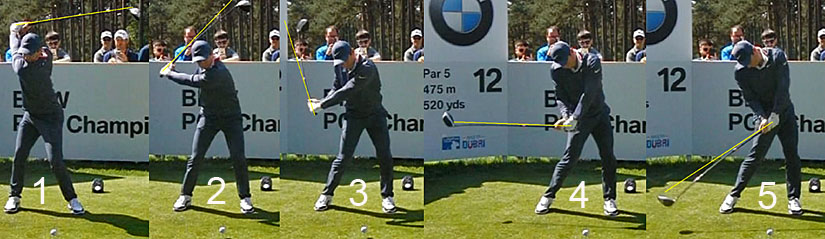
Image 1 is at P4, image 2 is at P5, image 3 is at P5.5, image 4 is at P6 and image 5 is at P6.4.
I have drawn a yellow line along his proximal clubshaft. Note that his entire clubshaft forms a straight line with that yellow line at his P4 position, which means that no alpha torque is being exerted at this time point.
Note that his peripheral clubshaft is bent back a lot at P5 and to a lesser degree at P5.5, which means that he is applying a positive alpha torque during his early-mid downswing between P4 and P5.5.
However, note that his clubshaft is marginally bent forward at P6 and significantly bent forward at P6.4 (and it remains bent forward all the way to impact). This means that the change from having a positive alpha torque to having a negative alpha torque happens around P5.5 - P6 and one can reasonably conclude that Rory McIlroy is applying a positive alpha torque during the "swing power generation phase" of his downswing between P4 and P5.5 (as a result of his pivot-induced release of PA#4 that is combined with an active right arm adduction maneuver) and that his club then releases (due to the release of PA#2) at roughly the P5.5 time point of his downswing. During his later downswing, his club is traveling faster than his hands as a result of the release of PA#2 and one can reasonably conclude that he is not applying any push-pressure against the aft (back) side of the club handle in order to make it travel faster at any time point during his later downswing. I think that this type of golf swing pattern is characteristic of a TGM swinging action, and incompatible with a swing-hitting action (as recommended by Brian Manzella).
Luke List
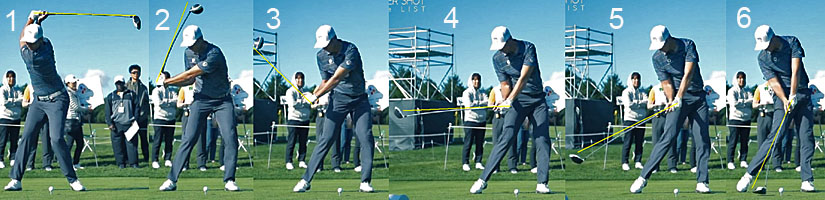
Image 1 is at P4, image 2 is at P5.2, image 3 is at P5.5, image 4 is at P6, image 5 is at P6.3 and image 6 is at P6.8.
I have drawn a yellow line along his proximal clubshaft. Note that his entire clubshaft forms a straight line with that yellow line at his P4 position, which means that no alpha torque is being exerted at this time point. Also, note that he must be applying a positive alpha torque at P5.3 and P5.5 because his peripheral clubshaft is bent back, and that he must be experiencing a negative alpha torque in his later downswing between P6 and impact because his peripheral clubshaft is bent forward at all time points between P6 and impact.
In other words, Luke List (like Rory McIlroy) is likely using a TGM swinging action and not a swing-hitting action (as suggested by Brian Manzella). It is abundantly clear to me that most PGA tour golfers are using a TGM swinging technique, and I believe that they are not applying any significant amount of push-pressure (positive alpha torque) against the aft side of their club during their late downswing between P6 and impact in a deliberate attempt to make their club release faster during the late downswing's PA2 release action.
Although I believe that a positive alpha torque swing pattern in the late downswing is not appropriate for a professional quality driver golf swing action when the golfer is using a TGM swinging technique (that is based on the sequential pivot-induced release of PA#4 => passive release of PA#2), I think that it is entirely appropriate to use it for certain specialised shots like a "punch shot". Professional golfers often use a TGM hitting technique (based on the active release of PA#1) for "punch shots" (eg. hitting a low flying shot out from the woods back to the fairway when they want to avoid hitting low-hanging tree branches). When using a TGM hitting action, that is powered entirely by the active release of PA#1 (which is biomechanically due to an active right arm straightening action), the golfer is continuously applying a positive push-force against the aft (back) side of the club handle with the trail hand throughout the entire late downswing and into impact, which means that a positive alpha torque must be present. However, I know of no professional golfer who is using a TGM hitting action (punch shot action) for his driver golf swing action.
There is another phenomenon - called parametric acceleration - that some pro golfers use in their driver swing action in an attempt to generate a greater clubhead speed at impact.
Parametric acceleration of the club refers to the phenomenon where a golfer can increase clubhead speed during the late downswing by shortening the hand arc path's radius (shortening the hub path radius).
Here is a diagram showing what is meant by the concept of "shortening the hub path radius" in the late downswing as the club approaches impact.
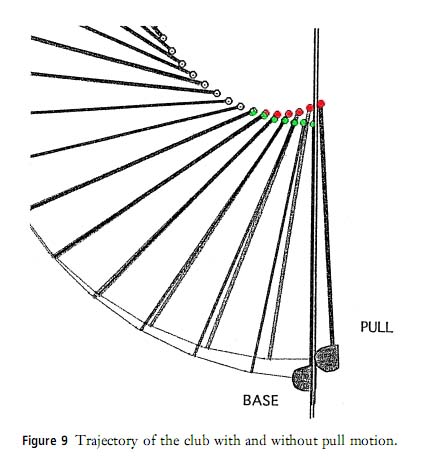
The green dots show the hand arc path in the absence of parametric acceleration and the red dots show the hand arc path in the presence of parametric acceleration, where the hands move slightly more upwards due to an upwards pull motion that is secondary to an increased degree of left shoulder socket elevation happening in the late downswing and through impact. What is the theoretical basis for believing that elevating the left shoulder socket, which lifts the club handle upwards in the later downswing just before impact, can increase clubhead speed? The scientific basis for the phenomenon of parametric acceleration comes from the experimental work of K Miura - see "Parametric Acceleration - The Effect of Inward Pull of the Golf Club at Impact Stage. K Miura. Sports Engineering (May 2001) 4: 75-86. Abstract available at http://onlinelibrary.wiley.com/doi/10.1046/j.1460-2687.2001.00071.x/abstract ".
Here is a copy of a diagram from his paper.
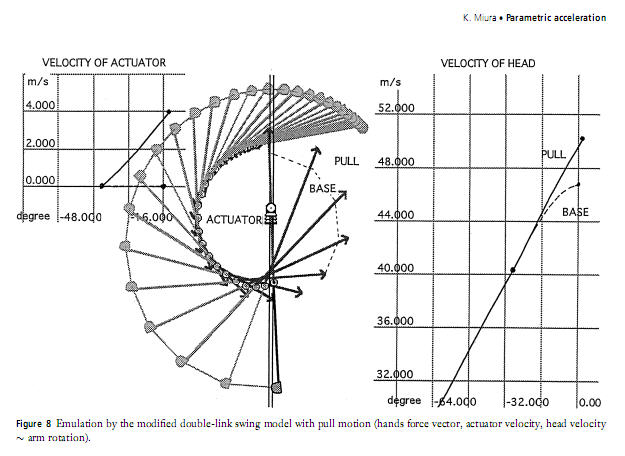
Miura modified a double pendulum model by adding a linear actuator that he situated above the central arm's torque motor, which then becomes a movable pivot (rather than a fixed pivot) if the linear actuator actively pulls the torque motor upwards during the late downswing. When he activates the linear actuator during the late downswing it pulls up on the torque motor, which in turn pulls the grip end of the club upwards to exactly the same degree (as the central arm has a fixed length).
The "velocity of actuator" graph on the left shows that he activates his linear pull actuator (in order to pull the club upwards) in the latter part of the late downswing, and the slope of the graph shows the rate of acceleration of the pulling-up action of the linear actuator. Note that the normal force (centripetal component of the hand force) arrows are increased in magnitude as a result of this added pulling-up action, which will shorten the hub radius near impact. The "velocity of head" graph on the right shows that he can get an extra 5% of clubhead speed using this maneuver. So, why is the increase in maximum clubhead velocity not greater than ~5%? The answer is related to the fact that the clubhead has already released due to a MoF-induced release of PA#2, and it is therefore difficult to get the club to release faster if the pulling up action is superimposed on an already-released club that has already gained >90% of its maximum clubhead velocity by the time the pulling-up action is instituted. From a golf instructional perspective, it is important to realise that if a golfer performs the requisite biomechanical movements needed to enact a greater amount of parametric acceleration, that the potential gain of an increased clubhead speed of 5% will only occur if the ball is still struck by the sweetspot of the clubface, thereby maintaining the maximum smash factor. If the golfer pulls the club handle upwards just before impact, and misses the sweetspot, then the smash factor will likely be significantly less due to an off-center strike, and the resulting loss of ball flight distance will probably offset the potential gains that can be obtained by using the phenomenon of parametric acceleration in one's driver golf swing action. That is why I am not personally in favor of trying to eke out a small potential gain of a 5% increase in clubhead speed at impact by incorporating a large amount of the parametric acceleration phenomenon into one's driver golf swing action.
How does a golfer enact the phenomenon of parametric acceleration in his driver golf swing action from a biomechanical perspective? In other words, what "extra" biomechanical movements must he introduce into his regular driver golf swing action in order to shorten the hub radius more than usual? To get the left shoulder socket to move more upwards during the later downswing between P6 and impact, a golfer can add one-or-all of the following biomechanical movements to his regular driver golf swing action-: i) he can increase the degree of straightening of his left leg thereby increasing the degree of elevation of his left hip joint; ii) he can increasingly stretch-lengthen the left side of his mid-upper torso, iii) he can elevate his left clavicle more skywards than usual in a manner that is independent of the stretch-lengthening of the left side of his mid-torso; and iv) he can get up on his toes, or even jump-off the ground, in order to elevate his left hip joint even more just before impact. A golfer who often manifests these "extra" biomechanical movements is Lexi Thompson.
Here is a capture image of Lexi Thompson soon after impact.

Note Lexi Thompson's i) very straight left leg at impact, which significantly elevates the left side of her pelvis; ii) the stretching-out of the left side of her upper torso, iii) the elevation of her left outer clavicle and iv) her tendency to get up onto her toes thereby lifting her heels off the ground.
If you, as a developing golfer, can consistently hit the ball on the sweetspot while performing all those "extra" biomechanical movements, then you may potentially gain up to a 5% increase in ball flight distance. Long-drive competitors are notoriously known for "jumping-up" through impact in an attempt to gain a few extra yards of driving distance, and they are usually willing to give up the idea of simultaneously achieving the maximum degree of accuracy in order to gain those few extra yards. A good long-drive competitor who performed a "crunch down-and-then-jump up" type of exaggerated parametric acceleration swing pattern is Jason Zuback, a former world long-drive champion. He manifests an exaggerated degree of "crunching down" between P4 and P5.5 due to the use of an exaggerated amount of hip joint flexion and knee joint flexion, and he then straightens his left leg very abruptly between P5.5 and impact and he sometimes even becomes "air-borne" through impact as result of the "jumping-up" action.
Greg Rose (a TPI co-founder) taught this "jumping-up action" at a golf clinic in California - https://www.youtube.com/watch?time_continue=100&v=VpnSwHoAh5M - where the subject matter of the golf clinic was "how to generate swing power" and one of the variables that he discussed was employing vertical ground reaction forces in order to execute the "jumping-up" biomechanical motion. First of all, I disagree with the "idea" of using the term "vertical ground reaction forces" because that term may give an uninformed golfer the wrong impression that the ground is producing the forces, when they are actually produced by the golfer's muscles. The ground merely serves as an immovable object that a golfer can push against when he contracts his left knee extensor muscles (especially his left vastus lateralis muscle) and his left hip joint extensor muscles (especially the left gluteus maximus muscle), but the true cause of the "jumping-up" motion is due to the muscular contraction of those specific muscles, and it is not due to "forces" arising from the ground under the left foot. Secondly, I think that a skilled long-drive competitor can still drive a golf ball 400-450 yards without using an exaggerated degree of parametric acceleration of the club if he manifests very good golf swing biomechanics during his "swing power generation phase" that happens between P4 and P5.5, and if hits the ball on the clubface's sweetspot and thereby generates the maximum smash factor.
Here is an example of a long-drive competitor who doesn't use an exaggerated degree of parametric acceleration in his late downswing.
Capture images of Domenic Mazza's driver swing action (captured from a video that was taken when he was 16 years old and when he was driving the ball >400 yards).
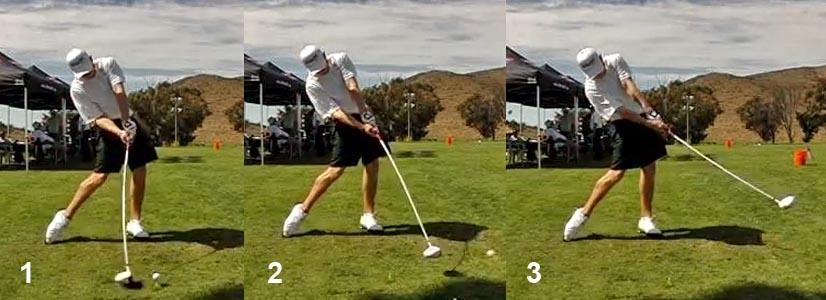
Image 1 is at impact, image 2 is at P7.2 and image 3 is at P7.5.
First of all, note that his peripheral clubshaft is bent forward just before impact, which means that he must have negative alpha torque pre-impact.
Secondly, note that there is no exaggerated left leg straightening action or any "jumping-up" action through impact. Finally, note that his left foot is solidly grounded at impact and it remains solidly grounded during his followthrough to P7.5, and that there is no lifting-up and counterclockwise spinning of his left heel (which some golf instructors incorrectly believe can contribute to swing power). However, I think that it is optional whether one should lift-up and spin the left heel counterclockwise through impact and that phenomenon is much more likely to be seen in *"reverse foot" golfers rather than "front foot" golfers. (* I discussed the difference between "reverse foot" golfers and "front foot" golfers in topic number 13 of this review paper) It is also interesting to note that Domenic Mazza's clubshaft has not bypassed his left arm between impact and P7.2 - and that means that he is using a DH-hand release action which allows him to keep the clubface square to his clubhead arc for many inches through impact. I think that these capture images demonstrate the fact that using a DH-hand release action does not impair a golfer's ability to generate maximum swing power, and I think that many golf instructors are incorrect when they label a "drive-hold" hand release action as being a "holding-off" type of hand release action. The term "holding-off" is a negative term that implies that a DHer is impeding the full release of his club through impact, but that is a totally inaccurate interpretation of reality because DHers are fully releasing their club, and they are simply matching their left arm's forward angular velocity so that it perfectly matches the forward angular velocity of their fully released club during their early followthrough action.
One of the longest drivers on the PGA tour is Luke List and he does not use an exaggerated degree of parametric acceleration of the club during his driver golf swing action.
Here are capture images of Luke List's downswing action.
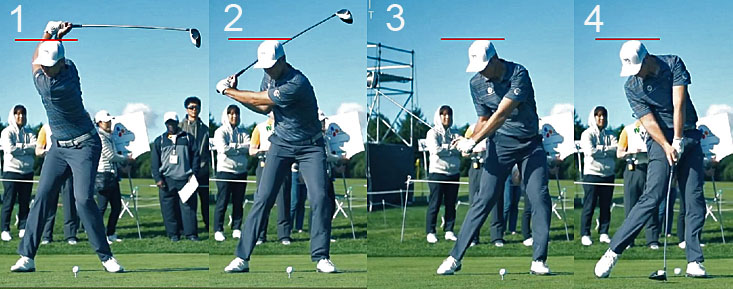
Image 1 is at his P4 position. Note that I have drawn a red line at the level of the top of his head.
Image 2 is at P5, image 3 is at P5.5 and image 4 is at impact. Note how his head does not change its position throughout his entire downswing. Note that he does manifest any of those "extra" biomechanical movements that are seen in Lexi Thompson's golf swing action.
Here is an image showing Luke List's hand arc path.
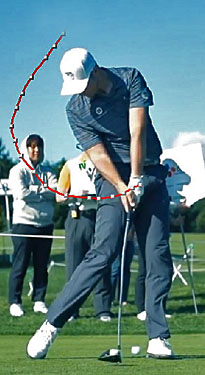
The red splined line represents his hand arc path. Note that his hand arc path reaches its nadir when it reaches his right outer thigh, and that it then moves slightly upwards in his late downswing due to a finite amount of left shoulder elevation happening between P5.5 and impact, which means that he does already have a finite amount of parametric acceleration inbuilt into his driver swing action.
Note that he does not i) overly straighten his left leg and overly elevate the left side of his pelvis; ii) get up on his toes; iii) overly stretch-out his left upper torso or iv) overly elevate his left outer clavicle. Despite not manifesting the "extra" biomechanical movements associated with the phenomenon of an increased degree of parametric acceleration of the club, he still drives the ball extremely far by PGA tour standards by using the standard amount of parametric acceleration that is already inbuilt into his driver swing action.
If you look at Luke List's hand arc path in his driver swing, you can see that he has the same U-shaped hand arc path between P5 => P6 that is seen in the driver swings of other pro golfers like Dustin Johnson.
Here is a comparison of Dustin Johnson's hand arc path between his driver swing (image 1) and his short iron swing (image 2).
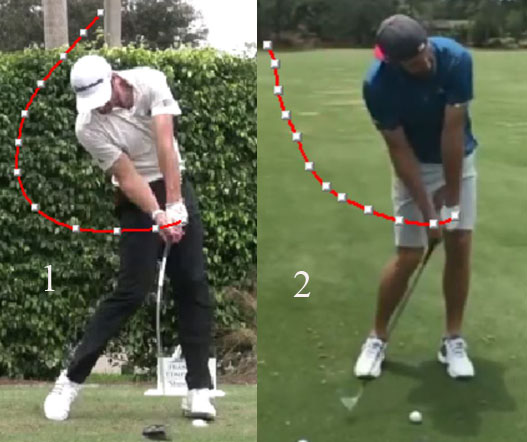
Note the large difference in hand arc path shape between Dustin Johnson's driver swing where the hand arc path is U-shaped, and his short iron swing where it is V-shaped. Note that in his V-shaped hand arc path, the hand arc path moves targetwards while it is simultaneously moving downwards, and it does not angle away from the target between P4 => P5.2 as seen in his driver swing. What effect does that V-shaped hand arc path have with respect to the MoF torques and hand couple torques that are present during the downswing?
Sasho MacKenzie analysed the 7-iron swing of a skilled pro golfer using his computer-generated calculations based on the interpretative technique of inverse dynamics and he presented the results in the online zoom conference hosted by Michael Finney.
Here are a series of capture images showing the results of his analysis.
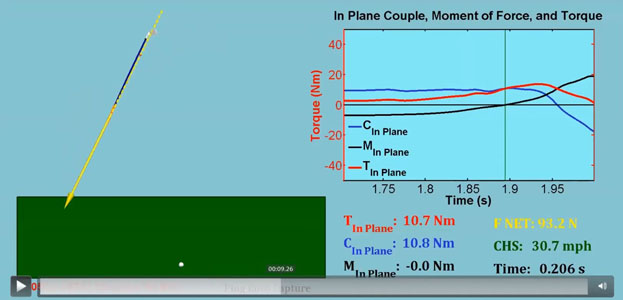
The blue graph shows the torque produced by the hand couple. The black graph shows the torque produced by the MoF. The red graph shows the total torque. The green vertical line represents his present position.
If you look at the clubshaft's position in space, you can surmise that he is probably at his ~P5 position. Note that his MoF was negative between P4 => P5, but that it becomes zero by ~P5.
Here is another capture image at the ~P5.5 position.

Note that the MoF torque is already significantly positive and roughly equal in magnitude to the positive hand couple torque, which is starting to diminish in magnitude. That means that both torques are acting in a club releasing manner by promoting a counterclockwise rotation of the clubshaft. That fact makes it easier for a golfer to complete the release of PA#2 by impact without having to use a more U-shaped hand arc path.
Note that Dustin Johnson's hand arc path is still moving downwards-and-targetwards between P6 => P7 in his short iron swing and his hands reach their lowest point (nadir) on the hand arc path just before impact. That hand arc path pattern is very conducive to a short iron swing action where the golfer wants to have a lot of forward shaft lean at impact and a negative clubhead attack angle at impact. The fact that the hand arc path between P6 and impact is shorter, and slightly downsloped, means that he cannot produce as large a MoF torque between P6 => P7 as he can achieve in his driver swing, but that does not matter because he is already efficiently releasing his club earlier in his P5 => P5.5 downswing time period due to a sufficiently large combined total positive torque produced by the combination of a positive hand couple torque and a positive MoF torque.
Note that Dustin Johnson's hands reach their lowest point (nadir) on his hand arc path at ~P5.5 - P6 in his driver swing, and that he has a longer time period between P6 => P7 where his hands are traveling relatively parallel to the ground with a slightly upsloping trajectory just before impact. During that late downswing time period he is generating an increasing MoF toque that can complete the release of PA#2 in a smoothly progressive manner. The driver is a longer club than a short-iron, which means that it produces a wider and longer clubhead path, and it takes more club-releasing power to ensure that the release of PA#2 is completed by impact. Note that an U-shaped hand arc path (where the lead hand is outside the right thigh at P5.5) lengthens the distance that the lead hand travels between P5.5 and impact, and that allows a golfer to more smoothly, and progressively, complete the release of PA#2 by impact. Another advantage of that hand arc path pattern is that it can produce a clubhead path that is relatively "flat" (level to the ground) during the last 12 - 18" of clubhead travel just before impact.
Here is a capture image of Tiger Woods hand arc path and clubhead path in his later downswing's driver swing.
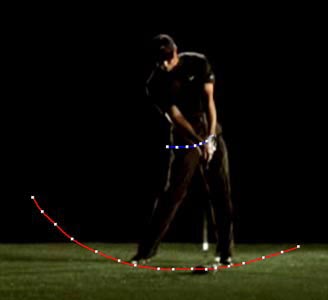
His hand arc path is depicted in blue, and his clubhead path is depicted in red.
Note that his hand arc path between P6 => P7 is relatively horizontal to the ground, but slightly more upsloping near impact. That hand arc path pattern is very conducive to generating a large MoF torque needed to complete the release of PA#2 by impact, which is going to take longer because the length of his driver is much longer than his length of his short iron. Another added benefit is the effect that it has on his clubhead path - note that his clubhead path is level to the ground for many inches prior to impact, which is very desirable in a driver swing action if a golfer wants to have a zero clubhead attack angle, or a slightly positive clubhead attack angle, at impact.
Shaping the hand arc path (which affects the MoF during both the early-mid downswing and late downswing) in order to make it more U-shaped for his driver swing (+/- long iron swing), is the major method that allows a pro golfer to efficiently maintain his maximum degree of clubhead lag until ~P5.2 - P5.5, and that then allows him to efficiently complete his PA#2 release action between P5.5 => P7 while simultaneously ensuring a shallower clubhead path in the last 12 - 18" of clubhead travel pre-impact.
Topic number 6: How does a pro golfer perform a golf swing action using either the intact LFFW/GFLW technique or the bowed lead wrist technique?
I have previously stated that I believe that most pro golfers are using a TGM swinging technique where the lead hand is pulling the club handle down the hand arc path during the entire downswing from P4 to P7. To ensure that the clubshaft moves smoothly, and not jerkingly, during the entire downswing time period, the lead hand must always be leading ( = by pulling the club handle) the clubhead end of the club in a smooth manner downwards-and-forwards towards impact. During most of the downswing, the clubhead end of the clubshaft will be lagging behind the club handle end of the clubshaft. If the lead hand's forward motion unintentionally stalls in the later downswing, it is possible for the clubhead's gained momentum to cause the clubshaft to uncontrollably flip passed the lead arm pre-impact, and that should never happen in a pro golfer's downswing action. Also, note that the hand arc path is not perfectly linear between P4 => P7 and it is curvilinear, especially when using longer clubs like a driver. The most curvilinear section of the hand arc path in a driver swing is between P5.2 => P6.2 and this is also the time period when lead hand speed is reaching its maximum speed down the hand arc path. To control the motion of the club during this critical P5.2 => P6.2 time period, when the hand arc path is most curvilinear, and to ensure that the club does not wobble as it goes around the curve between P5.2 => P6.2, a golfer must perform a very smooth leading hand motion. What makes it even more problematic, is the fact that the release of PA#2, and then the release of PA#3, is starting to happen during this P5.2 => P6.2 time period. That means that the lead wrist is starting to uncock (ulnar deviate) and then the lead forearm is secondarily going to start to rapidly supinate soon thereafter if the golfer uses a weak-neutral lead hand grip strength. How do pro golfers prevent the clubhead from wobbling too much during this P5.2 => P6.2 time period due to uncontrolled biomechanical motions happening at the level of the lead wrist? I believe that pro golfers, who use a weak-neutral lead hand grip strength, use either one of two biomechanical techniques to help them maintain better control of their lead wrist motion during their entire downswing and early followthrough - i) the intact LFFW/GFLW technique and the ii) bowed lead wrist technique. I will start off by describing the intact LFFW/GFLW technique, which is used by the majority of pro golfers (eg. Tiger Woods, Adam Scott, Justin Rose, Rory McIlroy and Henrik Stenson) who adopt a weak-neutral lead hand grip strength at address.
The intact LFFW/GFLW technique.
The term LAFW is an abbreviation used for the TGM concept of the "Left Arm Flying Wedge", which is a TGM concept first introduced by Homer Kelley in his book called "The Golfing Machine". Homer Kelley only briefly discussed the Left Arm Flying Wedge concept in his TGM book, and he implied that a golfer should maintain an intact LAFW throughout the downswing. I believe that it is impossible to maintain an intact LAFW throughout the downswing, but I do believe that it is possible to maintain an intact LFFW and GFLW throughout the downswing and early followthrough. The abbreviation LFFW refers to a "Left Forearm Flying Wedge" and the term GFLW refers to a "Geometrically Flat Left Wrist". I have coined those two terms, and they are not TGM terms introduced by Homer Kelley. To better understand those two terms, consider this capture image of me (author) holding a short golf club.
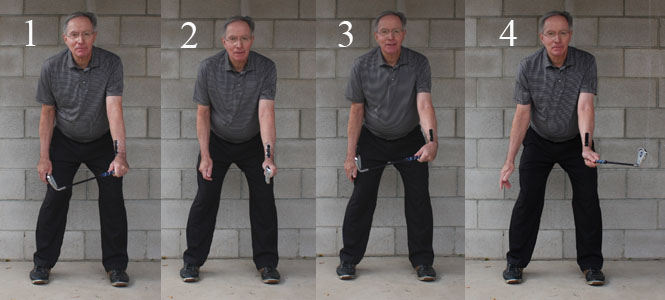
Note that I have taped a 3" length of black tape over the lower radial bone area of my lower left forearm.
Note that in image 1, the clubshaft is straight-in-line with the black-taped area of my lower left forearm (lower 3" of the left forearm just above the wrist crease), which means that I have an intact LFFW. However, the clubshaft is not straight-in-line with my left upper arm because my left forearm is pronated slightly and that causes the clubshaft to angle slightly towards the right. Therefore, I do not have an intact LAFW. However, because the clubshaft is angled to the right to the same degree as my left lower forearm's lower radial bone as a result of a slight clockwise rotation of my left hand due to the biomechanical phenomenon of left forearm pronation, I can still maintain an intact LFFW if my wrist angle (in the plane of left wrist extension/flexion) does not change from its neutral alignment. The wrist angle (in the plane of left wrist extension/flexion) that allows me to have the clubshaft straight-line-aligned with the lower 3" of my left lower radial bone is a geometrically neutral wrist angle, which I label as being a GFLW. A geometrically neutral left wrist angle is by definition a geometrically non-extended left wrist angle (even if the left wrist visually appears to be dorsiflexed) and also a geometrically non-flexed left wrist angle (even if the left wrist visually appears to be slightly palmar flexed), and it allows the clubshaft to be straight-line-aligned with my lower left forearm (black taped area of my lower left forearm).
In image 2, note that I have supinated my lead forearm slightly (while maintaining a GFLW) to get the clubshaft to be straight-in-line with both my lower left forearm and my left upper arm, which means that I not only have an intact LFFW, but I now also have an intact LAFW (where the clubshaft is straight-line-aligned with both my left forearm and left upper arm). A key biomechanical element that allows me to have an intact LFFW alignment, where the clubshaft is straight-in-line with my lower lead forearm, is the fact that I have a GFLW. A GFLW refers to a neutral left wrist alignment, which allows the clubshaft to be straight-line-aligned with the lower 3-4" of the left lower forearm. The left wrist does not have to anatomically flat to be a GFLW, and it can visually appear to be cupped to a variable degree.
In image 3, I have bowed my lead wrist and that angles the clubshaft to the right, and in image 4, I have extended (bent) my lead wrist and that angles the clubshaft to the left. Because the clubshaft is not straight-in-line with the lower 3-4" of my left lower forearm, I do not have a GFLW, which means that I cannot have either an intact LFFW or an intact LAFW. In other words, left wrist bowing or extending (bending) disrupts a GFLW and causes the LFFW alignment to become non-intact.
The following side-view capture image shows a wedge-shaped piece of red cardboard placed between my clubshaft and my lower left forearm (over the radial bone area). Theoretically, the piece of red cardboard should fit perfectly between the clubshaft and the lower 3-4" of my left lower forearm while remaining perfectly straight-in-line with the black-taped area of my lower left forearm, but this piece of cardboard is too large so I am holding it against the ventral aspect of my left forearm with the fingertips of my left hand. Nonetheless, the flat piece of red cardboard helps one to mentally imagine a wedge-shaped area between the clubshaft and the lower 3-4" of my left lower forearm that is planar in nature and where the clubshaft can be aligned in the same plane as the black-taped lower 3-4" area of my left lower forearm.
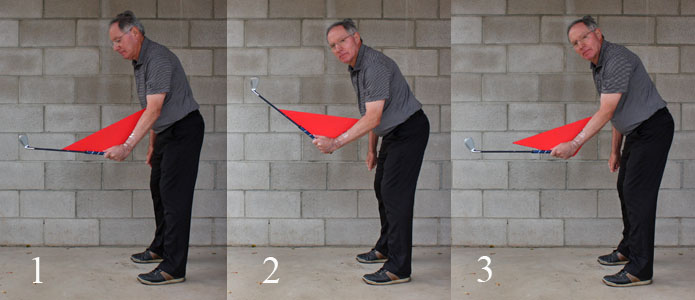
Note that the wedge-shaped angle between my left forearm and the clubshaft in image 1 exists because I have adopted a low palmar left hand grip, and that allows one to more easily conceptualise the mental concept of an intact LFFW as being a wedge-shaped structure (involving the lower lead forearm and the clubshaft) that is planar in nature.
In image 2, I have radially deviated my left wrist while maintaining a GFLW/intact LFFW alignment, and in image 3, I have ulnar deviated my left wrist while maintaining a GFLW/intact LFFW alignment. Note that radial deviation and ulnar deviation of the left wrist does not disrupt an intact LFFW alignment if one maintains a GFLW and that the biomechanical phenomenon of upcocking (radially deviating) or uncocking (ulnar deviating) the left wrist happens within the plane of the LFFW. Upcocking my left wrist decreases the angle of the wedge-shaped alignment between my left forearm and the clubshaft so that the wedge-shaped angle is closer to 90 degrees, while uncocking my left wrist increases the wedge-shaped angle between my left forearm and the clubshaft so that the wedge-shaped angle is closer to 180 degrees. Now, although the biomechanical phenomenon of left wrist upcocking/uncocking does not disrupt a GFLW or intact LFFW alignment, it does alter the physical appearance of the back of my GFLW if I adopt a weak/neutral left hand grip - as seen in the following birds-eye view capture images where I continuously maintain a GFLW and intact LFFW alignment.
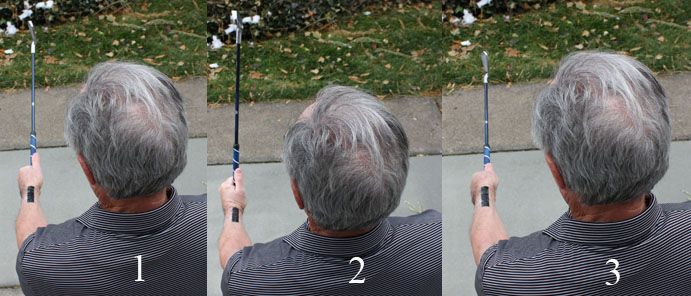
Image 1 shows a neutral position where I am holding my left wrist in a neutral cocked position approximately half-way between being fully upcocked (fully radially deviated) and fully downcocked (fully ulnar deviated). Note that the back of my left wrist looks to be slightly cupped (scooped) because I have adopted a weak left hand grip. Note that the clubshaft is straight-line-aligned with the black-taped area of my lower left forearm and that they are both in the same plane.
Image 2 shows my left wrist in an upcocked position (position of radial deviation) and one can see that the back of my left wrist looks to be more cupped.
Image 3 shows my left wrist in an uncocked position (position of ulnar deviation) and one can see that the back of my left wrist looks far less cupped and borderline anatomically flat or slightly bowed (minimally palmar flexed).
Note that both radial deviation of my left wrist and ulnar deviation of my left wrist does not disrupt the GFLW/intact LFFW alignment. I strongly recommend that all readers of this review paper confirm my above biomechanical claims by personally repeating this demonstration at home. Note that it is an obvious biomechanical fact that in order for a golfer (who uses a weak-neutral left hand grip) to maintain a GFLW all the way throughout the entire downswing between the P4 position (where the left wrist is radially deviated) to impact (where the left wrist is ulnar deviated), the left wrist angle must continuously change from being significantly dorsiflexed at P4 to becoming far less dorsiflexed (and even slightly palmar flexed) by impact.
The following series of capture images show that it is biomechanically possible to maintain an intact LFFW/GFLW alignment throughout the backswing and entire downswing (including the early followthrough).
Backswing action capture images
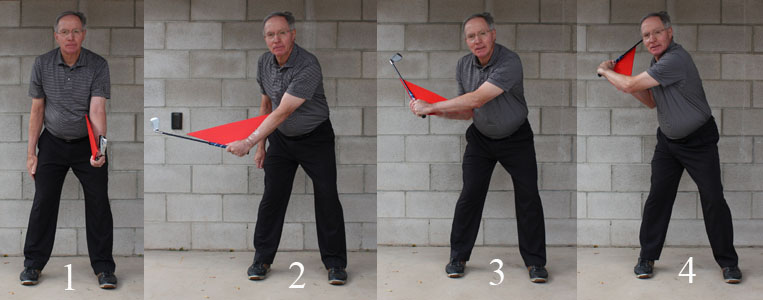
These capture images are artificial in the sense that I am simply placing my left arm/clubshaft into different simulated P positions and holding those simulated P positions for each still photograph.
Image 1 shows a simulated address position where I have a GFLW/intact LFFW alignment.
Image 2 shows a simulated P2 position where I still have a GFLW/intact LFFW alignment. Note that the toe of the clubhead is pointing straight-up. Note that the clubface is straight-line-aligned relative to the back of my GFLW and the black-taped area of my left lower forearm.
Image 3 shows a simulated mid-backswing position where I still have a GFLW/intact LFFW alignment. Note that my clubface is straight-line-aligned relative to the back of my GFLW and the black-taped area of my left lower forearm, and they all parallel to the swingplane. To get the back of my GFLW and the watchface area of my left lower forearm parallel to the swingplane, I had to pronate my left forearm by a finite amount.
Image 4 shows a simulated end-backswing position where I still have a GFLW/intact LFFW alignment. Note that my clubface is straight-line-aligned relative to the back of my GFLW and the black-taped area of my left lower forearm, and they all parallel to the swingplane (which has become steeper at P4 compared to image 3).
Downswing action capture images
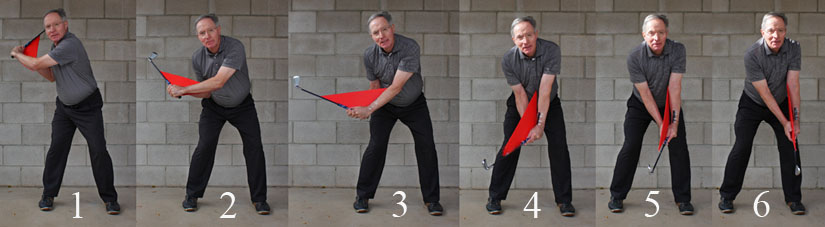
These capture images are artificial in the sense that I am simply placing my left arm/clubshaft into different simulated P positions and holding those simulated P positions for each still photograph.
Image 1 shows a simulated end-backswing position where I still have a GFLW/intact LFFW alignment. Note that my clubface is straight-line-aligned relative to the back of my GFLW and the black-taped area of my left lower forearm, and they all parallel to the swingplane. Note that my GFLW is significantly cupped because my left wrist is radially deviated.
Image 2 shows a simulated mid-downswing position where I still have a GFLW/intact LFFW alignment. Note that my clubface is straight-line-aligned relative to the back of my GFLW and the black-taped area of my left lower forearm, and they all parallel to the swingplane. Note that my left wrist is still cupped, which is expected if a GFLW is still radially deviated to a significant degree.
Image 3 shows a simulated P5.8 position where I still have a GFLW/intact LFFW alignment. Note that my clubface is straight-line-aligned relative to the back of my GFLW and the black-taped area of my left lower forearm. Note that the toe of my clubhead is pointing straight up.
Image 4 shows a simulated P6.5 position where I still have a GFLW/intact LFFW alignment. Note that my clubface is straight-line-aligned relative to the back of my GFLW and the black-taped area of my left lower forearm. Note that I have partially released the club due to a left wrist uncocking action that has caused my left wrist to become more ulnar-deviated. Note that my more ulnar-deviated left wrist has caused the back of my GFLW to appear to be less cupped in appearance, and slightly flatter in appearance.
Image 5 is at a simulated impact position where I still have a GFLW/intact LFFW alignment. Note that my clubface is straight-line-aligned relative to the back of my GFLW and also the black-taped area of my left lower forearm. Note that my GFLW is not cupped in appearance and it is relatively flat in appearance, which is fully expected when a GFLW becomes markedly ulnar deviated (presuming the adoption of a weak/neutral left hand grip). Note that I have a small degree of forward shaft lean, and the clubshaft is not in a straight-line relationship with my left upper arm, which means that I have an intact LFFW, but not an intact LAFW.
Image 6 is at a simulated P7.1 position. Note that the clubshaft is straight-in-line with both the black-taped area of my left lower forearm and also my left upper arm, which means that I have an intact LAFW as well as an intact LFFW.
What I am demonstrating in an artificial manner actually happens in the "real life" golf swings of pro golfers (like Henrik Stenson, Justin Rose, Adam Scott and Tiger Woods) who use the intact LFFW/GFLW technique when adopting a weak or neutral left hand grip strength.
I will use Henrik Stenson as an example of a pro golfer, who uses the intact LFFW/GFLW technique with a neutral left hand grip strength. As I have already explained, in order for a golfer (who uses a neutral left hand grip) to maintain a GFLW throughout the entire downswing, the golfer must have a significantly dorsiflexed left wrist when the left wrist is radially deviated (eg. at the end-backswing position) and he must have a minimally dorsiflexed, or slightly palmar flexed, left wrist when the left wrist is ulnar deviated (eg. at impact).
Here is a HackMotion 3D graph showing Henrik Stenson's left wrist angles during his downswing action.
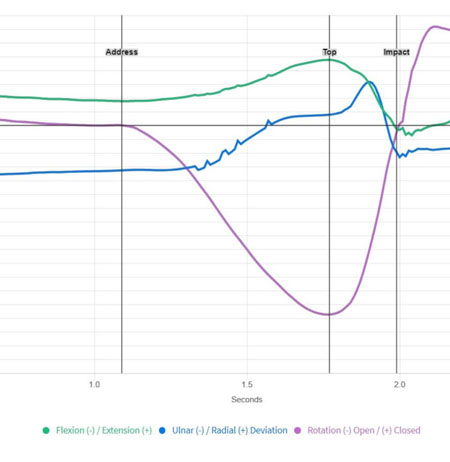
The black vertical line labelled "top" represents his end-backswing position while the black vertical line labelled "impact" represents his impact position and all downswing events involving the left wrist/hand occur between those two black vertical lines.
The green graph represents his left wrist extension-flexion graph. Note that his left wrist is maximally extended at his end-backswing position and that it remains relatively extended in the early downswing before it becomes non-extended by impact. That biomechanical phenomenon is exactly what one would expect if a golfer maintains a GFLW throughout the downswing. Note that his left wrist does not rapidly-and-massively extend through impact and that it is minimally bowed (minimally palmar flexed) during the early followthrough's immediate impact zone between P7 and P7.2, which is actually expected because Henrik Stenson uses a drive-hold (DH) hand release action through impact.
The blue graph represents his left wrist's radial-ulnar deviation graph. Note that his left wrist is radially deviated at his end-backswing position and also during his early downswing and that it becomes increasingly ulnar deviated in his later downswing due to the club release phenomenon (which is due to a left wrist uncocking action called the release of PA#2 in TGM terminology).
The violet colored graph represents rotation of his left hand because the HackMotion device is placed of the back of his left hand. Rotary motion of the left hand in a closing direction during the downswing is not entirely due to left forearm supination because it could also be due to external rotation of the left humerus. Note that his left hand is rotated to an open position at his end-backswing position, and that it does not close very fast in his early downswing, but it does close steadily/progressively throughout his later downswing (and I will later show that it is mainly due to a left forearm supinatory motion, which is called a PA#3 release action in TGM terminology).
I will now present a number of capture images of Henrik Stenson's downswing action that are fully compatible with Henrik Stenson's HackMotion lead wrist extension-flexion graph.
DTL capture images of Henrik Stenson's early mid downswing.
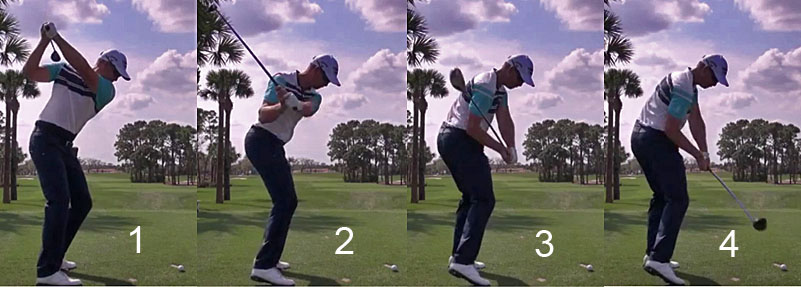
Image 1 is at the P4 position, image 2 is at his P5 position, image 3 is at his P5.5 position and image 4 is at his P6.2 position.
Note that his left wrist is significantly cupped at his P4 position when his left wrist is radially deviated, and also at his P5 position because he is still maintaining a radially deviated left wrist that enables him to retain clubhead lag.
Note that his club is starting to release (representing a PA#2 release action in TGM terminology) by P5.5 due to a left wrist uncocking phenomenon and that it causes his GFLW to become less cupped between P5.5 - P6.2 as his left wrist moves increasingly towards ulnar deviation. Note that his left wrist is uncocking within the plane of his intact LFFW (which is parallel to the swingplane) between P5.5 => P6.2 and that it does not disrupt his intact LFFW/GFLW alignment.
Note that his clubshaft appears to be straight-line aligned with his straight left arm at the P4 position, which suggests an intact LAFW alignment. Note how he is shallowing the club between P5 => P5.5, which requires a small degree of left forearm pronatory motion, and that causes his clubshaft to no longer be straight-line-aligned with his left upper arm, so he does not have an intact LAFW at his P5.5 position (where one can clearly see that his clubshaft is on a slightly shallower plane than his left upper arm). However, he still has a GFLW/intact LFFW alignment between P5.5 - P6.2 where his clubshaft is straight-line-aligned with the lowest 3" of his left lower radial bone in his lower left forearm. Secondary proof that he still has an intact LFFW/GFLW alignment at the P5.5 position is to note that his clubface is parallel to the back of his GFLW and also the watchface area of his left lower forearm and that they are all equally parallel to the swingplane.
Note that he is starting to rotate the back of his left hand in a closing direction between P5.5 (image 3) => P6.2 (image 4), but you should note that he maintains an intact LFFW/GFLW alignment where the clubface remains parallel to the back of his GFLW and also the watchface area of his left lower forearm during that downswing time period.
Here are two more series of capture images of Henrik Stenson's downswing as seen from two different viewing perspectives.
Example 1
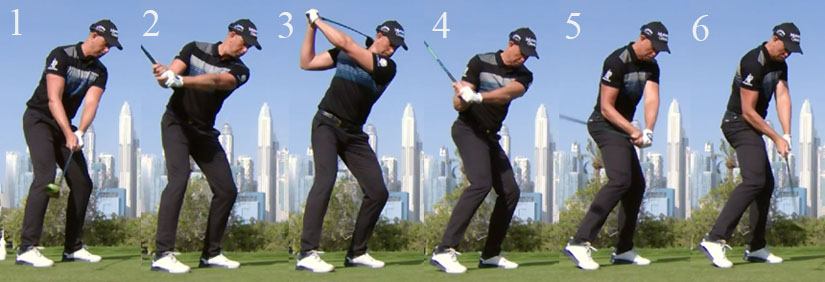
Example 2
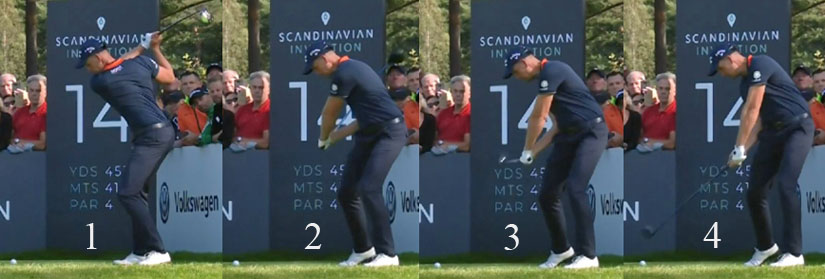
Example 1 - image 3 is the P4 position, image 4 is just bypassing the P5 position, image 5 is at the P5.5 position and image 6 is at the P6.5 position.
Example 2 - Image 1 is at the P4 position, image 2 is the P5.5 position, image 3 is at the P6 position, and image 4 is at the P6.5 position.
Note that his clubshaft appears to be straight-line-aligned with his left forearm and also his left upper arm at his P4 position, so he has an intact LAFW alignment at his end-backswing position.
Note that his GFLW is significantly cupped at the P4 position because his GFLW is radially deviated. Note that Henrik Stenson has shallowed his clubshaft to a shallower swingplane by P5.5, so he no longer has an intact LAFW alignment. However, he still has a GFLW/intact LFFW alignment.
Note that the back of his GFLW is less cupped at his P5.5 position because his left wrist is less radially deviated.
Note that he still has a GFLW/intact LFFW alignment at the P6 position. The toe of his club is pointing straight up. Note that his clubface is parallel to the back of his GFLW and the watchface area of the back of his lower left forearm at P6 (example 2) thereby proving that he still has a GFLW/intact LFFW alignment.
Note that he still has a GFLW/intact LFFW at the P6.5 position even though he is releasing the club (in the plane of his intact LFFW) and also starting to simultaneously rotate his intact LFFW counterclockwise secondary to a left forearm supinatory motion. It is particularly easy to discern that his clubshaft is straight-line-aligned with his lower radial bone in his lower forearm at the P6.5 position in example 1. Note that his GFLW is far less cupped at the P6.5 position because his GFLW is moving increasingly towards becoming ulnar deviated.
Now, I will demonstrate how Henrik Stenson squares his clubface by impact by using a PA#3 release action (which is secondary to a left forearm supinatory motion) in his late downswing between P6.2 => P7 (impact).
Here are face-on view capture images of Henrik Stenson's late downswing between P6.2 => P7.
Image 1 is at the P6.2 position, image 2 is at the P6.5 position, image 3 is at the P6.8 position and image 4 is at impact.
Note that Henrik Stenson's clubface is still open to his clubhead arc at P6.2 and that it steadily closes during the later downswing between P6.2 => P7 so that it can become square to the clubhead arc, and also the ball-target line, at impact. Note how the back of his left hand and the watchface area on the back of his left lower forearm are closing at the same closing rate as the clubface (from an angular rotational perspective). There are two possible biomechanical causes that can explain why his left hand is rotating in a closing direction between P6.2 => P7 and they are i) external rotation of the left humerus or ii) a left forearm supinatory action. However, note that his left humerus appears to be internally rotated at P6.2 and P7 to roughly the same degree so that his olecranon bone (proximal end of his left forearm's ulna bone) points at the target to roughly the same degree at P7 compared to P6.2. Therefore, it suggests that the closing rotary motion of his left hand in a counterclockwise rotary direction is primarily due to a left forearm supinatory action (which is called a PA#3 release action in TGM terminology).
Most importantly, note that Henrik Stenson maintains an intact LFFW/GFLW alignment all the way between P6.2 (image 1) and P7 (image 4), while his lead wrist is progressively uncocking and while his lead forearm is progressively supinating, and I believe that it helps him to more optimally produce a smooth clubhead motion along the clubhead path during that time period.
A key biomechanical feature that allows a golfer to maintain an intact LFFW/GFLW throughout the entire downswing and early followthrough time periods is swing rhythm. To use the *intact LFFW/GFLW technique in an efficient manner, like the pro golfer Henrik Stenson, a student-golfer must learn how to perform his entire downswing and early followthrough action smoothly and with perfect rhythm.
(* If you want to learn more about the intact LFFW/GFLW technique, you can read further descriptions by me in the appendix section of the following review paper or you can watch the part 1 video of my video project where I, and Jim George, visually demonstrated the intact LFFW/GFLW technique)
Many pro golfers, who use the intact LFFW/GFLW technique, also maintain their intact LFFW/GFLW alignment through impact to P7.2+ and this enables them to perform a DH-hand release action through impact.
Here is an example of a golfer (Kelli Oride) who maintains an intact LAFW/GFLW through impact to P7.4.
Kelli Oride swing video - https://www.youtube.com/watch?v=p7hBadAiMcA
Capture images from the swing video.
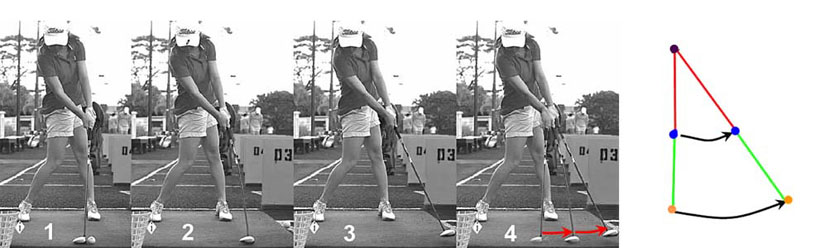
Image 1 is at impact, image 2 is at P7.2 and image 3 is at P7.4.
Image 4 is a composite image showing the targetwards motion of her left hand and clubshaft/clubhead between P7 and P7.4. The accompanying diagram depicts her left shoulder socket in black, her left arm in red and her clubshaft in green. The blue dot represents her left hand and the orange dot represents the clubhead.
Note how Kelli Oride keeps the back of her left hand (GFLW) continuously facing the target between P7 and P7.4 and there is very little counterclockwise rotation of her left hand happening between P7 and P7.4. Also, note that her left hand (represented by the blue dot in the diagram) moves targetwards at an angular velocity that perfectly matches the angular velocity of the clubhead (orange dot) and that action allows Kelli Oride to keep her LFFW intact, and it thereby prevents the clubshaft from bypassing her left arm (from an angular rotational perspective) between P7 => P7.4. That phenomenon defines a DH-hand release action and it allows a golfer to more reliably keep the clubface square to the clubhead arc during that early followthrough time period.
Another swing thought that is very useful for a golfer, who wants to become a DHer (like Kelli Oride), is how to usefully use the right arm/hand to synergistically assist the left arm/hand in efficiently performing a DH-hand release action. Note that Kelli Oride does not fully straighten her right arm, or her right wrist, between P7 and P7.4 and she straightens her right elbow at an optimum speed that can potentially allow her right palm to continuously apply push-pressure against PP#1 (which is located over the base of her left thumb) and that small amount of push-pressure that is continuously being applied by the right palm against PP#1 can potentially help her to optimally control the speed of forward (targetwards) motion of the left hand between P7 and P7.4 - while she simultaneously avoids any unwanted right forearm pronation, or left forearm supination, from happening during that same P7 => P7.4 time period. To achieve that goal of fruitfully using the straightening right arm to synergistically assist her left arm/hand to more efficiently execute a DH-hand release action through the immediate impact zone between P7 => P7.4, Kelli Oride must avoid "running-out-of-right arm" by also ensuring that her right shoulder continuously moves forward (targetwards) under her chin at an optimum speed.
In summary, if a golfer uses an intact LFFW/GFLW technique through impact he can be using two biomechanical techniques to prevent the clubshaft from bypassing his lead arm between P7 => P7.2 (or even further to P7.4) from an angular rotational perspective - i) by swinging with perfect rhythm so that the angular velocity of the lead arm perfectly matches the angular velocity of the clubshaft and ii) by allowing the trail palm to controllably apply a finite amount of push-pressure against PP#1 (which is located over the base of the lead thumb), which can potentially help stabilise the GFLW alignment through impact.
I will now move on to describe the bowed lead wrist technique, which has an added benefit when it comes to performing a DH-hand release action through impact - because if a golfer maintains a bowed lead wrist through impact, while performing a DH-hand release action, the bowed lead wrist adds an element of mechanical stability to the lead wrist throughout the P7 => P7.4 time period.
ii) The bowed lead wrist technique.
Although most pro golfers, who adopt a weak-neutral lead hand grip at address, use a non-bowed lead wrist technique, a small subset of those pro golfers prefer to use the bowed lead wrist technique. Examples include Jordan Spieth, Jon Rahm, Gary Woodland, Ben Hogan, Cameron Champ and Collin Morikawa.
Pro golfers, who use the bowed lead wrist technique, vary as to when they first start to bow their lead wrist and some pro golfers (eg. Jon Rahm and Collin Morikawa) first start to bow the lead wrist during their backswing action while other pro golfers (eg. Gary Woodland and Ben Hogan) only start to bow their lead wrist during their mid-downswing.
I think that the bowed lead wrist technique has two advantages over the intact LFFW/GFLW technique - it naturally predisposes to forward shaft lean at impact (which is very desirable in an iron golf swing action) and it adds mechanical stability to the lead wrist when performing a DH-hand release action through impact.
If a golfer bows his lead wrist during his backswing, or early downswing, *when the lead wrist is radially deviated, it will twist the club handle and thereby close the clubface relative to the clubhead arc by ~20 - 30 degrees. However, it will not angle the clubshaft (relative to the lead forearm) between P4 => P5.5 if the lead wrist is kept radially deviated. But, if the golfer continuously maintains a bowed lead wrist alignment during the mid-late downswing, the effect of bowing the lead wrist *while the lead wrist becomes increasingly ulnar-deviated (due to the release of PA#2) will cause the clubshaft to angle back (away from the target) relative to the lead hand (and lead forearm) and that will allow the golfer to reach impact with forward shaft lean.
(* I have described these biomechanical phenomena in great detail in the following review paper called "What effect does left wrist bowing have on the clubface and clubshaft?")
Here are capture images of Collin Morikawa manifesting the biomechanical phenomenon of forward shaft lean at impact due to lead wrist bowing.
Image 2 shows Collin Morikawa at impact. Note that his hands are ahead of the ball and note that he has forward shaft lean at impact. Coming into impact with forward shaft lean is very desirable when hitting an iron, but it is not necessarily advantageous when hitting a driver. If you look at image 1, which is at the P6.8 position, you will note that the clubhead is approaching the ball along a slightly steeper clubhead path (compared to Tiger Woods where his clubhead travels level to the ground for 12 - 18" prior to impact). Having a slightly steeper clubhead path just before impact makes it easier to have a negative clubhead attack angle at impact, which many pro golfers prefer for their short iron shots, but it is not necessarily advantageous for a driver swing if the golfer wants to strike the ball with a level clubhead attack angle or a slightly positive clubhead attack angle.
Another advantage of the bowed lead wrist technique is that having an actively bowed lead wrist alignment at impact adds an element of mechanical stability to the lead wrist at impact, and that should help the golfer avoid left wrist breakdown and a left wrist flipping motion through impact.
Finally, I think that having a bowed lead wrist through impact to P7.2+ is very conducive to performing a DH-hand release action through impact.
Here are capture images of Cameron Champ's DH-hand release action.
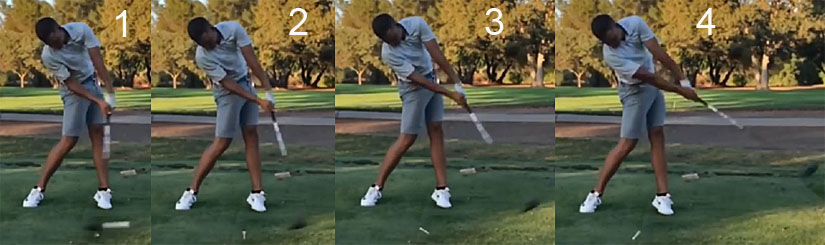
Image 1 is at impact, image 2 is at the P7.2 position, and image 3 is at the P7.4 position.
Note that Cameron Champ continuously maintains a bowed lead wrist all the way to P7.4 (image 3) and he also prevents the clubshaft from bypassing his lead forearm (from an angular rotational perspective) between P7 => P7.4 (which is a characteristic feature of a DH-hand release action).
Note that Cameron Champ maintains a slightly bent right arm, and a significantly bent right wrist, all the way between P7 => P7.4 and he is potentially using his right palm to apply a finite amount of push-pressure against PP#1 (which is located over the base of his left thumb), which can potentially add an added element of increased stability to his bowed lead wrist alignment throughout his early followthrough time period. To achieve that desirable goal, a golfer has to actively rotate the pelvis and upper torso to an open alignment through impact and ensure that the right shoulder can move far enough downplane thereby avoiding a "running-out-of-right arm" scenario. It obviously requires an inordinate amount of flexibility and athleticism to perform a DH-hand release action like Cameron Champ, but it has the great advantage that it allows him to more easily keep his clubface square to his clubhead path through impact to the P7.4 position.
Topic number 7: Explaining the concept of being "on-plane" and explaining the concept of a swingplane.
I will first describe what's my personal definition of a swingplane.
Consider these swingplane lines drawn by Brian Manzella in the following image.
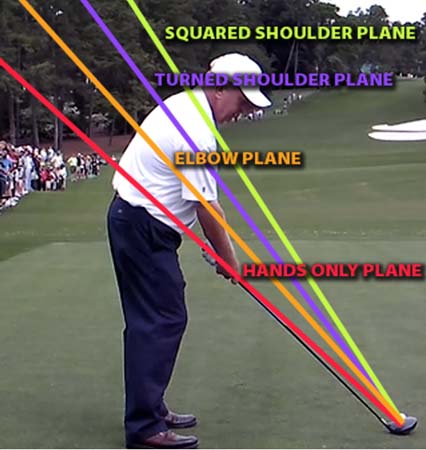
Most pro golfers stand at address with their lead arm near-vertical, but with their clubshaft angled more horizontally than their lead arm. Most often, if a line is drawn along their clubshaft at address, then an imaginary extension of that line will pass through their belt buckle (or close to their belt buckle) - see red line. I refer to that plane line as the hand plane.
The orange plane line is steeper and it is drawn from the ball through the right elbow at address, and it is called the elbow plane.
The squared shoulder plane line (in lime-yellow) is a line drawn from the ball to the base of the neck across the top of the clavicles.
The turned shoulder plane (TSP) line (in purple) is a line drawn from the ball to the right shoulder socket at the P4 position, and it is shallower than the squared shoulder plane, but steeper than the elbow plane.
All these plane lines have one feature in common - they all have their base on the ball-target line, and that fact is critical to my personal definition of a swingplane.
During the backswing a golfer will move his clubshaft from the hand plane to a steeper plane (eg.TSP at the P4 position), and during the downswing the clubshaft will either stay on that same steeper plane (eg. TSP) between P4 => P7 if the golfer does not shallow his clubshaft, or the golfer will shallow his clubshaft to a less steep plane (eg. elbow plane or hand plane) by impact. If that golfer keeps his clubshaft on any swingplane, that is intermediate in its degree of steepness between the hand plane and the squared shoulder plane, at all instantaneous time points during his entire downswing action, then he is performing an "on-plane" golf swing action. By definition, to perform an "on-plane" golf downswing action, the clubshaft must always be on a swingplane at all instantaneous time points between P4 => P7 - which means that the end of the clubshaft that is nearest the ground must always be pointing at the ball-target line (because all swingplane lines that are intermediate in their degree of steepness between the hand plane and the squared shoulder plane point at the ball-target line). If the end of the clubshaft that is nearest to the ground points at a point on the ground that it outside the ball-target line during any instantaneous time point during the downswing, then the clubshaft is underplane. An underplane clubshaft is obviously on a plane, but it is not on a swingplane - because I have arbitrarily defined a swingplane as having its base on the ball-target line. If the end of the clubshaft that is nearest the ground points at a point on the ground that is inside the ball-target line at any instantaneous time point during the downswing, then the clubshaft is over-the-plane. An over-the-plane clubshaft is obviously on a plane, but it is not on a swingplane - because I have arbitrarily defined a swingplane as having its base on the ball-target line.
In other words, in order to perform an "on-plane" golf swing action during the downswing, the golfer's clubshaft must at all times be on a swingplane line (which can vary in steepness depending on whether the golfer shallows his clubshaft during his downswing), and it should preferably not ever be on a plane that is either underplane or over-the-plane. If a golfer shallows his clubshaft during the early-mid downswing between P4 => P6 so that it shallows from being on the TSP at P4 to end up being on the elbow plane by P6, then the shallowing clubshaft will be continuously shifting from one swingplane to a minimally shallower swingplane until it eventually reaches the elbow plane, but at every instantaneous moment it must be parallel to a swingplane for the clubshaft to be deemed to be continuously "on-plane".
To learn how to perform an "on-plane" golf swing action during the downswing, view this video of Martin Hall demonstrating the TGM principle of "how to trace a straight plane line" (where the SPL is the ball-target line) during a golf swing action - https://www.youtube.com/watch?v=a5rYpfmAwo4 (and also demonstrated outdoors using an outdoor version of the "Smartstick wall" at https://www.youtube.com/watch?v=mX0-nvy2oFc ) If you look at Martin Hall tracing the straight plane line (= ball-target line) using a Smartstick training device, you will note that the Smartstick's clubshaft (which includes the club handle end, the mid-section of the clubshaft and the clubhead end) can be kept continuously "on-plane" during the entire backswing, downswing and early followthrough.
Here are capture images from the Martin Hall video.
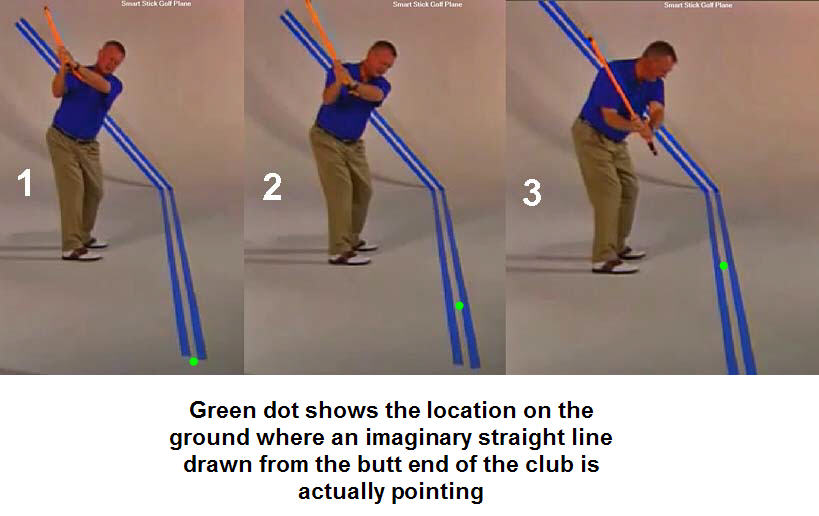
The space between the two blue lines on the ground represents the ball-target line.
Image 1 is at a shortened end-backswing position where the clubshaft is still "on-plane" (where an imaginary straight line drawn down the length of the Smartstick's clubshaft points at that green dot that is located on the ball-target line).
Note that if the green laser dot continuously points at the ball-target line during Martin Hall's early-mid downswing action (image 2 is at P4.5 and image 3 is at P5.2), then that means that the clubshaft is continuously "on-plane". There is only one time point that the "on-plane" clubshaft will not be pointing at the ball-target line, and that is when it is parallel to the ball-target line (eg. at the P6 position).
I believe that learning how to trace the straight plane line (where the SPL = ball-target line) during the entire downswing and early followthough is a very useful TGM golf instructional concept, and both I and Jim George demonstrated how to use a Smartstick training device in order to learn how to keep a clubshaft continuously "on-plane" during the entire backswing and entire downswing in my part 2 video (watch the video at https://youtu.be/wJveJDoNzCw from the 10:50 minute to the 13:50 minute time points) of my 7-part video project on "How to Perform a Golf Swing Like a PGA Tour Golfer".
What is the advantage of keeping the clubshaft continuously "on-plane" during the entire downswing and early followthrough? If a golfer can keep his clubshaft continuously "on-plane" throughout his entire downswing and early followthrough, then he can more easily create a clubhead path that is perfectly symmetrical relative to the ball-target line - as demonstrated in the following diagram.
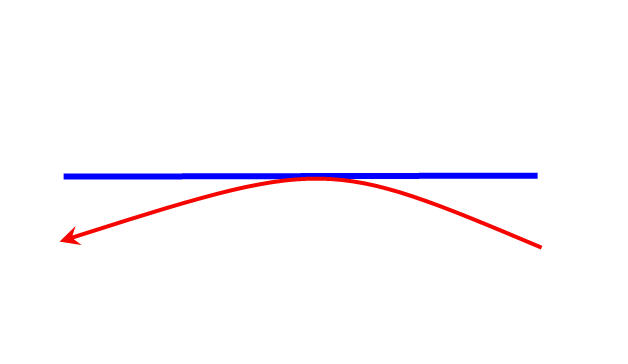
The straight blue line represents the ball-target line. The curved red arrowed path represents a clubhead arc that is symmetrically "in-to-square-to-in" relative to the ball-target line, and where the clubhead path is temporarily square to the target at the exact point where it reaches the ball-target line. If the golf ball is placed at that point where the clubhead arc is temporarily square to the target, then it is possible to zero-out the clubhead path at impact, which is critically important if a golfer wants to hit the golf ball straight towards his intended target. To drive a golf ball straight down the middle of the fairway using a straight ball flight with no fade/draw curvature, a golfer needs to zero-out both his clubhead path and his clubface angle at impact, and simultaneously ensure that he hits the ball on the sweetspot of the clubface with a level strike. By creating a symmetrical "in-to-square-to-in" clubhead path relative to the ball-target line, a golfer can more easily solve the first requirement (zeroing-out the clubhead path) needed to generate a straight ball flight (with no/little side-curvature) and then all that he subsequently needs to learn is how to consistently zero-out his clubface angle at impact (which I discussed in topic number 4).
Adam Scott is an example of a professional PGA tour golfer who uses Homer Kelley's TGM "on-plane" golf swing technique to generate his "in-to-square-to-in" clubhead path that is perfectly symmetrical relative to the ball-target line - as demonstrated in the following you-tube video at https://www.youtube.com/watch?v=qOwvteZr-3w
Here is a capture image from the Adam Scott video.
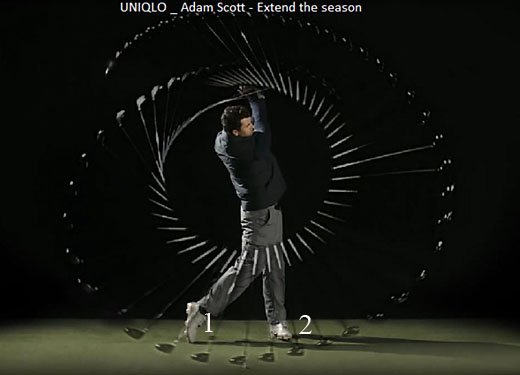
This capture image clearly shows that Adam Scott has generated a clubhead path that is symmetrical relative to the ball-target line and where the clubhead arc is "in-to-square-to-in" through the peri-impact zone between P6.8 (point 1) and P7.2 (point 2).
Here are close-up capture images from that same video, which demonstrates that Adam Scott's clubhead arc is not only "in-to-square-to-in" between P6.8 and P7.2, but it is also square to the target at impact.
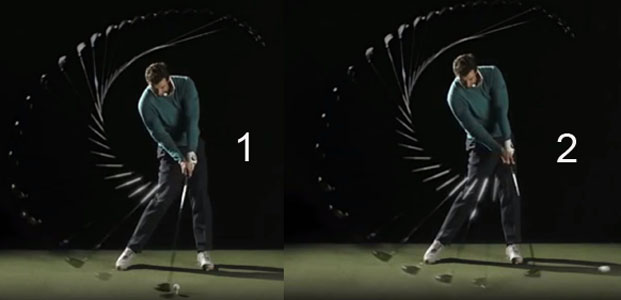
Image 1 shows that Adam Scott's clubhead path is square to the target at impact and that his clubhead path immediately pre-impact was "in-to-square".
Image 2 shows that Adam Scott's clubhead path moves slightly inside-left after impact, which means that he has generated an "in-to-square-to-in" clubhead path through the peri-impact zone between P6.8 and P7.2 and that he has temporarily zeroed-out his clubhead path at impact.
Although I personally prefer the idea of being continuously "on-plane" during the backswing action from P1 => P4, it is definitely not imperative to be "on-plane" during the backswing. Many pro golfers use an exaggerated over-the-plane clubshaft motion to get to their P4 position, while other pro golfers use an exaggerated underplane clubshaft motion to get to their P4 position. However, most pro golfers use an "on-plane" clubshaft motion during their downswing action if they want to generate a straight ball flight pattern. When performing an "on-plane" golf downswing action, a golfer does not have to be perfectly "on-plane" and it is very acceptable if the clubshaft is momentarily underplane, or momentarily over-the-plane, during the early-mid downswing between P4 => P6 as long as the amount is very small and easy to biomechanically correct during the remainder of the downswing action. Virtually all pro golfers, who prefer to generate a straight ball flight pattern, are continuously "on-plane" between P6 => P7, and that plane is often referred to as the functional swingplane.
Topic number 8: Miscellaneous topics.
I will be discussing a number of topics in this subsection of my downswing chapter, and I will be adding additional content with the passage of time.
Topic number 8g : Should the trail humerus externally rotate during the early-mid downswing?
Topic number 8a: What is a desirable impact alignment and how should a golfer achieve that impact alignment from a biomechanical/mechanical perspective?
Most pro golfers reach impact with the hands ahead of the clubhead, which means that a condition of forward shaft lean exists at impact.
Here is a capture image from Bertie Cordle's excellent video - https://vimeo.com/373872166 - showing the impact alignments of a number of tour pro golfers.
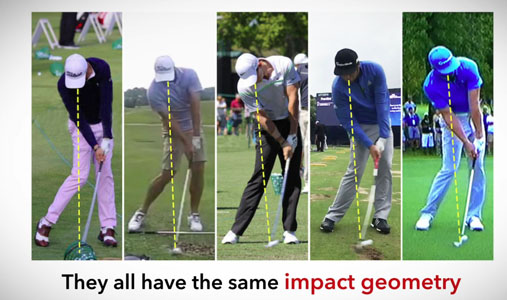
Note that all these pro golfers have the same impact alignment - where the hands are ahead of the clubhead, and where there is forward shaft lean.
This impact alignment is very desirable for a number of reasons. First all, irons are manufactured in such a manner that when the sole of the club is positioned flat on the ground, then the club handle will be marginally ahead of the clubhead. That means that if a golfer wants to hit the ball with the sole flat at impact, then the hands should be ahead of the clubhead at impact. Secondly, many pro golfers want to generate a larger negative clubhead attack angle at impact when hitting an iron, where their clubhead path is steeper pre-impact, and that means that they come into impact with even more forward shaft lean. The third advantage of coming into impact with forward shaft lean means that the lead hand is still leading the club into impact, and hopefully still controlling the club at the moment of impact. What would happen if the golfer reaches impact with backwards shaft lean due to the fact that the clubhead has bypassed the lead arm, thereby causing a left wrist flipping scenario before impact?
Bertie Cordle does an excellent job in his video showing the deleterious effects of reaching full extension (where the clubshaft catches up to the lead arm and becomes straight-lined-aligned with the lead arm) before impact, and I will use a number of capture images from his video to show what happens if a golfer reaches full extension before impact and then flips before impact.
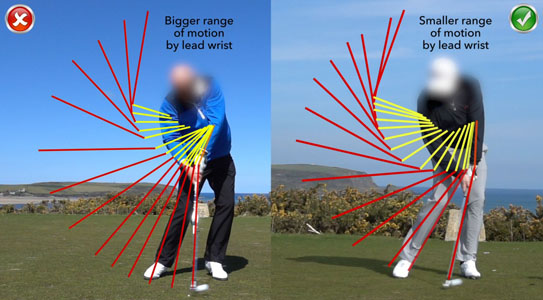
The first image shows what happens if a golfer reaches full extension in the late downswing before impact. From the point of full extension, the lever assembly is no longer the combined left arm + clubshaft, which has its fulcrum point at the level of the left shoulder socket, but the fulcrum point of the clubshaft's motion becomes the left wrist, and the moving clubshaft becomes equivalent to a short lever that is rotating around the fulcrum point of the left wrist. That means that it becomes harder to time the motion of the short lever (clubshaft) - which is now rotating faster (because the radius of the lever assembly is smaller) - to ensure that the clubface is square to the target at impact. Also, if the clubshaft bypasses the lead arm when using a TGM swinging action, then that means that the clubshaft is no longer being controlled by the lead arm, and it is in a very uncontrolled state where it is not being controlled by biomechanical motions of the two arms/hands. A golfer could possibly try and control the flipped clubshaft via a right wrist straightening motion, but that is likely to be a very unreliable and inefficient maneuver.
Another side-effect of having a shorter lever assembly through impact is that it affects both the clubhead path and the clubface ROC (rate-of-closure).
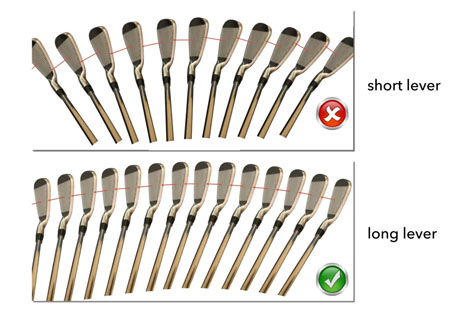
The bottom image shows how the clubhead/clubface would behave through impact if a golfer uses a TGM swinging action and a DH-hand release action through impact. The clubhead path would be in-to-square-to-in, but the radius of the clubhead path would be larger because the length of the lever assembly is longer. Also, if the golfer uses a DH-hand release action through impact, then he can controllably keep his clubface square to the clubhead path through impact into the early followthrough.
The top image shows what happens through impact if the clubshaft bypasses the left arm due to a left wrist flipping scenario. The clubhead path is more exaggeratedly in-to-square-to-in because the radius of the clubhead path is smaller due to the fact that the length of the lever assembly is shorter. Also, it is very likely that the clubshaft will rotate faster counterclockwise in a more uncontrolled manner thereby causing the clubface's ROC through the peri-impact zone to be much greater.
Bertie Cordle does a good job of explaining in his video why an amateur golfer may be predisposed to become a pre-impact flipper.
The first cause would be the hit impulse, which Bertie Cordle describes in the following capture image from his video.
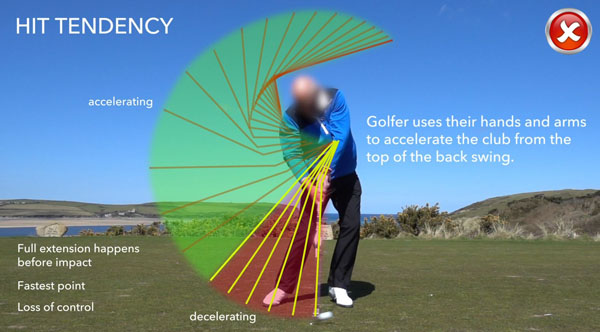
Many amateur golfers want to maximise their clubhead speed as fast as possible from the very start of the downswing. So, they may start their downswing action with an arm motion rather than the standard kinematic sequence (as explained in topic number 1). They may not only pull the club handle down the hand arc path too fast between P4 => P5.5, but they may also prematurely straighten their right arm using an active muscular action that causes the right hand to produce too much force-across-the shaft, which predisposes to casting. That causes the clubshaft to catch up to the left arm well before impact - as seen in the above image (see transition time point between the green zone and the red zone). From that time point onwards, the club will be decelerating, and not accelerating, in the later downswing (as routinely seen in the PA#2 release action of a pro golfer's TGM swinging action).
Another predisposing cause of pre-impact flipping is the scoop impulse - as described by Bertie Cordle in the following capture image from his swing video.
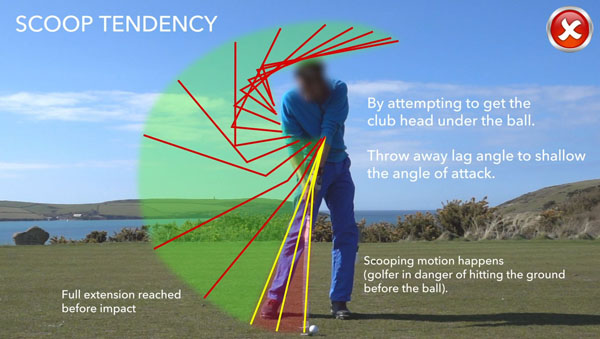
Bertie Cordle correctly identifies the swing fault that happens when a golfer wants to get the ball into the air by trying to artificially get the clubface under the ball by using a scooping action. The golfer will often slow his lead arm motion in the mid-downswing and then actively straighten his right arm in a scooping manner that will result in pre-impact flipping. This swing fault can result in "duffed" shots (where the clubhead hits the ground behind the ball) or "thinned" shots (where the leading edge of the clubface, instead of the sweetspot of the clubface, hits the ball).
To avoid premature full extension before impact, a golfer must learn how to delay full extension until just after impact - as seen in the following capture image from Bertie Cordle's video.
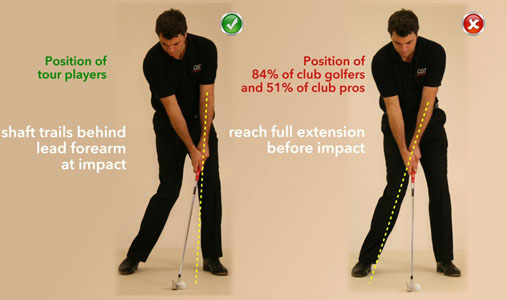
The left-sided image shows a golfer who has his clubshaft trailing behind his lead arm (see dotted line) at impact, which is very desirable.
The right-sided image shows a golfer who has allowed his clubshaft to bypass the dotted line before impact, which means that he has reached full extension before impact.
The following capture image from Bertie Cordle's video shows how a pro golfer reaches full extension after impact.
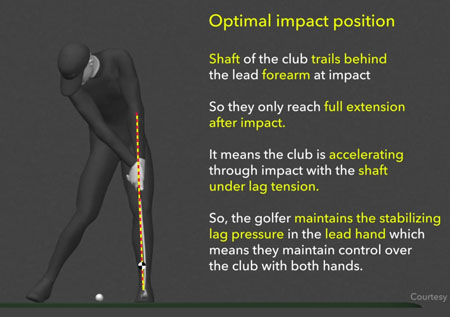
I agree with the two statements at the top - which simply define the phenomenon of an optimal alignment position at impact (where the clubshaft lags behind the lead arm) and at P7.1 (when full extension is reached).
However, I disagree with the following statement in that image-: "It means that the club is accelerating through impact with the shaft under lag tension".
What does it mean when Bertie, or any TGM-literalist, claims that the shaft is being subjected to a condition of "lag tension"?
Bertie Cordle's opinion regarding "lag tension" is seemingly compatible with any TGM-literalist's opinion regarding the TGM concept of lag tension ( = TGM concept of "sustaining the lag").
Here is a video - https://www.youtube.com/watch?v=oQUiJ9VgqQI&feature=emb_logo - where Antony Taggart (a TGM-literalist aka "The Swing Engineer") describes the phenomenon of clubhead lag and lag tension.
Here are capture images from the video.
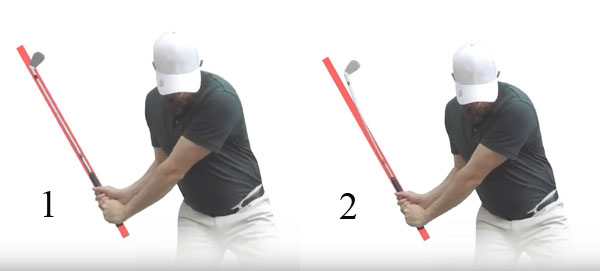
Image 1 shows a golfer at the P5.5 position with a ~90 degree angle between the lead arm and the clubshaft. That image would fit my personal definition of clubhead lag, because I define clubhead lag as existing when the clubshaft lags behind the lead arm during the downswing action from an alignment perspective. Clubhead lag disappears when full extension is reached - when the clubshaft and lead arm become straight-line-aligned.
However, Antony Taggart claims that the true definition of clubhead lag only exists when the clubshaft is bent backwards - as seen in image 2. Under those conditions, the visible presence of shaft flex, where the peripheral clubshaft is bent backwards, implies that the shaft is under a condition of lag tension. That selective definition of clubhead lag is seemingly also used by Bertie Cordle when he uses the term "lag tension" to imply that the clubshaft must be under a condition of flexed-tension throughout the downswing, and that the condition of lag tension should only dissipate when full extension is reached (and which usually happens soon after impact in a pro golfer).
Both Antony Taggart and Bertie Cordle seemingly imply that if the peripheral clubshaft is bent back throughout the entire downswing, that a condition of lag tension exists throughout the entire downswing; and they both claim that the presence of lag tension will allow the clubhead to be accelerated through impact. There is a major problem with their claim. First of all, i) the peripheral clubshaft of tour pro golfers is not bent back throughout the entire downswing, and secondly, ii) evidence exists that the clubhead is decelerating before impact in tour pro golfers.
Here are capture images of Rory McIlroy's downswing.
Image 2 is at the P5 position. Note that the peripheral clubshaft is bent backwards, thereby implying that that the shaft being subjected to positive tension due to the fact that a positive torque condition exists at the level of the hands on the club handle.
However, the peripheral clubshaft is only bent backwards up to P5.5 (image 3) and the peripheral clubshaft becomes bent forward in the later downswing (see image 5 at the P6.5 position). The peripheral shaft routinely remains bent forward until impact in the driver swings of all pro golfers, and according to the "experts" (David Tutelman, Sasho MacKenzie and Dr. Kwon) that means that a negative torque condition exists at the level of the hands on the club handle. A negative torque condition means that the peripheral clubshaft is traveling faster than the proximal (central) clubshaft, which means that the clubhead end of the shaft is being subjected to a condition of reverse tension (negative tension).
Here are capture images of Alvaros Quiros' late downswing when swinging an iron, which I copied from a video on Bertie Cordle's website.
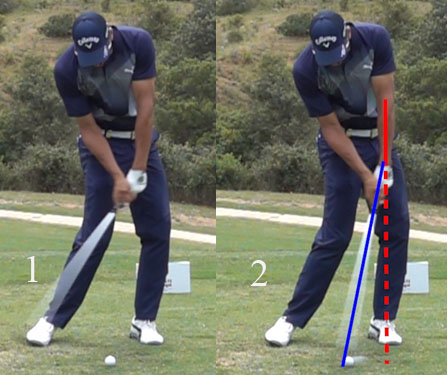
Image 2 is at impact - note that Bertie Cordle drew a blue line along his clubshaft and a red line along his lead forearm, and the fact that the clubshaft has not caught up to the dotted red line at impact shows that he has not reached full extension at impact.
Image 1 is just before impact - note that the peripheral clubshaft is bent forward implying that a negative torque condition exists at the level of his hands on the club handle.
All the scientific evidence that I have ever uncovered suggests that pro golfers have a negative torque condition at the level of their hands on the club handle in their later downswing and at impact - irrespective of whether they are swinging a driver or an iron club. That means that the peripheral end of the clubshaft is being subjected to a condition of reverse tension (negative tension) in their later downswing and just before impact.
Even though the scientific evidence does not support their opinion that the clubhead end of the shaft is under a condition of positive tension (lag tension) in the later downswing and at impact, both Antony Taggart and Bertie Cordle believe that it must exist so that the clubhead can be accelerated into impact. In fact, in his video Antony Taggart claimed that if the clubhead is not accelerating into impact, that it will result in a weakly struck shot ("cushioned" shot), and not a solidly struck shot.
However, there is substantial evidence that the clubhead of a pro golfer's driver is not accelerating into impact.
Here are images of the 3D kinematic sequence graphs of two pro golfers - Rickie Fowler and Jordan Spieth.
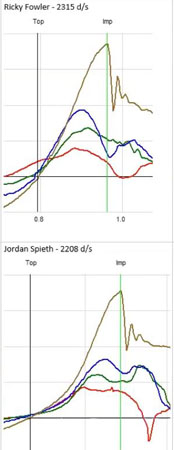
The brown graph shows the angular velocity of the clubshaft. The slope of the graph shows its rate of acceleration. Note that the slope becomes much less steep in the later downswing, which means that the clubhead is actually decelerating slightly just before impact. In fact, a golf researcher studied the driver swings of pro golfers (both male and female) and noted that the "average" clubhead speed of the study group's driver swings peaked at 94% of the downswing period, and then decelerated slightly before impact.
Does the fact that a pro golfer's clubhead speed may decelerate slightly before impact affect how solidly the ball is struck (as Antony Taggart suggests in his video) and result in less ball travel distance for a given amount of clubhead speed? The answer is negative! David Tutelman has studied the effect of clubhead acceleration into impact (versus non-acceleration) - https://www.tutelman.com/golf/swing/accelerateThru.php - and he found that if the driver's clubhead is accelerating at the time of ball collision, that the clubhead speed will be 100.14 mph (versus 100mph if the clubhead is not accelerating) and that it will only result in an extra ball travel distance of 1.5 yards (which is negligible).
Finally, let's consider the last sentence in this Bertie Cordle capture image.
Note that Bertie Cordle states that a golfer must be maintaining a stabilising lag pressure in the lead hand at impact. What does Bertie Cordle mean by a "stabilising lag pressure", that is being applied by both hands, in order to control the club at impact?
Bertie Cordle uses the following image in his video to demonstrate his opinion on how the golfer's hands should be applying a "stabilising lag pressure" at impact.
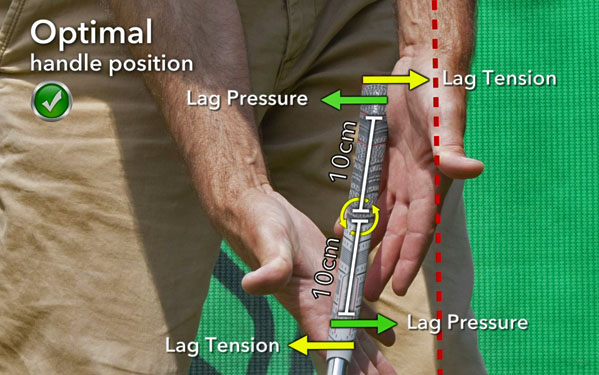
He states that the lead hand's heel pad should be pushing against the club handle in the direction of that green arrow (which is in an away-from-the-target direction) while the trail hand's right index finger must be pushing against the aft side of the club handle below the mid-hands point (coupling point) in the direction of the green arrow (which is in a targetwards direction), and that these two lag pressure forces will produce a positive hand couple phenomenon around the coupling point that will produce a torque in a counterclockwise direction (see the two curved yellow arrows).
What would happen as a result of having the hands working as a positive hand couple phenomenon at impact (as seen in the above image), which produces a torque that promotes a counterclockwise rotation of the club handle around the mid-hands point (coupling point)? I think that it would actually promote a counterclockwise rotation of the club handle around the coupling point, and that phenomenon would more likely result in a clubshaft flipping phenomenon, rather than stabilise the club handle through impact. To better stabilise the club handle through impact in order to prevent flipping, I think that it would be much better for a golfer to have the hands working as a negative hand couple phenomenon around the coupling point at impact. In other words, I think that those green arrows must be reversed - the lead hand should be applying a positive force on the club handle above the coupling point so that the applied force is directed in the direction of the target, and the trail hand's fingers should be applying a restraining force on the club handle below the coupling point so that the applied force is directed away from the target. How could this negative hand couple phenomenon be accomplished?
Consider this modified capture image of Ernie Els' grip.
The red dot shows the location of the coupling point (point midway between the two hands).
Note that pressure point number 1 (PP#1) is located over the base of the left thumb, and that it is located above the coupling point.
To create a negative torque phenomenon around the coupling point, all the forces being applied to the club handle above the coupling point must be working in a targetwards direction. That can practically be accomplished if the lead hand's 3rd, 4th and 5th fingertips are actively pulling against the aft side of the club handle in a targetwards direction - and that is exactly what should be happening in a TGM swinging action where the golfer uses a DH-hand release action through impact. Secondly, a golfer could potentially be applying a positive push-force with his trail palm against PP#1 if he controllably straightens his right arm through impact at a controllable speed that will continuously provide a finite amount of push-pressure against PP#1 in a targetwards direction.
To complete the negative hand couple phenomenon, the trail hand must be applying a restraining force on the club handle below the coupling point, so that the applied force is directed in an away-from-the-target direction (even if the trail palm is applying a push-force against PP#1 in a targetwards direction). How can that goal be accomplished? I think that this goal can be accomplished by preventing the right wrist from straightening through impact, thereby ensuring that the right hand's fingers are applying a restraining force that is working in an away-from-the-target direction.
Consider Cameron Champ's DH-hand release action through impact.
Note that Cameron Champ is using a lag style release pattern (recommended by Bertie Cordle) where he has forward shaft lean at impact with his lead hand well ahead of the clubhead. Note that he delays full extension until well after impact and he only reaches full extension in image 3 (which is at the P7.4 position). In other words, Cameron Champ is a poster child (prototypical) example of how to perform a lag style release (and not a flip style release) through impact.
I strongly suspect that Cameron Champ is using a negative hand couple phenomenon through impact for the following reasons. Note that Cameron Champ is not stalling the forward motion of his lead arm/hand between P7 (image 1) and P7.4 (image 3) and he seems to be actively ensuring that his lead hand is still actively pulling the club handle in a targetwards direction during that time period. Secondly, note that Cameron Champ is controllably straightening his right arm at a speed that can potentially allow him to be continuously applying a finite amount of push-pressure against PA#1 (which is above the coupling point) all the way between P7 => P7.4. Thirdly, note that Cameron Champ does not allow his right wrist to straighten fast through impact, and it is possible that his continuously bent right wrist is continuously acting as a restraining force on the club handle below the coupling point during the P7 => P7.4 time period. I obviously cannot prove that Cameron Champ's hands are working in a "negative hand couple phenomenon" manner through impact, and it would take a well-designed golf research study to study this issue. At the time of writing this 4th version of my downswing chapter (March 2021), I know of no golf researcher who has even attempted to study this issue of whether a negative hand couple phenomenon exists through impact into the early followthrough in pro golfers, who perform a DH-hand release action between P7 => P7.2+ in the same biomechanical manner as demonstrated by Cameron Champ.
Although I enthusiastically endorse the golf instructional idea of performing a lag style release pattern (and not a flip style release pattern) through impact, I obviously do not believe that it works via the physical mechanism of lag tension where the shaft is being flexed (positively tensed) via a handle-dragging technique. What surprises me about TGM literalists, who promote a handle-dragging technique, is that they still do not explain how the clubshaft catches up to the lead arm by impact. A handle-dragging technique obviously does ensure that the lead hand remains ahead of the clubhead all the way to impact, but it doesn't explain how flexing the shaft in order to create a positively tensed shaft enables the golfer to reach impact with exactly the correct amount of lag (correct amount of forward shaft lean) at impact.
I will now explain how I personally think about a number of factors that must synergistically interact with each other in order to make this complex phenomenon repeatedly achievable.
It is obviously desirable to come into impact with a small degree of forward shaft lean, where the hands are marginally ahead of the clubhead at impact. However, one still needs to think of all the factors (biomechanical and mechanical) that make this feat possible. I think that the major factor in play is the issue of timing - i) how to time the club release phenomenon and ii) how to time the speed of rotation of the intact LFFW/GFLW during the late downswing time period if the golfer adopts a weak-neutral lead hand grip strength at address.
Consider this modified capture image that I copied from an image in Bertie Cordle's video.
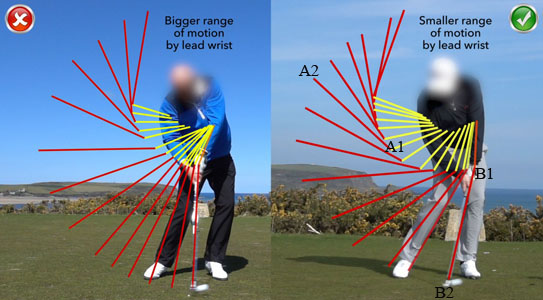
The optimum golf swing action is shown in the right-side image.
Consider what a student-golfer actually has to accomplish from a biomechanical and mechanical perspective to exactly duplicate that professional quality golf swing action - presuming that he starts with a clubhead lag angle of 90 degrees at the P4 position.
Note that A1 is the position of the hands on the hand arc path at the ~P5.3 position, and A2 is the position of the clubhead on the clubhead path at the same P3 position. To get to these lead hand-clubhead positional points, the golfer has to maintain his ~90 degree of clubhead lag unchanged between the P4 => P5.3 position. I discussed how to achieve this goal of maintaining lag in great detail in topic number 5.
Between P5.3 => P7, the hands must move from point A1 on the hand arc path to point B1 on the hand arc path, while the clubhead moves from point A2 on the clubhead path to point B2 on the clubhead path. There is no easy way to explain how this relative timing phenomenon can be repeatedly achieved by skilled pro golfers. A TGM-literalist may believe that a pro golfer is simply dragging the club handle down the hand arc path in such a way that the lead hand remains ahead of the clubhead, but that does not explain how a pro golfer gets the relative timing phenomenon correctly timed so that the clubhead gets to the B2 position at the exact moment in time that the lead hand gets to the B1 position. It is certainly not possible to explain how the handle-dragging phenomenon of creating positive shaft flex (lag tension) would result in perfect timing. Unfortunately, a student-golfer has to realise that he has to perfect the timing of many factors to achieve the goal of perfect relative timing between the motion of the lead hand and the motion of the clubhead - and those factors include i) the shape and length of the hand arc path between point A1 => point B1; ii) the speed of motion of the lead hand down the hand arc path between point A1 => point B1; and iii) the speed of club release, which is passively secondary to the magnitude of the MoF torque being generated between point A1 => point B1 while simultaneously ensuring that the hand couple torque is reduced to a negative value after ~P6. There is no magic formula that can allow a student-golfer to easily solve this complex timing problem in a short-cut way, but the more he understands about all the biomechanical/mechanical factors that are in play, the more likely he will be mentally equipped to modulate his swing in order to synergistically control all those interacting factors. In other words, the reason why I have explained the biomechanics/mechanics of the downswing in such great detail in this downswing chapter, is that it gives a golf instructor, or analytical student-golfer, the mental ammunition that he needs in order to learn how to perfect the timing of the PA#2 release phenomenon.
What makes this complex timing issue even more complicated, is the fact that the release of PA#2 happens within the plane of the intact LFFW (plane of left wrist radial => ulnar deviation) while the plane of the intact LFFW is rotating continuously during the late downswing (secondary to the release of PA#3).
Consider this capture image of me (author) demonstrating the intact LFFW/GFLW golf swing technique in a simulated manner.
Image 2 shows me (golfer) at a simulated P5.5 position with an intact LFFW/GFLW alignment.
Image 5 shows me (golfer) at a simulated impact position with a finite degree of forward shaft lean, and image 6 shows that I reach full extension at roughly the P7.1 position.
Consider what has to be perfectly timed between the P5.5 position (image 3) and impact (image 5) for a golfer to get to impact with exactly the desired amount of forward shaft lean and a square clubface. Note that while the club is releasing (representing the release of PA#2) in the plane of the intact LFFW, the entire LFFW unit has to rotate counterclockwise with perfect timing. In fact, the difference between image 5 (where a golfer has a small amount of forward shaft lean) and image 6 (where a golfer has full extension) is due more to subtle variations in the degree of counterclockwise rotation of the intact LFFW unit (secondary to variations in the degree of lead forearm supination happening in the later downswing) than it is due to subtle variations in the degree of clubhead lag (because the final stage of the release of PA#2 between P6.7 => P7 is happening in a plane that is progressively more perpendicular to the ball-target line).
Unfortunately, for a golfer, who adopts a weak-neutral lead hand grip strength at address and who also uses the intact LFFW/GFLW swing technique, to repeatedly get the exact desired amount of forward shaft lean at impact means that golfer has to repeatedly perfect both the release of PA#2 and PA#3 in a synergistically timed manner during the later downswing while continuously maintaining an intact LFFW/GFLW alignment during that same later downswing time period.
Although the intellectual process of describing what has to happen seems very complex, it is practically easy for a skilled pro golfer to repeatedly time his downswing actions so that he repeatedly gets to impact with the desired amount of forward shaft lean, and repeatedly delays getting to full extension until P7.1+. Hopefully, a student-golfer may eventually learn to achieve that same goal by improving his understanding, and performance, of optimum golf swing biomechanics/mechanics.
Topic number 8b: How does the trail shoulder move downplane in an optimally executed driver swing action?
In this subtopic, I will be discussing how the trail shoulder moves downplane in an optimally executed driver golf swing action.
As an example of an optimally executed driver golf swing action, I will be using LPGA golfer Maria Fassi's driver swing action - https://www.youtube.com/watch?v=6zVqIMi9Ams&feature=emb_logo
Here are capture images of Maria Fassi's downswing action.
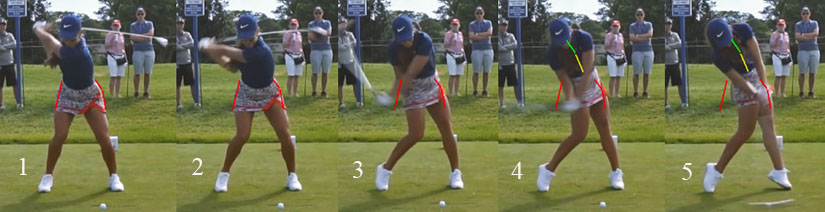
Image 1 is at the P4 position, image 2 is at the P5 position, image 3 is at the P5.5 position, image 4 is at the P6 position, and image 5 is at impact.
I have drawn red lines alongside the outer border of her pelvis at her P4 position (image 1). Note that her pelvis is centered between her two feet. Note that she has rotated her pelvis about 40 degrees clockwise, and her upper torso about 100 degrees clockwise, during her backswing action.
Note that she has completed her hip-squaring action by P5 (image 2), but note that she is not shifting her pelvis left-laterally during her early downswing's counterclockwise pelvic rotary motion. Note that she has a small amount of upper torso counterclockwise rotation happening between P4 => P5, but far less than her amount of counterclockwise pelvic rotation, so she is generating an increased amount of torso-pelvic separation (dynamic X factor) during her transition to her early downswing action. Note that her trail shoulder is not lower than her lead shoulder at this time point of the downswing.
At the P5.5 position (image 3) her pelvis is far more open than her upper torso. Note that her trail shoulder is now slightly lower than her lead shoulder, and that is due to the fact that her lead shoulder is moving upwards as she starts to straighten her lead leg and stretch-out (extend) the left side of her mid-upper torso.
At the P6 position, her trail shoulder is even more lower relative to the ground than it was at her P5.5 position, and that is due to an increased degree of secondary axis tilt (see yellow line showing that her lumbar spine is more rightwards-tilted at P6 compared to P5.5) and also due to the acquisition of right lateral bend (see green line showing that her thoracic spine is arched more rightwards relative to her lumbar spine).
At impact, her trail shoulder is very low and moving under her chin in a targetwards direction. Note how much more she has continued to rotate her pelvis counterclockwise between P5.5 => P7 while still keeping the outer border of her left pelvis inside an imaginary line drawn vertically upwards from the inside of her left foot. Note that her left buttock has rotated back toward the tush line and also away from the target between P5.5 => P7 and that is due to the activation of her left gluteus maximus muscle. Note that her head has not moved targetwards between P4 => P7, but she has a very arched appearance at P7 because her pelvis has rotated forwards to a very open position at impact.
Further insights can be gained from viewing her DLT capture images.
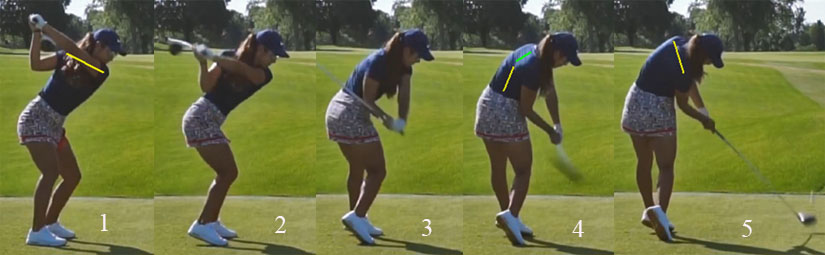
Image 1 is at the P4 position, image 2 is at the P5 position, image 3 is at the P5.5 position, image 4 is at the P6 position, and image 5 is at impact.
I have drawn a yellow line across her shoulders in image 1, and one can see that her shoulders turned relatively horizontally during her backswing action.
Note how efficiently she squares her pelvis between P4 (image 1) and P5 (image 2). Note that she seems to be keeping her upper back still partially facing the target between P4 => P5 because she is rotating her pelvis counterclockwise much more than she is rotating her upper torso counterclockwise. Note how actively she is adducting her right upper arm towards the right side of her torso during her early downswing between P4 => P5. Note that her trail shoulder is still slightly higher than her lead shoulder at her P5 position.
Note that her shoulders are relatively level at her P5.5 position (image 3), because her lead shoulder is starting to elevate as she elevates her left pelvis.
Note that her trail shoulder is moving significantly more downwards between P5.5 (image 3) => P6 (image 4) as she acquires an increased degree of secondary axis tilt (see yellow line) and right lateral bend (see green line). Note how the lowering of her right shoulder allows her to get her right elbow below waist level by P6 as she continues to complete her right arm adduction maneuver that is combined with a pitch elbow motion of her right arm. Note that her right forearm is supinated at her P6 position and her right palm is partially under the club handle.
I have drawn a yellow line across her shoulder angle at impact (image 5). Note how steeply her shoulders are turning between P6 (image 4) => P7 (image 5). Note how her right shoulder continues to move a lot downplane under her chin during her late downswing and that allows her to reach impact with a significantly bent right arm and significantly bent right wrist, thereby avoiding a "running-out-of-right arm" scenario. Note that her right forearm is still partially supinated at impact, and that her right palm is partially under the club handle at impact. Note that she continued to rotate her pelvis and upper torso to a very open position by impact, which is very conducive to performing a DH-hand release action through impact.
Capture images of Maria Fassi's DH-hand release action.
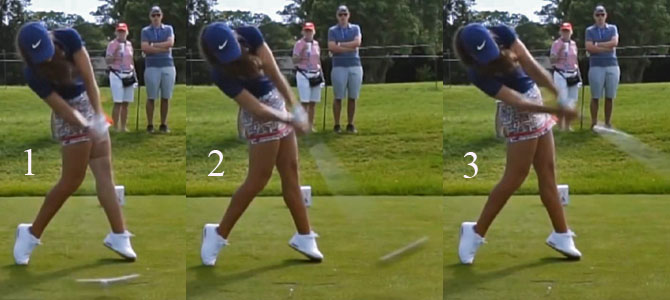
Image 1 is at impact, image 2 is at her P7.4 position and image 3 is at her P7.7 position.
Note how Maria Fassi performs a DH-hand release action between P7 (image 1) and P7.4 (image 2) and that her clubshaft does not bypass her lead arm (from an angular rotational perspective). Note that she still has a significantly bent right arm, and significantly bent right wrist, at her P7.4 position (image 2) and that is biomechanically possible because she gets her right shoulder socket moving very efficiently downplane under her chin through impact. Note how open her pelvis and mid-upper torso are during her followthrough between impact (image 1) and P7.7 (image 3) and that type of pivot motion is very conducive to allowing a golfer to more efficiently execute a DH-hand release action during the early followthrough time period.
Topic number 8c: What is meant by the term "running-out-of-right arm" and what effect will it have on a golfer's swing action?
In topic number 8b, I stated that the LPGA golfer Maria Fassi does not suffer from a "running-out-of-right arm" problem.
What exactly do I mean when I use the term "running-out-of-right arm" and what effect will it have on a golfer's golf swing action?
Consider these capture images of Maria Fassi's DH-hand release action.
Note that Maria Fassi's trail arm and trail wrist are incompletely straightened at impact (image 1), and even at P7.4 (image 2).
If the trail arm and trail wrist are incompletely straightened at impact, then it potentially allows a golfer to be applying a synergistically modulating force on the lead hand at PP#1, and/or on the aft side of the club handle below the coupling point, that can potentially allow the golfer to better control the forward speed of lead hand motion, and the efficacy of the release of PA#3, all the way between P6 => P7. It can also potentially help the golfer create a negative hand couple torque phenomenon at impact (as explained in topic number 8a) that can enable a golfer to better stabilise the lead hand through impact and avoid a lead wrist flipping motion through impact. To make it possible for the trail arm, and trail wrist, to be incompletely straightened by impact, the distance between the club handle and the trail shoulder socket cannot be too large. Note that Maria Fossa actively rotates her trail shoulder targetwards under her chin between P6 => P7 so that her trail shoulder socket moves further downplane, and thereby ensures that her trail hand can still reach the club handle at impact while her trail arm and trail wrist remain incompletely straightened at impact. If the trail shoulder does not move far enough downplane by impact, then the trail arm and trail wrist will fully straighten before impact, or through impact, and that is called a "running-out-of-right arm" scenario.
Phil Mickelson is an example of a golfer who occasionally "runs-out-of-right arm" during his driver swing's late downswing action.

Image 1 is at impact, and image 2 is immediately post-impact.
Note that Phil Mickelson's trail arm and trail wrist have straightened at impact, which means that he has a "running-out-of-right arm" scenario. I should be calling this phenomenon a "running-out-of-trail arm" scenario because Phil Mickelson is a lefty and it is his left arm that is the trail arm, but I have acquired the habit of using the term "running-out-of-right arm", so you need to know that I am always referring to the trail arm when I use the term "running-out-of-right arm".
If the trail arm and trail wrist fully straighten just before impact, or through impact, then there is a biomechanically natural tendency for the trail forearm to pronate excessively (as seen in image 2). If the trail hand is still in firm contact with the club handle, then it will cause the club handle to twist too much in a clubface-closing direction, and thereby cause a high clubface ROC through impact - as seen in image 2.
Here is another example of a pro golfer - VJ Singh - manifesting a "running-out-of-right arm" scenario through impact.
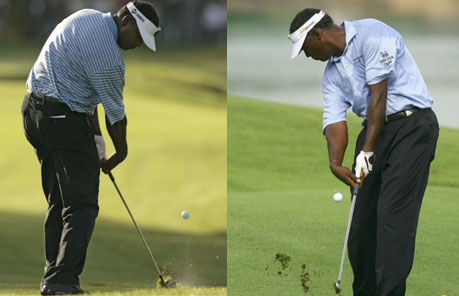
Note that VJ Singh has his pelvis and upper torso roughly parallel to the ball-target line at impact. Note that his right shoulder socket has not moved far enough downwplane, and that his trail arm/wrist both become fully straightened through impact and that he cannot keep his trail palm attached to the club handle through impact. Note that his lead arm, which is unsupported by his trail hand, rotates counterclockwise too fast through impact, and that causes his clubface to to be very closed relative to his clubhead arc very soon after impact.
The primary cause of this problem is that the trail shoulder is too far back at impact - note how far Phil Mickelson's and VJ Singh's trail shoulder is from their club handle at impact (compared to Maria Fassi's trail shoulder at impact). At impact, Phil Mickelson and VJ Singh do not have a very open pelvis alignment and their shoulders are roughly parallel to the ball-target line and their trail shoulder has not moved far enough downplane, and that causes the trail shoulder to be too far back at impact. To avoid this problem, it is advantageous for a golfer to reach impact with a more open pelvis/upper torso alignment (as seen in Maria Fassi's driver swing action) and to ensure that the trail shoulder has moved far enough downplane, so that he does not "run-out-of-right arm". To perform a DH-hand release action all the way to P7.4 (like Maria Fassi and Cameron Champ), where the trail arm and trail wrist are still incompletely straightened at P7.4, requires an even higher degree of efficacy of the trail shoulder moving far enough downplane during the early followthrough time period. It is not essential to avoid a "running-out-of-right arm" scenario all the way to P7.4, but it is very disadvantageous to have a "running-out-of-right arm" problem before impact, or through impact.
Topic number 8d: Why does the trail forearm not significantly pronate during a pro golfer's late downswing's PA#3 release action?
During the late downswing, the lead forearm has to supinate in order to close the clubface relative to the clubhead arc, and the amount of lead forearm supination required is inversely proportional to lead hand grip strength. If a golfer adopts a weak-or-neutral lead hand grip strength, and a neutral right hand grip strength, then the two palms face each other across the grip during the entire downswing. Therefore, if the lead hand is rotating counterclockwise during the late downswing's PA#3 release action, then the trail hand must rotate by roughly the same amount in the same rotary direction. Intuitively, one would imagine that if the counterclockwise rotation of the lead hand is due to lead forearm supination, then the counterclockwise rotation of the trail hand must be due to trail forearm pronation. However, Jon Sinclair, who used a 3D device to study many pro golfers, found that trail forearm pronation does not happen in the late downswing, and that a condition of dual forearm supination actually happened during the early phase of the late downswing.
Here is a copy of Jon Sinclair's 3D graphs.
The faint yellow zone shows the late downswing between P6 => impact.
The red graph represents the trail forearm supination-pronation graph, and the green graph represents the lead forearm supination-pronation graph. Supination is above the black horizontal zero line, and pronation is below the black horizontal zero line. The abbreviation "top" represents the P4 position, the abbreviation "MD" represents the P6 position.
Note that the lead forearm is pronated during the early mid-downswing between P4 => P6, and that it then rotates in a supinatory direction to become frankly supinated by impact (end of the faint yellow zone).
Note that the trail forearm is neutral at the P4 position, and that it starts to rapidly supinate during the early-mid downswing. Note that the trail forearm nearly reaches its peak level of supination at the start of the yellow zone, but that it is still supinating slightly more between the start of the faint yellow zone and the vertical white line. That means that a condition of dual forearm supination is happening between ~P6 => P6.5. Then, the trail forearm rotates in a pronatory direction to a small degree in the later downswing between ~P6.5 => impact, but it is still significantly supinated at impact.
Here are capture images of Rory McIlroy's downswing showing those same facts.
Rory McIlroy at the P6 position.
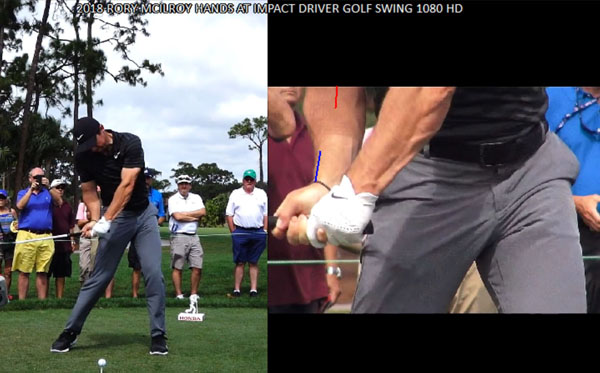
I have drawn a red line down the middle of his right antecubital fossa and a blue line along his right forearm's lower radial bone. Note that the blue line is rotated more clockwise than the red line and that means that his right forearm is frankly supinated to a large degree at his P6 position, and that causes his right palm to be positioned under the club handle so that it faces skywards at his P6 position.
Note that his left forearm is pronated and that the back of his lead hand is roughly facing the ball-target line.
Rory McIlroy at the P6.5 position.
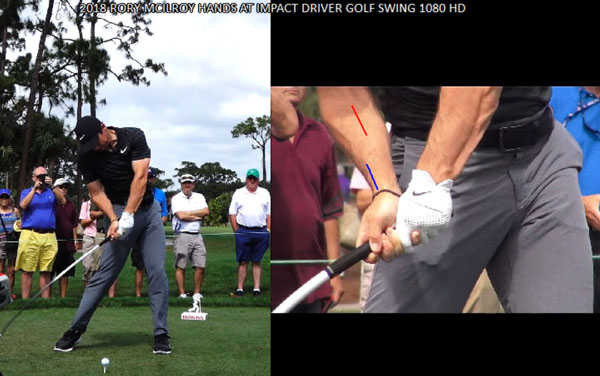
Note that the blue line is rotated more clockwise than the red line by roughly the same amount as it was at his P6 position and that means that his right forearm is frankly supinated to roughly the same degree as it was at his P6 position, and that causes his right palm to still be positioned under the club handle so that it faces skywards at his P6.5 position.
However, his left forearm is starting to supinate between P6 => P6.5, which means that both forearms are in a condition of dual forearm supination during that P6 => P6.5 time period.
Rory McIlroy at his impact position.
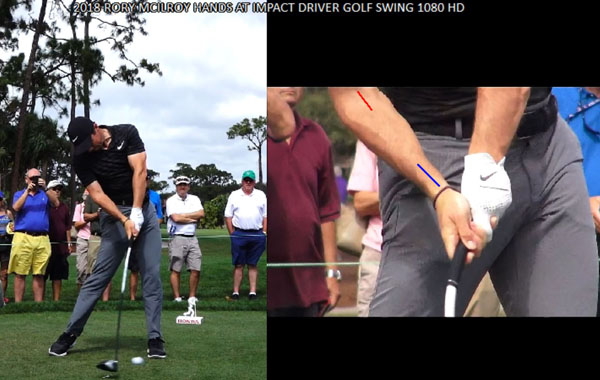
Rory McIlroy has completed his PA#3 release action, which is due to lead forearm supination, by impact.
Note that the blue line is still rotated more clockwise than the red line, which means that his trail forearm is still supinated at impact. However, it is less supinated, which means that there was some counterclockwise roll motion of his trail forearm in a pronatory direction happening between P6.5 => P7. That allows his right palm to become partially behind the club handle at impact, while it is still partially under the club handle.
How can one explain how it is possible for his trail palm to be continuously parallel to his lead palm all the way between P6 => P7 if his trail forearm is not rotating as much counterclockwise as his lead forearm?
The answer is that his trail wrist is progressively straightening between P6 => P7, and it is simultaneously becoming progressively more ulnar-deviated, and the combination of those two trail wrist motions causes the trail wrist to rotate clockwise due to a trail wrist circumductory roll motion, which allows the trail palm to remain partially under the club handle while the club is releasing during the late downswing. During that trail wrist's circumductory roll motion, it is naturally producing a clockwise torque effect on the trail forearm in a supinatory direction, that allows the trail forearm to continue to supinate between P6 => P6.5.
That same biomechanical phenomenon can be seen in Dustin Johnson's late downswing.
Capture images of Dustin Johnson's mid-late downswing action.
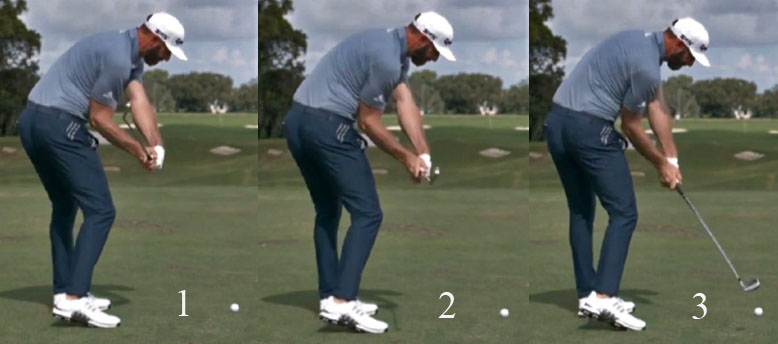
Note that two phenomena are happening to the clubshaft between image 1 => image 3 - the clubshaft is releasing (representing the release of PA#2), but when it releases it does not tumble over-the-plane, and it angles downwards across his hands between image 1 => image 3.
Note that his right wrist is very extended and radially deviated in image 1. Then, it moves progressively towards ulnar deviation as the right wrist straightens between image 1 => image 3. The combination of ulnar deviation + right wrist straightening allows the right wrist to undergo a circumductory roll motion that allows the right palm to continue to face more skywards while the right wrist straightens (which means that the back of the right hand does not move more over the top of the club handle). That right wrist's circumductory roll motion due to the combination of "right wrist straightening combined with right wrist ulnar deviation" torques the right forearm in a supinatory direction, and allows the right forearm to continue to supinate to a very small degree while the left forearm is supinating (accounting for the phenomenon of dual forearm supination). One can clearly see his left forearm supinating between image 1 => image 3, and that causes his left hand to rotate counterclockwise between image 1 => image 3. However, note that his right forearm remains frankly supinated between image 1 => image 3, and his right palm remains partially behind his club handle, and partially under his club handle, during that time period because of his right wrist's circumductory roll motion, which is happening during his right wrist's straightening action.
Topic number 8e: What potentially useful functions can the trail arm perform during the downswing if a pro golfer uses a TGM swinging action?
I suspect that the majority of pro golfers are using a pivot-induced TGM swinging action (lead arm swinging action).
Here is a link to a swing video ( https://www.youtube.com/watch?v=w57n1m_Nd3g ) of a skilled amateur golfer, Logan Aldridge, performing a pivot-induced TGM swinging action to drive the ball >300 yards.
Here are capture images from the swing video.
Image 1 is at his P4 position, image 2 is near his P5 position, and image 3 is near impact.
Logan Aldridge can drive the ball 300 yards without the assistance of a trail arm and he can also drive the ball straight. That means that a trail arm is not required to generate swing power if a golfer uses a pivot-induced TGM swinging action (lead arm swinging action) and it is not required to enable a golfer to drive the ball straight towards his intended target. However, using the trail arm in a biomechanically fruitful manner can potentially help a golfer (who uses a TGM swinging technique) to both generate swing power and to also control his clubhead path and clubface angle during the downswing action. I have already discussed at various points in this downswing chapter the many ways that use of the trail arm can help a golfer improve his full golf swing action, and I will summarise them again in this subtopic.
If you look at Logan Aldridge at his end-backswing position (image 1), he has positioned his left arm across his shoulder turn angle and he has a 90 degree lag angle between his lead arm and his clubshaft. One potential advantage of having a trail arm is that it allows a golfer to support the weight of the lead arm/clubshaft at the P4 position.
Here are capture images of Tiger Woods and Adam Scott at their P4 position.
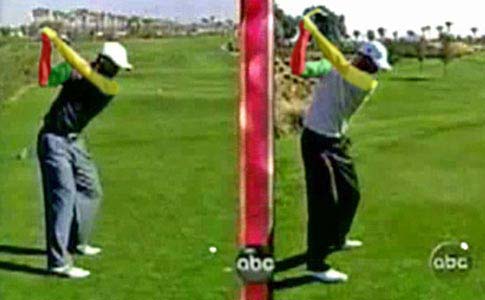
Both Tiger Woods and Adam Scott prefer to angle their lead arm across their shoulder turn angle at their P4 position. Note that they have a ~90 degree lag angle between the clubshaft and their lead arm (which I have colored in yellow), and note that the clubshaft is straight-line-aligned with their lead forearm's lower radial bone, which means that they have an intact LFFW/GFLW alignment.
The trail forearm and bent right wrist represents a *RFFW (right forearm flying wedge), which is a TGM term, and I have colored the RFFW in red. Note that the RFFW is connected to the torso at the level of the right shoulder socket via the right upper arm (which I have colored in green). Note that if the trail upper arm and RFFW are correctly aligned from a biomechanical perspective that it enables the trail palm to be parallel to the lead palm at the P4 position, and that allows their RFFW to support the weight of their intact LFFW (which consists of the lead arm and clubshaft that are straight-line-aligned) at their end-backswing position. Note the biomechanical alignment of the RFFW and right upper arm that makes it biomechanically possible for the right palm to become parallel to the lead palm at the P4 position - i) the right upper arm is abducted away from the right side of the upper torso; ii) the right humerus is slightly internally rotated; iii) the right elbow is bent to approximately a right-angle bend, iv) the right forearm is slightly pronated and v) the right wrist is significantly extended (bent-back) and radially deviated.
(* I am using the TGM term "RFFW", even though it would be more factually correct to use the more neutral term "trail forearm flying wedge", and a reader should realise that when I use the TGM term "RFFW" in this subtopic that I am always referring to the trail forearm/wrist)
Both Tiger Woods and Adam Scott adopt a weak-to-neutral lead hand grip strength and a neutral right hand grip strength at address, which means that their two palms face each other across the grip. Both of those pro golfers also use the intact LFFW/GFLW golf swing technique throughout their entire downswing action, and they also correctly align their RFFW relative to their intact LFFW/GFLW at all time points throughout their entire downswing, and that allows them to keep their two palms continuously facing each other across the club handle at all time points during their downswing action. To make that fact biomechanically possible, the RFFW must change its internal structural alignment, and also its alignment relative to the trail upper arm, to a variable degree during different phases of the downswing (as will later be described).
Now, let's consider what happens in the early downswing between P4 => P5.
Capture images of Tiger Woods and Adam Scott at their P5 position.

Both Tiger Woods and Adam Scott have started their downswing action by performing a pivot motion using the standard kinematic sequence - where the pelvis rotates first followed by a rotation of the upper torso. When the upper torso rotates counterclockwise, it causes the left shoulder socket to move targetwards, and that left shoulder socket motion causes the left arm to be pulled downwards-and-forwards. While they perform their pivot motion, they are simultaneously shallowing their clubshaft to a lower swingplane, while keeping their clubshaft continuously "on-plane" (where an imaginary line extended out from the butt end of the clubshaft will continuously point at the ball-target line) at all time points between P4 => P5. Note that both Tiger Woods and Adam Scott are also continuously maintaining their clubshaft angle of ~90 degrees unchanged between P4 => P5 and thereby avoiding casting (= premature release of PA#2 due to a premature lead wrist uncocking motion). Finally, they are both maintaining an intact LFFW/GFLW alignment where their lead palm is continuously parallel to their progressively shallowing swingplane between P4 => P5.
The trail arm and RFFW can potentially assist in helping a golfer optimise all these downswing actions performed by the lead arm between P4 => P5 - i) shallowing the clubshaft; ii) maintaining an intact LAFW/GFLW that is continuously aligned parallel to the progressively shallowing swingplane and iii) maintaining an unchanged clubhead lag angle of ~90 degrees (thereby avoiding casting). How does the motion of the right arm/RFFW synergistically assist a golfer in optimally performing all of these actions?
The key biomechanical action that must be performed by the golfer's trail arm between P4 => P5 is an active right arm adduction maneuver, which is combined with a pitch elbow motion of the right arm. During the right arm's pitch elbow motion, the ~90 degree angle bend of the right elbow must remain unchanged, while the golfer increasingly supinates the right forearm so that the right palm can continuously remain parallel to the progressively shallowing intact LFFW/clubshaft's swingplane. The amount of "supination of the right forearm" required during the active right arm adduction manuever depends on the amount of clubshaft shallowing happening between P4 => P5. During this time period, the right wrist must remain significantly extended (bent-back) and upcocked (radially deviated).
All these biomechanical actions can be seen in these rear-view images of Dustin Johnson's driver swing action.
Image 1 is at his P4 position, image 2 is at his P4.3 position, image 3 is at his P4.7 position, and image 4 is at his P5 position.
Note that Dustin Johnson's right upper arm is abducted away from his upper torso at his P4 position. Note that his right elbow is bent by ~90 degrees, that his right wrist is significantly extended (bent-back) and also upcocked (radially deviated), and that his right palm is parallel to his lead palm.
Note how actively Dustin Johnson adducts his right upper arm towards the right side of his torso between P4 => P5 so that his right upper arm becomes fully adducted against the right side of his upper torso by P5. Note that Dustin Johnson continuously maintains an unchanged bent right elbow angle of ~90 degrees, an unchanged bent-back (extended) right wrist, and an unchanged degree of right wrist upcocking during this active right arm adduction manuever.
Note that Dustin Johnson's clubhead lag angle (angle between his lead arm and clubshaft) remains unchanged between P4 => P5 and he does not prematurely straighten his right arm, which will likely produce casting (premature release of PA#2). Not only is Dustin Johnson avoiding casting (by avoiding any premature straightening of his right arm); but he is also simultaneously providing a *"force-across-the-shaft" with his right hand (working as a hand couple) that prevents the clubshaft from jack-knifing towards his lead arm as a result of his lead hand's pulling force that is pulling the club handle downwards-and-away from the target as the lead hand moves down the hand arc path between P4 => P5.
(* I discussed how the right hand works as a hand couple in great detail in a certain subsection of topic number 5 of this downswing chapter)
Note that Dustin Johnson's lead hand is moving away from the target between P4 => P5 and it reaches its furthest point away from the target at his P5 position. For the right hand to move in the same "away from the target" direction and by the same amount as the lead hand, a golfer should "feel" that he is performing a right arm throw action that is directed away from the target - while keeping his degree of right elbow bend unchanged during the right arm's throw motion. To optimally perform that right arm throw action between P4 => P5 where the right hand moves away from the target by a finite amount, while the right upper arm is being actively adducted and while the right elbow bend angle remains unchanged, the following biomechanical events have to happen between P4 => P5 - i) the right scapula must protract so that the right shoulder socket can move away from the target, ii) the upper torso must rotate counterclockwise so that the right shoulder socket can move away from the target, and iii) the right forearm must move from being more vertically-oriented at P4 to becoming more horizontally-oriented at P5 (which happens automatically/naturally as a result of the active right arm adduction manuever if a golfer keeps his right elbow bend angle of ~90 degrees unchanged). By ensuring that those biomechanical events unfold in the manner described, the golfer's right hand will be moving downwards-and-away from the target by a finite amount between P4 => P5 and that will have two potential advantages - i) it will provide a finite amount of "extensor action" force to help keep the lead arm fully straight and ii) it will provide a "force-across-the shaft" (at a point on the clubshaft that is below the coupling point) that will prevent jack-knifing of the clubshaft towards the lead arm during the early downswing. The amount of "force-across-the-shaft" being exerted by the right hand must be small, and it should only be large enough to prevent any jack-knifing of the clubshaft inwards towards the lead arm, and it should not be so large that it may lead to a casting problem.
An interesting question arises - can the active right arm adduction manuever (happening in the manner described) synergistically help the lead hand pull the club handle down the hand arc path between P4 => P5, and thereby contribute to the speed of release of PA#4 (speed of release of the lead arm)? I strongly suspect that it can synergistically help the lead arm/hand pull the club handle down the hand arc path between P4 => P5, but this issue has never been sucessfully studied by golf researchers, so I cannot rationally estimate to what degree an active right arm adduction manuever can significantly contribute to the speed of release of PA#4. If golf researchers used an instrumented club handle, and also placed pressure sensors at PP#1 over the lead thumb and also over selected spots on the club handle (eg. at PP#3), then they would be better able to answer this question. Only two instrumented grip studies (Koike study and the Choi-Park study) have been published in the golf research literature, but they were significantly flawed from a scientific methodological perspective and many "experts" question their scientific legitimacy and practical value. David Tutelman (a golf physicist) analysed those two research studies in the following article at https://www.tutelman.com/golf/swing/openloop.php?fbclid=IwAR0-lBLmbNEvQ8-uvXwDdaVQllE611SeLZtvMdZaHHQ4wQmka9iDoiey29U .
Now, let's consider what role the trail arm can play in the mid-downswing between P5 => P5.5 if a golfer uses a TGM swinging action.
Here are capture images of Tiger Woods and Adam Scott at the P5.2 position (top images) and P6 position (lower images) .
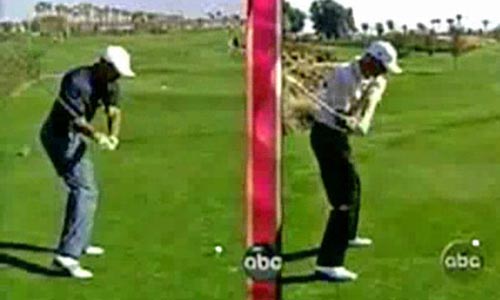
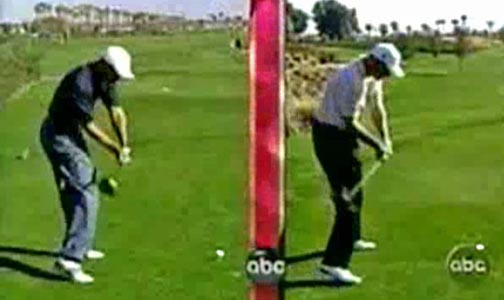
During the mid-downswing between P5 => P6, the club is starting to release in the plane of lead wrist radial => ulnar deviation. During that P5 => P6 time period, the intact LFFW/GFLW will still be aligned parallel to the progressively shallowing swingplane so that the clubshaft will be releasing downplane in such a way that it is continuously parallel to the shallowing swingplane, which means that the lead palm will be continuously parallel to the swingplane at all time points between P4 => P6.
The trail arm has to accomodate itself to those two facts that are happening - i) the club is releasing and that requires that the right elbow must start to straighten thereby changing the angular relationship between the right upper arm and the RFFW; and ii) the swingplane is getting shallower, and that means that the right forearm must continue to supinate while the right arm increasingly straightens so that the right palm can remain continuously parallel to the left palm between P5 => P6. That fact enables the RFFW to still be supporting the intact LFFW during the entire early-mid downswing time period as the intact LFFW decends down a progressively shallowing swingplane. In other words, if both the right upper arm and RFFW move in an optimal manner, it can synergistically help to control the rate of shallowing motion of the intact LFFW, while simultaneously ensuring that the clubshaft is continuously "on-plane", all the way between P4 => P6. For the right upper arm and RFFW to move in an optimal manner, the right upper arm must not stall its downward-and-forward motion, and it must drive the right elbow to a position in front of the right hip area by P6 while the right humerus remains neutral, and the right forearm must continue to supinate while the right arm straightens so that the right palm can be continuously parallel to the progressively shallowing swingplane of the intact LFFW. Note that the trail wrist remains fully bent-back and radially deviated during this entire P4 => P6 time period. If a golfer internally rotates the right humerus, or pronates the right forearm, by using a punch elbow motion during his mid-downswing time period, then it will be biomechanically impossible for him to keep his right palm continuously parallel to the shallowing clubshaft's swingplane!
By looking at rear-view images of Dustin Johnson's downswing, one can learn more important facts about the role of the trail arm during the mid-downswing.
Image 4 is at the P5 position (end of the early downswing) and image 5 is at the P5.5 position.
Note what happens between P5 => P5.5 with respect to Dustin Johnson's trail arm.
Note that Dustin Johnson continues to adduct his right upper arm towards the midline of his body and that drives his right elbow to a position in front of his right hip area.
Note that he is simultaneously starting to slightly straighten his right arm and that angles the right forearm more downwards so that his hands become closer to the target by a small amount. The amount is not large because he maintains a neutral right humerus and that angles his right forearm in an away-from-the-target direction while his right arm is starting to straighten. The fact that the hands move slightly closer to the target by a small amount as they continue to move downwards has the beneficial effect of slightly decreasing the amount of force-across-the-shaft being produced by the right hand couple, which must happen for the club release phenomenon to occur in a smoothly controlled manner.
Most importantly, note that his hands are still about 12" outside his right thigh at his P5.5 position - and that fact has a very beneficial effect.
Consider Dustin Johnson's hand arc path.
Image 1 is his P4 position, image 2 is his P5 position and image 3 is his P5.5 position.
Between P4 => P5 note that his hand arc path is directed away from the target, and I previously explained how the trail arm must move to make that possible.
Between P5 => P5.5, his hands are moving downwards and slightly towards the target. However, note that his hands are no closer to the target at P5.5 than they were at P4. What makes that fact possible are two biomechanical phenomena - i) he maintains a neutral right humerus and avoids internally rotaing his right humerus, even though he is actively adducting his right upper arm towards the right side of his torso and that angles his right forearm in an away-from-the-target direction; and ii) he maintains a significantly bent right elbow and he does not allow his right arm to straighten too fast, and that allows the right forearm to be more horizontally aligned, rather than being more vertically-aligned, at his P5.5 position. Those two biomechanical actions involving the trail arm have the great advantage that it allows Dustin Johnson to create a more U-shaped hand arc path between P5 => P5.5, which allows him to maintain clubhead lag for longer and it is also conducive to a more smoothly efficient release of PA#2.
Now, let's consider how the trail arm must move in the later downswing between P5.5 => impact in order to synergistically help the left arm more efficiently control the release of PA#2 and PA#3 during the later downswing, while the golfer continuously maintains an intact LFFW/GFLW alignment.
Here are capture images where I (author) demonstrate a simulated downswing action in a slow motion manner.
Image 3 is at the P5.5 position, image 4 is at the P6.5 position and image 5 is at impact.
The red cardboard represents the intact LFFW wedge. Note how the intact LFFW has to rotate counterclockwise between P5.5 => P7 while the club is releasing in the plane of the LFFW (in the plane of radial => ulnar deviation). Note that the left hand is partially on top of the club handle at P5.5 and it eventually becomes situated in front of the club handle at impact. Between P5.5 => P7, the left palm is partially facing the ground while the entire LFFW rotates counterclockwise. Therefore, for the right palm to continuously face the left palm all the time between P5.5 => P7 so that it can efficiently support the intact LFFW/GFLW during the later downswing, the right palm must be partially under the club handle during that entire time period. At P5.5 the right palm will be facing skywards because it is positioned under the club handle, at P6.5 the right palm will be partially under the club handle and partially behind the club handle, and at impact the right palm must mainly face the target but it will still be slightly under the club handle at impact. In other words, when the right arm straightens between P5.5 => P7, the right palm must never face groundwards and it must always be facing partially skywards to a diminishing degree between P5.5 => P7. That mandatory requirement is only possible if the right forearm remains significantly supinated between P5.5 => P7 and if it avoids pronating. In topic number 8d, I described how the right forearm and right wrist must move to make this fact possible, and it means that the right wrist must roll clockwise (and not counterclockwise) via the biomechanical mechanism of a right wrist circumductory roll motion that naturally happens when the right wrist straightens and simultaneously ulnar-deviates between P5.5 => P6.5. If a golfer performs the trail arm straightening action, the trail forearm supinatory motion, and the trail wrist circumductory roll motion in an optimal manner, then it can potentially help him to continuously support the intact LFFW/GFLW while he potentially uses his trail arm to synergistically help him to more efficiently, and more smoothly, control the release of PA#3 during the later downswing. According to computer-modelling studies based on inverse dynamics calculations, a pro golfer's right hand couple's torque is negative in the later downswing between P6 => P7, which means that the right palm is not applying a positive alpha torque against the aft side of the clubshaft in an attempt to make the club move faster between P6 => P7. However, if a golfer avoids a "running-out-of-right arm" scenario (as described in topic number 8c), then a controllable straightening motion of the right arm and right wrist can potentially allow a golfer to execute his PA#3 release action in a more smoothly controlled manner in his late downswing.
To determine whether I could learn more about the potential role of the trail arm in a pro golfer's downswing action, I performed a you-tube channel search using the terms "trail arm" or "right arm" and "throw" to search for golf swing instructional videos on this topic. There are a small number of online golf instructors, who have posted golf instructional videos on the topic of a "right arm throw" action, and the most prolific example is the golf instructor Steve Pratt, who mentored under the influence of Mike Austin, who also made filmed lessons in ~1960 regarding his personal "idea" on how to perform a right arm throw action during the execution of a full golf swing action.
I disagree with a number of opinions expressed by Steve Pratt, and I will now explain why I harbor a number of different opinions.
Here is an example of a Steve Pratt video - https://www.youtube.com/watch?v=zYQxs_RbIGo - regarding the topic of how to perform a "right arm throw action" during a full golf swing action.
Note what he states, and demonstrates, between the 9:20 - 10:20 minute time point of his video. He demonstrates how he wants to get his right arm positioned at his P4 position, which he calls the "90-by-90-by-90" box-alignment, where the right arm upper arm is abducted away from the chest wall by ~90 degrees, where the right elbow is bent by ~90 degrees and where the right wrist is bent back about ~90 degrees. Then, to start the downswing's right arm throw motion, he states that one should externally rotate the right humerus while getting the chest out-of-the-way. Most importantly, he states that during the initial phase of the early downswing's right arm throw action, the right arm must remain abducted away from the right side of the chest wall.
Here are capture images from Steve Pratt's swing video demonstrating how he keeps his right arm abducted away from the right side of his upper torso during his early downswing's right arm throw action.
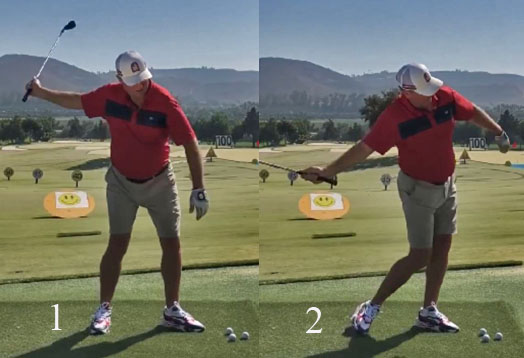
Image 1 shows the start of his right arm throw action at the start of the downswing, and image 2 shows him when his right hand has already reached down to waist level. Note that he has rotated his pelvis and upper torso to an open alignment by image 2, but note that his right upper arm is still abducted far away from the right side of his upper torso in image 2. Note that his right hand is lower than his right elbow, and that he has a very straightened right arm.
I think that this Steve Pratt "visual demo" image represents sub-optimal golf instructional advice!
I think that a golfer, who wants to perform a TGM swinging action like a pro golfer, must adduct the right upper arm as fast as possible towards the right side of the torso during the early downswing, while maintaining an unchanged ~90 degree right elbow bend angle.
In fact, both Steven Pratt and Mike Austin follow my advice in their "real life" full golf swing action.
Here are capture images from that same Steve Pratt video showing his early downswing action in his "real life" short iron swing action.
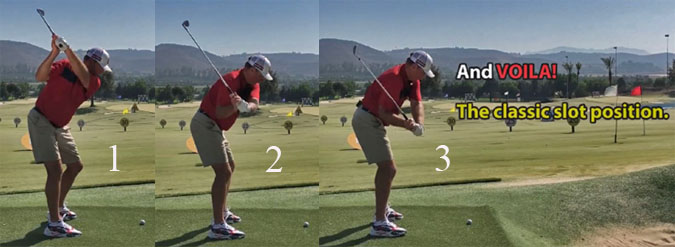
Image 1 is at his P4 position, image 2 is at his P5 position, and image 3 is at his P5.5 position.
Note that his right upper arm is abducted away from the right side of his chest wall at his P4 position (image 1).
Note how fast he adducts his right upper arm towards the right side of his chest wall during his early downswing while keeping an unchanged ~90 degree right elbow bend angle (image 2). A very useful visual clue on how fast a golfer adducts the right upper arm during the early downswing is to note how much the right elbow drops well below the level of the lead elbow by P5 - as seen in image 2.
Note that Steve Pratt still has a ~90 degree right elbow bend angle at his P5.5 position (image 3) and that allows him to maintain most of his clubhead lag angle by P5.5. Note that he is "leading with his right elbow" between P4 => P5.5 and that his right hand has still not bypassed his right elbow, and got closer to the ground, by P5.5.
Now, consider Mike Austin's full golf swing action in the following you-tube video - https://www.youtube.com/watch?v=UdpoU1LA2os
Mike Austin has one of the most perfect golf swing pivot motions that I have ever seen - watch the first 50 seconds of that video to see his absolutely flawless pivot motion.
Mike Austin was also featured in many TV shows where he dressed up in his "skeleton suit", as seen in the latter half of that video, and where he also demonstrates his right arm throw motion.
Here are capture images from that Mike Austin video.
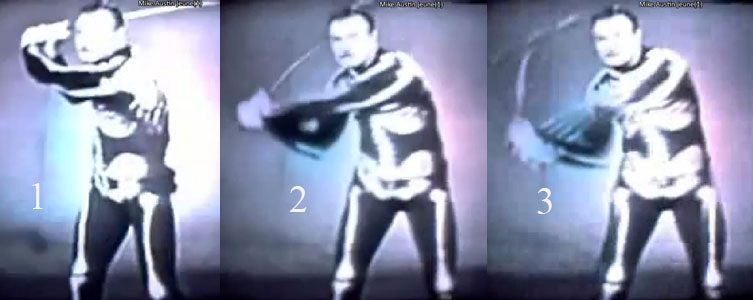
Image 1 is at his P4 position, image 2 is at his P5.1 position and image 3 is at his P5.3 position.
Note that his elbows are roughly level at his P4 position.
Note how much his right elbow has dropped down below the level of his left elbow by P5.1 - and that is an useful visual sign of a very active right upper arm adduction maneuver. Note that he keeps his right elbow bent at ~90 degrees and that he retains his clubhead lag angle.
Image 2 is at P5.3 and his right upper arm is near-vertical due to his very active right upper arm adduction maneuver.
Here are capture images of Mike Austin from a slow motion photographic film of his driver golf swing action.
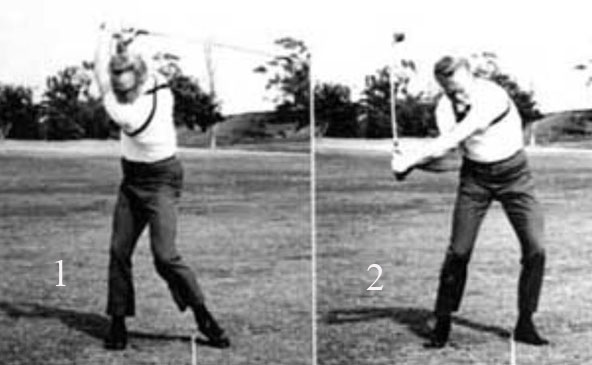
Image 1 is at his P4 position where his right upper arm is abducted away from the right ride of his upper torso.
Image 2 is at his P5.5 position - note that he has fully adducted his right upper arm against the right side of his mid-upper torso, and he has retained his ~90 degrees of right elbow bend, which allows him to maximally retain his clubhead lag angle. Note that his right forearm is near-horizontal, which allows him to retain the width of his hand arc path, even though his right upper arm is fully adducted against the right side of his mid-upper torso.
I could present many capture images of pro golfers, which demonstrate that they routinely adduct their upper arm very fast towards the right side of their torso between P4 => P5, but I will limit myself to two further examples.
Capture images of Sergio Garcia's early-mid downswing action.
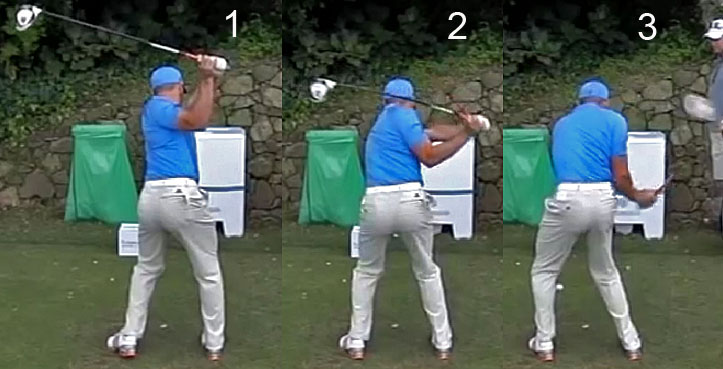
Image1 is at his P4 position - note that his right upper arm is abducted away from the right side of his upper torso.
Image 2 is at his P5 position - note that he is actively adducting his right upper arm towards the right side of his upper torso, while retaining his ~90 degree right elbow bend angle. Note how his right elbow is positioned well below the level of his left elbow.
Image 3 shows that his right upper arm is fully adducted against the right side of his mid-upper torso at P5.5. Note that his right elbow has straightened a small amount, which angles his right forearm more downwards (compared to Mike Austin at the same comparable position).
Capture images of Jon Rahm's early-mid downswing action.
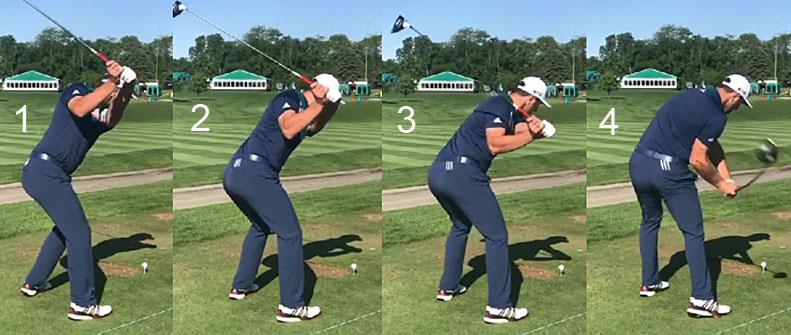
Image 1 is at his P4 position - note that his right upper arm is abducted away from the right side of his upper torso.
Image 2 is at his P4.5 position and image 3 is at his P5 position - note that his right elbow is positioned well below the level of his left elbow by P5, which is a visual sign of a very active right upper arm adduction maneuver.
Image 3 is at his P5.5 position - note that his right upper arm is fully adducted against the right side of his mid-upper torso. Note that he has only straightened his right elbow by a very small amount and that he still has retained his clubhead lag.
Note that his right wrist remains upcocked (radially deviated) and bent-back (extended) all the way between P4 => P5.5, which helps him to retain his clubhead lag angle.
I have bold-highlighted that last statement because I believe that a golfer should optimally retain his upcocked (radially deviated) right wrist and bent-back (extended) right wrist all the way between P4 => P5.5, while Steve Pratt in the following video - https://www.youtube.com/watch?v=0IhI-7OP8r4 - states that a golfer should "shed" his radially deviated right wrist alignment immediately from the very moment that he starts his downswing action and that he should move the right wrist very quickly towards ulnar-deviation. Watch that video between the 6:00 - 7:23 minute time points - note that when Steve Pratt allows his right wrist to immediately move towards ulnar deviation at the very start of the downswing that the loses a small amount of clubhead lag. Most pro golfers, like Jon Rahm, keep their right wrist fully upcocked (radially deviated) between P4 => P5.5 (or at least to P5.2) and that helps them to maximally retain their clubhead lag angle and avoid a premature release of PA#2. Note that even Steve Pratt retains his upcocked (radially deviated) right wrist in image 3 of those capture images of his "real life" golf swing action!
Steve Pratt believes that a golfer should externally rotate the right upper arm, and supinate the right forearm, during the early-mid downswing between P4 => P6, but Mike Malaska, a golf instructor in Arizona, takes a polar opposite approach and he believes that a golfer should internally rotate the right upper arm and pronate the right forearm during the early-mid downswing.
Here is a link to a golf instructional video - https://www.youtube.com/watch?v=WGcLuex-CUA - that Mike Malaska did with Eric Cogorno.
Watch the video between the 5:10 - 5:22 minute time points, and note that Mike Malaska states that the right upper arm must internally rotate during the early-mid downswing.
Here are capture images from that section of the video showing Mike Malaska demonstrating his recommended right arm throw motion.
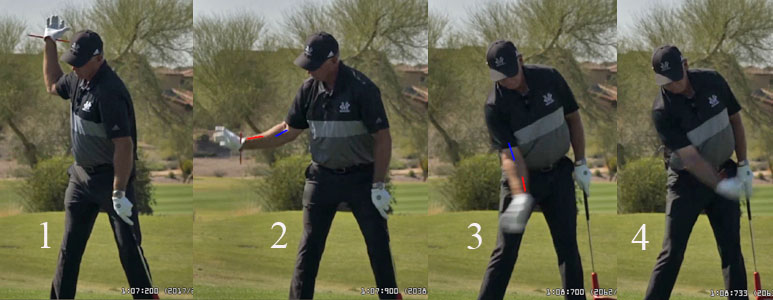
Image 1 shows Mike Malaska at a simulated end-backswing position.
Images 2 and 3 show his right arm throw motion. Note that I have drawn a blue line down the middle of his right antecubital fossa and a red line along the lower 4" of his right lower radial bone in his right lower forearm, and one can see that the red line is rotated more counterclockwise than the blue line in image 3, which means that his right forearm is pronated. Note how he internally rotates his right upper arm and pronates his right forearm between image 1 => image 3, and when his right hand reaches down to below waist level (image 3) his right palm is partially facing the ground. That type of right arm motion is called a punch elbow motion in TGM terminology and I have never seen a pro golfer use a punch elbow motion for their driver golf swing action, and I believe that Mike Malaska's right arm throw motion is a very sub-optimum way to perform a right arm throw motion during the early-mid downswing. I would highly recommend that a student-golfer, who wants to perform a golf swing like a pro golfer, use an active right arm adduction maneuver combined with a pitch elbow motion during their early downswing between P4 => P6.
Although Steve Pratt and Mike Malaska have different opinions on how to perform a right arm throw motion in the early-mid downswing between P4 => P6, they both recommend the same approach to performing the right arm throw motion in the later downswing between P6 and impact. Note how Mike Malaska performs his right arm throw motion in image 4 above - he straightens his right arm without rolling his right forearm more counterclockwise and he fully straightens his right wrist in a slap-hinge manner through impact. Mike Malaska states that he wants his right forearm to be straight-in-line with the clubshaft between P6 and P7 so that he can pressure-load the clubshaft throughout the later downswing and thereby come into impact with a pressure-loaded clubshaft. To pressure-load the clubshaft into impact means that a golfer must be applying a positive alpha torque with the right hand against the aft side of the club handle, but that positive torque phenomenon is not actually happening in the full golf swing action of pro golfers. According to the "experts" (Sasho MacKenzie, Dr. Young-Hoo Kwon and David Tutelman), pro golfers manifest a negative hand couple torque phenomenon during the later downswing and at impact, and I discussed this negative torque phenomenon in great detail in a specific section of topic number 5.
Steve Pratt, like Mike Malaska, also recommends that a golfer fully straighten the right wrist in a slap-hinge manner through impact, and in this video - https://www.youtube.com/watch?v=0IhI-7OP8r4 - Steve Pratt describes how to fully straighten the right wrist in the "freest-flap" manner between the 7:20 - 8:35 minute time point of the video. Steve Pratt states that a rock-thrower, or baseball pitcher, would not maintain a dorsiflexed right wrist during the release of the rock/baseball because that would not allow him to propel the thrown object with maximum speed. I believe that this widely-held "belief" has no scientific merit, and I believe that the speed of the released rock/baseball can be very closely correlated with the overall efficiency of the entire throw motion, which involves an optimised body pivot motion that is combined with an optimised right arm throw motion where the right arm efficiently straightens in the final phase of the right arm throw motion. Trying to add an active/snapping right wrist straightening action (in a slap-hinge manner) just before the release of the thrown object will not necessarily increase the speed of release of the thrown object.
Steve Pratt states between the 8:16 - 8:35 minute time points of his video that all the top-performing pro golfers perform a free, unrestricted release of the trail wrist through impact and that they all straighten the trail wrist to a variable degree in a slap-hinge manner through impact. However, that assertion is obviously not true!
Here are capture images of Cameron Champ's DH-hand release action through imapct.
Note that Cameron Champ has a significantly bent trail wrist at impact (image 1) and it is still significantly bent at P7.4 (image 3).
Cameron Champ is one of the longest drivers on the PGA tour, and there is no scientific evidence to support Steve Pratt's opinion that Cameron Champ could obtain a higher clubhead speed at impact by allowing his trail wrist to fully/freely straighten in a slap-hinge manner through impact. In fact, David Tutelman has scientifically studied this issue and he has stated that if a pro golfer, like Cameron Champ, can generate a clubhead speed of ~125mph at impact using his standard DH-hand release action through impact, that it is biomechanically impossible for his trail wrist to add an additional amount of clubhead speed by trying to actively straighten through impact.
Here are capture images of Bryson DeChambeau's DH-hand release action through impact.
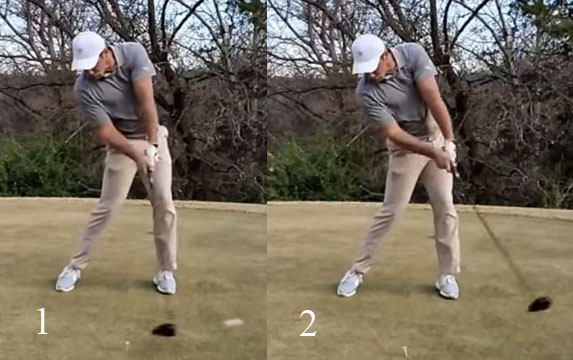
Image 1 is at impact and image 2 is at ~P7.4. Note that Bryson Dechambeau does not allow the clubshaft to bypass his lead arm (from an angular rotational perspective) between P7 => P7.4 and that fact defines a DH-hand release action.
Note that Bryson DeChambeau has a significantly bent right wrist at impact, and also at P7.4 , and that there is no significant amount of right wrist straightening action (in a slap-hinge manner) happening through impact into his early followthrough. The lack of a free-flowing, slap-hinge action of the trail wrist through impact does not prevent Bryson DeChambeau from generating a clubhead speed at impact of >125mph and a ball speed of >200mph!
My personal opinion is that it is perfectly acceptable to straighten the right wrist through impact in a flapping manner as long as it does not cause left wrist breakdown and a significant amount of left wrist flipping through impact, but I personally favor the use of a DH-hand release action (as performed by Cameron Champ and Bryson DeChambeau) because it is more likely to reliably keep the clubface square to the clubhead arc through impact.
I think that Steve Pratt also makes a major mistake in the following video - https://www.youtube.com/watch?v=x4JVm6s6EUo - when he compares two versions of Mike Austin's hand action through impact. Steve Pratt describes two versions of performing a Mike Austin type of hand action through impact - the classic version, and the modern version (originated by Dan Shauger).
Steve Pratt prefers the classic version of the Mike Austin hand action and he states that it is really just a flap-and-roll motion, and he tries to succinctly describe that classic version of the Mike Austin hand action between the 19:06 - 20:12 minute time points of the video. Steve Pratt claims that between P6 => P7 he is simply performing a flap motion with his trail arm/hand and that any roll motion only happens post-impact when the right forearm pronates over a supinating lead forearm in the early followthrough. Steve Pratt's description can give a student-golfer the false impression that he is not rolling the clubface closed pre-impact between P6 and P7 and that he is keeping the clubface square to the clubhead arc between P6 => P7.
However, look at these capture images from that video, which show Steve Pratt performing the classic version of Mike Austin's hand release action.
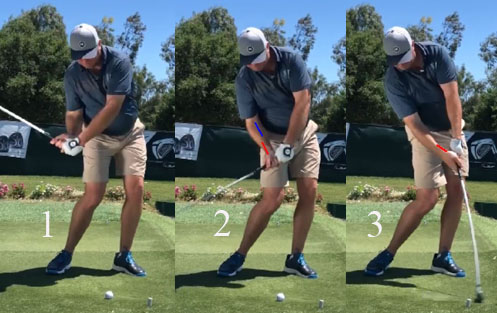
Image 1 is at P5.5, image 2 is at P6.5 and image 3 is at impact.
Note that I have drawn a blue line over his proximal right forearm and that blue line is straight-in-line with the middle of his right antecubital fossa. I have also drawn a red line over his lower radial bone in his lower right forearm. If the red line is rotated clockwise relative to the blue line, then his right forearm must be supinated.
Note that Steve Pratt's right forearm is supinated throughout his downswing action between P5.5 => P7, and he never pronates his right forearm during his late downswing action. So, when Steve Pratt states that he is simply performing a flap motion with his right arm/hand between P6 => P7 when he straightens both his right arm and right wrist, he is accurately describing the "feel" of the motion of his trail arm/wrist. In other words, Steve Pratt does not "feel" that he is performing a counterclockwise roll motion of the clubface in his late downswing between P6 => P7 because he does not "feel" that he is pronating his right forearm between P6 => P7. However, the true "real life" reality is that he is actually rolling his clubface closed relative to his clubhead arc by performing a PA#3 release action during his later downswing. Note that the back of his lead hand is parallel to his swingplane at P5.5 and it is then facing the target at impact, which means that he is rotating the back of his lead hand counterclockwise by >90 degrees between image 1 and image 3. Most of that counterclockwise rotation of the back of his flat lead wrist is due to lead forearm supination. Even if Steve Pratt is not consciously aware that he is rolling his clubface closed relative to his clubhead arc by performing a lead forearm supinatory motion during his late downswing action between P5.5 => P7 *it has to happen because he adopts a neutral-to-slightly strong lead hand grip strength at address. Steve Pratt seemingly believes that his clubface is staying square to the clubhead arc all the way between P6 => P7 when he supinates his lead forearm, but I think that his "belief" is factually incorrect because the clubface cannot be square to the clubhead arc at P6 if a golfer uses a weak-or-neutral lead hand grip strength and an intact LFFW/GFLW technique (like Tiger Woods, Adam Scott, Justin Rose and Henrik Stenson many other pro golfers) and where the intact LFFW/GFLW, and therefore the clubface, is parallel to the swingplane at P6.
(* I discussed the biomechanical method of how a pro golfer closes the clubface relative to the clubhead arc in great detail in topic number 4 of this downswing chapter and I provided a substantial amount of "evidence" that demonstrates that the clubface closes relative to the clubhead arc during the late downswing's PA#3 release action, which is secondary to lead forearm supination, and that the clubface does not remain square to the clubhead arc all the way between P6 => P7 when a golfer, who adopts a weak-or-neutral lead hand grip, performs a PA#3 release action).
Here is another Steve Pratt video - https://www.youtube.com/watch?v=4CxmsLQUy40&t=621s - where he claims that he is keeping the clubface square to the clubhead arc throughout his late downswing between P6 => P7.
Here are capture images from the video.
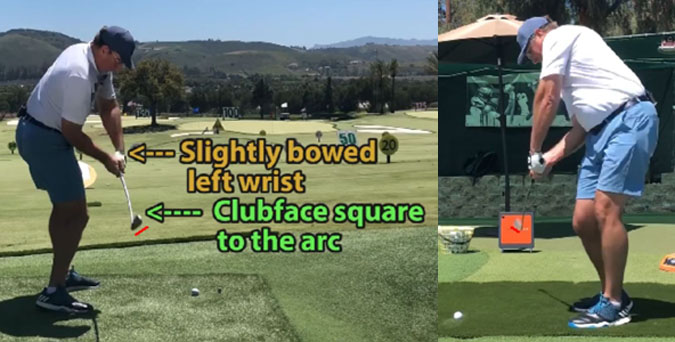
The left-sided image shows Steve Pratt at his P6 position. Note that he claims that his clubface is square to his clubhead arc at his P6 position. I disagree and I have drawn a short red line, which I believe is more truly perpendicular (square) to his clubhead arc. The difference in angle between his clubface and that red line is ~20-25 degrees. In fact, note that the only reason why his clubface is even tilted slightly forward at his P6 position is because his clubface is slightly closed relative to the back of his left hand, which is vertically-aligned at his P6 position. If he adopted a weak-to-neutral lead hand grip at address, where his clubface is not closed relative to the back of his lead hand at address, then his clubface would be more vertical at his P6 position if the back of his lead wrist/hand is vertical at his P6 position. Under those conditions, the clubface would definitely be significantly open, and not square, to the clubhead arc at the P6 position.
The right-sided image shows an upline view of Steve Pratt at about his P6.2 position. I have again drawn a short red line that I perceive is square to his clubhead arc, and the difference in angle between his clubface and that red line is ~20 degrees.
Here are capture images of Steve Pratt's driver swing action (which I captured from another Steve Pratt you-tube video).
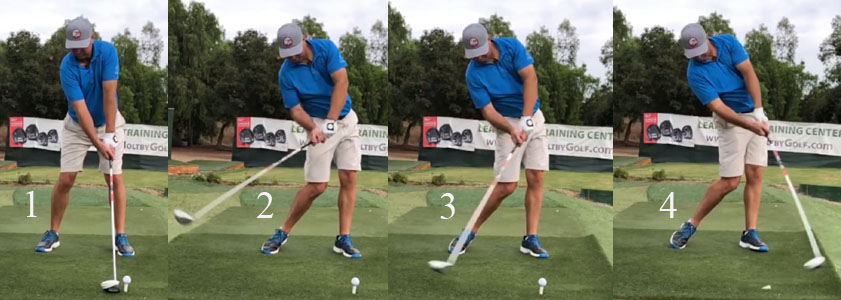
Image 1 shows Steve Pratt at address. Note that his clubface is facing the target, but it is slightly closed relative to the back of his left hand because he has adopted a neutral-to-slightly strong lead hand grip.
Image 2 is at his P6.3 position. Steve Pratt may claim that his clubface is square to his clubhead arc, but I suspect that it is open to his clubhead arc by ~20 degrees.
Image 3 is at his P6.6 position. Steve Pratt may claim that his clubface is square to his clubhead arc. However, I suspect that it is still 10 degrees open relative to his clubhead arc. His clubface is less open to his clubhead arc at P6.6 than it was at P6.3 because he has already started to release PA#3 - note that the back of his left hand is rotated more counterclockwise.
Image 4 is just passed impact (as there was no capture frame obtainable exactly at the moment of impact in this video). I would agree that his clubface is square to his clubhead arc at impact.
I believe that Steve Pratt's clubface is progressively closing relative to his clubhead arc between image 2 => image 4 because he is performing a PA#3 release action, which is biomechanically due to lead forearm supination, between P6.3 => P7.
What Steve Pratt also seemingly does not understand is that if his right palm is continuously parallel to his left palm between P6.3 => P7 in those above capture images, and if his lead palm is rotating counterclockwise by a large amount between P6.3 => P7, then his trail palm must be rotating by roughly the same amount in the same rotary direction. However, the trail palm's counterclockwise rotation is not due to a trail forearm pronatory motion, but it is primarily due to a trail wrist circumductory roll motion that happens when the trail wrist simultaneously palmar flexes and ulnar deviates during his trail wrist's straightening action that happens between P5.5 => P7. Many golf instructors are mentally unaware of the biomechanical phenomenon of a circumductory roll motion of the wrist, and they do not understand that it is possible to supinate the lead forearm during the late downswing in order to square the clubface by impact without having to pronate the trail forearm. Mike Austin was seemingly unaware of this biomechanical phenomenon - watch this Steve Pratt video at https://www.youtube.com/watch?v=x4JVm6s6EUo between the 2:57 - 3:38 minute time points of the video when Mike Austin demonstrates how he squares the clubface in his late downswing. Note that he states that he releases the club (representing the release of PA#2 in TGM terminology) in the plane of radial => ulnar deviation by applying push-pressure with his left thumb against the aft side of the grip and by applying push-pressure with the base of his right thenar eminence against PP#1, which is located over the base of his left thumb. However, he then states that he also has to rotate the clubshaft in a clubface-closing direction by using his forearm muscles, which have to rotate in a counterclockwise direction - being in a pronatory direction with respect to his trail forearm and being in a supinatory direction with respect to his lead forearm. Mike Austin's description is correct with respect to his lead forearm, but it is incorrect with respect to his trail forearm because he seemingly did not realise that *both forearms are simultaneously supinating between P5.5 => P6.5 in a pro golfer's late downswing.
( * I described the topic of dual forearm supination in topic number 8d of this downswing chapter)
There is a serious mental consequence secondary to the fact that the trail forearm does not pronate while the lead forearm supinates during the later downswing in a professional quality golf swing action, and that mental consequence leads golf instructors, who concentrate their mind on what the trail wrist is doing, to incorrectly believe that if they keep their trail wrist relatively square to their clubhead arc between P6 => P7 then that means that their clubface is not closing relative to their clubhead arc during that late downswing time period.
Mike Malaska is an example of a golf instructor, who manifests that "mental belief" phenomenon.
Watch this you-tube video - https://www.youtube.com/watch?v=jl3MPvgqUJY - produced by Mike Malaska.
In that video, Mike Malaska states that a golfer should think of his trail (right) wrist being continuously perpendicular to the swingarc throughout the entire downswing and early followthrough. The word "swingarc" refers to the movement of his right wrist along his right wrist's motional path during his downswing and early followthrough swing action and Mike Malaska thinks that if he keeps his right wrist at a right angle (perpendicular) to his swingarc throughout his entire downswing, then that means that his clubface must be square to his clubhead arc throughout his entire downswing.
To summarise his "beliefs" Mike Malaska featured the following text message at the end of his video.
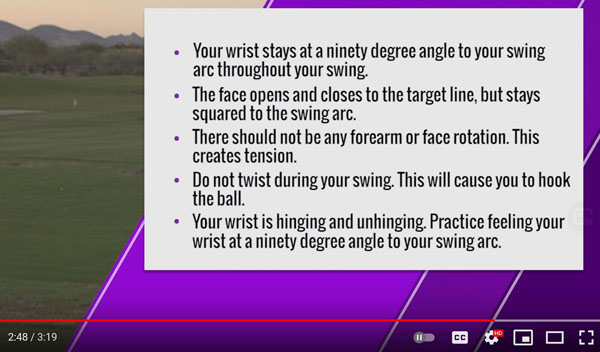
Note that Mike Malaska states that one should keep the right wrist at a 90 degree angle to the swingarc throughout the downswing. He then concludes that that it will cause the clubface to remain square to the clubhead arc throughout the right wrist's swingarc motion, and he also states that it means that there should be no forearm rotation during the downswing.
However, Mike Malaska is seemingly so focused on what his trail forearm/wrist is doing that he loses focus on what is really happening to the clubface during the downswing of a pro golfer's golf swing action.
Here is another Mike Malaska you-tube video - https://www.youtube.com/watch?v=_F875oDTqio - where he demonstrates how a tour pro golfer performs a golf swing action.
Watch the first 22 seconds of the video where Mike Malaska demonstrates how the arms go up in the backswing, and then go down in the downswing to get to impact with the clubface square to the clubhead arc and the target.
Here are capture images of the early-mid downswing's P4 => P6 time period.
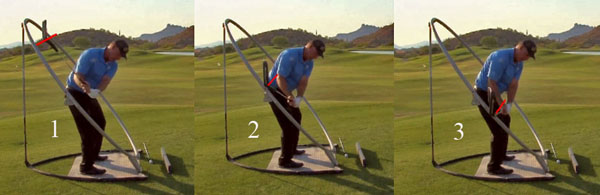
Note that Mike Malaska is using one those plastic clubhead arc training aids which help a golfer to mentally visualise the clubhead path during the downswing action. Note that Mike Malaska is using a training club with a large clubface that helps one to visualise what the clubface is doing during the downswing. Note that Mike Malaska adopts a neutral lead hand grip where the clubface is minimally closed relative to the back of his lead hand (which he keeps geometrically flat) throughout his entire downswing action.
Image 1 is at his P5.2 position. I have drawn a short red line that is perpendicular to the clubhead arc. Note that his clubface is wide open to his clubhead arc.
Image 2 is at his P5.5 position. I have drawn a short red line that is perpendicular to the clubhead arc. Note that his clubface is still wide open to his clubhead arc.
Image 3 is at his P6 position. I have drawn a short red line that is perpendicular to the clubhead arc. Note that his clubface is still open to his clubhead arc, but to a slightly lesser degree compared to image 1. Note that his clubface is vertical (and roughly parallel to the back of his lead hand, which is vertically-aligned) and that the toe of his clubface is pointing straight upwards towards the sky.
Here are capture images of his late downswing's P6 => P7 time period.
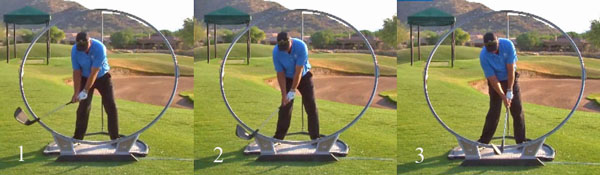
Image 1 is at his P6.3 position. Note that his clubface is significantly facing the camera, which means that his clubface must be significantly open relative to his clubhead arc.
Image 3 is at his P6.5 position. Note that his clubface is closing more relative to his clubhead arc, but it is obviously still not square to his clubhead arc.
Image 3 is at impact. Note that his clubface is square to his clubhead arc and also the target.
Note that his clubface rotated a large amount counterclockwise between P6 => impact, and that the degree of counterclockwise rotation of his clubface is roughly proportional to the amount of counterclockwise rotation of the back of his lead hand that is happening between P6 => P7, and which is biomechanically due to a lead forearm supinatory motion (which is a lead forearm rotary motion).
Note that Mike Malaska's right forearm does not appear to be pronating between P6 => P7 and note that his right wrist appears to continuously be at a right angle (perpendicular) relative to his clubhead arc between P6 => P7. However, the fact that he keeps his right wrist continuously perpendicular to his right wrist's motional swingarc between P6 => P7 does not mean that the clubface is square to the clubhead arc between P6 => P7. It is frankly obvious that his clubface is progressively rotating closed relative to the clubhead arc between P6 => P7 due a PA#3 release action, which is biomechanically due to a lead forearm supinatory motion!
Topic number 8f: How does one decide whether the clubface is too open during the early-mid downswing time period?
Many golf instructors state that is a major swing fault to have the clubface too open during the early-mid downswing time period, and they recommend that a golfer close the clubface more during the early-mid downswing time period so that the golfer can arrive at the P5.5 position with a clubface that is less open.
What is the definition of a clubface that is too open at the P5.5 position?
Golf instructors are often very vague about their definition of an open clubface and they often refer to its visual appearance relative to the horizon (ground) or relative to an imaginary clubhead arc. Mike Malaska is a good example of a golf instructor who wants to teach his student-golfers (who use a weak-or-neutral lead hand grip strength) to avoid having a clubface that is too open at the P5.5 position because he believes that it will necessitate a forearm rotation during the later downswing in order to close the clubface so that the clubface can become square to the target by impact. Mike Malaska wrongheadedly believes that he can avoid performing any counterclockwise lead forearm rotation during the later downswing and that he can keep the clubface square to the clubhead arc all the way between P6 => P7 if his clubface is not too open at his P5.5/P6 position. He believes that if a golfer keeps his right forearm from pronating during the downswing so that his right wrist remains perpendicular to its hand arc path between P6 => P7, that it indubitably means that his clubface must automatically/naturally be square to the clubhead arc between P6 => P7. However, I clearly demonstrated in topic number 8e that it is a fallacy to believe that one can avoid performing a PA#3 release action (which is biomechanically due to lead forearm supination) in the later downswing if one adopts a weak-or-neutral lead hand grip strength at address, and if one performs a golf swing action like a pro golfer.
Here again are capture images showing Mike Malaska performing a simulated full golf swing action like a tour pro golfer in slow motion using a neutral lead hand grip.
If one looks at image 2 (P5.5 position) and image 3 (P6 position) you will note that his clubface is open relative to his clubhead arc and it is not square to his clubhead arc (where square is represented by the red line). It is easy to make that determination because one can use that plastic frame's clubhead arc ring as a reference point.
However, how does one make that determination when simply looking at DTL capture images of a pro golfer?
Here are capture images from Mike Malaska's "real life" golf swing action - captured from one of his swing videos.
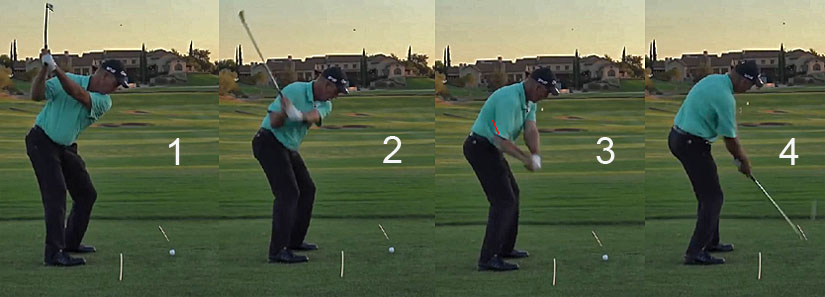
Image 1 is at his P4 position, image 2 is at his P5 position, image 3 is at his P5.5 position and image 4 is at impact.
Note that I have drawn a short red line parallel to his clubface in image 3 when he is at his P5.5 position. Is his clubface open at his P5.5 position and is it too open?
To answer that question in a rational manner, you have to first establish a reference point that you use to make that determination. What are you using as a reference point when deciding whether his clubface is open, and then secondarily deciding whether it is reasonably open or far too open?
Most golfers simply look at the clubface relative to the horizon (ground) when deciding whether the clubface is open or square at the P5.5 position.
So, consider these capture images of Mike Malaska demonstrating his "Malaska Move" type of golf swing action in simulated slow motion.
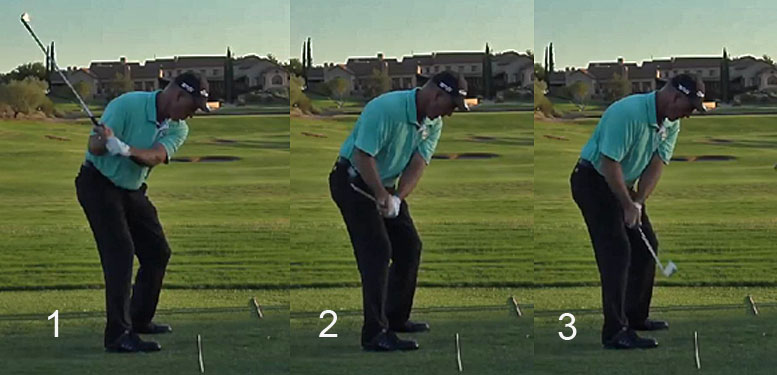
Image 2 is at a simulated P5.5 position. Note that his clubface is much more vertical (tilted more forward in the direction of the ball-target line) than it is in image 3 of his "real life" golf swing action. What is causing this difference in clubface angle?
To answer that question in a rational manner one has to consider a number of factors that could determine his clubface angle at his P5.5 position?
Here is how I approach the evaluation of the clubface angle to determine whether it is too open during the early-mid downswing?
The first factor that I consider is whether the golfer adopts a weak, or neutral or strong lead hand grip strength at address. If a golfer adopts a weak lead hand grip strength at address and maintains an intact LFFW/GFLW alignment during his backswing and downswing, then his clubface should be roughly parallel to the watchface area on the back of his lead forearm at all times if he does not bow/cup his lead wrist and therefore disrupt his intact LFFW/GFLW alignment during his backswing-and-downswing golf swing action. If a golfer adopts a neutral lead hand grip strength at address, then the clubface will be marginally more closed (but only by 5 - 10 degrees) relative to the watchface area of his lead lower forearm at all times during his backswing/downswing if he maintains an intact LFFW/GFLW alignment.
A good position to make one's first evaluation is to look at a golfer's clubface at the P4 position.
Consider yet again these capture images of Mike Malaska's "real life" golf swing action.
Image 1 is at his P4 position, image 2 is at his P5 position, image 3 is at his P5.5 position and image 4 is at impact.
Image 1 is at his P4 position - note that Mike Malaska's lead lower forearm and clubshaft are in a straight line relationship and that his clubface appears to be roughly parallel to the watchface area of his lead lower forearm. That parallel alignment suggests an intact LFFW/GFLW alignment using a weak-to-neutral lead hand grip strength. The angle of his clubface relative to the horizon is equal to the angle of his lead forearm relative to the horizon. If his lead forearm was angled at a steeper angle than his shoulder turn angle, then his clubface would be steeper and more vertically-aligned and if his lead forearm was angled at a less steep angle than his shoulder turn angle then his clubface would become more horizontally-aligned. However, they would both be equally neutral relative to his lead forearm if he has a neutral lead hand grip strength and an intact LFFW/GFLW alignment. In other words, the difference in the degree of clubface alignment relative to the horizon at a pro golfer's P4 position would only be due to a greater degree of lead forearm pronation happening when the lead arm is positioned at a different angle relative to the ground when the lead arm is positioned below the shoulder turn angle at the P4 position - compared to an end-backswing scenario when the lead forearm is positioned above the shoulder turn angle at the P4 position. In both scenarios, the clubface is open relative to the clubhead arc in direct proportion to the amount of lead forearm pronation that happened between the P1 position => P4 position.
Note that Mike Malaska is shallowing his clubshaft between P4 => P5 and then even to a greater degree between P5 => P5.5. When he shallows his clubshaft, Mike Malaska maintains an intact LFFW/GFLW alignment so that his clubface remains straight-in-line (parallel) to both the back of his GFLW and the watchface area of his lead lower forearm. His clubface appears to be tilted back (away from the ball-target line), and it is flatter than vertical, at his P5.5 position, and it appears to be very open relative to his imaginary clubhead arc. Most importantly, the degree that his clubface is tilted back (relative to a vertical alignment) is directly proportional to the degree that he is pronating his lead forearm as he lowers his left arm between P4 => P5.5. Can his clubface be deemed to be too open (too tilted back) at his P5.5 position? I believe that it is only possible if he over-pronates his lead forearm so that an imaginary line drawn out from the butt end of his club points outside the ball-target line, thereby reflecting an underplane clubshaft. If that imaginary line extended out from the butt end of his club points at the ball-target line at his P5.5 position, then his clubshaft is "on-plane" and the clubface cannot be deemed to be too open even it is tilted far back.
Consider this capture image of Sergio Garcia at his P5.5 position.
The red splined path is his hand arc path.
Note that Sergio Garcia's clubface is even more tilted back than Mike Malaska's clubface at his P5.5 position. One could incorrectly conclude that his clubface is too open, but that would be an incorrect assessment because it is only due to the fact that his lead forearm is more pronated at his P5.5 position - note that he has an intact LFFW/GFLW alignment, but his intact LFFW is positioned on a flatter plane because he shallowed his clubshaft down to the hand plane by P5.5 while Mike Malaska only shallowed his clubshaft down to the elbow plane by P5.5. In other words, if the clubshaft is still "on-plane" at the P5.5 position, then the clubface cannot be deemed to be too open at the P5.5 position if the golfer still has an intact LFFW/GFLW alignment where the clubface is still parallel to the back of the GFLW and the watchface area of the lead lower forearm.
Now, let's re-evaluate these capture images of Mike Malaska's simulated downswing action when he demonstrates his "Malaska Move" maneuver.
Image 1 is at the P5 position. Note that he has an intact LFFW/GFLW alignment and that his clubshaft is "on-plane". Note that the clubface is straight-in-line (parallel) to the back of his GFLW and also the watchface area of his lead lower forearm - because he adopted a neutral lead hand grip strength at address. Note that the clubface is open to an imaginary clubhead arc because he pronated his lead forearm to get the clubshaft to lie parallel to his desired swingplane.
Image 2 is at a simulated P5.5 position. Note that his clubface is minimally tilted back and it is not tilted as far back as his clubface seen in his "real life" golf swing action at the same P5.5 position. What is causing this difference? Note that Mike Malaska is prematurely supinating his lead forearm in a counterclockwise rotary direction and that causes the back of his lead hand (which was parallel to the swingplane in image 1) to become more vertically-oriented. That "Malaska Move" maneuver of premature lead forearm supination causes his clubshaft to steepen and move off-plane in an over-the-plane manner.
Image 3 is at a simulated P6 position - note that he "tumbled" his clubshaft in an over-the-plane manner between P5.5 => P6 so that his clubhead is now closer to the ball-target line than his hands. Note that his clubface is tilted slightly towards the ground at his P6 position and his right hand is positioned partially on top of his club handle. However, that type of over-the-plane "tumbling" maneuver does not happen in Mike Malaska's "real life" golf swing action - as seen above!
Here is another set of capture images of Mike Malaska's "real life" golf swing action (captured from another example of his "real life" golf swing action).
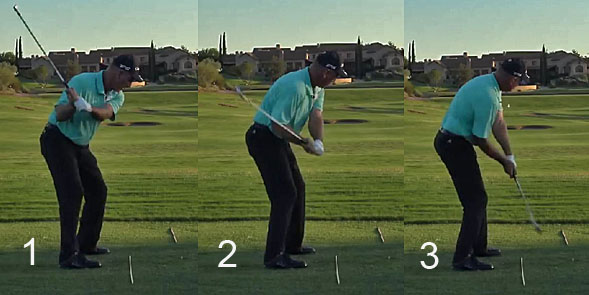
Image 1 is at his P5 position. Note that he has an intact LFFW/GFLW alignment and that his clubshaft is "on-plane". Note that his clubface is straight-in-line (parallel) with the back of his GFLW and the watchface area of his lead lower forearm, and they are all parallel to his swingplane.
Image 2 is at his P5.5 position. Note that he has shallowed his clubshaft between P5 => P5.5 while maintaining an intact LFFW/GFLW alignment and that his i) clubface, ii) back of his GFLW and the iii) watchface area on the back of his lead lower forearm are all parallel to that shallower swingplane. Note that his clubface is tilted far back and it is still wide open to his imaginary clubhead arc. However, his clubface cannot be deemed to be too open because it is parallel to his swingplane (which is expected if his intact LFFW is lying on that particular swingplane and he has a neutral lead hand grip strength), and if his clubshaft is simultaneously "on-plane" (and not underplane).
Image 3 is at his P6 position. Note that the toe of his clubface is pointing straight upwards and it is not tilted groundwards (as seen in his simulated "Malaska Move" capture images).
Note that his right palm is under the club handle at his P5.5 and P6 positions, and it does not get partially on top of his club handle.
If you consider the position of Mike Malaska's clubface at his P5.5 position (where it is tilted far back) and at his P6 position (where it is near-vertical), I do not think that it is rational to label his clubface as being too open. In fact, they are angled exactly where one would expect them to be angled if a pro golfer uses i) a weak-or-neutral lead hand grip strength and ii) an intact LFFW/GFLW alignment golf swing technique and iii) if he keeps his clubshaft continuously "on-plane" during the entire downswing action and if iv) he shallows his clubshaft down to approximately the elbow plane by P5.5. To prove that point, consider the following capture images of other pro golfers who use a i) weak-or-neutral lead hand grip strength and ii) an intact LFFW/GFLW golf swing technique and who iii) keep their clubshaft continuously "on-plane" during their entire downswing.
Henrik Stenson's early-mid downswing action.
Henrik Stenson uses a neutral lead hand grip strength combined with an intact LFFW/GFLW golf swing technique and he keeps his clubshaft continuously "on-plane" during his entire downswing action.
Image 3 is at his P5.5 position - note that his clubface is tilted far back, but it is still roughly parallel to his swingplane.
Image 4 is just bypassing his P6 position - note that his clubface is near-vertical and the toe of his club is pointing straight upwards.
Justin Rose's early-mid downswing action.

Justin Rose uses a neutral lead hand grip strength combined with an intact LFFW/GFLW golf swing technique and he keeps his clubshaft continuously "on-plane" during his entire downswing action.
Image 3 is at his P5.5 position - note that his clubface is tilted far back, but it is still roughly parallel to his swingplane.
Image 4 is at his P6 position - note that his clubface is near-vertical and the toe of his club is pointing straight upwards.
Tiger Woods' early-mid downswing action
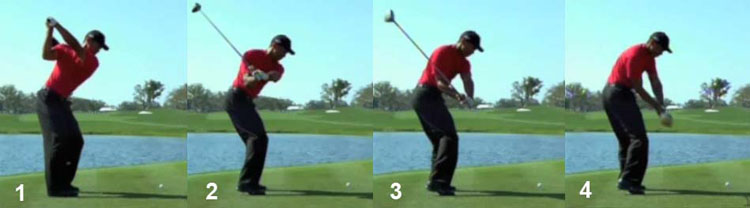
Tiger Woods uses a weak lead hand grip strength (in this swing action) combined with an intact LFFW/GFLW golf swing technique and he keeps his clubshaft continuously "on-plane" during his entire downswing action.
Image 3 is at his P5.5. position - note that his clubface is tilted far back, but it is still roughly parallel to his swingplane.
Image 4 is at his P6 position - note that his clubface is near-vertical and the toe of his club is pointing straight upwards.
Adam Scott's early-mid downswing action.
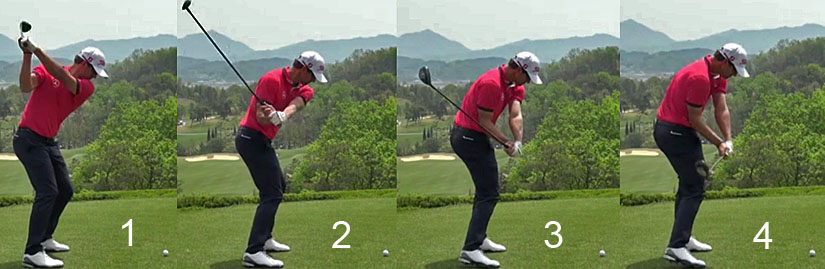
Adam Scott uses a neutral-to-borderline strong lead hand grip strength combined with an intact LFFW/GFLW golf swing technique and he keeps his clubshaft continuously "on-plane" during his entire downswing action.
Image 3 is at his P5.5. position - note that his clubface is tilted far back, but it is still roughly parallel to his swingplane. His clubface is slightly more closed relative to the watchface area of his lead lower forearm (and clubhead arc) than the clubface of Henrik Stenson, Justin Rose and Tiger Woods at their respective P5.5 positions, but that is only because he adopts a slightly strong lead hand strength at address, which causes the clubface to be slightly closed relative to the back of his lead hand at address. Another additional biomechanical factor that causes Adam Scott's clubface to be marginally closed relative to the watchface area of his lead lower forearm at the P5.5 and P6 positions is the fact that he bows his lead wrist by a very small amount, starting at the P4 position.
Image 4 is at his P6 position - note that his clubface is near-vertical and the toe of his club is pointing straight upwards.
There are some golf instructors (like Mike Malaska) who state that if the clubface is tilted far back (away from the ball-target line) at the P5.5 position that the clubface is too open and that it will necessitate a supinatory motion (counterclockwise rotary motion) of the lead forearm during the later downswing in order to get the clubface square to the clubhead arc (and target) by impact.
That assertion about the necessity of a lead forearm supinatory motion is obviously true! However, it is a biomechanically natural phenomenon for a pro golfer to need to execute a lead forearm supinatory motion during the later downswing, and that biomechanical necessity does not necessarily mean that his clubface was too open at his P5.5 position.
If a golfer adopts a weak-or-neutral lead hand grip strength at address, then he should expect to have to pronate his lead forearm during his backswing action in order to get his clubshaft to his desired end-backswing position, and he should expect to have to reverse the process by performing a lead forearm supinatory motion during his late downswing.
Jon Sinclair has performed 3D studies on >100 pro golfers and here is a copy of an image that he features in his "Wrist Angles Video", where he plots his lead forearm pronation/supination results.
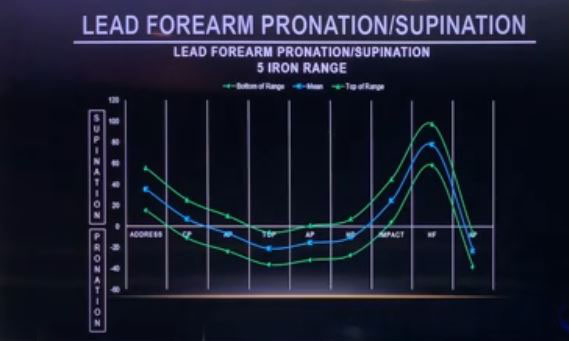
"Address" is the P1 position, "top" is the P4 position, "AP" is the P5 position, "MD" is the P6 position, and "impact" is the P7 position.
The blue graph is his mean value, and the two green graphs show the outer range limits of one standard deviation (representing ~67% of all of the golfers in his study group).
Note that the pro golfers have a slightly supinated lead forearm at address, and that they all pronate their lead forearm during their backswing action between P1 => P4. Note that all the pro golfers supinate their lead forearm to a marked degree in their late downswing between P6 => P7. It is a naturally expected biomechanical phenomenon, which must happen in the late downswing in order for a golfer to square the clubface relative to his clubhead arc by impact.
If a student-golfer chooses to play golf with a weak-or-neutral lead hand grip, and an intact LFFW/GFLW golf swing technique where he keeps his clubshaft continuously "on-plane" between P4 => P7, then he should automatically/naturally expect to have a very open (tilted-back) clubface at his P5.5 position, and he should automatically/naturally expect to have to use a significant amount of lead forearm supination during his later downswing in order to get a square clubface by impact. If the student-golfer wants to reduce the amount of lead forearm supination required between P5.5 => P7, then he should consider adopting a very strong lead hand grip strength at address because the amount of lead forearm supination required between P5.5 => P7 is inversely proportional to lead hand grip strength.
Topic number 8g: Should the trail humerus externally rotate during the early-mid downswing?
I have repeatedly emphasized the fact that I believe that a golfer, who wants to perform a TGM swinging technique during his early-mid downswing, should actively adduct the right upper arm towards the right side of the torso during the early-mid downswing while using a pitch elbow motion. When performing a pitch elbow motion, the right elbow should lead the right hand so that it is closer to the target than the right hand between P4 => P5.5. I have also stated that a golfer should avoid internally rotating the right humerus during that time period because it would result in a punch elbow motion where the right hand prematurely bypasses the right elbow. An interesting question arises about the precise biomechanical performance of a pitch elbow motion of the trail arm during a TGM swinging (lead arm swinging) action's trail arm adduction maneuver - should the trail humerus be neutral or externally rotated during the active trail arm adduction maneuver?
Milo Lines, a golf instructor in Arizona, believes that the right arm should not become externally rotated during the early-mid downswing time period and he expressed his opinions in a BeBetterGolf you-tube video - https://www.youtube.com/watch?v=0CDi7dUiulU&t=18s - that he did with Brendon Devore. Between the 1:15 - 2:40 minute time points of the video, Milo Lines describes how his trail arm moves in his personal golf swing action. He states that his right humerus is slightly internally rotated at his P4 position and that it moves in the direction of external rotation during his early-mid downswing, but that it never frankly becomes externally rotated by his P6 position. In other words, it must be relatively neutral during the early-mid downswing time period. What represents a neutral right humerus?
Here are capture images from that BeBetterGolf video showing Milo Lines demonstrating the biomechanical condition of internal, and external, rotation of his right humerus.
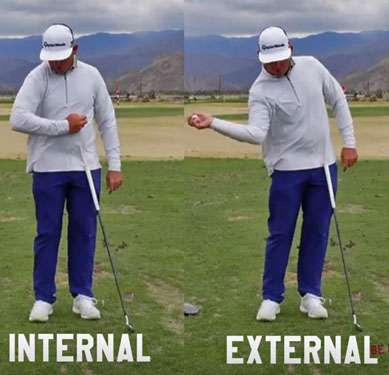
Imagine standing like Milo Lines with your right upper arm vertical so that the right elbow is vertically below the right shoulder socket while your right elbow is bent ~90 degrees. If the right humerus is internally rotated, then the right hand would be closer to the target than the right elbow. If the right humerus is externally rotated, then the right hand is further away from the target than the right elbow. Although he does not demonstrate the neutral position in the video, common sense dictates that it must be half-way between internal rotation and external rotation, which means that the right hand would be the same distance from the target as the right elbow. In other words, expressed differently, the right hand and right elbow and right shoulder socket would be straight-line-aligned in a vertical plane that is perpendicular to the front of his torso when viewed from a face-on viewing perspective if the right humerus is in a neutral position.
In the BeBetterGolf video, there is an added video of a pro golfer, Patrick Cantlay, who is presumably keeping his right humerus relatively neutral between his P4 position and his P6 position.
Here are capture images from the BeBetterGolf video of Patrick Cantlay's early-mid downswing action.
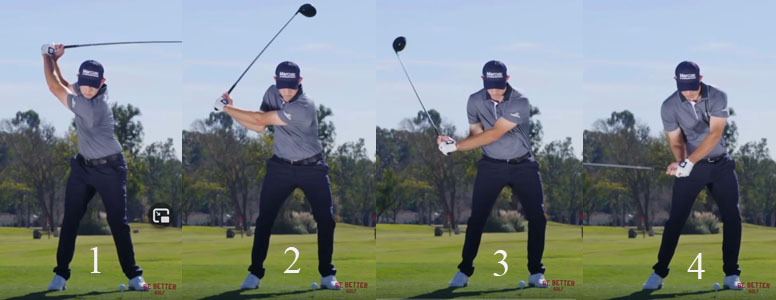
Image 1 is at the P4 position, image 2 is at the P5 position, image 3 is at the P5.5 position and image 4 is at the P6 position.
I strongly suspect that his right humerus is very close to neutral at his P4 position - when viewed from a DTL viewing perspective where the viewing observer is observing the golfer from a position that is roughly perpendicular to the golfer's upper chest between his two shoulder sockets.
Note that the golfer is adducting his right humerus between his P4 position and his P6 position so that his right upper arm becomes fully adducted against the right side of his torso by the P6 position. Note that his right humerus appears to be neutral at his P6 position where he still has maintained a ~90 degree right elbow bend angle - note that his right shoulder socket, right elbow and right hand are vertically aligned and equidistant from the target. It is easy to make this estimation of right humeral neutrality at his P6 position because his upper torso is facing the camera.
However, it is not easy to decide whether the right humerus is neutral at his P5 position (image 2) and P6.5 position (image 3) because the upper torso is angled relative to the camera in these 2D capture images. It would be very useful to have definitive 3D data to answer this question, but I know of no golf researcher who has conclusively studied this issue using markers correctly placed on the right humerus and right antecubital fossa. In the absence of accurate 3D data, my personal visual impression is that his right humerus likely remains neutral during his P4 => P6 time period.
I have examined a fair number of swing videos of pro golfers and I can concur with Milo Lines' generic opinion that the right humerus likely remains neutral during the right arm adduction maneuver that happens between P4 => P6 in most pro golfers.
Here is an example of a pro golfer - featuring Rory McIlroy - who seems to keep his right humerus neutral during his right arm adduction maneuver.
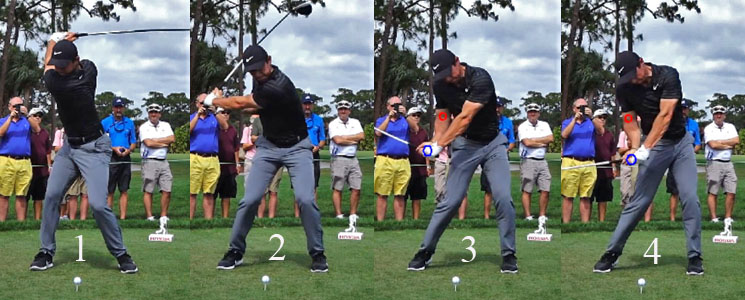
Image 1 is at the P4 position, image 2 is at the P5 position, image 3 is at the P5.5 position and image 4 is at the P6 position.
Note that Rory McIlroy actively adducts his right upper arm towards the right side of his torso between P4 => P6 and his right elbow gets very close to the right side of his mid torso by his P6 position. At his P6 position (image 4), his right elbow's antecubital fossa (see small red circular marker) is vertically straight-in-line with his right shoulder socket and his right hand (see small blue circular marker) is vertically aligned with his right elbow and right shoulder socket. Note that his right elbow and right hand are equidistant from the target in image 4 suggesting a *relatively neutral right humerus alignment.
(* I bold-highlighted the word "relatively" because his upper torso is slightly closed relative to the ball-target line, and his right humerus may actually be internally rotated to a very small degree. However, if his right scapula is very protracted it can allow the right shoulder socket to be significantly more square to the ball-target line than the upper torso)
At his P5.5 position, his right hand is further away from the target than his right elbow suggesting the possibility that his right humerus is externally rotated to a small degree, but that impression could be an artifactual visual impression due to the fact that his upper torso is even less perpendicular to the face-on camera at his P5.5 position. In the absence of definitive 3D data, I would tend to agree with an opinion that Rory McIlroy keeps his right humerus relatively neutral during his right arm adduction maneuver between P4 => P6. There is definitely no strong visual evidence suggesting that he is externally rotating his right humerus during his right arm adduction maneuver.
Pro golfers vary with respect to how fast they adduct their right upper arm towards the right side of their mid-upper torso during the early downswing and they also vary with respect to where their right elbow ends up at the P6 position. Some pro golfers adduct their right arm very fast during their early-mid downswing and they get their right elbow to bypass the outer border of their mid-torso by P6 so that their right upper arm is angled towards the target at P6 (which causes the right elbow to be closer to the target than their right shoulder socket).
Consider two examples of pro golfers - Tony Finau and Brooks Koepka - who manifest this pattern.
Capture images of Tony Finau (image 1) and Brooks Koepka (image 2) at their P6 position.
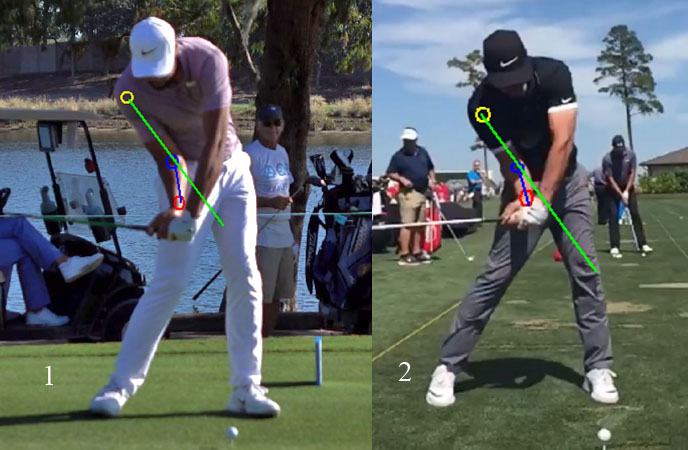
I have placed a small yellow circular marker over their trail shoulder's position. I have placed a small blue circular marker over their trail elbow's antecubital fossa. I have drawn a green line between those two markers and I have extended that line groundwards. If the lead humerus is neutral, then the trail forearm should lie on that extended green line. I have drawn a small red marker over the center of the peripheral end of their trail forearm. I have drawn a blue line down the longitudinal axis of their trail forearm between the small blue circular marker and the small red circular marker. The angle between the blue line and the green line reflects the magnitude of their degree of external rotation of their trail humerus at their P6 position.
Milo Lines also has a very efficient right arm adduction maneuver and his right upper arm is also angled targetwards at his P5.5 and P6 positions.
Here are capture images of Milo Lines' right arm adduction maneuver.
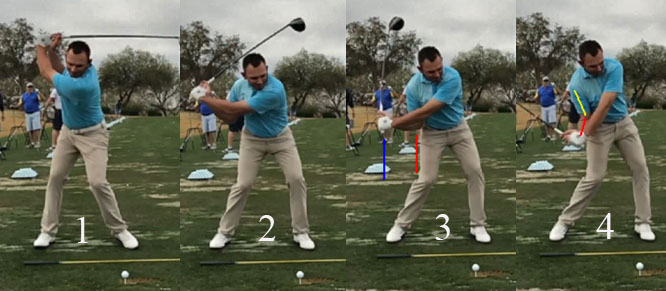
Image 1 is the P4 position, image 2 is at the P5 position, image 3 is at the P5.2 position and image 4 is at the P5.5 position.
Note that his right elbow is already adducted against the right side of his torso at P5.2 (image 3), but his right hand is much further away from the target than his right elbow, which suggests that his right humerus could be externally rotated to a small degree. However, his upper torso is closed relative to the ball-target line and his right humerus may actually be neutral when viewed from an angle that is perpendicular to his upper torso.
Note that his right upper arm is adducted so much at P5.5 (image 4) that his right elbow is significantly closer to the target than his right shoulder socket because his right upper arm (yellow line) is angled targetwards. Note that his right elbow is closer to the target than his right hand and his right forearm (red line) is angled away from the target, which suggests that his *right humerus is externally rotated to a small degree.
(* Note that his upper torso is reasonably square to the ball-target line at P5.5 so the problem with parallax error distortion is small)
If I am correct to suspect that Milo Lines' right humerus is externally rotated to a small degree at P5.5 due to a super-efficient right arm adduction maneuver that is combined with a pitch elbow motion, then some golfers may think that it will cause the clubhead arc to become too narrow between P5 => P5.5. However, I think that it is very unlikely because he retains his right elbow bend angle all the way to P5.5 - note that his right forearm is nearly horizontal at P5.2 (image 3) and that his right hand (see short vertical blue line) is much further away from the target than his right elbow (see short red line). I don't believe that his hand arc path is too narrow between P5 - P5.5, and I think that *his hand arc path must optimally become slightly narrower between P5 => P5.5 in order to allow the right hand's couple torque to start to diminish between P5 => P5.5 so that it can become negative after P5.5.
(* see this subsection of this downswing chapter if you cannot understand the relationship between the shape of the hand arc path and the magnitude of the right hand's hand couple torque)
Some golfers may also be concerned that getting the right elbow in front of the right hip area at P6 (like Milo Lines) will not give them enough time to complete their release of PA#2 by impact. However, I don't think that's a likely problem if the right hand bypasses the right elbow between P5.5 => P6.2.
Capture images of Milo Lines' late downswing action.
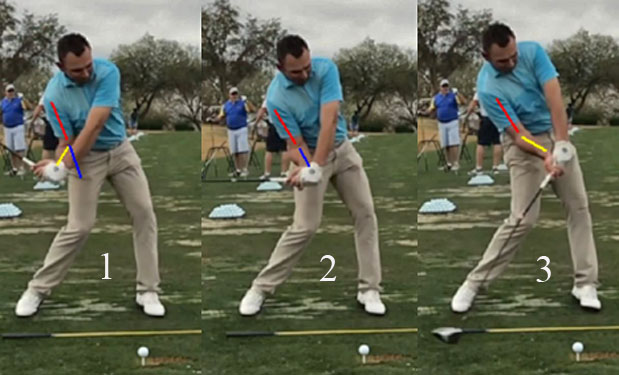
Image 1 is the P5.5 position, image 2 is the P6 position and image 3 is the P6.5 position.
Note that his right upper arm (red line) is angled towards the target at his P5.5 position (image 1) and that his right forearm (yellow line) is angled away from the target. The short blue line is an imaginary line that is straight-in-line with the red line and the angle between the blue line and the yellow line suggests that his right humerus is externally rotated to a small degree at his P5.5 position.
Note that his right upper arm (red line) is straight-in-line with his right forearm (blue line) at his P6 position (image 2), and that his right hand is starting to get closer to the target than his right elbow as he starts to release PA#2.
Note that he is efficiently releasing PA#2 between P6 (image 2) and P6.5 (image 3) as he increasingly straightens his right arm.
It appears to me that Milo Lines' right humerus is moving from being externally rotated to a very small degree at P5.5 (image 1) to becoming neutral by P6 (image 2) and then becoming internally rotated to a very small degree by P6.5 (image 3).
Some golfers try to get their right elbow far ahead of their right hip area before they start to straighten their right arm in order to generate a late hit (late release of PA#2).
Here is a link to a you-tube video - https://www.youtube.com/watch?v=w-qnus2yIS0 - where the golf instructor, Russell Heritage, is teaching the very flexible amateur golfer (named George) how to execute a late hit maneuver.
Here is a capture image of George practicing a late hit maneuver.
Note how far George is driving his right elbow towards the target, which requires an inordinate amount of right upper arm adduction combined with external rotation of his right humerus. Note that his right elbow is closer to the target than his right hand, and it is very close to his ball position.
I agree with Milo Lines that this type of late hit maneuver is a very undesirable maneuver and I would never recommend that a golfer attempt to perform a late hit maneuver in order to generate a later release of PA#2. I think that one should optimally start to release PA#2 before P6 - as seen in the golf swings of Tony Finau, Brooks Koepka and Milo Lines, who are perfect role models for an aspiring pro golfer.
Consider these DTL capture images of Milo Lines driver golf swing action.
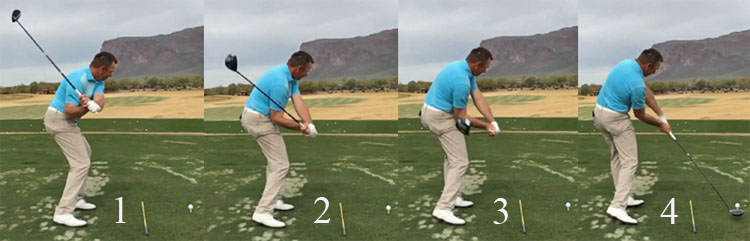
Image 1 at his P5 position, image 2 is at his P5.5 position, image 3 is near his P6 position and image 4 is at impact.
Note how Milo Lines is shallowing his clubshaft during his early-mid downswing. I believe that the clubshaft shallowing phenomenon (with respect to the involvement of the right arm) is primarily due to the combination of a right upper arm adduction maneuver using a pitch elbow motion + a right forearm supination phenomenon. It is not only due to a right forearm supination phenomenon and the right upper arm must be simultaneously adducting so that the hands can progressively move further down the hand arc path between P4 => P6 while the right forearm is progressively supinating.
In the BeBetterGolf video - https://www.youtube.com/watch?v=0CDi7dUiulU&t=710s - Brendon and Milo discuss the biomechanics of the clubshaft shallowing action between the 4:40 - 6:20 minute time points of the video. Brendon asks Milo how he shallows the clubshaft in his personal golf swing action, and Milo states that it happens naturally/passively. With respect to how it happens in other pro golfers, Milo states that they simply get their arm structure set at their P4 position and that they then "let nature takes its course". I think that this comment is not helpful from a golf instructional perspective because a student-golfer does not necessarily know how to "let nature takes its course" so that the right arm's motion during the clubshaft shallowing action can happen automatically/naturally in an optimal manner. However, I do agree with another opinion expressed by Milo Lines, who stated that a student-golfer must realise that he may have to learn how to actively perform a right upper arm adduction maneuver combined with a pitch elbow motion, which necessitates an increasing degree of right forearm supination, during the P4 => P6 time period if it does not happen naturally; and he must also learn how to avoid internally rotating the right humerus and pronating his right forearm, which will produce a punch elbow motion and not a pitch elbow motion.
Topic number 8h: How to mentally envisage performing a right arm throw motion during the later downswing and early followthrough time period - when executing a TGM swinging action.
In the previous subtopic number 8g I referred to a BeBetterGolf video - https://www.youtube.com/watch?v=0CDi7dUiulU&t=18 - where Brendon Devore and Milo Lines talked about the topic of external rotation of the right humerus during the early-mid downswing action. In that video, they also talked about how to mentally envisage performing a right arm throw motion during the later downswing. Brendon Devore, who has interviewed many golf instructors for his BeBetterGolf video series, stated at the beginning of the video that many golf instructors have advised him to think of performing a "stone skipping" type of right arm throw motion where the right elbow leads the hand and where the throw motion is performed in an underhand (and not an overhand) manner. He then demonstrated the right arm throw motion where he threw a golf ball at an imaginary ball position in front of his feet. I agree with the mental idea of thinking of the right arm motion in a full golf swing action as being similar to an underhand "stone skipping" type of throw motion, but the imaginary target should not be the ground in front of one's feet. I think that it is better to think of the target being far away from the golfer and one should think of throwing the right hand towards that distant target. One potentially useful mental image for some student-golfers could be thinking of performing the right arm throw motion in a way suggested by Ben Hogan, who used the analogy of the "two-handed basketball pass from the right side" type of throw motion.
Here is a copy of an image from Ben Hogan's "Five Lessons" book showing the "two-handed basketball pass" throw concept.
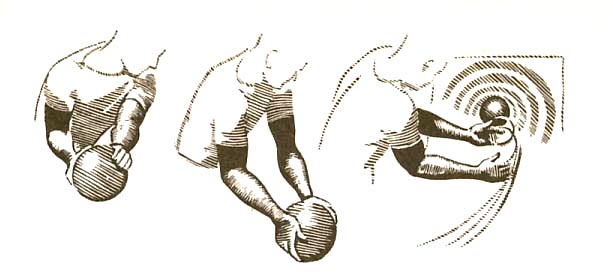
When performing a two-handed basketball pass from the right side towards a distant target, one could imagine that most of the throw power would be generated by the right arm/hand while the left arm/hand would be mainly helping to steady the ball during the throw motion. However, in a TGM swinging type of throw action where one can mentally envisage throwing the golf club handle (instead of a basketball) most of the power throwing the club handle should come from the lead arm/hand (secondary to a pivot-induced release of PA#4) and not the trail arm/hand. Therefore, I suggest that you should mentally think of a modified two-handed basketball throw motion where there is a handle attached to the front of the ball and where one can slip one's lead hand under that handle.
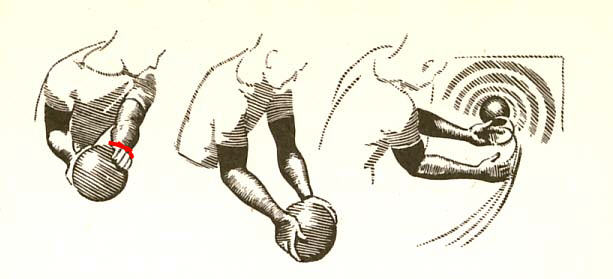
Note that I have modified Ben Hogan's image by drawing a red handle attached to the front of the ball, and where the lead hand can be positioned under that handle. Then, one could imagine throwing the ball mainly with power being generated by the left arm/hand (like throwing a frisbee with the lead arm in a back-handed manner where much of the left arm speed is due to an efficient pivot action). The right arm throw motion would then be designed to keep up with the throw motion of the left arm/hand so that the two hands can be moving at the same speed. In that image above, the ball is released before both arms are fully straight. However, a better mental image scenario would be a two-handed ball throwing motion where the end point of the throw motion is a mental image scenario where both arms become fully straight about 45+ angular degrees ahead of the body.
Keep that mental image scenario in mind when looking at the following series of capture images of Milo Lines' driver swing action.
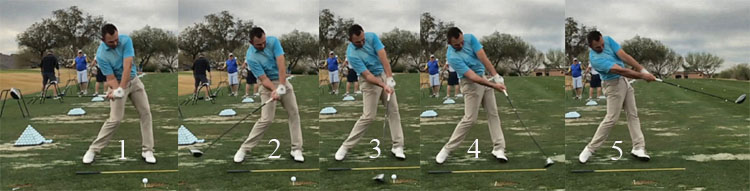
Image 1 is at the P6 position, image 2 is at the P6.5 position, image 3 is at impact, image 4 is at the P7.4 position and image 5 is at P7.8.
If you look at Milo Lines' right arm motion, it looks like he is performing a "stone-skipping" underhand type of throw motion where his right hand is traveling relatively horizontal to the ground between P6 => P7.4 and where the right arm throw motion finally ends when his right arm is fully straight at P7.8 (image 5). I think that's a much better way to mentally think of how the right arm motion should be performed during a full golf swing action.
Now, a pertinent question arises-: What useful functions are likely being performed by the right arm during Milo Lines driver golf swing action at impact and also between P7 => P7.4 - presuming that Milo Lines is using TGM swinging technique?
To answer that question, one needs to understand how I mentally think about what is happening biomechanically, and mechanically, in Milo Lines' driver golf swing action between P7 => P7.8.
First of all, when I look at those capture images of Milo Lines' driver golf swing action they represent for me the "ideal" way to perform a driver golf swing action if one uses a TGM swinging technique. In an ideal TGM swinging action, where one uses a pivot-induced release of the left arm (release of PA#4) to power the golf swing action, an ideal pivot action should not only power the release of PA#4 in an optimal way in order to generate the maximum amount of clubhead speed at impact. In addition, one should think of an "ideal pivot action combined with an ideal lead arm motion" as also being useful in terms of controlling the motion of the club and clubface through impact so that the clubface can remain stably square to the clubhead arc between P7 => P7.2 (or even better to P7.4 as seen in image 4 above where Milo's clubface is still square to the clubhead arc). How does Milo Lines achieve that desirable goal?
Milo Lines manifests all the ideal features seen in a well-executed DH-hand release action. I arbitrarily define a DH-hand release action as being present if the clubshaft does not bypass the lead arm (from an angular rotational perspective) between P7 => P7.2 (or even better to P7.4 as can be seen in image 4 above). How does Milo Lines prevent the clubshaft from bypassing his lead arm all the way between impact and P7.4? I think that two biomechanical elements are needed if one wants to perform a DH-hand release action as efficiently as Milo Lines. First of all, the lead arm must not stall its forward (targetward) motion between P7 and P7.4 and its forward angular velocity must perfectly match the angular velocity of the fully released golf club. In addition, it is biomechanically very useful to have a very open pelvis/upper torso alignment as can be seen in those capture images of Milo Lines' impact and followthrough images (images 3, 4 and 5). If one achieves those two goals, then one theoretically does not even need a trail arm/hand to perform a flawlessly executed DH-hand release action (like Milo Lines). So, what useful functions can the trail arm/hand be potentially performing in Milo Lines' driver golf swing action during the later downswing and early followthrough - presuming that he is using a TGM swinging technique?
When I look at those capture images of Milo Lines' driver golf swing action, I can readily note that he does not "run-out-of-right arm" between P6 => P7.4 - note that his right arm and right wrist do not fully straighten between P6 => P7.4 and note that his right shoulder continues to move targetwards under his right chin. That means that Milo can more easily allow his right hand to at least travel as fast as his left hand during that late downswing and early followthrough time period. Presuming that his right hand is easily keeping up with his left hand all the way to P7.4, what potentially useful functions could his right hand be performing between P7 => P7.4 if Milo is using a TGM swinging technique? One potentially useful function that could theoretically be performed by the right hand during the right arm straightening action that is happening between P7 => P7.4 is that it could help to prevent the left arm's forward motion from stalling between P7 => P7.4. That synergistic phenomenon would be biomechanically possible if the base of Milo's right palm was continuously applying a positive push-pressure against PP#1, which is located over the base of his left thumb, all the way between P7 => P7.4. In the absence of scientific research study evidence, I don't really know whether that synergistic phenomenon is actually happening in Milo Lines' driver golf swing action. Another potentially useful function that could theoretically be performed by the right hand through impact is that it could potentially help to stablise the left hand and prevent a left wrist flipping motion (left wrist breakdown phenomenon) through impact, which is totally incompatible with a DH-hand release action. That useful function would require that the two hands work as a *negative hand couple, and not as a positive hand couple, through impact.
(* I described the mechanics of a negative hand couple phenomenon in topic 8a of this downswing chapter).
Note that I have not suggested that the right hand should be applying a positive push-force (positive hand couple torque) against the aft side of the club handle below the coupling point during the later downswing or early followthrough, because that phenomenon is not compatible with a TGM swinging action. In a TGM swinging action, the hand couple torque should be negative between P6 => impact. In other words, during a right arm throw motion, that could be synergistically used in conjunction with a TGM (lead arm) swinging action, a student-golfer should never attempt to make the golf club travel faster than the left arm (from an angular rotational perspective) in either the later downswing or early followthrough by trying to apply any push-pressure with the right palm against the aft side of the club handle below the coupling point. A golf instructor who teaches that sub-optimal golf instructional approach is Mike Malaska, who works at the same Arizona golf club (Superstition Mountain Golf Club) as Milo Lines.
Here is a link to a you-tube video - https://www.youtube.com/watch?v=35me0WITwSw - where Mike Malaska recommends that golf instructional approach.
In that video, Mike Malaska distinctly states that he throws the club with his right arm's throwing motion during his downswing action so that the clubhead can gain a lot of momentum by impact. Then, he mentally pictures himself allowing his right wrist to straighten freely (fully straighten in an unimpeded manner) through impact and he believes that he can keep his clubface square to the clubhead arc between P7 => P7.2+. To allow that to happen, Mike Malaska states that the left wrist must breakdown and the left elbow has to fold post-impact so that the straightening right arm/hand can keep up with the momentum of the club beyond impact and not be impeded by the left hand.
Now, let's look at capture images from a "real life" golf swing action performed by Mike Malaska in one of his Malaska Golf videos.
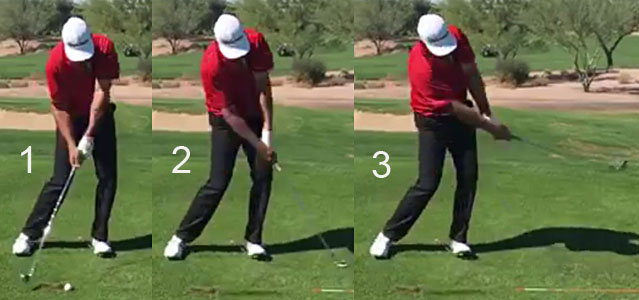
Image 1 shows Mike Malaska nearing impact.
Image 2 is at the P7.3 position and image 3 is at his P7.7 position.
Note how Mike Malaska's right arm and right wrist fully straighten through impact, and note how he folds his left elbow and allows his left wrist to breakdown during his early followthrough action. So, Mike Malaska is performing his hand release action through impact in the way that he actually described it in his video.
Note that his clubshaft bypasses his left arm very early in his followthrough - partly because he is stalling his targetwards motion of his left arm. That means that the fulcrum point for the motion of his clubhead arc is going to be located at the level of his left wrist (which breaks down) and that will cause the *clubhead arc to move inside-left more abruptly.
(* See this discussion in topic number 8a of this downswing chapter where I discussed the different clubhead arc patterns depending on whether there is a short lever scenario rather than a long lever scenario)
The effect of a short lever scenario is that the clubface ROC will be greater even if the clubface is kept square to the clubhead arc - because the clubhead arc has a smaller radius in a short lever scenario.
But, does Mike Malaska even keep his clubface square to his clubhead arc in the early followthrough?
Note that Mike Malaska's right hand is pronating over the top of his club handle through impact even though he is not supinating his left forearm. In other words, Mike Malaska is not keeping his right wrist perpendicular to his right hand's arc path, which is his consciously pre-programmed mental intention, and that significant degree of pronatory right forearm rotation that is happening through impact can potentially induce the clubface to roll even more closed relative to his clubhead arc.
Why is Mike Malaska's right forearm pronating so much through impact - even though he states that he does not intentionally want to roll his forearms during either his later downswing or early followthrough?
I think that there are a number of factors in play, which I will now discuss.
Mike Malaska does not use a pivot-induced TGM swinging action (like Milo Lines) and he believes that the correct way to obtain clubhead speed at impact is to use the arms/hands combined with a reactive pivot motion.
Here is a link to a Mike Malaska video - https://www.youtube.com/watch?v=9h7ACG5AiLg&t=1937s - where he discusses "where speed really comes from".
Here are capture images from the video.
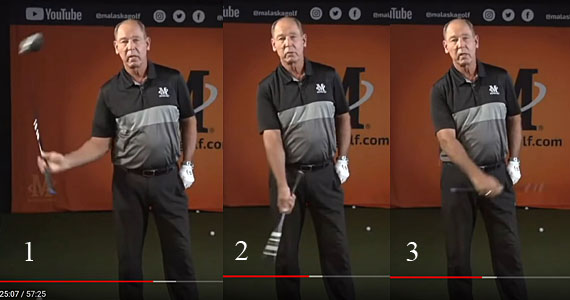
Note that Mike Malaska is only holding the club with his right hand as he demonstrates how to generate clubhead speed - by performing a right arm throwing motion where the right forearm pronates through an imaginary impact zone. Watch the video between the 24:41 - 25:13 minute time points and listen to what Mike is really saying - Mike Malaska basically states that one plays sports with the hands, and not the body's core. I therefore think that Mike Malaska mentally envisages primarily using an active right arm throwing motion to cause the club to gain a large amount of momentum by impact, and he does not use a TGM swinging action's pivot-induced release of PA#4 like Milo Lines.
The second factor in play is how Mike Malaska moves his right upper arm and right forearm during the early phase of his active right arm throwing motion. I previously referred to this Mike Malaska video - https://www.youtube.com/watch?v=WGcLuex-CUA - in my discussion in topic number 8e where I described how Mike Malaska believes that one should internally rotate the right humerus between P4 => P6.
Here are capture images from that Mike Malaska video.
Note how Mike Malaska demonstrates his right arm throwing motion between P4 (image 1) and P6 (image 3) by internally rotating his right humerus and pronating his right forearm ( = using a punch elbow motion) that gets his right palm to partially face the ground when his right hand reaches waist level (image 3).
So, imagine a full golf swing action where Mike Malaska has his right palm partially on top of the club handle at P6, and then imagine him completing his active right arm throwing action between P6 => P7.2 by actively and fully and freely straightening his right arm and right wrist between P7 => P7.2 so that it can keep up with the momentum of his released club. Under those conditions, it is therefore not surprising to me that Mike Malaska would have a biomechanical predisposition to be pronating his right hand over the club handle through impact - as seen in the following capture images of his "real life" golf swing action.
Note how Mike Malaska's right palm is partially on top of the club handle in image 1 (and it looks similar to image 3 in the capture images just above).
Note how Mike Malaska's right palm is pronating even more over the club handle though impact in image 2 (and it looks similar to image 4 in the capture images just above).
Contrast Mike Malaska's right arm throw motional pattern to Milo Lines' right arm throw motional pattern.
Here are close-up capture images of Milo Lines' right arm motion between P6 and impact.
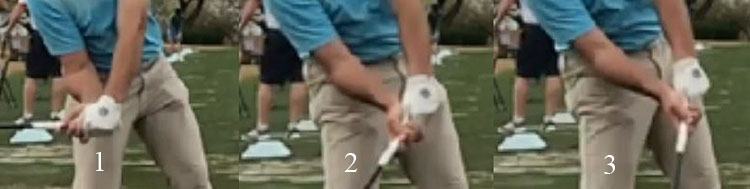
Image 1 is at P6, image 2 is P6.5 and image 3 is at impact.
Note that Milo's right forearm is markedly supinated at his P6 position (image 1) and that his right palm is under the club handle.
Note that Milo's right palm remains partially under his club handle all the way between P6 => P7 and that is biomechanically possible i) because he keeps his right forearm supinated and ii) because he uses a clockwise right wrist circumductory roll motion when he partially straightens his right wrist during his late downswing action.
By contrast, Mike Malaska i) pronates his right forearm and ii) uses a counterclockwise right wrist circumductory roll motion during his late downswing's active right arm/wrist straightening action.
I highly favor Milo Lines' right arm throwing motion and I think that he is an excellent role model for student-golfers who want to use a TGM swinging action, that is combined with a DH-hand release action through impact.
Topic number 8i: Drills that can be used to help a golfer perform a right arm throwing action in the correct way.
In topic number 8h, I compared the correct way to perform a right arm throw motion when performing a TGM swinging action (using Milo Lines' "real life" golf swing action as a role model) to the incorrect way of performing a right arm throw motion (using Mike Malaska's "real life" golf swing action as an example).
A student-golfer may be interested in performing drills to help him first conceptualise, and then secondly perform, the right arm throw motion in the correct (optimum) way. The following two you-tube videos (featuring drills) may be of value to a student-golfer and help him to achieve those two goals.
The golf instructor, Chris Ryan, produced a you-tube video - https://www.youtube.com/watch?v=1KPkyTkQxtU - that can help a student-golfer better perform a release action in the later downswing and early followthrough. In that video, Chris Ryan advises a golfer to throw the clubhead as far away from the body as possible while simultaneously preventing the clubshaft from bypassing the left arm (from an angular rotational perspective). I think that the two drills that he demonstrates in his video are potentially very useful, but I would like to emphasise certain biomechanical elements of the right arm throw motion that Chris Ryan does not mention.
Capture images of the Chris Ryan right arm throw motion drill.
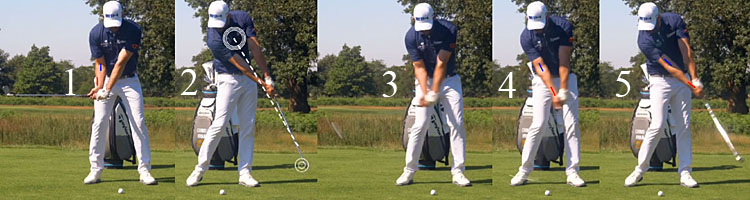
Image 1 shows Chris Ryan at the starting point of his drill (simulated P6 position) where he he has a bent right arm and a very extended right wrist. Note that I have drawn a blue line down the center of his right antecubital fossa and a red line along his right lower radial bone in his lower right forearm - note that the red line is rotated clockwise relative to the blue line because his right forearm is frankly supinated so that his right palm is under the club handle at his P6 position.
Image 2 shows Chris Ryan's goal - performing a right arm throw motion that will cause the clubhead to move as far away from his body as possible while simultaneously ensuring that the clubshaft does not bypass the lead arm. To perform the right arm throw motion in the optimum way, Chris Ryan talks about fully straightening his right arm and nearly fully straightening his right wrist. However, he does not discuss the roll motion of the straightening right forearm and the roll motion of the straightening right wrist during his demonstration. I, therefore, want to emphasise a number of key biomechanical points that are happening during Chris Ryan's right arm throw motion.
Image 3 shows Chris Ryan at a simulated P6.5 position. The club is starting to release in the left wrist's plane of radial-ulnar deviation, and that plane of motion is relatively parallel to his swingplane because the back of his left wrist is still moving relatively parallel to the swingplane between P6 => P6.5.
Image 4 shows Chris Ryan at simulated impact where the back of his left wrist faces the target. So, between P6.5 => P7, Chris Ryan must be supinating his left forearm while he continues to release the club and that allows him to square his clubface by impact. However, note that his right forearm is still significantly supinated at impact (red line is still rotated slightly clockwise relative to the blue line), which means that he does not perform a frank pronatory roll motion of his right forearm between P6 => P7. Note that his right palm is still partially under the club handle at P7 and that is only possible because he is rolling his right hand in a clockwise direction by performing a clockwise right circumductory roll motion of his right wrist during his right wrist's straightening action.
Image 5 is at his P7.4 position when both arms are fully straight. Note that he is using a DH-hand release action where the clubshaft does not bypass his left arm (from an angular rotational perspective) and that allows him to keep his clubface square to his clubhead arc between P7 => P7.4. Most importantly, note that his right forearm is still slightly supinated and that his right palm is still positioned partially under his club handle at P7.4, and that requires a clockwise circumductory roll motion of his right wrist during his right wrist's straightening action.
In the following you-tube video - https://www.youtube.com/watch?v=AUT9XJB6z8Q&t=112s - Tyler Ferrell demonstrates a drill on how to perform a right arm throw motion (side-arm throw motion) in the optimum way.
Capture images of Tyler Ferrell from his video.

Tyler Ferrell is at a simulated P6 position where he start his right arm throw motion drill. Note that his clubface is straight-line-aligned with the back of his left wrist, and the watchface area of his left lower forearm, because he has a neutral left hand grip; and note that they are all parallel to the ball-target line. Note that his right arm is still bent and that his right wrist is fully extended. Note that his right forearm is frankly supinated so that his right palm is positioned partially under the club handle.
Capture images of Tyler Ferrell from his video.
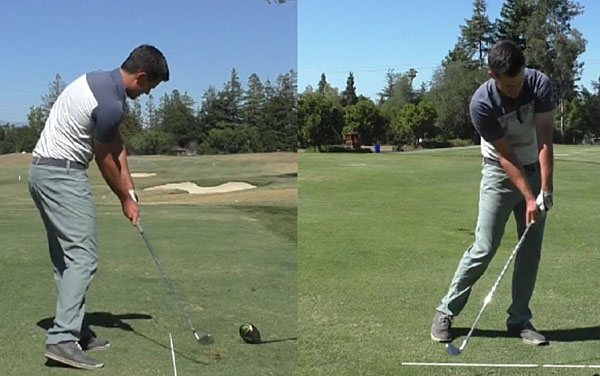
Tyler Ferrell is nearing impact. Note that the back of his left wrist/hand is rolling counterclockwise due to a left forearm supinatory motion and that will allow him to square his clubface by impact. However, note that his right forearm is still significantly supinated and he never frankly pronates his right forearm during his right arm's straightening action. Note that his right palm is still partially under his club handle, and that requires that he perform a clockwise right wrist circumductory roll motion as he partially straightens his right wrist.
Capture images of Tyler Ferrell from his video.
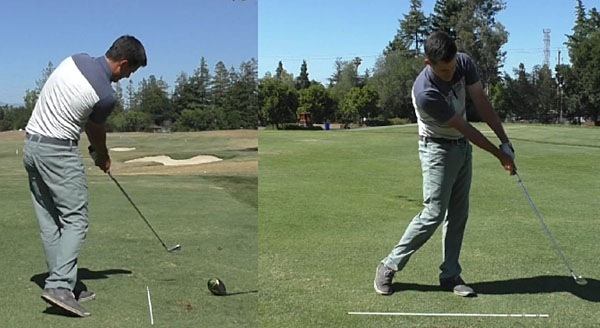
Note that Tyler Ferrell has reached a simulated P7.4 position where the clubshaft has not bypassed his left arm (from an angular rotational perspective) and that defines a DH-hand release action, which allows him to keep the clubface square to his clubhead arc all the way between P7 => P7.4. Note that his right forearm is still slightly supinated at P7.4, and his right palm is still partially under his club handle, which necessitates a clockwise (and not a counterclockwise) right wrist circumductory roll motion of his right wrist during his partial right wrist straightening action.
Note how open his pelvis/upper torso are rotated between P7 => P7.4, and that allows Tyler Ferrell to more easily execute a flawless DH-hand release action through impact. If Tyler Ferrell kept his pelvis/upper torso parallel to the ball-target line through impact, then that would cause his clubshaft to move inside-left too much and it would cause his clubshaft to bypass his left arm - as he demonstrates between the 1:50 - 2:50 minute time points of his video. So, to perform a right arm throw action in the correct way, where the clubshaft never bypasses the left arm (from an angular rotational perspective), and where the arms/club remain in front of the rotating torso, a golfer must optimally perfect his pelvis/upper torso rotation through impact in the manner demonstrated by Tyler Ferrell in his video.
Jeffrey Mann.
Downswing Chapter (Version 4) : March 2021.