2014: Revisions And Refinements In My Thinking Regarding Golf Swing Mechanics/Biomechanics
Click here to go back to the home page.
Introduction:
I started this golf website in December 2006 and I have revised my basic chapters a few times since then to reflect new insights that I have progressively acquired over the past 7 years. However, I have made no major revisions to my basic chapters during the past two years because I believe that I have finally acquired a solid and rationally sound understanding of golf swing mechanics/biomechanics that will very likely stand the test of time. Nonetheless, I still continue to think about golf swing mechanics/biomechanics and this new review paper reflects my latest insights regarding many aspects of the full golf swing. These new insights are mainly refinements in my thinking and there has been no major change in my thinking regarding golf swing mechanics/biomechanics during the past few years. These minor new insights cover many aspects of the golf swing (backswing, downswing and the critical topic of hand release actions through the immediate impact zone) and they are often complex in nature. Beginner and developing golfers (who are visiting my golf website for the first time) need to thoroughly study my basic chapters, and many review papers, if they hope to understand my latest insights because they are far more complex and esoteric in nature, and they require a good background understanding of TGM mechanics and human golf swing biomechanics to become completely understandable. I am also automatically presuming that all golfers, who will be reading this latest review paper, are already fully familiar with my personal use of TGM terminology and golf biomechanics terminology, and that they are fully familiar with the *P system of classifying a golfer's position at different time points during the swing action.(* see this review paper for a description of the P system of classifying a golfer's positions at different time points during the golf swing action)
Please note that I am going to use horizontal lines to separate the different sub-topics that I will discuss in this review paper. I will start off by describing new/refined insights regarding the backswing, and I will then move on to new/refined insights relating to the downswing and the followthrough.
Backswing insights:
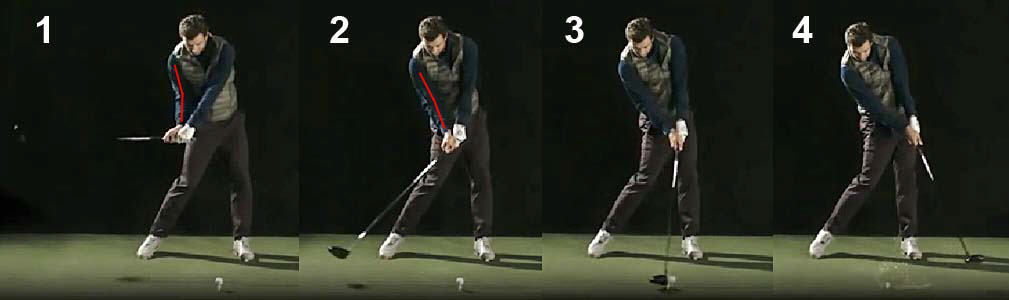
Topic number 1: The issue as to whether the right wrist has to upcock (radially deviate) during the backswing action.
In my chapter on the backswing action, and in some of my review papers, that discuss the right arm action during the backswing, I expressed the opinion that the right wrist should only bend backwards (dorsiflex) and that it should not upcock (radiallly deviate) during the execution of a backswing action. This opinion obviously needs to be revised because it is very likely that the right wrist will radially deviate (upcock) at some time point during the backswing action in most golfers. The timing of the right wrist's upcocking action, and the degree of right wrist upcocking, will vary between different golfers, and as a general rule the degree of right wrist upcocking will be greater in golfers who have a steeper backswing action where the left arm and clubshaft moves along a steeper path between the P2 position and the P4 position.One of my website's readers sent me a video of Claude Harmon performing a backswing action where he deliberately upcocked both wrists (from their address position) and where he didn't describe any right wrist dorsiflexion action. Let's consider what is actually happening in Claude Harmon's backswing action.
Claude Harmon's backswing action video lesson - https://www.youtube.com/watch?v=VwmXTAGObFg
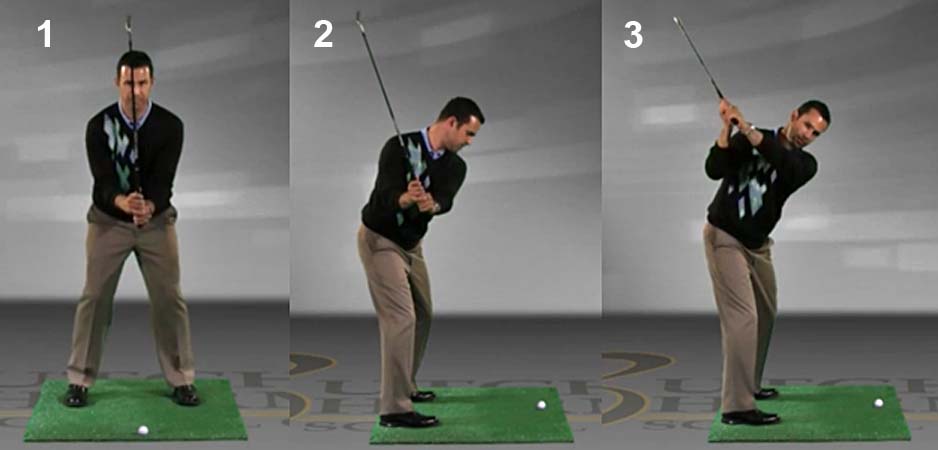
In that video lesson video, Claude Harmon starts off with his hands and club in the standard address position where the hands are positioned roughly midway between the thighs and where the clubshaft is perpendicular to the ball-target line. Note that both wrists are slightly dorsiflexed (bent) at address, and that both wrists are level with respect to the plane of cocking (plane of radial-ulnar deviation) at address. He then starts the backswing by upcocking (radially deviating) both wrists and lifting the club vertically upwards from its address position.
Here are capture images from his swing video lesson.
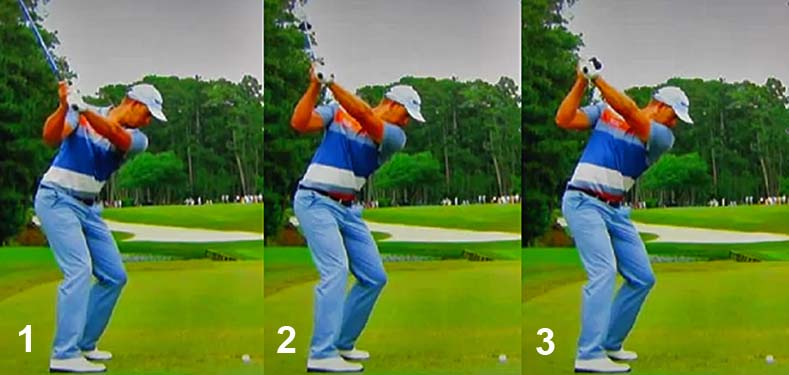
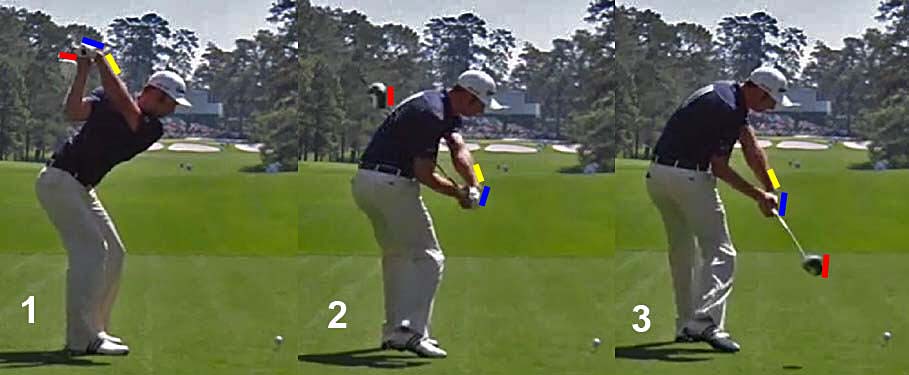
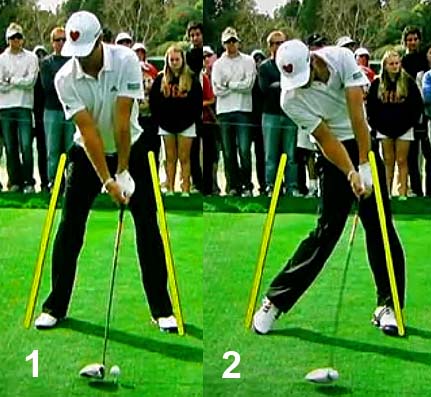
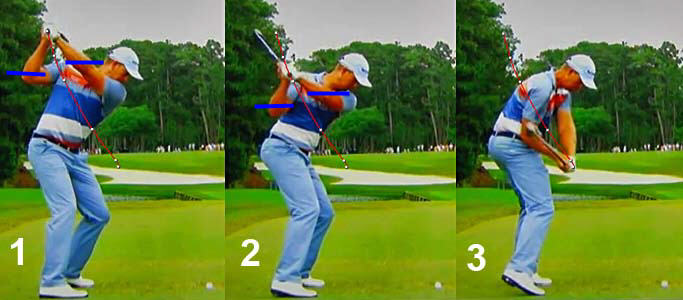
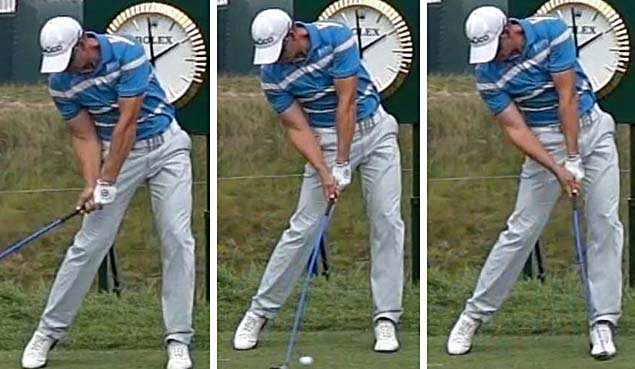
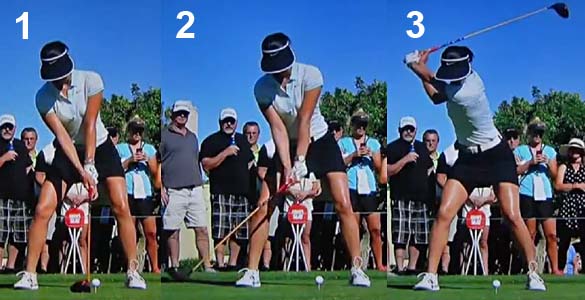
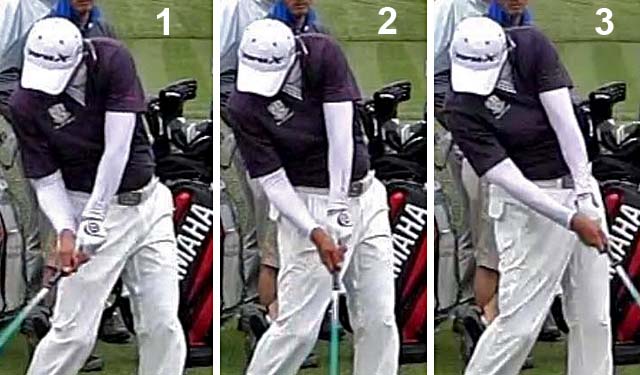
Claude Harmon's backswing action - capture images from his swing video
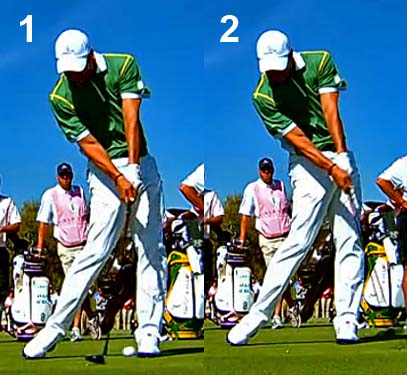
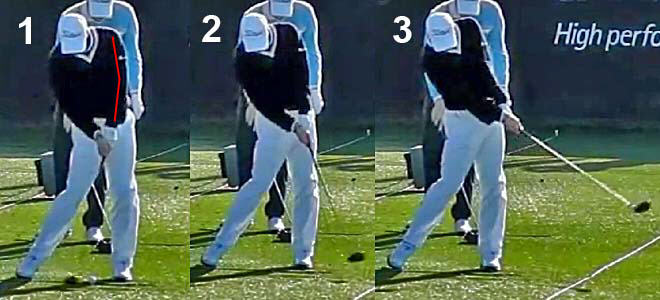
Image 1 shows Claude Harmon starting the backswing by upocking (radially deviating) both wrists to the same degree while keeping the club centralised in front of his non-rotating torso. Note that both wrists are bent (dorsiflexed) to roughly the same degree.Image 2 shows how Claude Harmon then performs a rotary motion of his torso while keeping his hands steadily unchanged in front of his rotating torso. Note that his hands are opposite the center of his lower chest area, and that both wrists are still upcocked (radially deviated) and still bent (slightly dorsiflexed). Note that his clubshaft is off-plane and that an imaginary extension line drawn from the butt end of his club points just outside his toe line. Note that his LAFW is non-intact - the clubshaft and left arm are not in a straight-line relationship.
Image 3 shows how he completes his backswing action by simply lifting his left arm to its P4 position, and note that he positions his hands on the TSP. Note how his left wrist flattens (to acquire a GFLW configuration) and that his clubshaft becomes straight-in-line with his left arm, which means that he has now acquired an intact LAFW alignment. Note that his right wrist becomes more dorsiflexed as he moves to his P4 position. Claude Harmon doesn't mention the i) flattening of his left wrist and ii) increased bending of his right wrist that must happen in his late backswing action if he wants to acquire a standard loaded intact LAFW and supporting RFFW at the P4 postion and where the clubshaft is on-plane (butt end of the club points at the ball-target line).
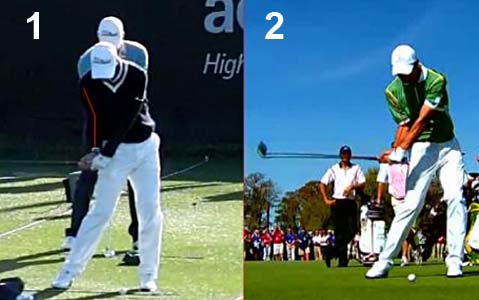
Now, it is obvious that "real life" skilled golfers do not perform a backswing action in the manner demonstrated by Claude Harmon. However, consider one golfer who looks very similar to Claude Harmon when he is at the image 2 position - Ryan Moore.
Ryan Moore golf swing video - http://www.youtube.com/watch?v=_m3lCmj9yrU
Here are capture images from his swing video.
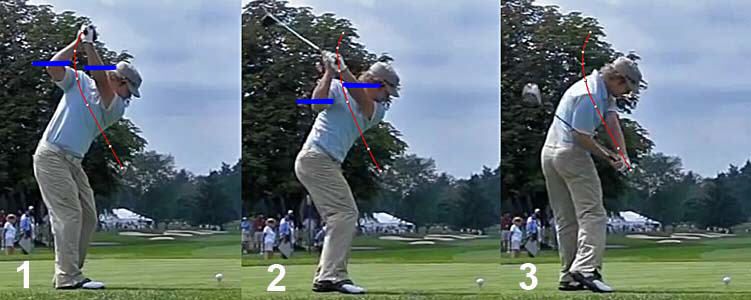
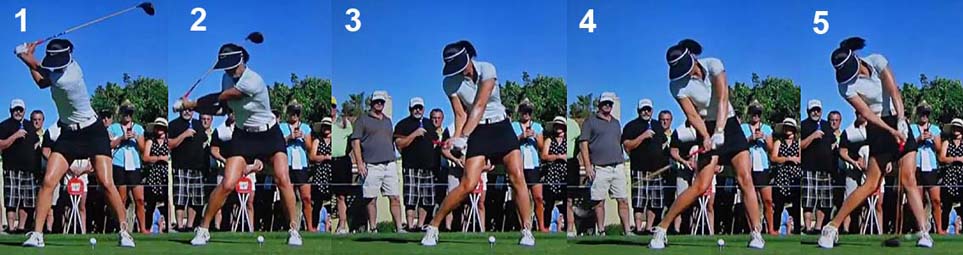
Ryan Moore's backswing action - capture images from his swing video
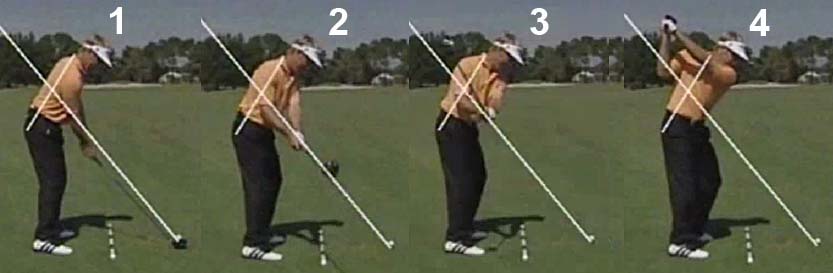
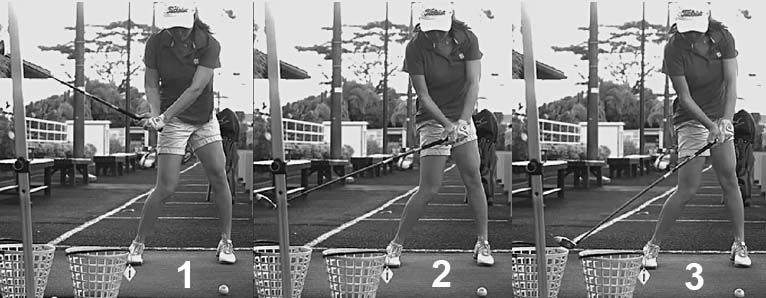
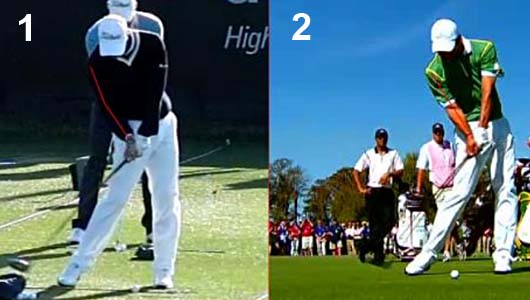
Image 1 shows Ryan Moore at address. Note that his arms are very vertical at address, which means that his hands are very close to his thighs. Note that his clubshaft is angled along a relatively horizontal plane (despite his vertical left arm alignment) and that he has a large accumulator #3 angle (angle between the left arm and clubshaft as viewed from a DTL perspective). The magnitude of the accumulator #3 angle is inversely proportional to the magnitude of the obtuse angle between the left arm and clubshaft - and the closer that angle approximates a 90 degrees angle (rather than a 180 degrees angle) the greater the magnitude of the accumulator #3 angle. Two factors allow a golfer to achieve a large accumulator #3 angle at address - i) a finger left hand grip or low palmar left hand grip (rather than a mid/high palmar left hand grip) and ii) radial deviation of the left wrist at address.Image 2 shows how Ryan Moore performs a takeaway action. Note that he rotates his upper torso while he lifts his hands, but he doesn't rotate his left arm/forearm clockwise during his takeaway action. That causes his clubshaft to remain outside his hands between the P1 and P2 position.
Image 3 shows Ryan Moore at the P3 position. Note that both wrists are upcocked and that both wrists are bent (and he looks very similar to Claude Harmon in image 2). However, his clubshaft is tilted even more outwards in the direction of the ball-target line, and an imaginary line extending from the butt end of his club points well inside his toe line.
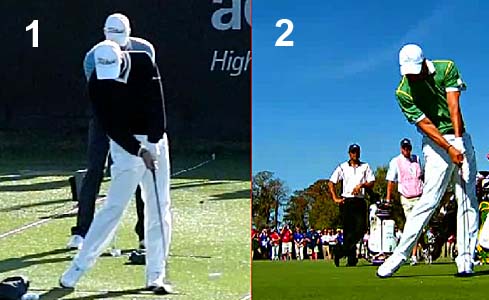
Image 4 shows Ryan Moore at the P4 position. Note that he lifted his hands vertically upwards in his late backswing action, and that he has flattened his left wrist slightly to acquire a GFLW by the P4 position, and that he has increased the degree of dorsiflexion of his right wrist so that he has a standard "loaded intact LAFW + supporting RFFW" alignment at the P4 position - except for the fact that his left arm angle is unusually steep relative to his shoulder turn angle (and similar to the steep left arm angle seen in Jim Furyk's and Rory Sabbatini's end-backswing position).
Image 5 shows that Ryan Moore achieves a perfect P5.5 position in his mid-downswing despite a very atypical backswing action - and it demonstrates the fact that skilled golfers can successfully use a variety of backswing actions and still be able to perform an optimum downswing action from a variety of end-backswing positions.
Now, although it is perfectly permissible to perform an idiosyncratic backswing action like Ryan Moore, most professional golfers perform a backswing action where the clubshaft moves from P1 to P4 along a shallower plane, and their clubshaft's planar motion is very close to their impact zone plane between P1 and P2.5.
Consider an example - Stuart Appleby.
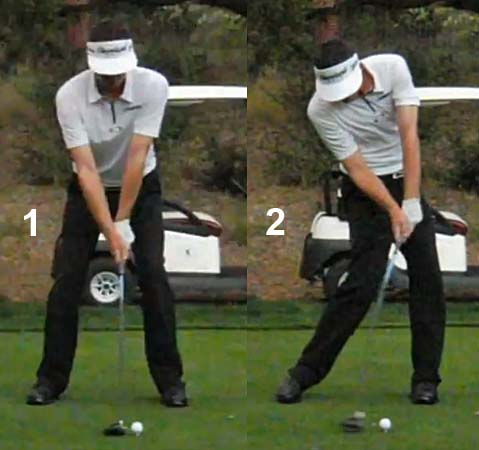
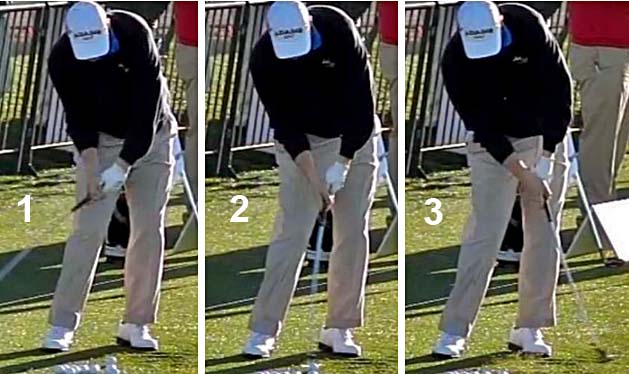
Stuart Appleby backswing action - capture images from a swing video
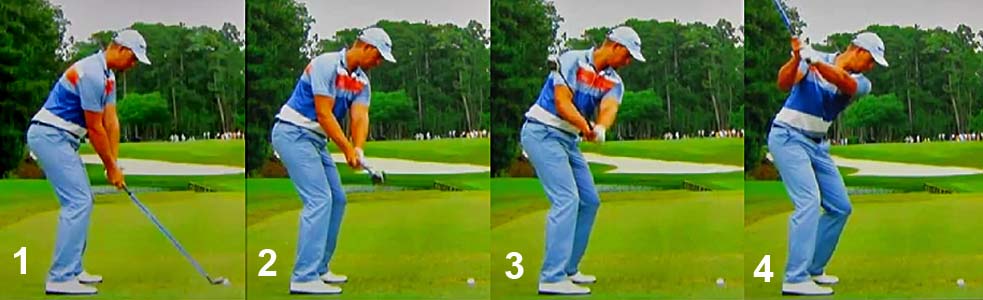
The white line represents his clubshaft plane at impact, and it passes through his right elbow, and that plane therefore represents the elbow plane.At address (image 1), Stuart Appleby's clubshaft is on the hand plane, and his hand plane is only minimally shallower than his elbow plane because he has a smaller accumulator #3 angle at address (compared to Ryan Moore - note that his left arm is less vertical and that his hands are further away from his thighs, and note that his left wrist is not radially deviated).
Image 2 shows that he rotates his torso clockwise during his takeaway action (like Ryan Moore). However, he moves his hands back (away from the target) along a hand arc path that is roughly parallel to the elbow plane while also keeping his clubshaft moving roughly parallel to the elbow plane. During his on-plane takeaway action, he slightly flattens his left wrist to acquire a GFLW and he increasingly dorsiflexes (bends) his right wrist. Note that he doesn't upcock his right wrist between the P1 and the P2 position - because the clubshaft is not on a steeper plane than the plane of his right forearm.
Image 3 shows Stuart Appleby in his mid-backswing and he is now radially deviating his left wrist as he performs a standard RFT backswing action. Note that his right wrist is bending backwards more as his right elbow bends, but he is also starting to upcock his right wrist as his clubshaft steepens to a plane that is steeper than the plane of his right forearm.
Image 4 shows Stuart Appleby at the P4 position with his left arm along his shoulder turn angle, and his hands are on the TSP. As his hands moved upwards from the elbow plane (image 3) to the TSP (image 4) there must be a certain amount of right wrist upocking action. In other words, the likelihood of a golfer (who uses a RFT backswing action) having a certain degree of right wrist upcocking in his later backswing increases if his hands/clubshaft move more vertically upwards to a higher plane between the P2 and the P4 position eg. to the TSP (like Stuart Appleby) or higher than the TSP (like Ryan Moore). By contrast, the amount of right wrist upcocking that occurs between P2 and P4 will be significantly less if the hands/clubshaft are significantly below the TSP at the P4 position.
Consider an example of a shallower backswing action - John Erickson.
John Erickson swing video - https://www.youtube.com/watch?v=GTP7j9fE6D8
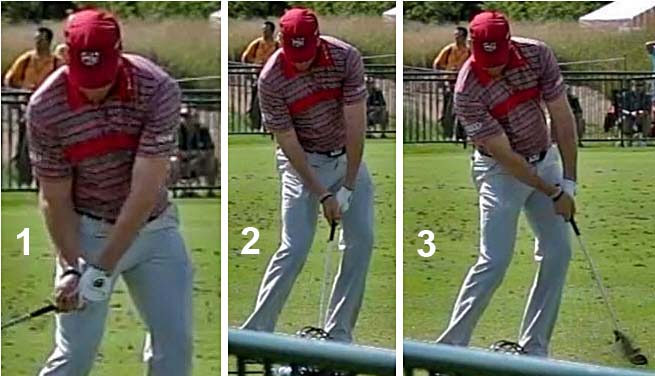
John Erickson's backswing action - capture images from his swing video
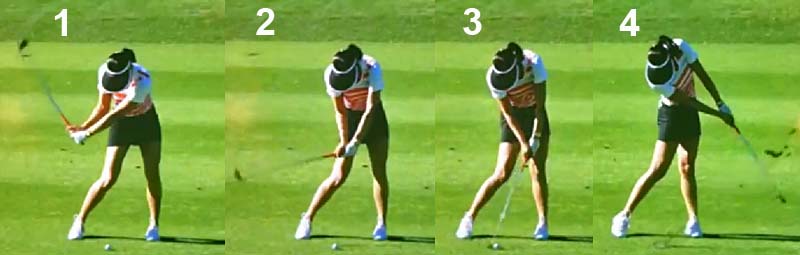
Images 1-3 shows John Erickson's hand and clubshaft movement between P1 and P2 as he performs a RFT backswing action. Note that his right wrist bends backwards more, but he doesn't upcock his right wrist because the clubshaft remains below the plane of his right forearm.Images 4 and 5 shows John Erickson during his mid-backswing action as he increasingly upcocks (radially deviates) his left wrist. Note that he doesn't upcock his right wrist while he increasingly bends his right elbow and increasingly bends (dorsiflexes) his right wrist. In other words, he demonstrates that it possible to radially deviate the left wrist to a 90 degree left arm-clubshaft angle during the execution of a RFT backswing action while simultaneously avoiding any right wrist upcocking action - but that is only possible because he keeps his hands/clubshaft on a shallow plane, that is near/below the plane of his right forearm between P2 and P3.
Image 6 shows that his hands are just below the TSP at his P4 position, and there must be a small amount of right wrist upcocking happening between his P3 and his P4 position as his clubshaft steepens to a plane that is slightly steeper than his right forearm's plane of motion. However, the magnitude of his right wrist upcocking will be less than the amount seen in golfers who have their left arm/clubshaft at a much steeper angle at their end-backswing position (eg. Ryan Moore).
In my review paper on How to Move the Arms, Wrists and Hands in the Golf Swing, I demonstrated the RFT backswing action using a dowel stick.
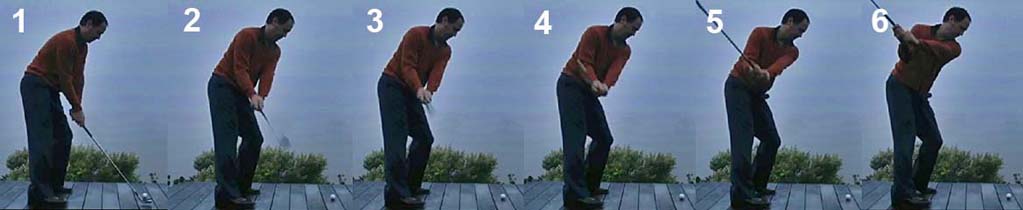
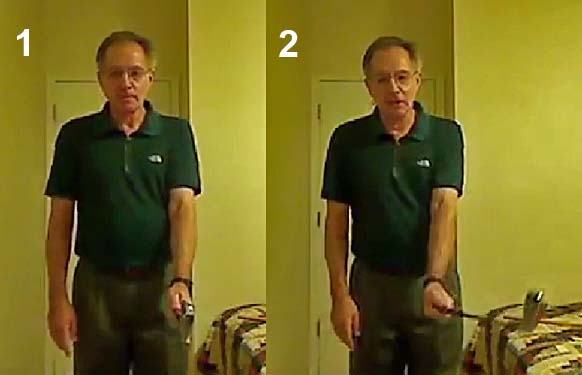
Author demonstrating the movement of the right arm/wrist during a RFT backswing action - capture images from his swing video
In my demonstration, note that the central end of the dowel stick (dotted blue line) is straight-in-line with my right forearm (dotted red line) which means that the right wrist bends back without any upcocking (any radial deviation). However, that only happens in a "real life" golf swing if the clubshaft moves back on a shallow plane (as occurs in John Erickson's backswing action). In most professional golfers, the clubshaft will move to a steeper plane after bypassing the P2 position, and the clubshaft plane will become steeper than the plane of the right forearm - and under those conditions, the right wrist must upcock (radially deviate) while it continues to bend backwards.In summary, I don't think that a golfer should worry about the i) timing and the ii) magnitude of any right wrist upcocking that will naturally occur during a backswing action. If he chooses to use a RFT backswing action (like Stuart Appleby) where the hands remain below the elbow plane, or very near to the elbow plane, during the early backswing action, then his right wrist will mainly dorsiflex (bend) between P1 and P2.5 and there will be very little accompanying right wrist upcocking motion. However, the amount of right wrist upcocking motion will automatically/naturally increase in the later backswing between P2.5 and P4 as the clubshaft move to a higher plane, that is steeper than the plane of motion of the right forearm.
Backswing insights:
Topic number 2: The topic of being "laid-off" at the end-backswing position.
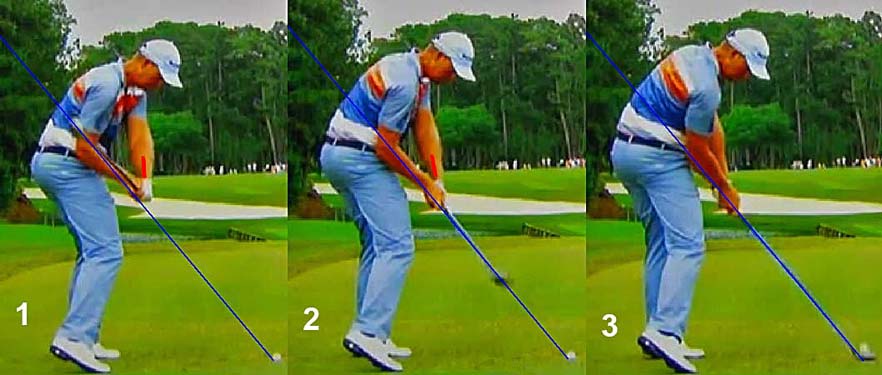
The term "laid-off" is often used to describe a golfer's particular appearance at his end-backswing P4 position, and I think that the term is often incorrectly used to describe a situation where the golfer's clubshaft points left-of-the-target at the P4 position. However, I think that golfer's clubshaft will likely point left-of-the-target if he shortens his backswing action so that his clubshaft doesn't get to a P4 position where it is parallel to the ball-target line - but that doesn't mean that the clubshaft is "laid-off" if it still on-plane. I believe that the term "laid-off" implies that the clubshaft is off-plane at the P4 position, and on a shallower plane, and that it is causally due to a superadded left wrist bowing/arching action in the late backswing or due to over-rotation of the left arm/forearm in a clockwise direction between P3.5 and P4 that flattens the clubshaft plane.Consider Henrik Stenson's backswing action.
Henrik Stenson swing video - https://www.youtube.com/watch?v=OKfe6F8PmUc
Here are capture images of his backswing action.
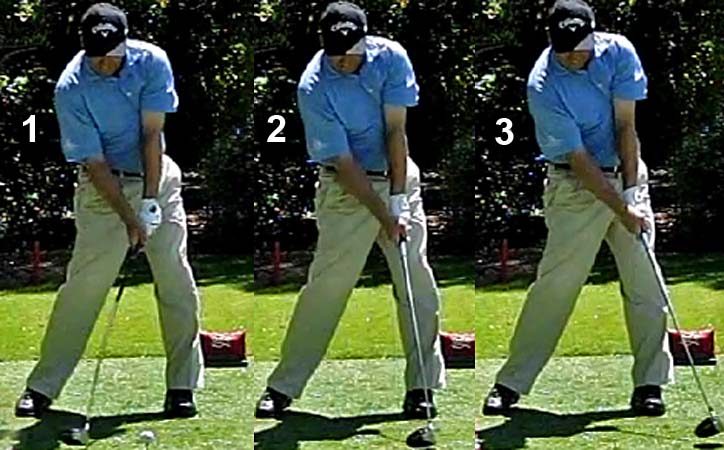
Henrik Stenson's early-mid backswing action - capture images from his swing video
Henrik Stenson uses a RFT (right forearm takeaway) backswing action - like Stuart Appleby.His address posture and left arm/clubshaft angle at address (image 1) is very similar to that seen in Stuart Appleby's golf swing (see image 1 above).
Image 2 shows how he moves his hands back on a hand arc path that is roughly parallel to the elbow plane between the P1 position and the P2 position. His clubshaft also moves roughly parallel to the elbow plane between P1 and P2. Note that he flattens his left wrist to a GFLW alignment and dorsiflexes his right wrist more (without upcocking his right wrist) during his RFT takeaway action - because the clubshaft remains below the plane of his right forearm.
Image 3 shows an early left wrist upcocking motion that is characteristic of a RFT backswing action. As his clubshaft steepens to a plane that is steeper than the plane of motion of his right forearm, then his right wrist will start to upcock (radially deviate) as it continues to increasingly dorsiflex.
Image 4 shows Henrik Stenson at the P3.5 position. Note that he has a GFLW and intact LAFW and that his clubshaft is on-plane (imaginary line extending from the butt end of his club will point at the ball-target line).
Now consider his on-plane backswing motion between the P3.5 and P4 positions.
Henrik Stenson's late backswing action - capture images from his swing video
These three sequential images show his late backswing action between the P3.5 and P4 positions. I have deliberately chosen a near-endbackswing image (image 3) where his clubshaft hasn't quite reached a position where it is parallel to the ball-target line. Note how he maintains a GFLW/intact LAFW (clubshaft is straight-line-aligned with his left arm) during his late backswing action and how his clubshaft also remains on-plane (an imaginary line extended from the butt end of his club will point at an extension of the ball-target line). If Henrik Stenson stopped his backswing at any time point between P3.5-P4, then his clubshaft will be pointing left of the target (to a variable degree), but that doesn't mean that his clubshaft is "laid-off". His clubshaft can only be deemed to be "laid off" if it droops downwards to a flatter, off-plane position between the P3.5 position and the P4 position.Consider a golfer who becomes "laid-off" during the late backswing - Aiko Leong.
Aiko Leong swing video - https://www.youtube.com/watch?v=uUMyb7BIUJQ
Here are capture images from her swing video.
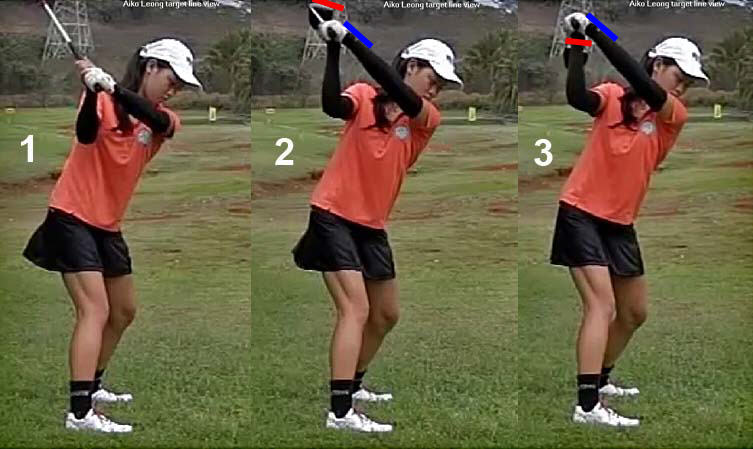
Aiko Leong's end-backswing action - capture images from her swing video
Image 1 shows Aiko Leong at the P3.5 position. She looks like she has an intact LAFW (clubshaft is straight-in-line with her left arm) and she looks very similar to Henrik Stenson at his P3.5 position - except for the fact that her left wrist is more visually flat (rather than being geometrically flat).Image 2 shows her getting very close to her end-backswing position. One can see that her clubface (red line) is slightly closed relative to the back of her left lower forearm (blue line) but her clubshaft still looks on-plane (imaginary line extending from the butt end of her club points at an extension of the ball-target line).
Image 3 shows her at the P4 position. Note that her clubshaft is drooping below the level of her left arm (which means that she does not have an intact LAFW) and her clubface (red line) is closed relative to the back of her lower left forearm (blue line). Note that the butt end of the club no longer points at an extension of the ball-target line, and that her clubshaft is off-plane. She is "laid-off" at her P4 position - not because her clubshaft is pointing left-of-the-target, but because her clubshaft is off-plane and on a flatter/shallower plane than the plane of her left arm. The likely cause of her "laid-off' action is the fact that she continues to rotate her left arm/forearm clockwise as she nears the end-backswing position.
The biomechanical condition of being slightly "laid-off" is not really a significant swing fault, because the clubshaft can easily get back inline with the left arm at the start of the downswing and become more straight-in-line with the left arm by the P5 position.
Backswing insights:
Topic number 3: How to best define whether the clubface is neutral, or closed, or open at the end-backswing position, and how should we determine what causes a closed (or open) clubface at the P4 position. Finally, what are the implications of having a dynamically closed (versus a statically closed) clubface at the P4 position - if it is due to left wrist arching/bowing?
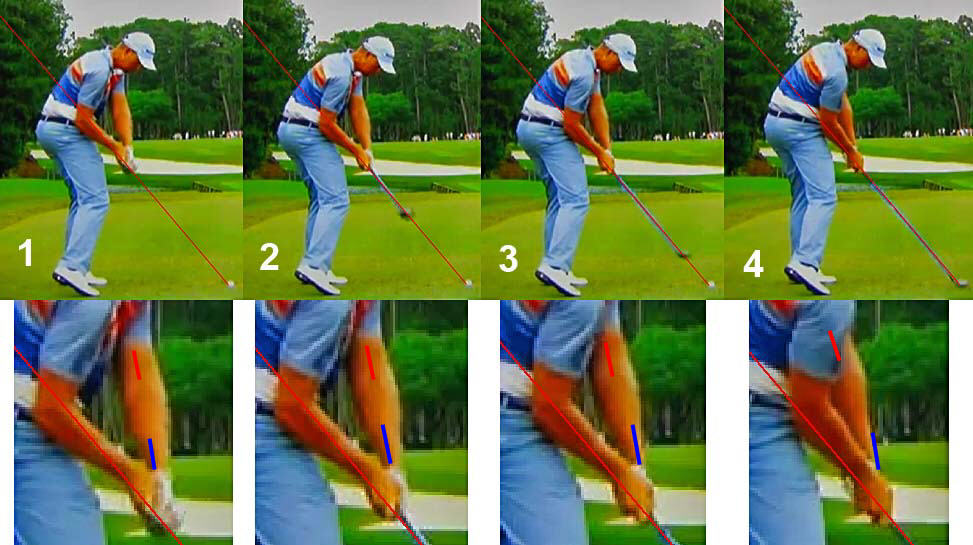
Consider again this composite image of Aiko Leong's late backswing action.
Aiko Leong's late backswing action - capture images from her swing video
Image 3 shows Aiko Leong at her end-backswing position. Note that the clubface (red line) is closed (angled up more horizontally/skywards) relative to the back of her left lower forearm (blue line). That represents my definition of a closed clubface alignment at the P4 position. If the clubface were angled down more vertically/groundwards (relative to her left forearm) then it would be open.Many golfers, and golf instructors, prefer to establish a clubface's open-versus-closed alignment at the P4 position by looking at the clubface alignment relative to the ground from a DTL viewing perspective, and they would claim that Aiko Leong's clubface is closed because it is near-parallel to the ground. If it was angled at about 45 degrees relative to the ground, they would claim that it is neutral, and if it was angled more vertically they would claim that the clubface is open.
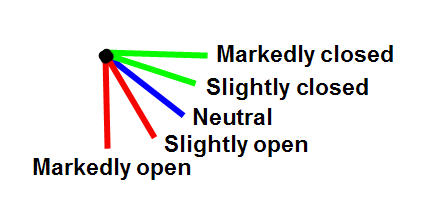
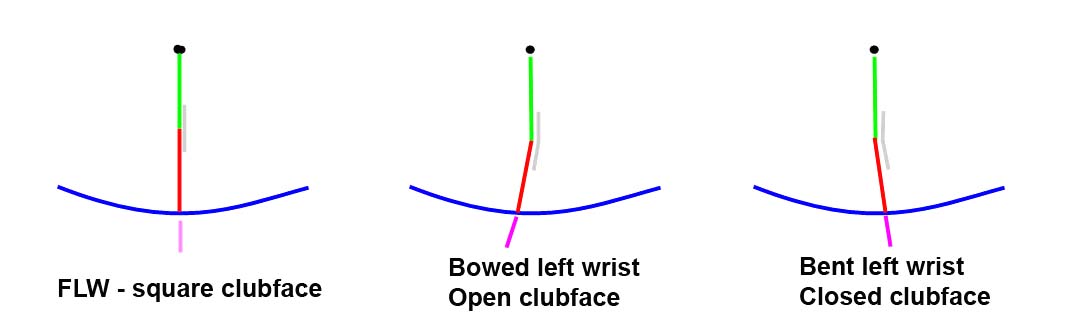
Consider the following diagram showing various clubface alignments at the P4 position - as viewed from a DTL viewing perspective.
Diagram of clubface alignments at the P4 position
The black dot represents the hosel of the club (as viewed from a DTL viewing perspective). The colored lines represent the clubface alignment - as viewed from a DTL viewing perspective.A neutral clubface alignment is often defined as a clubface alignment that is about 45 degrees angled relative to the ground (blue line). An open clubface alignment would then be defined as a clubface alignment that is more vertical than neutral (red lines), while a closed clubface alignment would then be defined as a clubface alignment that is more horizontal than neutral (green lines).
I would discourage golfers/golf instructors from using this method because it doesn't take into account the golfer's left arm angle at the P4 position.
Consider Henrik Stenson's clubface alignment at the P4 position.
Henrik Stenson's clubface alignment at the P4 position - capture image from a swing video
Image 1 shows Henrik Stenson at his end-backswing position. His left arm is angled very slightly higher than his shoulder turn angle. Note that his clubface (red line) is parallel to the back of his left lower forearm and that is due to the fact that he has a i) neutral left hand grip; ii) that he adopted a neutral clubface alignment (relative to the back of his functionally flat left wrist and left lower forearm) at address and iii) that he has a GFLW and intact LAFW (clubshaft is straight line-aligned with his left arm) at the P4 position. All those three conditions conjointedly create a neutral clubface (relative to the back of the left lower forearm) at the P4 position. Note that his clubface is also angled at about 45 degrees relative to the ground. However, that "fact" is simply due to the biomechanical fact that he has angled his left arm at a roughly 45 degree angle relative to the ground at his P4 position. If he angled his left arm flatter so that it is flatter than his shoulder turn angle at the P4 position (see the lowest left arm image in image 2), then his clubface alignment would be more horizontal relative to the ground and it could be "incorrectly" labelled as being closed - even though it is still neutral relative to the back of his left lower forearm. Also, if he angled his left arm steeper so that its much steeper than his shoulder turn angle at the P4 position (see the highest left arm image in image 2), then his clubface alignment would be more vertical relative to the ground and it could "incorrectly" be labelled as being open - even though it is still neutral relative to the back of his left lower forearm.Therefore, when considering whether the clubface is open-neutral-closed at the P4 position, I think that it is better to use the back of the left lower forearm (and not the ground) as a reference point. By using the back of the left forearm as reference point, it will enable you to better understand the mechanical and/or biomechanical factors that can produce a non-neutral (open or closed) clubface at the P4 postion (or at any other backswing or downswing position).
Let's consider some of the factors that cause an open or closed clubface at the P4 position.
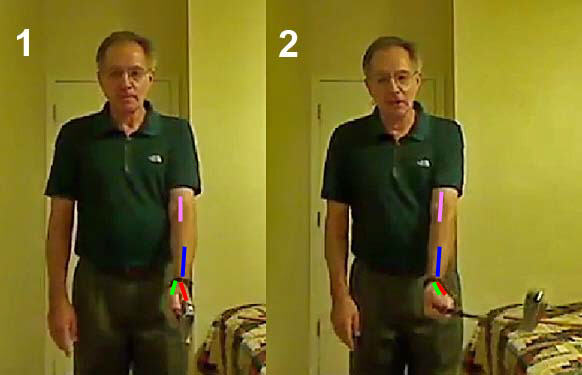
Consider a photograph of the author demonstrating a GFLW.
Author demonstrating a GFLW - capture image from his swing video lesson
Note that my left arm is held vertically below my left shoulder socket and that the clubshaft (dotted yellow line) is being held straight-in-line with my straight left arm (solid yellow line). Note that the clubface is parallel to the back of my left lower forearm and the back of my GFLW (definitionally equivalent to a functionally-flat left wrist). That is due to two factors working in combination - i) I have a neutral (1-2 knuckle) left hand grip with the back of my functionally-FLW/GFLW and back of my left lower forearm (watchface) facing the target and ii) I have adopted a neutral clubface at address (where the clubface is straight-in-line with my functionally-FLW/GFLW and the back of my left forearm).If I kept my neutral left hand grip/neutral left forearm alignment, but rotated the clubshaft clockwise (as viewed from above) in my left palm before gripping the club then the clubface would become open relative to the back of my left lower forearm. By contrast, if I kept my neutral left hand grip/neutral left forearm alignment, but rotated the clubshaft counterclockwise (as viewed from above) in my left palm before gripping the club then the clubface would become closed relative to the back of my left lower forearm. This example represents an example of static clubface closure - where the degree of clubface closing (relative to the back of the functionally-flat left wrist/left forearm) remains constant throughout the backswing and downswing - presuming that one continuously maintains a GFLW/intact LAFW. So, if a golfer (who adopts a neutral left hand grip/neutral left forearm alignment at address) has a GFLW/intact LAFW at the P4 position, then the clubface will be closed relative to the back of the left forearm to the same degree that it was at address (presuming that one holds the left arm straight-in-line with the clubshaft at address).
Another cause of static clubface closure (relative to the back of the left lower forearm) is due to the adoption of a strong left hand grip.
If a golfer adopts a strong left hand grip (3-4+ knuckle grip) then the back of the left hand is rotated clockwise (as seen from above) due to left forearm pronation prior to gripping the club. That means that the if the clubface faces the target, then the back of the left hand will appear angled relative to the clubface.
Varying left hand grip strength demonstration
Image 1 shows a weak (1-knuckle) left hand grip where the back of the left lower forearm (watchface) and back of the left hand (which is slightly dorsiflexed due to the creation of a fist-like grip) face the target. If the clubface faces the target at address, then the clubface is basically straight-in-line with the back of the left lower forearm (watchface).Image 2 shows a neutral-to-slightly strong (2-3 knuckle) left hand grip where the back of the left hand and left lower forearm (watchface) is angled about 45 degrees away from the target due to a certain amount of left forearm pronation. The clubface (which faces the target at address) is therefore closed relative to the back of the left hand and left lower forearm (watchface).
Image 3 shows a very strong (4+ knuckle) left hand grip where the back of the left lower forearm (watchface) and back of the left hand is roughly parallel to the inclined plane and roughly parallel to the ball-target line. The clubface (which faces the target at address) is therefore very closed (>> 45 degrees closed) relative to the back of the left hand and left lower forearm (watchface).
Consider a golfer who has a very strong (4+ knuckle) left hand grip - Domenic Mazza.
Here is a link to a slideshow showing his swing action - http://www.golfdigest.com/golf-instruction/swing-sequences/2011-02/photos-domenic-mazza#slide=1
Here are three capture images from that slideshow.
Domenic Mazza's closed clubface
Image 1 shows Domenic Mazza's very strong (4+ knuckle) left hand grip where the back of his left hand and back of his left lower forearm is roughly parallel to the inclined plane, and where his clubface (which faces the target) is very closed relative to the back of his left hand and left lower forearm.Note how his clubface remains equally closed (relative to the back of his left hand and left lower forearm) in his mid-backswing (image 2) and end-backswing (image 3) if he doesn't bend/bow his left wrist. Because the degree of clubface closure (relative to the back of his left lower forearm) doesn't vary at different stages of his backswing action, it is static and not dynamic in nature.
If a golfer has a slightly strong (3-knuckle) left hand grip, then the amount of clubface closure (relative to the back of the left hand and left lower forearm) is also static in nature, but it is comparatively less closed.
Consider Keegan Bradley, who uses a slightly strong (3 knuckle) left hand grip.
Keegan Bradley's closed clubface - capture images from a swing video
Image 1 shows Keegan Bradley's slightly strong (3 knuckle) left hand grip where the back of the left hand and left lower forearm is angled about 45 degrees relative to the inclined plane, and where his clubface (which faces the target) is angled about 45 degrees relative to the back of his left hand and left lower forearm.Note how his clubface remains equally closed (relative to the back of his left hand and left lower forearm) in his mid-backswing (image 2) and end-backswing (image 3) if he maintains a GFLW/intact LAFW and if he doesn't bend/bow his left wrist. Because the degree of clubface closure (relative to the back of his left lower forearm) doesn't vary at different stages of the backswing/downswing action between *P2 and P4, it is static and not dynamic in nature.
(* note that I have specifically specified between P2 and P4, and not between P1 and P4 - because Keegan Bradley's left wrist is bent at P1 and he only acquires a GFLW/intact LAFW in his later takeaway action as he increasingly flattens his left wrist to acquire a GFLW/intact LAFW alignment)
It is also very important to note that I have been using the back of the left forearm as a reference point for defining whether the clubface is closed - and I have not referred to the clubhead arc. If one thinks about what is happening to the clubface relative to the clubhead arc between P1 and P4, then you need to appreciate the fact that Domenic Mazza's clubface is remaining square to his clubhead arc between P1 and P4 - because he is not rolling his left arm/forearm clockwise during his backswing action, and he is not arching/bending his left wrist. By contrast, Keegan Bradley's clubface becomes slightly open to his clubhead arc - compare his clubface in images 2 and 3 to Domenic Mazza's clubface in images 2 and 3 of Domenic Mazza's backswing action - because he rotates his left arm/forearm clockwise by a finite amount during his backswing action (while maintaining a GFLW/intact LAFW). Therefore, the amount that the clubface rotates open relative to the clubhead arc during the backswing action depends on the amount of clockwise rotation of the left arm/forearm that happens between P1 and P4 - presuming that the golfer maintains a GFLW/intact LAFW during his backswing action. A golfer who uses a neutral left hand grip grip (like Henrik Stenson) will have a clubface that is more open relative to the clubhead arc at comparable P positions between P2 and P4 than a golfer who uses a slightly strong left hand grip (like Keegan Bradley) - presuming that both golfers maintain a GFLW/intact LAFW between P2 and P4. However, Henrik Stenson's clubface will be neutral relative to the back of his left lower forearm between P2 and P4, while Keegan Bradleys' clubface will be slightly closed (statically closed) relative to the back of his left lower forearm between P2 and P4 - due to the fact that he adopted a stronger left hand grip at address (which requires more left forearm pronation at address).
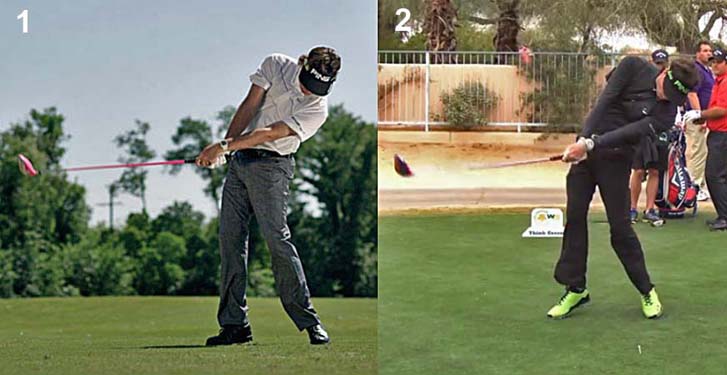
Now, let's consider the issue of dynamic closing of the clubface during the backswing action. Dynamic closing of the clubface is different to static clubface closing (as previously described in Keegan Bradley's backswing action) because the degree of clubface closing (relative to the back of the left forearm) changes in magnitude during the backswing action due to some superaddded biomechanical phenomenon. As an example, I will use Dustin Johnson, who also uses a slightly strong (3-knuckle) left hand grip like Keegan Bradley.
Dustin Johnson's swing video - taken at 3,000 frames/second - http://www.youtube.com/watch?v=CMbr_3WzAG0
Consider capture images taken from the swing video.
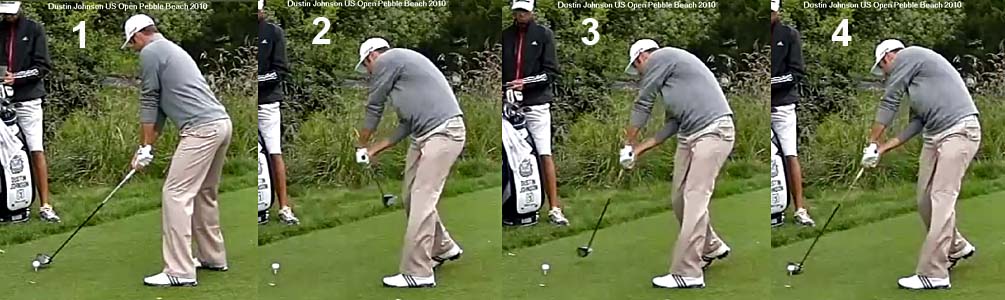
Dustin Johnson's closed clubface - capture images from a swing video
Image 1 - note that Dustin Johnson has a slightly strong (3-knuckle) left hand grip at address. Note that his left forearm is slightly pronated at address, and it is similar in degree to Keegan Bradley's left forearm, because he also adopts a slightly strong left hand grip. Note that his clubface is closed relative to his left lower forearm (watchface area) to the same degree as Keegan Bradley's at the P1 position.Note that Dustin Johnson's clubface is more closed relative to the back of his left lower forearm, and also relative to his clubhead arc, in both image 2 and image 3 - when compared to Keegan Bradley's clubface at similar P positions (and it is nearly identical to Domenic Mazza's clubface at similar P positions). That means that some additional clubface-closing factor is dynamically in play that causes the clubface to become more closed during his backswing action. If you look at Dustin Johnson's left wrist/hand in image 2 and image 3, you can see that he is arching/bowing his left wrist and that causes the clubface to become more dynamically closed relative to the back of his left lower forearm. In image 3, one can clearly see that his clubface is only slightly closed relative to the back of his left hand, but it is very closed relative to the back of his left lower forearm - because his left wrist is angled groundwards (relative to his left forearm) due to the fact that Dustin Johnson actively palmar flexes his left wrist. One can see the "effect" of this dynamic clubface-closing phenomenon very clearly in a DTL image.
Dustin Johnson's closed clubface phenomenon - capture images from a swing video
Image 1 shows Dustin Johnson at the P4 position - note that Dustin Johnson's clubface (red line) is slightly closed relative to the back of his left hand (blue line) and that is due to the static clubface closure inherent in adopting a slightly strong (3-knuckle) left hand grip. However, note that he is palmar flexing his left wrist to a marked degree and that causes the back of his left hand (blue line) to become closed relative to the back of his left forearm (yellow line) and that dynamic element (due to the biomechanical phenomenon of left wrist arching/bowing) causes his clubface (red line) to become much more closed relative to the back of his left forearm (yellow line).Note that Dustin Johnson maintains an arched/bowed left wrist during his early-mid downswing action and that causes his clubface to remain similarly closed (relative to the back of his left lower forearm) between P4 and P6 (image 3).
Now, what is really interesting is to mentally project (mentally imagine) what "effect" having an arched/bowed left wrist at P4 (which dynamically closes the clubface relative to the back of his left lower forearm and also relative to the clubhead arc) will have with respect to Dustin Johnson's late downswing action - if he maintains an arched/bowed left wrist all the way between P4 and P7. We know that Dustin Johnson had to roll his left forearm clockwise during his backswing action, and we could imagine that he will not have to roll it as much counterclockwise during his late downswing action in order to get a square clubface at impact - because his clubface is "seemingly" more closed at P4 (due to the fact that he has added a dynamic clubface-closing phenomenon due to left wrist palmar flexion). However, the "real life" reality is the opposite of one's mental expectations - Dustin Johnson will actually have to roll his left forearm more counterclockwise during his late downswing action in order to acquire a square clubface at impact. This surprising "real life" fact appears to be counter-intuitive! How do we explain why Dustin Johnson has to roll his left forearm more counterclockwise during his late downswing action in order to acquire a square clubface by impact - as a result of having a dynamically closed clubface at P4?
First of all, let's examine Dustin Johnson's downswing action to see whether he maintains an arched/bowed left wrist to the same degree all the way between P4 and P7.
One can clearly see that Dustin Johnson is maintaining a bowed/arched left wrist from P4 to P6 in this series of capture images from a swing video.
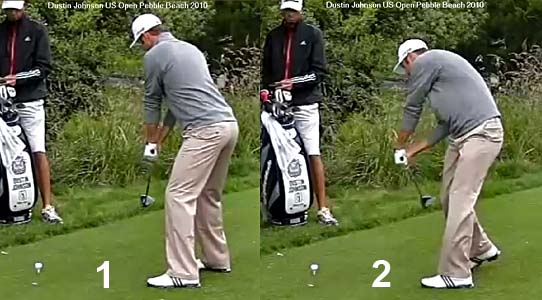
Dustin Johnson's early-mid downswing - capture images from a swing video
I have drawn a yellow line parallel to the back of Dustin Johnson's left forearm and a blue line parallel to the back of his left hand - and one can clearly see that his left wrist is arched/bowed to the same degree at the P4 position (image 1), the P5.5 position (image 2) and the P6 position (image 3).To better see whether his left wrist remains equally arched/bowed between P6 and P7, one needs a different camera viewing angle.
This upline swing video (taken from behind the golfer) offers a very good viewing perspective of the back of his left wrist/hand between P6.5 and P7.
Dustin Johnson swing video - http://www.youtube.com/watch?v=7GJVzA1OheI
Here are capture images of his late downswing.
Dustin Johnson's late downswing - capture images from a swing video
Image 1 shows him at address - when he doesn't have an arched/bowed left wrist. Image 2 shows him at P6.5 - note that his left wrist is arched/bowed to the same degree as it was in the early-mid downswing between P4 - P6. Note that he maintains his arched/bowed left wrist unchanged into impact (images 3 and 4) - although it may visually appear to be less arched/bowed in images 3 and 4, but that it only due to the fact that he is rotating his left forearm counterclockwise and thereby changing the viewing perspective of the back of his left wrist/hand as viewed from the "fixed" camera viewing perspective.What effect does having an arched/bowed left wrist have at the P6.5 position?
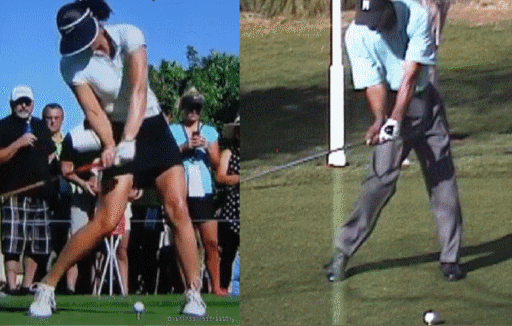
To make the difference between having an arched (versus a non-arched) left wrist clearer, I will compare Dustin Johnson's P1.5 position to his P6.5 position.
Dustin Johnson at P1.5 and P6.5 - capture images from a swing video
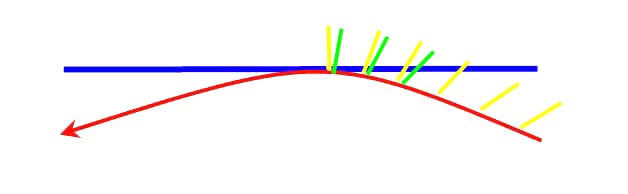
Note that he has an arched/bowed left wrist at P6.5 (image 2) and that causes his clubshaft to be angled back - relative to a comparable situation at P1.5, where the left wrist is not arched/bowed (image 1). Note that his clubface is more open (relative to the ball-target line) as a result of the clubshaft being angled back (away from the target). That means that his clubface is slightly open (relative to the ball-target line and the clubhead arc) during his late downswing - as demonstrated in the following diagram.
Diagram showing the clubface-closing phenomenon in the late downswing
The yellow lines represent a clubface that progressively closes in the late downswing due to the release of PA#3 (left forearm supination phenomenon that rotates the left forearm counterclockwise). If a golfer times his PA#3 release action perfectly, then he should have a square clubface by impact. The green lines represent a clubface where the clubshaft is angled back slightly due to the presence of left wrist arching/bowing, and if one has the same rate of clubface-closing due to the release of PA#3 then the clubface will be slightly open at impact. To acquire a square clubface at impact, the golfer will have to rotate his left forearm slightly more counterclockwise during his PA#3 release action. Does Dustin Johnson rotate his left forearm counterclockwise to a greater degree during his late downswing (during his PA#3 release action)? The answer is unequiviocally affirmative, and it can be clearly discerned by comparing his impact position image to his address position image.
Dustin Johnson at address and at impact - capture images from a swing video
Image 1 shows Dustin Johnson at address - note that he has pronated his left forearm to a finite degree so that he can acquire a slightly strong (3-knuckle) left hand grip. Note that his clubshaft is in a straight-line relationship with his left arm at address, and that he has a finite amount of forward shaft lean secondary to adopting a slightly strong left hand grip.Image 2 shows Dustin Johnson at impact. Note that he has an overtly arched/bowed left wrist that flattens the back of his left wrist (and eliminates the cupping seen in his address position left wrist image). Note that the radial border of his left lower forearm (just above the level of his glove) is rotated more counterclockwise - compared to his address position image. Secondary proof that he has rotated his left forearm more counterclockwise in image 2 (compared to image 1) comes from considering the degree of forward shaft lean that exists in image 2. Note that he has roughly the same degree of forward shaft lean in image 2 as seen in image 1 - despite the fact that he has an arched/bowed left wrist. One would "mentally expect" to see more forward shaft lean at impact - due to the presence of an arched/bowed left wrist (compared to his address postion where he has a GFLW). The "fact" that it doesn't exist offers secondary proof that he has rolled his left forearm more counterclockwise - because counterclockwise rolling of the left forearm will change the "apparent" degree of forward shaft lean that is visually perceived when the clubshaft is viewed from a "fixed" face-on viewing perspective, and it will decrease the "apparent" amount by a finite amount.
Another useful comparison is to compare Dustin Johnson to Keegan Bradley, who also adopts a slightly strong (3-knuckle) left hand grip at address.
Here is a comparison between Keegan Bradley's address position and impact position.
Keegan Bradley at address and impact - capture images from a swing video
Image 1 shows Keegan Bradley at address - note that he prefers to hold his clubshaft perpendicular to the ball-target line at address (and not straight-in-line with his left arm), which means that he must have a slighly bent left wrist at address.Image 2 shows him at impact with more forward shaft lean, which is due to the fact that he doesn't have a bent left wrist at impact and partly due to the fact that his left forearm is pronated at impact, which angles the lifeline of his left palm, and therefore the clubshaft, backwards (away from the target). Keegan Bradley actually has a GFLW at impact - because he maintains a GFLW/intact LAFW throughout his entire downswing action. Note that one can clearly see the entire back surface of his left hand at impact, which means that he has not rotated his left forearm more counterclockwise (like Dustin Johnson) - one can also clearly see that the radial border of his left lower forearm (just above the level of his glove) is angled away from the target to roughly the same degree at impact, as it was at address. This represents further ancillary proof that having an arched/bowed left wrist at impact (as seen in Dustin Johnson's golf swing action) means that the golfer has to rotate his left forearm more counterclockwise during his late downswing in order to get a square clubface by impact.
To better understand this "apparent" contradiction, where an "apparently" closed clubface at P4 results in an open clubface at P6.5 - P7, one needs to understand how golf instructors and golf swing theorists routinely define the terms "open" and "closed" as it pertains to the clubface alignment.
Let's start off with impact (and the late downswing scenario where the clubshaft is nearing impact).
Diagram showing the effect of a bowed/bent left wrist on the clubface at impact
The black dot represents the left shoulder socket, the green line represents the left arm, the grey line represents the left wrist alignment, the red line represents the clubshaft and the violet line represents the clubface alignment.If a golfer places the ball at low point, and the left arm and clubshaft are in a straight line relationship vertically-aligned under the left shoulder socket at impact, then the golfer has a GFLW (functionally-flat left wrist) at impact. If the clubface is parallel to the GFLW (f-FLW) then the clubface should be square to the target (and clubhead arc) at impact if the back of the GFLW (f-FLW) faces the target at impact.
If the golfer has an arched/bowed left wrist at impact, that will cause the clubshaft to be angled back, and the clubface will therefore be open if left wrist palmar flexion causes the clubshaft to angle back without any added twisting of the clubshaft about its longitudinal axis.
If the golfer has a bent left wrist at impact, that will cause the clubshaft to be angled forwards, and the clubface will be closed if left wrist dorsiflexion (extension) causes the clubshaft to angle forwards without any added twisting of the clubshaft about its longitudinal axis.
In this impact (or near-impact) scenario, the left arm and clubshaft are more-or-less in a straight-line relationship, and the back of the left wrist is oriented perpendicular to the general direction of travel of the clubhead along the clubhead arc.
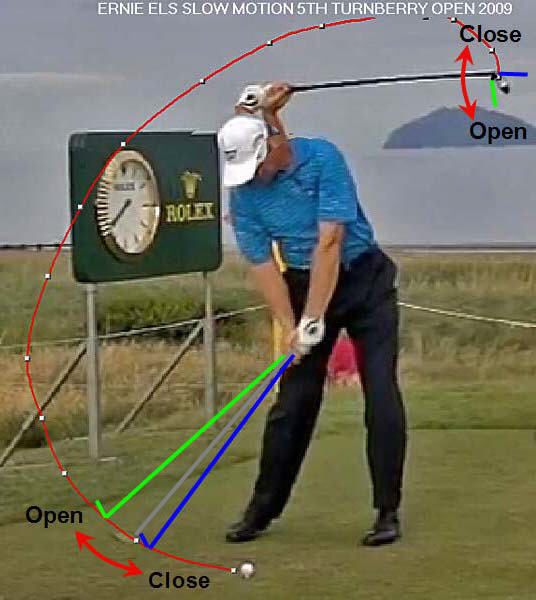
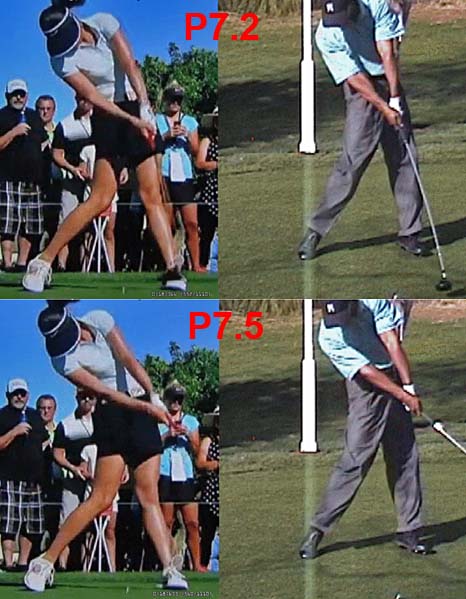
Consider an image of Ernie Els' clubhead arc.
Ernie Els' clubhead arc - image adapted from a swing video capture image
The curved red arced line represents the clubhead arc arc during Ernie Els' downswing action.The green line (near-impact) represents an angled-back clubshaft due to left wrist bowing and it will cause the clubface to be open (relative to the clubhead arc) - presuming that the degree of counterclockwise rotation of the left forearm in the late downswing (due to a PA#3 release action) remains unchanged. The blue line (near-impact) represents a clubshaft that is angled forwards due to a bent left wrist (extended left wrist) and it will cause the clubface to be closed (relative to the clubhead arc) - presuming that the degree of counterclockwise rotation of the left forearm in the late downswing (due to a PA#3 release action) remains unchanged. Note that the left arm and clubshaft are nearly in a straight line relationship, and that the back of the left forearm/left wrist are oriented in a direction that is perpendicular to the direction of travel of the clubhead along the clubhead arc (circumference of the clubhead arc circle). That means that any left wrist bowing/bending motion changes the angle of the clubface in the same general direction of travel of the clubhead along the clubhead arc (see curved red arrow).
Note that I have added another image of Ernie Els' left arm/clubshaft at the P4 position - note that left arm and clubshaft have a 90 degree angle at the P4 position and that the back of his left forearm/left wrist is now parallel (and not perpendicular) to the general direction of travel of the clubhead along the clubhead arc. That means that any left wrist bowing/bending motion changes the angle of the clubface at a roughly perpendicular angle relative to the direction of travel of the clubhead/clubface along the clubhead arc (see curved red arrow). The following diagram better demonstrates the effect of left wrist bowing/bending at the P4 position on the clubface orientation angle.
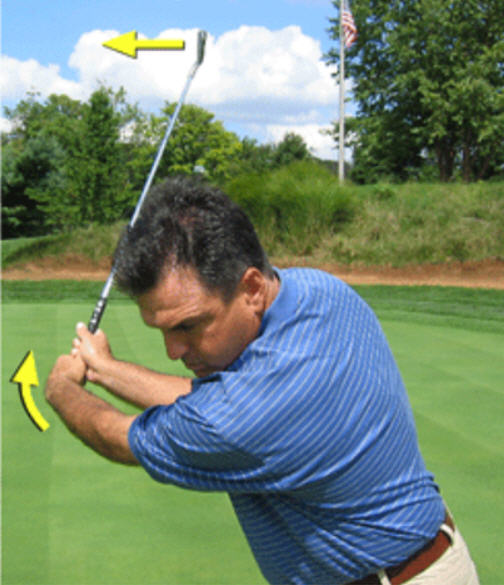
Change in clubface orientation angle due to left wrist bowing/bending at the P4 position
The green line represents the left arm, the red line represents the clubshaft (that is roughly at a 90 degree angle relative to the left arm), the violet line represents the clubface (that is parallel to the back of the left forearm if the left wrist is geometrically/functionally flat and the golfer has a neutral left hand grip) and the curved blue line represents the clubhead arc. Note that left wrist arching/bowing will close the clubface in the upwards-direction of the curved black arrow, and that left wrist bending will open the clubface in the downwards-direction of the curved black arrow. Note that the changing motion of the clubface orientation angle that occurs in the direction of the curved black arrowed path (due to a left wrist bowing/bending motion) is happening roughly perpendicular (and not parallel) to the general direction of travel of a clubhead along the clubhead arc. That is a critically important difference - compared to the near-impact scenario where changes in clubface orientation due to left wrist bowing/bending occurs parallel (and not perpendicular) to the direction of travel of the clubhead along the clubhead arc. When we talk about a closed clubface at the P4 position due to left wrist arching/bowing, we are talking about a clubface-closing phenomenon where the toe of the club is changing its relationship to the heel of the club - but this change is happening at right angles to the clubhead arc, and not in the general direction of travel of the clubhead along the circumference of the clubhead arc. It's like an "apples-to-oranges comparison" scenario when attempting to compare what is happening at P4 relative to what is happening between P6.5-P7 with respect to the effect of left wrist arching/bowing on the clubface orientation angle - and I don't think that it is meaningful to make this comparison when trying to understand the final effect of any left wrist arching/bowing on the clubface orientation angle at impact!If a golfer understands the implications of the previous paragraph, then a golfer should clearly understand that the same left wrist motion (either left wrist bowing or left wrist bending) will have a totally different clubface opening-or-closing effect at the P4 position (compared to the P6.5-P7 position) because the back of the left forearm/left wrist has a totally different orientation angle relative to the clubhead arc at the P4 position. That's why I prefer not to write about whether the clubface is open-or-closed (due to the biomechanical phenomenon of left wrist bowing/bending) at the P4 position - because the same biomechanical phenomenon of left wrist arching/bowing due to left wrist palmar flexion doesn't have the same significance at P4 as it has at near-impact - with respect to its ultimate effect on the the clubface orientation angle at impact. I much prefer to think about the effect of left wrist arching/bowing on the relationship of the clubshaft/clubface relative to the back of the left forearm at the P4 position. Dustin Johnson's arched/bowed left wrist at the P4 position causes his clubshaft to be angled back in the direction of his left forearm's ventral surface (front surface of the left forearm) and it also causes the clubface to become angled back in a similar manner. If that same degree of back-angulation of the clubshaft/clubface (relative to the left forearm) is maintained all the way down to P7, then the clubshaft will be angled back more at impact and the clubface will be open (and not square) at impact - if the back of the left forearm/f-FLW gets back to its address orientation (and if the golfer doesn't compensate for the biomechanical phenomenon of left wrist arching/bowing by increasing his degree of left forearm counterclockwise rotation during the late downswing).
Backswing insights:
Topic number 4: Understanding the biomechanical phenomenon of twistaway and appreciating its dynamic clubface-closing effect.I previously briefly discussed the twistaway phenomenon in my backswing chapter, but my description was incomplete and partly incorrect. In this topic's discussion, I will discuss the issue of twistaway in much greater detail and hopefully clear up any misunderstandings.
Twistaway is basically the biomechanical phenomenon of a finger-torquing action that twists the clubshaft around its longitudinal axis in a counterclockwise direction, and this twisting motion of the clubshaft around its longitudinal axis causes the clubface to become more closed relative to the back of the left forearm and f-FLW.
To help my website's visitors better understand the twistaway phenomenon, I have produced a short (18 minute) explanatory video on this topic, and I have posted the video to my you-tube channel.
Twistaway phenomenon video - https://www.youtube.com/watch?v=85vqJpWIan0
Twistaway can occur with, or without, left wrist palmar flexion; and i) any left wrist palmar flexion action that is happening can either be independent of the twistaway action (where any added twistaway phenomenon is superimposed on an actively/independently palmar flexing left wrist) or ii) any left wrist palmar flexion that is happening can be passively secondary to the twistaway phenomenon. To better understand this important distinction, it is important to understand that one can palmar the left wrist using different muscles.
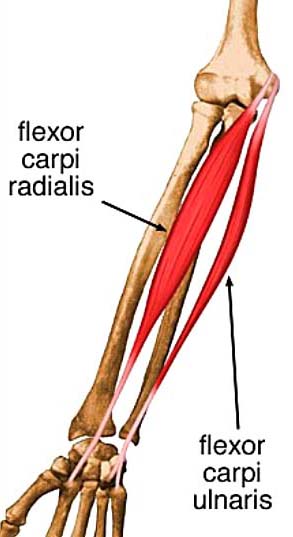
Consider the situation of a "pure" left wrist palmar flexion phenomenon where one only uses the wrist's flexor muscles, and not the finger flexor muscles. There are two wrist flexor muscles - flexor carpi ulnaris and flexor carpi radialis - and if both muscles actively contract they will cause the left wrist to palmar flex in a neutral manner (without any ulnar/radial deviation).
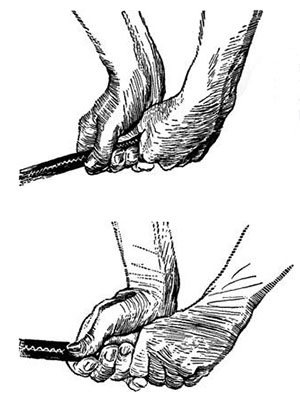
Consider an artist-drawn diagram of these two muscles.
Wrist flexor muscles
Note that the two wrist flexor muscles have their origin on the medial epicondyle of the lower humerus, and they insert on the ventral surface of the distal carpal bones and the base of some proximal phalanges. When these two muscles conjointedly contract, they result in left wrist palmar flexion at the level of the radio-carpal/ulna-carpal joints.
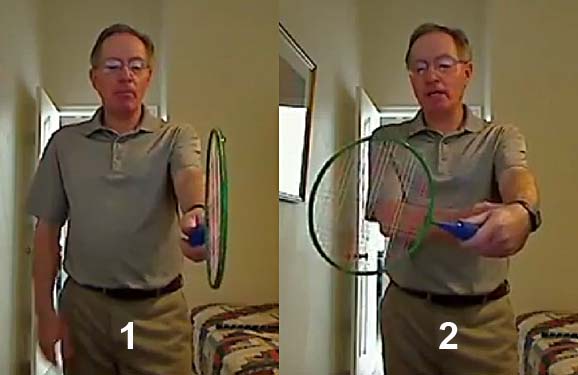
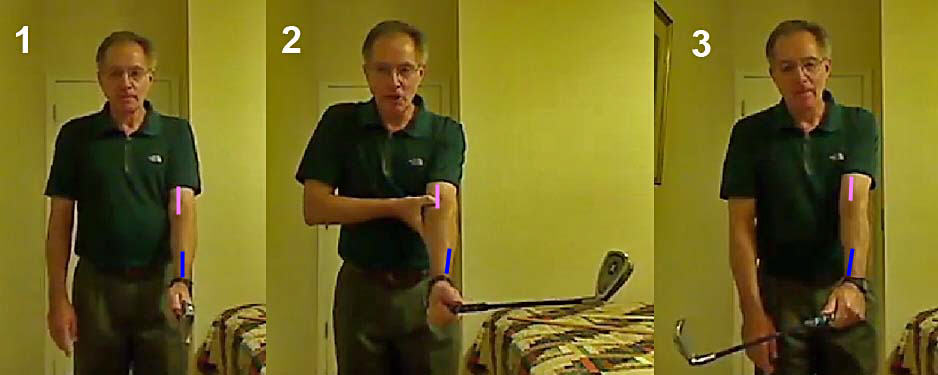
Here is a capture image from my swing video where I demonstrate a "pure" left wrist palmar flexion action while holding a badminton racquet (which is useful to show overt changes in the face orientation angle due to biomechannical phenomena that affect the left wrist and left hand).
Left wrist palmar flexion demonstration - capture images from my swing video
In image 1, I am holding the grip end of a badminton racquet using a neutral left hand grip - note that the racquetface is parallel to the back of my left forearm and f-FLW.In image 2, I am actively palmar flexing my left wrist using the two wrist flexor muscles - without *increasing the degree of active contraction of my finger flexor muscles.
(* the finger flexor muscles to the left 3rd, 4th and 5th fingers are only actively contracted to a finite degree, and to a biomechanically necessary degree that allows me to hold the grip end of the racquet relatively firmly in my left hand)
Note that the effect of "pure" left wrist palmar flexion (due to activation of the two left wrist flexor muscles) is to cause the racquet shaft to be angled backwards. Note that the racquet face remains neutral, and it doesn't open or close [relative to the back of my left hand/forearm] due to a rotation of the racquet shaft around is longitudinal axis.
Now consider, how a very active contraction of the left hand's finger flexor muscles can secondarily cause left wrist palmar flexion that is not due to active contraction of the wrist flexor muscles.
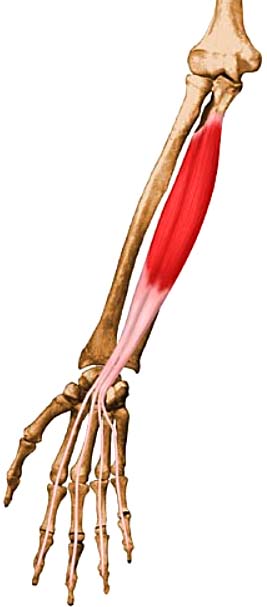
The primary finger flexor muscle is the flexor digitorum profundus muscle.
Flexor digitorum profundus muscle
The flexor digitorum muscle (that supplies tendons to the 2nd, 3rd, 4th and 5th fingers) consitutues most of the muscle bulk of the flexor muscles groups in the ventral muscle compartment of the left forearm, and this muscle has its origin on ventral surface of the proximal end of the ulna bone. At its peripheral end (at the level of the wrist joint), the flexor digitorum muscle turns into four tendons and these four tendons travel through tendon sheaths in the palm and proximal fingers to finally insert at the base of the four distal phalanges.
When the flexor digitorum muscle starts to contract, it first produces flexion at the level of the distal interphalangeal joint, and it only flexes the finger tips. If one progressively increases the degree of active contraction of the flexor digitorum muscle, flexion of the fingers will subsequently also occur at the level of the proximal phalangeal joints and then at the level of the metacarpophalangeal joints. That creates a "fist-like hand" situation where the fingers will curl around any object placed within the palm of the hand eg. racquet grip or golf club grip. By increasing the degree of contraction of the flexor digitorum muscle, it allows a golfer to firmly hold a golf club grip in his left hand so that it doesn't inadvertently/uncontrollably twist around during his execution of a full golf swing action.
Now consider what will happen if one contracts the flexor digitorum muscle even more - more than is needed to acquire a firm grip on the grip end of a golf club or badminton racquet.
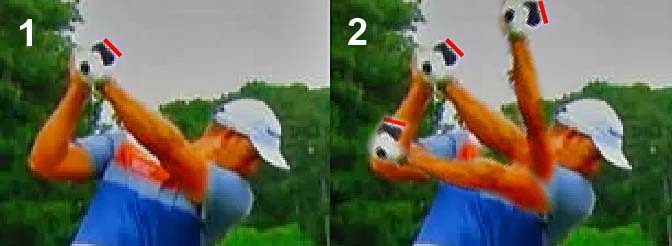
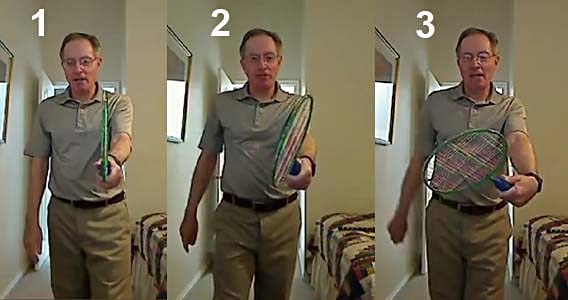
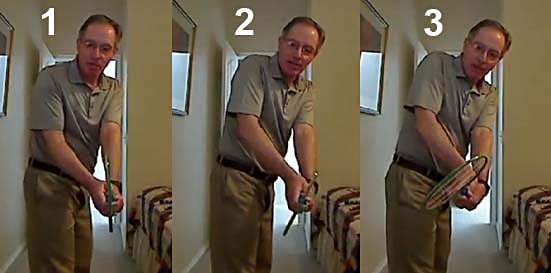
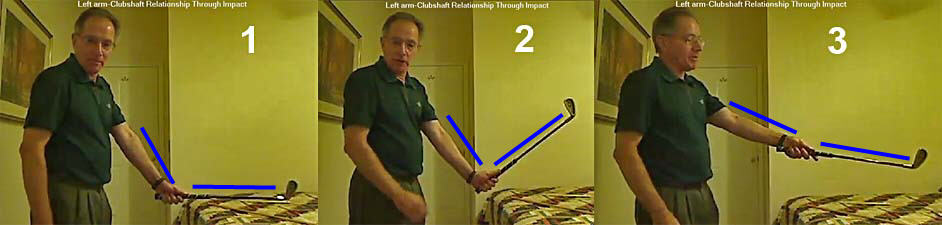
Author demonstrating a twistaway phenomenon - capture images from his swing video
Image 1 shows the racquet being held straight-in-line with my left arm at address - while I am only contracting me left flexor digitorum muscle enough to be able to hold the racquet's grip firmly in my hand. Note that the racquet face is parallel to the back of the back of the left forearm and f-FLW.Image 2 shows what happens when I increase the strength of contraction of the flexor digitorum muscle to the left 3rd, 4th and 5th fingers - the fingers clasping the grip start to twist the grip counterclockwise and the racquet face becomes slightly closed relative to the back of the left forearm/f-FLW. Note that my left wrist is still neutral and not palmar flexed.
Image 3 shows what happens when I increase the degree of contraction of the flexor digitorum muscle to the maximum degree - the racquet face gets twisted even more closed due to the finger torquing action and the left wrist becomes secondarily/passively palmar flexed. The palmar flexion is not due to activation of the left wrist's wrist-flexor muscles, and it is solely due to active contraction of the flexor digitorum muscle.
Here is an example of twistaway happening during a takeaway action.
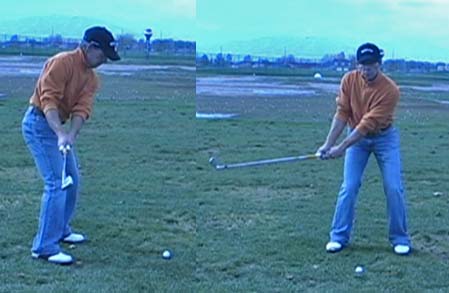
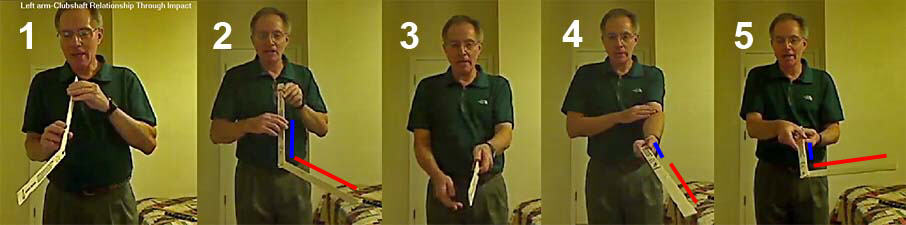
Twistaway happening during a takeaway action - capture images from the author's swing video
Image 1 shows the author simulating a standard takeaway action using a badminton racquet. Note that the racquet face remains parallel to the ball-target line, because the back of the left forearm/f-FLW is parallel to the ball-target line at the P2 position.Image 2 shows what happens when I apply a twistaway finger-torquing phenomenon during the execution of a takeaway action. Note that my fingers and knuckles (MP joints) curl under, and note that the back of my left hand becomes flattened - but note that my left wrist doesn't become overtly palmar flexed if the degree of left flexor digitorum profundus muscle contraction is not maximal. Note that the racquet face becomes closed relative to the back of my flat left hand and left forearm due to the finger-torquing phenomenon.
Image 3 shows what happens during a takeaway if I maximise the twistaway phenomenon's finger-torquing action by maximising my contraction of the left flexor digitorum profundus muscle. The racquetface becomes even more closed *relative to the back of the left hand and left forearm, and the left wrist becomes secondarily palmar flexed.
(* the fact that the racquet face becomes closed relative to the back of the flattened left hand, and not only to the back of the left forearm, is the distinguishing element that allows one to differentitate dynamic clubface closing due to a twistaway finger-torquing phenomenon from dynamic clubface closing due to a "pure" left wrist palmar flexion action [as previously described in Dustin Johnsons' backswing action])
A twistaway finger-torquing phenomenon can happen during the takeaway action, during the mid-backswing or end-backswing time period, or during the downswing's P5.5-P6.2 time period when the back of the left hand starts to turn in the direction of the target. Many golfers inadvertently/unconsciously apply a twistaway finger-torquing force without even being consciously aware that it is happening. It is usually of no consequence (in terms of affecting the clubface angle at impact) because the twistaway finger-torquing biomechanical phenomenon usually dissipates in the late downswing as the club releases and as the left wrist moves from radial deviation to ulnar deviation. I have never seen a skilled/professional golfer maintain a twistway finger-torquing action during the late downswing (P6.5-P7) time period.
Consider some examples of when a twistaway finger-torquing phenomenon (that dynamically closes the clubface) may happen during the backswing action.
Example 1: A twistaway finger-torquing phenomen may happen during a TGM hitter's takeaway action.
Consider this swing video of Scott performing a TGM hitter's swing takeaway action - http://www.youtube.com/watch?v=08k4R6SlbZI
Note that Scott talks about "keeping the clubface facing the ball" during the performance of his takeaway action - as shown in the following capture images.
Scott performing a TGM hitter's takeaway action - capture images from his swing video
Note how he keeps the clubface slightly closed relative to the clubhead arc during his takeaway action. Note that the back of his left forearm/f-FLW is not parallel to the ball-target line at the P2 position, because he is not rotating his left forearm clockwise as much as would usually happen in a TGM swinger's takeaway action. Note that it "appears" that the fingers of his left hand are curling more under and facing more groundwards during his takeaway action, and it "appears" that the clubface could be slightly closed relative to the back of his left hand during this time period due to a superadded element of a twistaway finger-torquing phenomenon. If a twistaway finger-torquing phenomenon (that dynamically closes the clubface relative to the back of the left forearm) is actually present, it is important to understand that it will not affect the clubface during his late downswing action if the flexor digitorum muscle naturally/automatically becomes less actively contracted during that time period.Example 2: A twistaway finger-torquing phenomenon may also happen during the takeaway if a golfer uses the type of takeaway action recommended by Joe Dante.
Here is link to a section of Joe Dante's book (that is freely available online) - http://www.golf-swing-magic.com/golf-backswing3.html
Here is an artist-drawn image from Joe Dante's backswing article.
Takeaway action recommned by Joe Dante
The standard takeaway action - where the back of the left hand becomes parallel to the ball-target line at the P2 position - is shown in the lower image.Joe Dante recommends "turning the knuckles of the left hand under" during his recommended takeaway action - as seen in the top image. Although Joe Dante doesm't describe any finger-torquing action (due to a twistaway phenomenon) in his article, I would not be surprised if it unconsciously happens during his recommended takeaway action when he turns his left hand under so that the knuckles of his left hand face more groundwards. Again, if a twistaway finger-torquing phenomenon is actually present, it would be of no consequence (in terms of affecting the clubface orientation angle in the late downswing) if the flexor digitorum muscle automatically/naturally becomes less actively contracted during the late downswing.
Example 3:
Brian Manzella (a New Orleans-based golf instructor) has recommended a twistaway action as a slice-fixing aid to prevent the clubface being open at impact.
Brian Manzella demonstrating his twistaway action
Note that Brian Manzella palmar flexes his left wrist during his twistaway action. A clue that a twistaway finger-torquing phenomenon is present is the "fact" that the clubface is slightly closed relative to the back of his flattened left hand.To keep the clubface closed, and to prevent an open clubface at impact, Brian Manzella actually recommends maintaining the twistaway action throughout the entire downswing and early followthrough. I think that's terrible golf instructional advice because maintaining an over-active contraction of the left flexor digitorum muscle during the late downswing would impede the free release of the club. I personally believe that any over-active contraction of the flexor digitorum muscle (that twists the club about its longitudinal axis) should not be allowed to happen during the late downswing/impact time period. I also believe that if a golfer has a slice-problem due to an open clubface at impact, that the appropriate remedy should be targeted at the "true" cause of the problem, and that one shouldn't use the band-aid approach of employing a twistaway phenomenon that can impede the free release of the club - which will happen if the golfer unnaturally maintains a twistaway finger-torquing action throughout the late downswing and early followthrough.
Downswing insights:
Topic number 5: Should dual external rotation (dual-ER) of both thighs occur at the end of the hip squaring phase of the early downswing?What is dual-ER of the thighs?
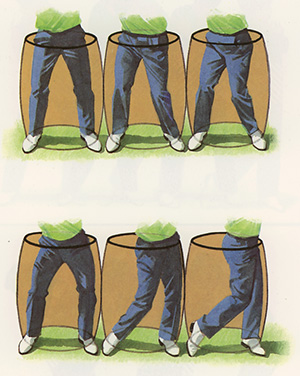
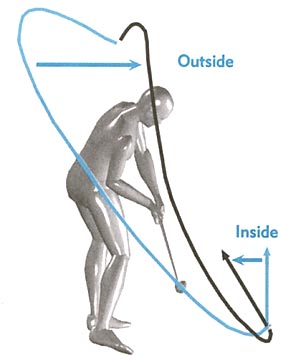
Consider a golfer who rotates his pelvis without much lateral shift towards the target - as if he were rotating in a barrel.
Diagram depicting the rotating-in-a-barrel concept - from reference number [1]
The top-right image shows the golfer at the end-backswing position. Note that his pelvis is centralised within the imaginary barrel.The bottom-left image shows the golfer at the end of the hip squaring phase of the downswing (which usually happens by the P5 position). Note that the pelvis is still relatively centralised within the imaginary barrel and the pelvis has not moved very much left-laterally during the early downswing. This represents a very rotary type of pelvic motion, and it is the type of pelvic motion that I believe is very suitable for a golfer's downswing pivot action.
The golfer who is often used as prototypical example of this type of rotary pelvic motion is Sam Snead.
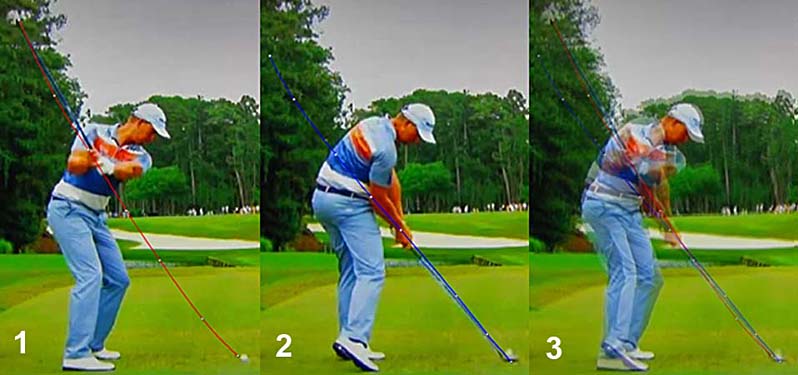
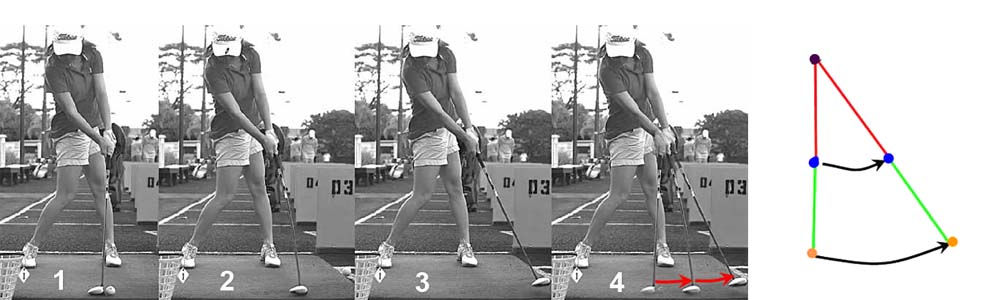
Sam Snead's early downswing pelvic motion - capture images from a swing video
This sequence of four images shows Sam Snead's early downswing pelvic motion.Image 4 shows Sam Snead at the P5 position (end of the hip squaring phase) - note that he has the classical Sam Snead "sit-down" look and note that both knee caps face forwards (in the direction of the ball-target line) and symmetrically outwards (away from the center).
The author-drawn diagram (below the Sam Snead images) depicts his pelvis motion during his early downswing. The blue line represents his tush line - and his right buttocks abuts the tush line at his end-backswing position (image 1). The red line represents his pelvis (represents a straight line drawn between his two hip joints). The green line represents the front (anterior surface) of his femur and the grey line represents an imaginary line that is drawn perpendicular to the pelvis axis at each hip joint. The grey line is the reference point that allows one to define whether the femur is internally or externally rotated at the level of the hip joint, and whether the femur is abducted or adducted.
The curved red arrow shows the directional motion of the left hip joint when a golfer uses a "left hip clearing action ala Hogan" maneuver.
The curved green arrow represents the translational motion of the left knee in a targetwards direction at the start of the early downswing.Image 1 shows Sam Snead at the P4 position - note that his pelvis has rotated clockwise more than the front of his right thigh during his backswing action, and that causes his right femur to be internally rotated and slightly adducted at his end-backswing position. The cause of this differential degree of rotation of the pelvis relative to the right femur is due to the fact that his right leg is increasingly weighted during his backswing action, and this phenomenon impedes the free clockwise rotation of his right femur. By contrast, his left leg becomes increasingly unweighted during his backswing action, and his pelvis does not rotate more than his left femur during his backswing action, so his left femur is still slightly abducted and externally rotated at his end-backswing position (as it was at address). The left knee appears "kicked-in" as viewed from the face-on camera viewing perspective, so the left femur "appears" to be adducted and more internally rotated - relative to an imaginary line that is perpendicular to the ball-target line. However, remember that the "true" reference point is the grey line - how the front of the femur is aligned relative to the pelvis axis at the level of each hip joint, and the left femur is externally rotated and slightly abducted at the P4 position relative to the pelvic axis.
Image 2 (~P4.3 position) shows how Sam Snead starts the downswing with a 'left hip-clearing action ala Hogan' maneuver where he pulls his left hip joint back towards the tush line while rotating his left femur counterclockwise. Note that the left knee moves targetwards. Note that the rate of rotation of the pelvis is similar to the rate of rotation of the left femur, so that there is very little change in the degree of external rotation and abduction of the left femur (relative to the pelvis axis) during this time period. By contrast, the right femur appears to be less internally rotated/adducted (relative to the pelvic axis at the level of the right hip joint) because the pelvis is moving more counterclockwise than the right femur. Note that the degree of internal rotation/adduction of the right femur diminishes between P4.3 - P5, and that the right femur becomes externally/abducted by the P5 position so that both femurs are symmetrically externally rotated (dual-ER) at the P5 position.
One can see this "pure" rotating-in-a-barrel type of pelvic motion during the early downswing in many professional golfers.
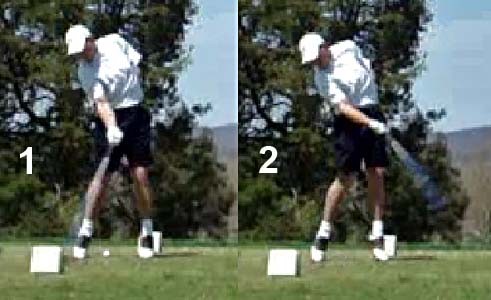
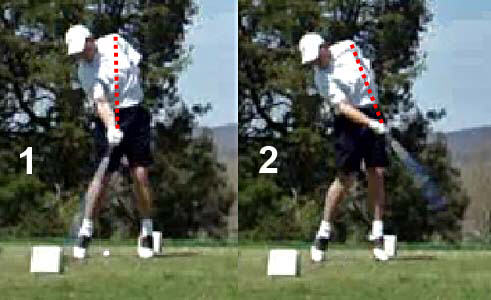
Consider another example - Jamie Sadlowski.
Jamie Sadlowski's pelvic motion - capture images from a swing video
Image 1 shows Jamie Sadlowski at address - note that both thighs are symmetrically abducted and externally rotated to a small degree.Image 2 shows Jamie Sadlowski at his end-backswing position - note that his right thigh is internally rotated and adducted relative to his pelvic axis at the level of his right hip joint, and that his left thigh is externally rotated and abducted relative to his pelvic axis at the level of the left hip joint.
Image 4 shows Jamie Sadlowski at the P5 position - note that he has dual-ER of both thighs to roughly the same degree and note that his pelvis is centralised between his legs (and that it is very similar in degree compared to his address position).
Now, although I personally favor a "pure" rotating-in-a-barrel type of pelvic motion, many professional golfers have more lateral shift of their pelvis during their early downswing action.
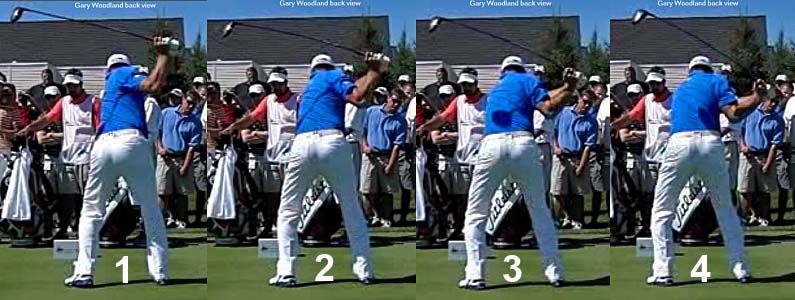
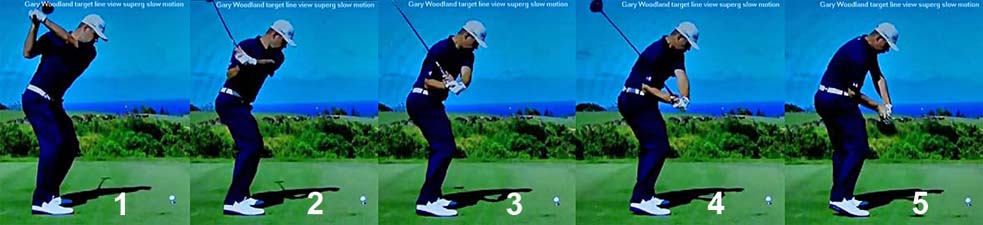
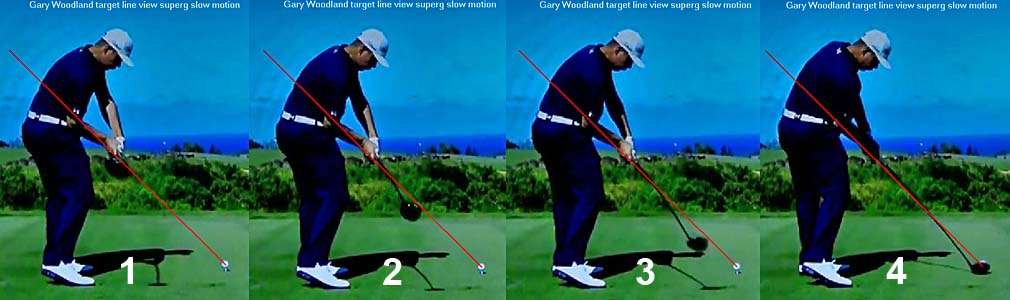
Consider an example - Gary Woodland.
Gary Woodland swing video - http://www.youtube.com/watch?v=jrkBJMd7Xno
Here are capture images from his swing video.
Gary Woodland's pelvic motion - capture images from his swing video
Image 1 shows Gary Woodland at address - I have placed red lines along the outer border of his pelvis and upper thighs.Image 2 shows Gary Woodland at the P3 position - note how much he slides his pelvis away from the target during his backswing action.
Image 3 shows Gary Woodland at his end-backswing position - he is slightly more centralised (compared to image 2) because he actually starts his downswing's pelvic motion before his club reaches its final end-backswing postion.
Image 4 shows Gary Woodland at the P5 position - note how much his pelvis has moved left-laterally during the hip-squaring phase of his early downswing. Note that his thighs are not symmetrically externally rotated/abducted (compared to Sam Snead and Jamie Sadlowski). The degree of asymmetry is very small and I think that it is perfectly acceptable to incorporate a small degree of left-lateral pelvic slide motion in one's downswing's pivot action if one can still consistently remain very stable between one's legs during one's downswing action - like Gary Woodland.
Downswing insights:
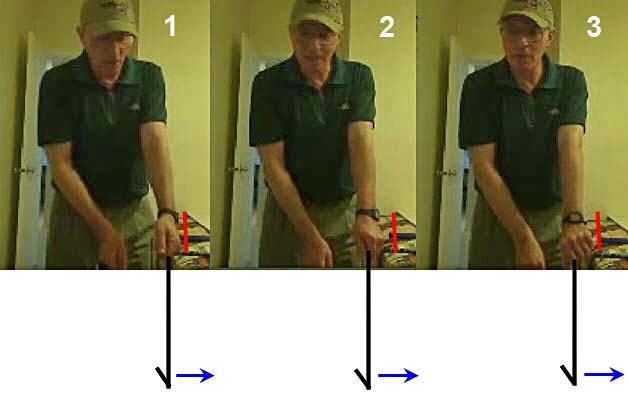
Topic number 6: How fast should the arms/hands drop down during the early downswing action, and should it happen before the golfer rotates his upper torso (shoulders)?
I have noted that many golf instructors recommend allowing the arms/hands to drop down vertically at the start of the downswing (due to the effect of gravity) before a golfer starts to rotate the upper torso. I personally believe that the force of gravity is insufficiently strong to account for the speed of downward motion of the arms during the early downswing in many professional golfers, and I also believe that it is not a biomechanical imperative to move the arms/hands downwards before rotating the upper torso.
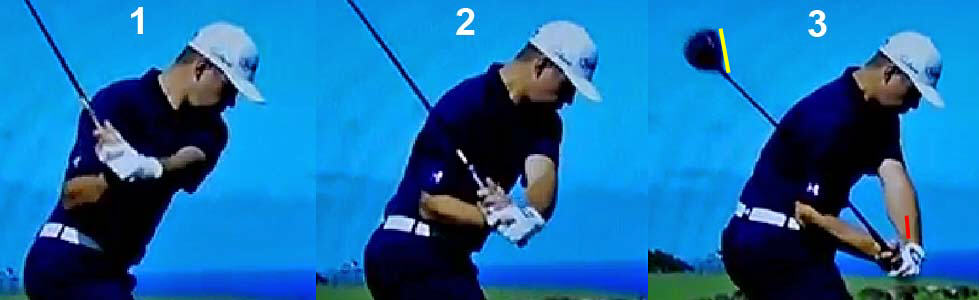
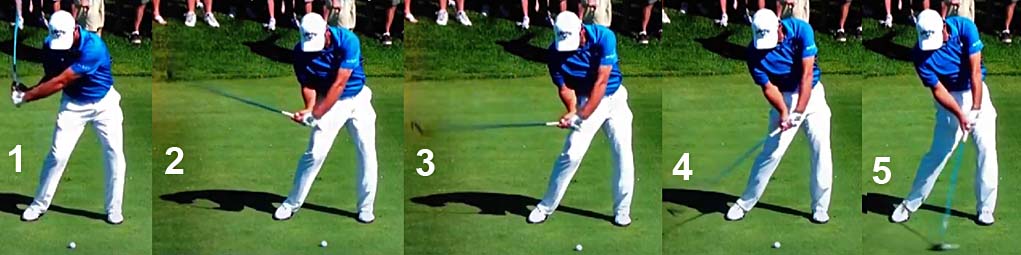
Consider Gary Woodland's early downswing action.
Gary Woodland swing video - http://www.youtube.com/watch?v=jrkBJMd7Xno
Here are capture images from the swing video.
Gary Woodland's early downswing action - capture images from his swing video
Note how fast Gary Woodland moves his right elbow groundwards during his early downswing action - see image 4. I think that it is wrong-headed to believe that it is entirely due to the influence of gravity and I think that he is actively adducting his right arm due to active muscular contraction of his right shoulder girdle muscles. I also think that he is actively rotating his upper torso (shoulders) at the same time.Consider a back view video of Gary Woodland's swing action - http://www.youtube.com/watch?v=Tb9Q-d9FWjQ
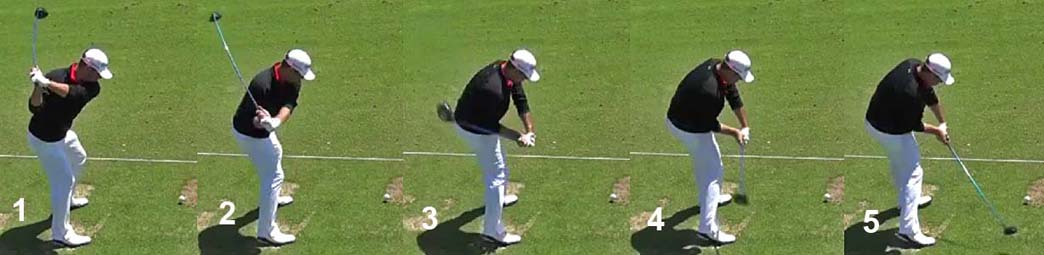
Here are capture images of his early downswing action.
Gary Woodland's early downswing action - capture imagess from his swing video
Image 1 shows Gary Woodland at his end-backswing position - note that he doesn't even rotate his shoulders to >90 degrees during his backswing action, and that his clubshaft doesn't get to parallel.Images 2,3 and 4 show his early downswing action between P4 and P5 - note that he is simultaneously i) rotating his upper torso (shoulders) and ii) adducting his right upper arm while keeping his power package intact. In other words, there is no vertical dropping of his arms/hands prior to a counterclockwise rotation of his upper torso (shoulders).
Professional golfers vary considerably in the degree of downward movement of the arms/hands in the early downswing (relative to the speed of rotation of their upper torso) and there is no "fixed" rule that states that the arms must drop down vertically before the upper torso starts to rotate counterclockwise. I have discussed this issue in much greater depth in my "Book review: Slot Swing - Jim McLean" review paper. In that review paper, I have provided an example of a golfer whose hands drop down vertically prior to any rotation of his upper torso (eg. Sergio Garcia) and many examples of golfers who hands drop down to waist level while they are simultaneously rotating their upper torso counterclockwise. However, as a general principle, it is reasonable to expect that a golfer who has "high hands" at the end-backswing position (eg. Ryan Moore) will more likely have to move his hands downwards/groundwards before rotating his upper torso - when compared to a golfer who has "low hands" at the end-backswing position (like John Erickson and Ben Hogan).
Downswing insights:
Topic number 7: What causes the clubshaft to shallow-out during the early downswing, and how much should the clubshaft shallow-out during the early downswing?
It is very common to see a professional golfer shallow-out the clubshaft during the early downswing, but there is no "fixed" rule that states how much the clubshaft should shallow-out during the early-mid downswing (between P4 and P5.5).
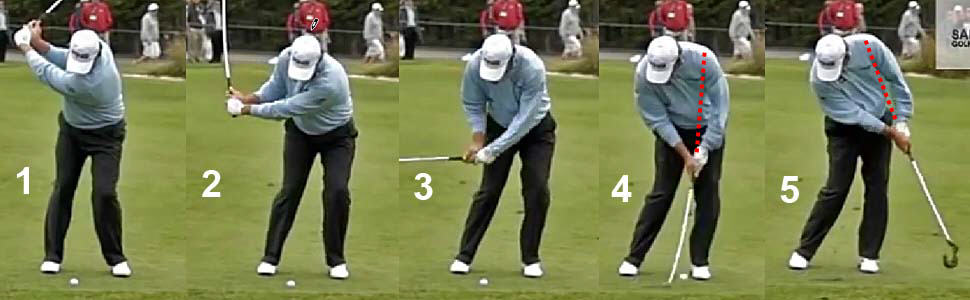
Consider Henrik Stenson's clubshaft shallowing-out action during his early downswing.
Henrik Stenson swing video - http://www.youtube.com/watch?v=OKfe6F8PmUc
Here are capture images from the swing video.
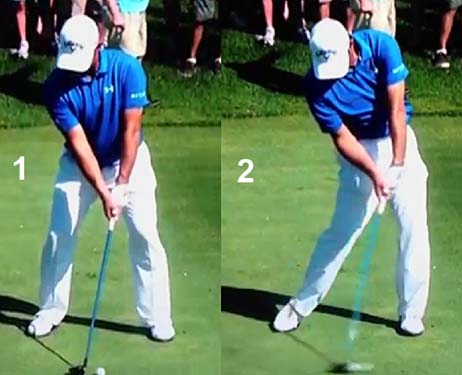
Henrik Stenson early-mid downswing - capture images from his swing video
The red curved line represents his hand arc path. The straight blue lines are drawn through the two elbows to show their respective degree of downward movement during the early-mid downswing.Henrik Stenson is an example of a golfer who gets his left arm across his shoulder turn angle at his end-backswing position with his hands very close to the TSP, and who gets his hands/clubshaft down to the elbow plane by the P5.5 position (image 3).
Note that Henrik Stenson's left elbow is slightly higher than his right elbow at the P4 position (image 1).
Note how Henrik Stenson actively adducts his right upper arm at the start of his downswing action (image 2) and note how his right elbow drops slightly more down below the level of his left elbow. It is that differential degree of movement of the right elbow (relative to the left elbow) that causes the clubshaft to shallow-out in his early downswing. Because the degree of dropping of his right elbow (relative to his left elbow) is very small, there is very little clubshaft shallowing-out effect - and his clubshaft plane in his early downswing is only slightly shallower than his clubshaft plane in his late backswing. Note that Henrik Stenson's hands move significantly downwards, and far less outwards (in the direction of the ball-target line), in his early downswing (image 2).
Image 3 shows Henrik Stenson at the P5.5 postion. Note that his hand arc path between P4 and P5.5 is steeper than the clubhead arc path.
Now, consider the hand arc path and clubshaft shallowing-out action of Ryan Moore.
Ryan Moore swing video - http://www.youtube.com/watch?v=_m3lCmj9yrU
Here are capture images from the swing video.
Ryan Moore early-mid downswing - capture images from his swing video
The red curved line represents his hand arc path. The straight blue lines are drawn through the two elbows to show their respective degree of downward movement during the early-mid downswing.Image 1 shows Ryan Moore at the end-backswing position. Note how steep his left arm is angled with his hands positioned high above his right lateral clavicle area. Note that both elbows are nearly level, with his right elbow slightly higher than his left elbow.
Image 2 shows how actively Ryan Moore adducts his right upper arm in his early downswing and note how that causes his right elbow to drop well below his left elbow. Note how that large differential degree of movement of the right elbow (relative to the left elbow) shallows-out his clubshaft. While that is happening, note that his left forearm must be pronating more so that his intact LAFW can become parallel to a shallower downswing plane, and this left forearm pronation phenomenon happens passively/subconsciously. Note that he maintains an intact LAFW (left arm-clubshaft remain straight-line-aligned) and a GFLW during his clubshaft shallowing-out action. Note that this active right arm adduction motion (that drops the right elbow well below the left elbow) causes the right humerus to become externally rotated. However, note that the right forearm is not affected and it remains neutral. Note that his hands have mainly moved downwards/groundwards and not outwards (in the direction of the ball-target line) - in fact, if you look carefully you will note that his hands have actually moved slightly backwards (away from the ball-target line).
Image 3 shows Ryan Moore at the P5.5 position and he looks very similar to Henrik Stenson at the P5.5 position. If you compare their hand arc paths, they look very similar between P5 and P5.5, but Ryan Moore's hand arc path is much more vertical, and even angled slightly backwards (away from the ball-target line), between P4 and P5. The important golf instructional lesson to be learned from this downswing comparison is that it is very important for a golfer, who has "high hands" at the P4 position (like Ryan Moore), to actively adduct the right arm and drop the right elbow below the left elbow - if he wants to shallow-out the clubshaft (like Ryan Moore). A major swing fault would be to move the hands outwards (in the direction of the ball-target line), rather than primarily downwards, at the start of the downswing as this would predipose to an OTT-move and an out-to-in clubhead swing path during the later downswing.
Clubhead swingpath comparison - from reference number [2]
The black path represents the clubhead path of a golfer who comes down too steeply due to an OTT-move, and the blue path represents the more optimum clubhead path of a golfer who shallows-out the clubshaft in the early downswing (like Ryan Moore). Beginner/developing golfers, who suffer from an OTT-move, must clearly appreciate the fact that they need to move their hands more downwards (and not outwards) at the start of the downswing, and that they need to actively adduct their right arm so that their right elbow drops below their left elbow - if they want to significantly shallow-out their clubshaft during their early downswing action. The mantra for golfers who suffer from an OTT problem is "down-down-down" when it comes to the initial motion of the hands at the start of the downswing and they must ingrain the "feel" of the hands moving mainly downwards (groundwards), and not outwards (in the direction of the ball-target line), if they want to cure their OTT problem.Consider another professional golfer who has a steep left arm angle and "high hands" at his end-backswing position - Steve Marino.
Steve Marino swing video - http://www.youtube.com/watch?v=y0_3CIx04jU
Here are capture images from the swing video.
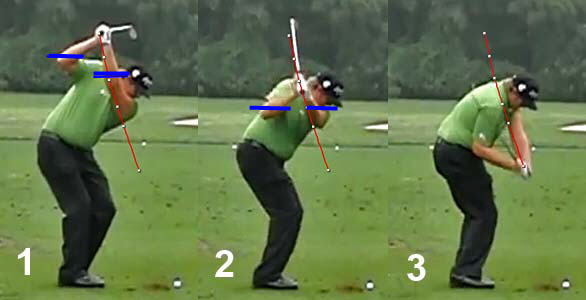
Steve Marino early-mid downswing - capture images from his swing video
The red curved line represents his hand arc path. The straight blue lines are drawn through the two elbows to show their respective degree of downward movement during the early-mid downswing.Image 1 shows Steve Marino at his end-backswing position. Note that he has "high hands" and a steep left arm angle even though his left arm is angled across his shoulder turn angle. His steep left arm angle is due to having more bend at hip joint level, so that he has a much more bent-over spinal bend inclination angle (compared to Ryan Moore). Note that his right elbow is higher than his left elbow.
Image 2 shows how Steven Marino actively adducts his right arm at the start of his downswing, but he he doesn't drop his right elbow below his left left elbow. Note that his hands move mainly downwards, and not backwards (away from the ball-target line) at the start of the downswing - compared to Ryan Moore - and that he has far less clubshaft shallowing-out effect. Images 2 and 3 shows that his clubshaft is coming down a steeper inclined plane (compared to Henrik Stenson and Ryan Moore).
It is possible to play tour professional quality golf with "high hands", a very steep hand arc path and a steeper downswing clubshaft plane (as seen in Steve Marino's swing action), but it is very easy for a less skilled amateur golfer to move the hands too much outwards (in the direction of the ball-target line) during the early downswing and throw the clubshaft over-the-plane, which will cause a major "out-to-in clubhead swing path through impact" swing fault. That's a potential disadvantage of having "high hands" at the P4 position. I much prefer Henrik Stenson's swing style where the hands are positioned at/near the TSP at the P4 position. From that end-backswing position, less clubshaft shallowing-out action is required and a large compensatory move (biomechanically driving the right elbow well below the left elbow via a very active right arm adduction maneuver) will not be necessary. Also, if a golfer has a small degree of OTT action that results in a reverse slot swing action (eg. Sam Snead's swing), then the clubshaft's inclined plane in the impact zone will still not be too steep - if he starts his downswing from a shallower end-backswing hand position.
Downswing insights:
Topic number 8: During the early-mid downswing, the intact LAFW comes down the inclined plane with the back of the GFLW (f-FLW) being parallel to the inclined plane. When the golfer reaches the P5.5 position, he will soon be turning his hands "around-the-corner" (which is the transitional zone between the mid-downswing and the late downswing [roughly equivalent to the zone between P5.5 and P6.2]) so that he can get the back of his GFLW (f-FLW) to progressively face the target during the late downswing. What efficient swing style options can a golfer use when moving his hands/clubshaft through this "around-the-corner" transitional zone between the mid-downswing and the late downswing?
I think that there are two efficient options - i) an intact LAFW option and ii) a combined "early left forearm supination + left wrist palmar flexion" option - and I will first describe the intact LAFW option because I personally favor the concept of playing golf with an intact LAFW.
Henrik Stenson is a poster-child example of a golfer who maintains an intact LAFW throughout his entire swing action from P1 to P7.2+, and he is a prototypical role model for golfers who want to adopt an intact LAFW swing style.
Let's consider how Henrik Stenson negotiates the "around-the-corner" transition zone between the mid-downswing and the late downswing.
First of all, let me remind me you how Henrik Stenson moves his intact LAFW/GFLW down the inclined plane between P4 and P5.5.
Henrik Stenson swing video - http://www.youtube.com/watch?v=OKfe6F8PmUc
Here are capture images from the swing video.
Henrik Stenson's clubhead path - capture images from his swing video
Image 1 shows Henrik Stenson's clubhead path during his backswing (red splined path) and image 2 shows his clubhead path during his downswing (blue path), while image 3 (composite image) shows how similar his downswing clubhead path is relative to his backswing clubhead path - note that the downswing's clubhead path is slightly shallower in the above-waist level zone secondary to his early downswing's clubshaft-shallowing action.
Henrik Stenson early-mid downswing action - capture images from his swing video
The red plane line represents his clubshaft plane at impact and it passes through his right elbow at impact, which means that it is the elbow plane.Image 1 shows Henrik Stenson near the P4 position with his hands/clubshaft well above the elbow plane, and roughly on the TSP.
Note how Henrik Stenson drops his hands/clubshaft down to the elbow plane between P4 (image 1) and P6 (image 3). I have drawn a short red line along his clubface and a short blue on the back of his lower left forearm, and these lines are straight-line-aligned relative to each other between P4 and P6, which indicates that he maintains an intact LAFW (clubshaft that is straight-line-aligned relative to his left arm)/GFLW during his early-mid downswing.
Image 2 shows that he is on-plane (butt end of the clubshaft points at the ball-target line) during his mid-downswing and that the back of his GFLW (and intact LAFW) is parallel to his mid-downswing's inclined plane (which is only marginally steeper than the elbow plane).
Note that his hands/clubshaft eventually reach the elbow plane by the time he gets to the P6 position (image 3) and that it remains on that plane as he transitions between the mid-downswing to the early phase of the late downswing (image 4).
Now let's' consider his hand and clubshaft behaviour in greater detail as he transitions through the "around-the-corner" transition zone between the mid-downswing and the early phase of the late downswing (zone between P5.5 - P6.2).
Henrik Stenson's mid-late downswing action - capture images from his swing video
The blue plane line represents the elbow plane.
Image 1 shows Henrik Stenson at the P5.5 position and his hands/clubshaft have descended down to the elbow plane. I have drawn a short red line along the radial border of his left lower forearm, and that red line is parallel to the back of his left lower forearm and GFLW.
Image 2 is at P6.2 and it shows how his clubshaft descended down the elbow plane while he starts to release PA#2 between the P5.5 and P6.2 position. Note that there is very little rotation of his left lower forearm/GFLW during this time period. In other words, the clubshaft is releasing within the plane of his intact LAFW between P5.5 and P6.2 while his intact LAFW remains roughly parallel to the elbow plane. In other words, Henrik Stenson is not yet rotating his intact LAFW/GFLW counterclockwise during this "around-the-corner" transition zone between P5.5 and P6.2.
Consider the rotary motion of his intact LAFW/GFLW in greater detail by studying the next series of images.
Henrik Stenson's transitional zone swing action - capture images from his swing video
The red plane line represents the elbow plane.
Image 1 is at P6, image 2 is at P6.2, image 3 is at P6.5 and image 4 is at impact. Note that I have included enlarged images of his left forearm/GFLW so that you can clearly discern the rotary motion of his left lower forearm and GFLW between P6 and impact. I have drawn a short red line over the front of his left antecubital fossa (left elbow pit) and a short blue along the radial border of his left lower forearm so that you can discern the degree of rotation of his left lower forearm/GFLW during this time period. Note that the blue line is straight-line-aligned with the red line in images 1 and 2, which indicates that he is not significantly supinating his left forearm between P6 and P6.2. Note that the blue line has rotated more counterclockwise than the red line in image 3 (which is at the P6.5 position) and this represents the start of his left forearm supinatory motion that is primarily responsible for the release of PA#3. Most importantly, note that he delays his left forearm supinatory action so that it doesn't happen during the P5.5 - P6.2 time period.
In summary, Henrik Stenson keeps his intact LAFW/GFLW roughly parallel to the elbow plane between P5.5 and P6.2 while allowing his club to release on that plane, and he only rotates his intact LAFW/GFLW counterclockwise after he bypasses the "around-the-corner" transition zone between P5.5 and P6.2.
Now consider another option of moving the hands/clubshaft during the "around-the-corner" transition zone between the mid-downswing and late downswing - and this option is called the combined "early left forearm + left wrist palmar flexion" option.
Gary Woodland is an example of a golfer who uses this combined "early left forearm supination + left wrist palmar flexion" option.
Gary Woodland swing video - http://www.youtube.com/watch?v=WUfnZuHPrvo
Here are capture images from that swing video.
Gary Woodland's early-mid downswing - capture images from his swing video
Image 1 shows Gary Woodland at his end-backswing position with an intact LAFW and GFLW. Note that the clubface is parallel to the back of his left forearm, and that feature is characteristic of a golfer who has i) a neutral left hand grip and ii) who has no static clubface closure/opening phenomenon when first adopting a left hand grip at address.Image 2 shows Gary Woodland at the end of his early downswing (P5 position) - note that he still has an intact LAFW and GFLW (slightly cupped left wrist).
Image 3 shows Gary Woodland just below the P5 position, and if you look carefully, you will note that his left wrist is slightly palmar flexed.
Image 4 shows Gary Woodland at the P5.3 - P5.5 position - his left wrist is now overtly palmar flexed and his left forearm is slightly supinated (compared to images 2 and 3 when the back of his left forearm was approximately parallel to the inclined plane). Note that his clubshaft's plane has not steepened even though his is supinating his left forearm slightly (which theoretically should steepen the clubshaft angle) and that is due to the fact that he is simultaneously palmar flexing his left wrist (which angles the clubshaft in an underplane direction). The two clubshaft-plane influencing phenomena cancel each other out and the clubshaft remains more-or-less on the same plane.
Image 5 shows Gary Woodland at the P6 position - note that the left forearm has supinated so much that the back of the lower left forearm is near-vertical, and not approximately parallel to the mid-downswing's clubshaft plane (as can be seen in image 3).
Here are close-up images showing the same combined "early left forearm supination + left wrist palmar flexion" biomechanical phenomena.
Gary Woodland's mid-downswing "early left forearm supination + left wrist palam flexion" action - capture images from his swing video
Image 1 shows Gary Woodland at the P5 position - note that he has a GFLW and the back of his left forearm/GFLW is approximately parallel to the inclined plane.Image 2 - note that one can start to see the logo on the back of Gary Woodland's left hand glove in this image and it is secondary to the initiation of his "early left forearm supination + left wrist palmar flexion" maneuver.
Image 3 shows Gary Woodland at the P5.5 position - note that his left wrist is overtly palmar flexed and that his left forearm is slightly supinated. I have drawn a short red line along the radial border of his left lower forearm and one can see that it has rotated more counterclockwise (relative to images 1 and 2). I have also drawn a yellow line parallel to his clubface and it is now closed relative to the back of his left forearm. Note that his clubshaft and left arm are no longer in a straight-line-alignment (compared to the P4 and P5 positions) and the clubshaft is slightly underplane relative to his left arm (and that is secondary to the clubshaft angulation due to a left wrist palmar flexion phenomenon).
What is the likely causal explanation for the two biomechanical phenomena that constitute a combined "early left forearm supination + left wrist palmar flexion" maneuver. I think that the best explanatory answer is that Gary Woodland is starting to turn the back of his left hand in the general direction of the target as he gets closer to the "around-the-corner" zone between P5.5 - P6.2, and that is biomechanically due to an active early left forearm supination phenomenon. However, the clubshaft, which lies on the inclined plane, is constrained by the RFFW and the RFFW's "clubshaft-holding" action, which impedes any clubshaft-steepening action that would normally occur secondary to a left forearm supinating phenomenon. The secondary effect of this "inertial constraint" (due to the RFFW holding the club back) is that the left wrist passively palmar flexes during the active left forearm supinatory action. I use the term "passive" to imply that the left wrist palmar flexing phenomenon is not due to active contraction of the left wrist palmar flexor muscles or due to over-active contraction of the flexor digitorum muscle to the left hand's 2nd - 5th fingers.
What "effect" does this combined "early left forearm + left wrist palmar flexion" biomechanical maneuver have on the clubshaft in the mid-late downswing?
Here are capture images showing the motion of the left forearm/hand and clubshaft as it passes through the "around-the-corner" zone between P5.6 - P6.2.
Gary Woodland's mid-late downswing - capture images from his swing video
The red line is the clubshaft plane at impact, and it passes through his right elbow at impact, and it is therefore (definitionally) the elbow plane.Note that Gary Woodland's hands are positioned slightly above the elbow plane at P6 (image 1) and also at P6.2 (image 2) and at P6.5 (image 3). By contrast, note that the clubshaft is slightly below the elbow plane as the club releases and that it approaches impact from slightly below-the-plane.
Here again (for comparison purposes) is Henrik Stenson's "around-the-corner" zone action.
Henrik Stenson's mid-late downswing - capture images from his swing video
Note that Henrik Stenson's left hand and clubshaft are on the elbow plane at P6 (image 1) and that they both remain on the same plane in the later downswing. Note that Henrik Stenson delays his left forearm supination phenomenon and that it doesn't happen during the "around-the-corner" time period between P5.5 - P6.2.By contrast, Gary Woodland's left forearm supination phenomenon starts earlier and it continues to happen during the entire mid-late downswing time period between P5.5 - P7. This continuous left forearm rotary phenomenon can be clearly seen in a face-on video.
Gary Woodland swing video - http://www.youtube.com/watch?v=16rBDm5hoNA
Here are capture images from the swing video.
Gary Woodland's mid-late downswing - capture images from his swing video
Image 1 shows Gary Woodland just bypassing the P5 position - note that he has a GFLW (slightly cupped left wrist) and intact LAFW. Note that the back of his GFLW and left forearm is approximately parallel to the inclined plane.Image 2 shows Gary Woodland at the P5.5+ position - note that he has an arched-bowed left wrist (due to left wrist palmar flexion) and note that the back of his left forearm/hand has rotated more counterclockwise (due to an early left forearm supination phenomenon) and it is no longer parallel to the inclined plane.
Note how he continues to rotate the back of his left forearm/hand counterclockwise throughout the remainder of his downswing action (images 3 and 4 and 5).
In other words, Gary Woodland not only starts his left forearm supination phenomenon early, but he also continues to supinate his left forearm all the way into impact in a continuous manner and he doesn't use a delayed left forearm supination phenomenon (like Henrik Stenson).
I previously mentioned that an early left forearm supination phenomenon (when combined with a passive left wrist palmar flexion phenomenon) will close the clubface relative to the back of the left forearm. This clubface-closing phenomenon can be clearly seen in this birds-eye view swing video.
Gary Woodland swing video taken from a more birds-eye viewing perspective - http://www.youtube.com/watch?v=ckGyP1NQo1I
Here are capture images from the swing video.
Gary Woodland's early-mid downswing action - capture images from his swing video
Images 1 and 2 show Gary Woodland's early downswing action - note that the clubface is straight-line-aligned relative to his GFLW and left forearm and that he has an intact LAFW.Image 3 shows Gary Woodland at the P5.5 position - note that he is performing a combined "early left forearm + left wrist palmar flexion" maneuver that angles the clubshaft to a slightly shallower plane and that also causes the clubface to become slightly closed relative to the back of his left forearm. However, note that the clubface is parallel to the back of his left hand (in images 3 and 4 and 5), which indicates that he is not using a twistaway maneuver during his combined "early left forearm supination + left wrist palmar flexion" action. Some golfers, who grip the club more tightly during their execution of a combined "early left forearm supination + left wrist palmar flexion" maneuver, may unconsciously (inadvertently) over-activate their left flexor digitorum muscle, which will produce a twistway phenomenon. A clue that a twistaway phenomenon is happening during this time period is the "fact" that the clubface will become more closed relative to the back of the left hand, and not only closed relative to the back of the left forearm. If a golfer utilises a twistaway phenomenon during his performance of a combined "early left forearm + left wrist palmar flexion" phenomenon, it will temporarily close the clubface even more (relative to the back of his left forearm), but this temporary clubface-closing effect will dissipate in the late downswing if the flexor digitorum muscle relaxes.
What is also interesting is that the clubface-closing phenomenon due to a combined "early left forearm + left wrist palmar flexion" maneuver, which closes the clubface relative to the back of the left forearm and clubhead arc, *will increase the total amount of left forearm supination needed to square the clubface by impact. This "fact" becomes readily apparent if one compares an impact capture image to an address capture image.
(* see my explanatory description of Dustin Johnson's bowed/arched left wrist downswing action in topic number 3 to better understand this counter-intuitive "fact")
Gary Woodland at address and at impact - capture images from his swing video
Note that the radial border of his left lower forearm is slightly more rotated counterclockwise at impact (image 2) compared to his address position (image 1). The amount of increased counterclockwise of the left forearm/hand is *very small and golfers, who use the combined "early left forearm supination + left wrist palmar flexion" option, instinctively/unconsciously make this small adjustment without any need for conscious (deliberate) thought.(* secondary proof that he has rotated his left forearm more counterclockwise at impact comes from noting that he has approximately the same degree of forward shaft lean at impact as he manifested at address - despite having a bowed left wrist at impact, which should theoretically increase the degree of forward shaft lean)
By contrast, this small degree of left forearm counterclockwise rotary adjustment (that is needed to ensure a square clubface at impact in a golfer who has a bowed left wrist at impact) is not necessary in golfers who use the intact LAFW option (like Henrik Stenson).
Here are capture images of Henrik Stenson at address and at impact.
Henrik Stenson at address and at impact - capture images from a swing video
Image 1 shows Henrik Stenson at address - note that he has a neutral left hand grip (like Gary Woodland). Note that he has a GFLW (slightly cupped left wrist) at address when the clubshaft is in a straight-line relationship with his left arm at address.Note that he still has a GFLW (and not a bowed left wrist) at impact - image 2. Note that his left forearm is pronated to the same degree at impact as it was at address, and that he doesn't have to rotate his left forearm more counterclockwise in order to square his clubface at impact.
Downswing insights:
Topic number 9: Do you believe that using i) a combined "early left forearm supination + left wrist palmar flexion" maneuver and ii) a delayed (late) internal rotation of the right humerus action is necessary/mandatory if a golfer wants to perform a drive-hold hand release action (DH-hand release action) through impact?
I don't - but Kelvin Miyahira believes that they are essential biomechanical elements that a golfer must perform in order to successfully execute a DH-hand release action.
Kelvin Miyahira has written a number of articles on the different release styles [3] used by professional golfers and he claims to have identified the biomechanical elements that allow a golfer to perform a DH-hand release action through impact, rather than a non-DH hand release action (flipping, rolling or flip-rolling).
Here is a list of the biomechanical elements that he has studied, and it also includes their prescribed motion for a DHer (copied from reference [3b]).
Kelvin Miyahira's list of biomechanical elements that "supposedly" produce a DH-hand release action
If you take the time to read his 5 release articles, you may gain the false impression that he has a very good knowledge of human anatomy, human musculoskeletal physiology and human kinesiology. However, he has no background training in these fields, and I think that his personal opinions are often woefully inaccurate and wrong-headed. There is a multitude of errors in his stated opinions, but they are far too numerous to discuss in this review paper, so I will only discuss a few, more pertinent, examples.Example 1:
Note that Kelvin Miyahira states that DHers must use an early left forearm supination maneuver, and that assertion may certainly apply to a small subset of professional golfers like Gary Woodland, who uses an "early left forearm supination + left wrist palmar flexion" maneuver. However, the majority of professional golfers, who are DHers, use the intact LAFW option - like Henrik Stenson, Adam Scott and Keegan Bradley. Note that Kelvin Miyahira also states that the left wrist must be in state of palmar flexion at impact (left wrist bowing/arching) in a DHer, but that claim is obviously untrue because many professional DH-golfers, i) who have a neutral left hand grip and ii) who use the intact LAFW option (like Henrik Stenson), will have a neutral left wrist (GFLW = f-FLW) at impact.
Example 2:
Kelvin Miyahira also places a major emphasis on his claim that a golfer should maintain external rotation of the right humerus for a longer time period in the mid-downswing and avoid early internal rotation of the right humerus. This is the specific written statement made by Kelvin Miyahira in reference number 3d-: "In looking at the differences between drive/holders and all other release styles, there is one common difference; early firing of right shoulder internal rotation."
First of all, Kelvin Miyahira incorrectly describes the internal rotation movement of the right humerus in the right shoulder socket joint as a "right shoulder internal rotation" movement. That represents the incorrect use of medical terminology. It is the right humeral head that is internally rotating in the right shoulder socket joint and the movement should be described with reference to to the moving bone (right humerus) and not the stationary bone (glenoid fossa of the right scapula). Secondly, he doesn't explain why he believes that earlier internal rotation of the right humerus will lead to a non-DHer hand release action. I agree that maintaining external rotation of the right humerus, while actively adducting the right humerus during the early-mid downswing, allows a golfer to shallow the clubshaft and also maintain a 90 degree lag angle for longer, which will allow a golfer to avoid an earlier club release action. However, an early random release action (rather than a late random release action or a late release action) doesn't causally (necessarily) result in a non-DHer hand release action (eg.flipping or rolling).
Consider the golf swing of one of Kelvin Miyahira's students - Kelli Oride.
Kelli Oride swing action - https://www.youtube.com/watch?v=p7hBadAiMcA
Here are capture images from her swing video.
Kelli Oride's DH-hand release action - capture images from her swing video
Image 1 shows Kelli Oride at impact - note that she has a GFLW (and not a bowed/arched left wrist).Images 1, 2, 3 and 4 demonstrates that she maintains a DH-hand release action throughout the immediate post-impact zone from P7 to P7.2+. First of all, note i) that the clubshaft never bypasses her left arm and she constantly maintains a GFLW and she avoids any left wrist flipping; and secondly, note that ii) she doesn't roll through impact (note that the radial border of her left lower forearm doesn't significantly rotate counterclockwise during the P7 - P7.2 time period). Kelli Oride is therefore a poster child example, and a prototypical role model, of a golfer who can perform a flawless DH-hand release action through the immediate impact zone.
Now, consider the motion of her right humerus in the mid-downswing.
Kelli Oride's early internal rotation of the right humerus - capture images from her swing video
Image 1 is at the P5.5 position and image 2 is at the P6 position - note that she is internally rotating her right humerus early, and not late (as recommended by Kelvin Miyahira). Now, that early internal rotation of her right humerus, when combined with an early straightening of the right elbow, may cause her to start to release the club earlier, but it obviously doesn't cause her to become a non-DHer.Consider Kelli Oride's late downswing action.
Kelli Oride's late downswing action - capture images from her swing video
Kellie Oride is using an early random release action, but that doesn't result in a non-DH hand release action. Also, note that she doesn't use an "early left forearm supination + left wrist palmar flexion" option (like Gary Woodland), and she maintains an intact LAFW while using the late left forearm supination option (like Henrik Stenson), and yet she still can perform a flawless DH-hand release action through the immediate impact zone between P7 - P7.2.Example 3:
In reference number 3e, which is devoted to the "Essentials of the Drive-Hold Swing", Kelvin Miyahira states-: "here’s the Cliff Notes version of the golf swing with nothing but the simple, essential macro movements listed here". In that article relating to the essentials of the drive-hold swing, his number one topic is a "strong grip". Kelvin Miyahira states under that topic-: "If your grip is strong enough, you will need less left forearm supination/left wrist flexion to get the clubface squared up early and remain stable through impact". It is obviously true that gofers who adopt a stronger left hand grip will need less left forearm supination (less PA#3 release action) to get a square clubface by impact, but that doesn't mean that the left wrist/hand unit will remain more stable throughout the immediate impact zone from P7 to P7.2 simply because the left hand grip strength is stronger. There are many skilled golfers (like Gary Woodland, Henrik Stenson, Adam Scott, Kelli Oride) who use a neutral left hand grip, and who have no problem performing a DH-hand release action through the impact zone. Ben Hogan even used a weak left hand grip, and he had no problem performing a DH-hand release action through impact. I think that it is eminently possible to "hold" a stable GFLW (or bowed left wrist) while the left arm and clubshaft moves through the immediate impact zone between P7 and P7.2 if the left arm is in constant forward motion at an angular velocity that matches the angular velocity of the clubshaft, because I believe that drive-hold stability is primarily derived from the perfectly matched angular velocity of the left arm relative to the angular velocity of the clubshaft, and it is not primarily due to some intrinsic property inherent to a particular anatomical configuration/immobility of the left wrist-hand unit that is solely determined by left hand grip strength.
Example 4:
In reference number [3e], which is devoted to the "Essentials of the Drive-Hold Swing", Kelvin Miyahira states in the second topic devoted to "clubfaceology"-: "Once you’ve got the body movements mastered, the most important factor for a drive/holder is clubface control. If the clubface gets too open at any point in the swing, a good golfer will figure a way to close it rapidly. But in doing so, this is increasing the clubface rate of closure making errors much more dramatic".
What represents an open clubface in Kelvin Miyahira's mind?
This is the photo example that Kelvin Miyahira uses in his article.
Golfer at the P4 and P7.2 positions - composite photo created from two images in reference number [3e]
Kelvin Miyahira has drawn a green line parallel to the clubface in image 1, and he is implying that it represents an open clubface. He is also implying that it is causally reponsible for the golfer flipping post-impact (image 2).I think that Kelvin Miyahira's opinion that the clubface is open at the P4 position is wrong. Note that the golfer has an intact LAFW and GFLW in image 1, and that the clubface is straight-line-aligned relative to the back of his GFLW/left forearm. Under those conditions, the clubface cannot be deemed to be open, and I regard it as "neutral". The "fact" that the green line is more vertical than 45 degrees is due to the "fact" that the left arm is much steeper than the shoulder turn angle. Kelvin Miyahira is seemingly oblivious of the "golf instructional lesson" that I described in topic number 3 when I used this modified, composite-arm photo of Henrik Stenson.
Henrik Stenson's clubface alignment at the P4 position - capture image from a swing video
In image 2, the clubface is parallel to the back of Henrik Stenson's left forearm/GFLW in all three left arm photo-variations, and therefore the clubface is neutral (and not open/closed) in all of those three left arm photo-variations. The change in clubface alignment (red line) relative to the horizon (ground) is simply due to the variation in left arm angle relative to the horizon (ground). If a golfer has a steep left arm angle at the P4 position (like Ryan Moore), and if he still has an intact LAFW/GFLW, then he will not have a greater predisposition to being a non-DHer (rather than a DHer) through impact - even though the clubface is more vertical than 45 degrees at the P4 position. Many professional golfers have a steep left arm angle at the P4 position (eg. Ryan Moore, Steve Marino, Rory Sabbatini, and Jim Furyk), while maintaining an intact LAFW/GFLW alignment, and I don't think that they are consequently more likely to flip-through-impact.Kelvin Miyahira has posted an image of that particular golfer flipping after impact, and he has posited a causal explanation between a i) cause - that particular golfer's clubface orientation angle at the P4 position and an ii) effect - that particular golfer's left wrist flipping action through impact. However, he has not seemingly excluded other biomechanical/mechanical factors that could more likely be causally responsible for the left wrist flipping phenomenon. For example, that particular golfer has a very bent left elbow ("chicken-winging" left elbow) in that post-impact image, and a "chicken-winging" left elbow is often associated with left arm stalling through impact (or/alternatively, a right arm swing-hitting action), and left arm stalling/slowing through impact could more likely causally account for the left wrist flipping phenomenon.
Example 5:
Kelvin Miyahira acknowledges the fact that there are different types of DHers and he divides DHers into three subtypes [3a]. The one major subtype is the bowed-DHer, and Gary Woodland is a good example of that bowed-DHer subtype. The other major subtype is the flat-DHer, who has a flat, and not bowed, left wrist through impact - and Henrik Stenson is a good example of a flat-DHer.
Here is Kelvin Miyahira's photo example of Henrik Stenson's flat-DH hand release action through impact.
Henrik Stenson's flat-DH hand release action - composite image created by combining three images from reference number [3a]
Note that Henrik Stenson has a f-FLW (GFLW) through impact (images 2 and 3) and that he doesn't flip or roll through impact.Now, although Kelvin Miyahira and I agree that Henrik Stenson is a flat-DHer, we have a totally different biomechanical explanation as to the nature of the biomechanical phenomena that are happening during his flat-DH hand release action. Kelvin Miyahira states in reference number [3a] the following regarding flat-DHers-: "Flat wrist DH’ers supinate their left wrist perhaps only half as much as the bowed DH’ers in the pre-impact phase. Since they don’t supinate much, their clubface gets squared early by releasing their lag earlier".
I think that his assertion is totally nonsensical! First of all, the total amount of left forearm supination that must occur pre-impact is directly correlated with left hand grip strength. Golfers who use a weak left hand grip (like Ben Hogan), or who use a neutral left hand grip (like Gary Woodland and Henrik Stenson), are going to need more left forearm supination during their late downswing than golfers who adopt a slightly strong (3-knuckle) left hand grip (like Keegan Bradley). As I demonstrated in topic number 8, both Gary Woodland and Henrik Stenson use a neutral left hand grip, and Gary Woodland (who is a bowed DHer) is only going to require marginally more left forearm supination than Henrik Stenson in his late downswing in order to square the clubface by impact, and the major difference between Gary Woodland and Henrik Stenson relates to the timing of the left forearm supinatory action. Gary Woodland uses an early left forearm supination maneuver while Henrik Stenson uses a late left forearm supinatory maneuver. Secondly, it is totally wrong-headed to believe that since flat-DHers "don't supinate much, their clubface gets squared earlier by releasing their lag earlier". There is no "evidence" that flat-DHers release PA#2 earlier than bowed DHers, and even if they did, it would not square the clubface earlier - because the club releases within the plane of the intact LAFW and it doesn't become closed relative to the clubhead arc if the golfer doesn't rotate the intact LAFW counterclockwise during the early phase of the PA#2 release action. As I demonstrated with respect to Henrik Stenson's downswing action in topic number 8, he releases the club within the plane of his intact LAFW between P5.5 - P6.5 and PA#2 is already >75% released by the time the club reaches the P6.5 position, and Henrik Stenson only significantly releases PA#3 (via a late left forearm supinatory action) after bypassing the P6.5 position. During the initial release of PA#2, and prior to the release of PA#3, the clubface is not really closing if the back of the GFLW still remains roughly parallel to the inclined plane and if the LAFW remains intact.
Kelli Oride's late downswing action - capture images from her swing video
Note how much Kelli Oride's club has released between the P5.5 and P6.5 positions because she uses an early random PA#2 release action, but note that the back of her GFLW remains roughly parallel to the inclined plane during this time period. Seeing that she maintains an intact LAFW during her PA#2 release action, and seeing that the club releases within the plane of her LAFW, the clubface must be parallel to the back of her GFLW during this time period. That means that the clubface is not really closing due to her early PA#2 release action. That "fact" can be verified by carefully examining her swing video.Here are capture images of her clubface between the P5.5 - P6.5 time period.
Kelli Oride's PA#2 release action - capture images from her swing video
Image 1 is at the P5.5 position - note that her clubface is parallel to the back of her GFLW/lower left forearm and that it is roughly parallel to the inclined plane because the back of her GFLW is parallel to the inclined plane.Image 2 is at P6.2 and image 3 is at P6.5. Note how much her club releases (via a PA#2 release action) between the P5.5 and P6.5 positions. Note that the clubface remains parallel to the back of her GFLW during this time period because she maintains an intact LAFW and the club releases within the plane of her LAFW during this entire time period. The clubface is not really closing relative to the clubhead arc during this time period although it is closing relative to the ball-target line, and that is due to the counterclockwise rotation of her upper torso and therefore left arm (note that both her left upper arm and left forearm rotate counterclockwise to the same degree during this time period due to a body rotation and not due to a PA#3 release action).
Note how open Kelli Oride's clubface is at the P6.5 position (image 3) even though her PA#2 release action is almost 70% completed. It is a fallacy to believe that her earlier PA#2 release action is closing her clubface relative to the clubhead arc, and thereby decreasing the need for a more complete left forearm supinatory action (more complete PA#3 release action) during the remainder of her late downswing action.
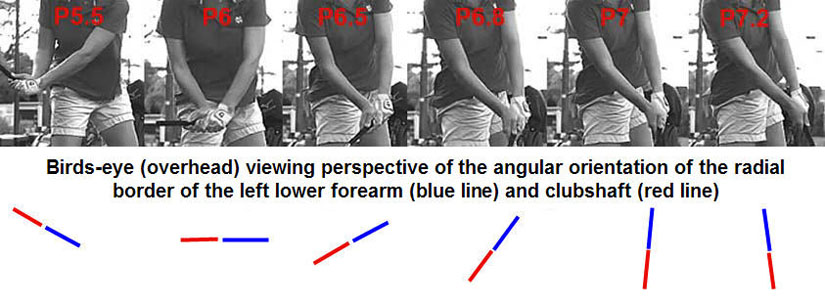
Kelli Oride's late downswing action - capture images from her swing video
Note how much Kelli Oride has to rotate her GFLW via a left forearm supinatory action (confirmed by looking at the signficant degree of counterclockwise rotation of the radial border of her left lower forearm relative to her left antecubital fossa) between the P6.5 position and the P7 position. Her early release of lag does not decrease the amount of left forearm supinatory action required to square the clubface by impact - as Kelvin Miyahira claims!
Example 6:
Kelvin Miyahira seemingly doesn't understand the difference between dynamic clubface closure due to left wrist bowing (as seen in Dustin Johnson's swing action) and static clubface closure due to adopting a very strong left hand grip (4-knuckle grip) at address (as seen in David Duval's swing action).
Kelvin Miyahira posted the following two images in reference number [3d].
Dustin Johnson and David Duval at the P4 position - composite image created from two images from reference number [3d]
Kelvin Miyahira made the following comments alongside those two images in his article [3d] -: "On the other end of the extreme there guys like Dustin Johnson, David Duval, Lee Trevino, Paul Azinger, Lee Janzen, Ryan Palmer, Tommy Gainey and more who play with what Johnny Miller calls “shut to open.” It just means they are more closed with the clubface at the top therefore require less supination prior to impact in order to square the clubface."Kelvin Miyahira states that Dustin Johnson's clubface is "closed at the top" and he believes that Dustin Johnson therefore needs "less supination" prior to impact. However, I have demonstrated in topic number 3 that Dustin Johnson actually needs more (and not less) left forearm supination during his downswing in order to square the clubface by impact - because he dynamically closes his clubface (relative to his left forearm) secondary to his use of an idiosyncratic left wrist bowing maneuver during his backswing action.
What about David Duval? David Duval virtually doesn't need to use any left forearm supination in his downswing action i) because his clubface is statically closed (relative to the back of his left forearm) due to the fact that he adopts a very strong (4-knuckle) left hand grip at address, and ii) because he doesn't rotate his left arm/forearm clockwise during his backswing action.
Consider David Duval's swing video - https://www.youtube.com/watch?v=8cGaBRAZHO8
Here are capture images from his swing video.
David Duval's backswing and downswing action - capture images from his swing video
David Duval adopts a very strong (4-knuckle) left hand grip at address. That means that the back of his left hand, and the back of his lower left forearm, is roughly parallel to the inclined plane (and roughly parallel to the ball-target line) at the P1 position. To acquire that address left hand position, he has to internally rotate his left humerus and fully pronate his left forearm at address (as similarly seen in Jamie Sadlowski's and Dominec Mazza's swing).Image 1 shows David Duval at the P2 position. To get to that P2 position, David Duval simply adducted his left arm without having to rotate his left forearm clockwise. Although his clubface looks slightly closed to the clubhead arc, it is actually square because he didn't perform any rotary motion of his left arm/forearm during his takeaway action.
Image 2 shows how David Duval upcocks his left wrist to acquire a 90 degree left arm-clubshaft angle by the P2.5 position. Note that the back of his left hand and back of his left forearm is parallel to the inclined plane, and that he didn't have to rotate his left forearm to achieve that alignment. His clubface is still square to the clubhead arc because he has not rotated his left arm/forearm.
Image 3 shows David Duval at the P4 position. He got to that end-backswing position by simply continuing to adduct and elevate his left arm without needing to rotate his left arm/forearm clockwise. His clubface could traditionally be defined as being closed (because it looks more horizontal than 45 degrees relative to the ground) at the P4 position, but I think that it is actually square to his clubhead arc because he didn't rotate his left arm/forearm clockwise at any time point during his entire backswing action.
Image 4 shows David Duval at the P5 position and image 5 shows him at the P6 position. Between P4 and P6, David Duval is simply abducting and depressing his left arm/forearm to a lower level without any counterclockwise rotation of his left arm/forearm. His clubface still "appears" closed (relative to the back of his left hand/left forearm) to the same degree as it was during his backswing action. The toe of his club is pointing more skwards at the P6 position (compared to the P2 position), but that is due to the fact that the back of his left forearm/hand is angled differently relative to the ground - note that his left arm is angled more upwards and outwards (in the direction of the ball-target line) and that his right forearm is more horizontal at the P6 position (compared to the P2 position). Note that his left humerus is internally rotated, and his left forearm is fully pronated, to the same degree as it was at the P2 position (and at address).
Image 6 shows him at impact. Note that his left arm is internally rotated and that his left forearm is still fully pronated, so that the back of his left hand and back of his left lower forearm are roughly parallel to the inclined plane. It is the ulnar border of his left hand that faces the target at impact, and not the back of his left hand. His clubface (which faces the target at impact) is closed relative to the back of his left forearm to the same degree as it was at the P1, P2, P4 and P6 positions. Note that didn't have to use any PA#3 release action (any left forearm supinatory action) during his downswing action in order to square his clubface by impact! I think that it more accurate to perceive of his clubface being virtually square to the clubhead arc during his entire backswing/downswing action and I therefore think that it is wrong-headed for Johnny Miller to assert that he is using a "shut-to-open" clubface technique!
Example 7:
Kelvin Miyahira believes that the left ebow must be slightly flexed if a golfer wants to be a DHer and that keeping the left arm very straight will predispose to flipping (non-DH hand release action). This is actually what he states in reference number [3d]-: "Since golf teachers don't study anatomy, we could not expect everything said to be true. For example, how about the notion of "keeping the left arm straight"? We blindly accept this but do you know what this does to your swing anatomically? If you straighten the left elbow (some can even hyperextend) using your triceps, this will cause a pull via the connective tissues that will anatomically pronate the left forearm AND extend the left wrist!"
That assertion about the triceps muscle causing left wrist extension (left wrist flipping) via connective tissue bands is totally unscientific and meritless. I think that his claim that "keeping the left arm very straight" will predispose to left wrist flipping through impact has ZERO biomechanical legitimacy! Most female LGPA golfers, and many male PGA tour golfers, have a very straight left arm during their downswing action, and I know of no biomechanical reason why it should predispose to a golfer being a non-DHer (flipper or flip-roller).
Consider an example of a professional male golfer who performs his downswing action with a very straight left arm - Adam Scott.
Adam Scott swing video - https://www.youtube.com/watch?v=as11RsttBcE
If you watch Adam Scott's left arm, you can clearly see that it is very straight (although not overtly hyperextended) during his backswing and downswing action.
Here are capture images showing his DH-hand release action through the immediate impact zone between P7 and P7.2.
Adam Scott through impact - capture images from his swing video
Image 1 shows Adam Scott at impact with a very straight left arm and no left elbow flexion. Note that he has a GFLW.Image 2 shows Adam Scott at the P7.2 position - he still has a very straight left arm and no left elbow flexion. He also has a GFLW and his clubshaft is straight-in-line with his left arm which means that he is not flipping or rolling through impact.
Adam Scott clearly demonstrates that it is very easy to perform a stable DH-hand release action through the immediate impact zone with a very straight left arm.
From a developing golfer's perspective, I think that it is perfectly acceptable to have either a very straight left arm (like Adam Scott) or a slightly bent left arm (like Ben Hogan and many pro golfers) during one's downswing action. I think that both of those two left arm options are perfectly compatible with the efficient execution of a DH-hand release action.
Example 8:
Another biomechanical element in Kelvin Miyahira's table-list of recommended biomechanical elements for a DH-hand release action is right forearm supination.
I agree with Kelvin Miyahira that a golfer should preferably not pronate the right forearm through impact because that can too easily predispose to a roller hand release action where the GFLW/clubface rotates too fast through impact. I much prefer that golfers use either a *no-roll DH-hand release action, or a delayed full-roll DH-hand release action, through impact, and the right forearm should be neutral (and not pronated or supinated) during those two types of DH-hand release action. I think that right forearm supination is only appropriate if a golfer decides to selectively use a reverse-roll DH-hand release action, which is selectively used for certain speciality shots eg. lob/flop shots and bunker shots.
( * I discussed the different types of DH-hand release action in great detail in my impact and followthrough chapter)
I also discussed the issue of right forearm motion in great detail in question-and-answer number 18 of my downswing chapter when I discussed the right forearm paddlewheeling action. In that Q&A sub-section, I stated that a neutral right forearm is used for a no-roll DH-hand release action and a delayed full-roll DH-hand release action, and that right forearm pronation is used for a non-delayed full-roll DH-hand release action eg. Ernie Els' hand release action. I am now more inclined to emphasize my "revised belief" that right forearm pronation should preferably be avoided through impact because it can too easily convert a non-delayed full-roll DH-hand release action into a roller's non-DH hand release action. I now think that the right forearm should preferably be neutral through impact - unless one selectively chooses to use a reverse-roll DH-hand release action. If right forearm pronation is used by a golfer, who prefers to use a non-delayed full-roll DH-hand release action through impact, then it should be minimal in degree - because any excessive right forearm pronation through impact can very easily predispose a golfer to becoming a roller, who uses a non-DH-hand release action through impact.
Interestingly, Kelvin Miyahira doesn't define right forearm supination in his release articles, and I actually think that the right forearm "appears" to be neutral, and not supinated, in most of those DH-release images that he uses as examples in his articles.
--------------------------------------------------------------------------------------------
I am now going to contrast my personal opinions regarding the major factors that allow a golfer to perform a DH-hand release action (versus a non-DH hand release action) through the immediate impact zone between P7 to P7.2 - by comparing my personal opinions to Kelvin Miyahira's personal opinions.
If you consider the list of DH-hand release promoting biomechanical elements that Kelvin Miyahira lists in his table, I believe that they are only tangentially-related to a golfer's ability to efficiently perform a DH-hand release action. I think that a golfer can easily perform a DH-hand release action with, or without, manifesting those biomechanical elements. For example, I believe that a golfer can easily/efficiently perform a DH-hand release action i) using early left forearm supination or late left forearm supination; ii) using a weak/neutral left hand grip or a strong left hand grip; iii) using a bowed/arched left wrist or a GFLW (f-FLW); iv) using early internal rotation of the right humerus or late internal rotation of the right humerus; v) using a very straight left arm or a "straightish" left arm with a slightly bent (flexed) left elbow; vi) using lateral bend (like Keegan Bradley) or not using lateral bend (like Kelli Oride) etc. In other words, I don't believe that those biomechanical elements are the key (fundamental) biomechanical elements that are casually responsible for a DH-hand release action. I believe that the major elements that cause a DH-hand release action (versus a flipper's non-DH hand release action) relate to the interplay of the speed of motion of the two arms/hands through the impact zone. To better contrast my personal opinions versus Kelvin Miyahira's personal opinions, consider how we personally interpret a particular 2011 Adam Scott swing video.
In reference number [3d] Kelvin Miyahira compares two Adam Scott swing videos - one from 2011 when he flipped post-impact and one from 2013 when he performed a DH-hand release action through impact (while maintaining a GFLW).
He could identify no differences in Adam Scott's downswing action between P4 and P5, but he then identifies slight differences in the mid-late downswing - as demonstrated below.
Adam Scott at the P6 position - images copied from reference number [3d]
Image 1 is from his 2011 swing action, and image 2 is from his 2013 swing action. Kelvin Miyahira drew red lines down the front of his right arm and right forearm.Kelvin Miyahira then stated-: "But now we can start to see the differences. On the right he has more external rotation of the right shoulder and more adduction."
Kelvin Miyahira then posted these two images from the P6.6 - P6.7 positions.
Adam Scott at the P6.6/P6.7 position - images copied from reference number [3d]
Kelvin Miyahira then stated-: "On the left, Adam has stopped adducting the right shoulder and fired internally. On the right he’s still adducting and therefore has barely started internal rotation."Finally, Kelvin Miyahira posted these immediate post-impact images.
Adam Scott at impact - images copied from reference number [3d]
One can see that Adam Scott was flipping his left wrist, and therefore clubshaft, in his 2011 non-DH hand release action, and that he was using a DH-hand release action in his 2013 swing action.Kelvin Miyahira is obviously proposing a cause-and-effect relationship between i) an earlier internal rotation of the right humerus and ii) a non-DH hand release action (left wrist flipping action). I think that his causal explanation is very unlikely to be correct, and I believe that the more likely casual explanation for Adam Scott's left wrist flipping action is a left arm stalling/slowing phenomenon through impact.
Here is the "evidence".
Adam Scott's 2011 swing video - https://www.youtube.com/watch?v=YHXmfcygnV8
Here are capture images from the swing video.
Adam Scott's non-DH hand release action - capture images from his swing video
I have drawn red lines along the front of his left arm and left forearm at impact (image 1) to better demonstrate that he has a bent left arm (slight "chicken-winging" of the left arm) at impact.Images 2 and 3 and show how fast Adam Scott folds his left arm immediately post-impact, and I believe that the i) slight "chicken-winging" of his left arm at impact and ii) his premature folding of the left elbow immediately post-impact signifies to me that he has very likely slowed the forward pulling motion of his left arm through impact in that particular 2011 swing action. It is very atypical of Adam Scott (who uses a TGM left arm swinging action) to go through impact with a bent (slightly "chicken-winged") left arm. I have looked at a number of his driver swings from that same time period, and he always maintains a very straight left arm through impact.
Another clue that he is not pulling his left arm very actively through impact is that his hands have only moved to a position in front of his left thigh at the P7.2 position (instead of being closer to the target at the P7.2 position). Also, note that you can see the entire back of his left hand at impact (image 1), which is very atypical for Adam Scott, who uses a neutral left hand grip, and it suggests an incomplete counterclockwise rotation of his left forearm due to an under-active left arm action.
Consider Adam Scott's typical hand release action through impact.
Adam Scott swing video - https://www.youtube.com/watch?v=nxOOuhMW0kA
Here are capture images from that swing video.
Adam Scott's hand release action through impact - capture images from his swing video
Images 1 and 2 show Adam Scott at the P6 and P6.5 positions. I have drawn red lines along the front of his right arm and right forearm.Image 3 shows that he has a GFLW at impact and a very straight (non-bent) left arm. Also, note that the back of his left hand faces the target, which indicates the he has completed the counterclockwise rotation of his left forearm (completed the PA#3 release action) by impact.
Image 4 shows Adam Scott at the P7.2 position - note that he used a DH-hand release action through the immediate impact zone between P7 - P7.2, and there is no evidence of left wrist flipping (clubshaft has not bypassed his left arm). Also, note that his hands have bypassed his left thigh by P7.2 showing that he is maintaining a lot of forward left arm/hand speed through impact, and note there is no premature folding (premature "chicken-winging") of his left arm.
I partly agree with Kelvin Miyahira's opinion that early internal rotation of the right humerus may predispose to flipping, but that will only happen if two other biomechanical conditions are also met - i) the forward motion of the left arm through impact is slowed/stalled and ii) the right arm straightens too actively and/or the right wrist actively straightens through impact (in a slap-hinge manner) thereby applying excessive push-pressure against the grip end of the clubshaft below the coupling point. I think that if a golfer maintains the forward speed of his left arm motion through impact, then it is very unlikely that left wrist flipping will occur - even if the golfer uses early internal rotation of the right humerus during his mid-late downswing (presuming that the right arm doesn't prematurely straighten to an excessive degree and/or presuming that the right wrist doesn't actively straighten near/at impact). The combined biomechanical phenomenon of i) no slowing/stalling of the left arm's forward motion through impact, and ii) early internal rotation of the right arm, can be clearly seen in Kelli Oride's swing action.
Kelli Oride swing video - https://www.youtube.com/watch?v=p7hBadAiMcA
Here are capture images from her swing video.
Kelli Oride's early internal rotation of her right humerus action - capture images from her swing video
One can clearly see that Kelli Oride is manifesting early internal rotation of her right humerus during her mid-downswing action and that it is much greater in degree than the amount seen in that atypical Adam Scott 2011 swing video. However, Kelli Oride doesn't flip-through-impact because she maintains the forward speed of motion of her left arm/hand through impact.
Kelli Oride's DH-hand release action through impact - capture images from her swing video
Note how actively Kelli Oride maintains the forward speed of motion of her left arm/hand through impact - note that she still has a GFLW (non-flipped left wrist) and a clubshaft that has still not bypassed her straight left arm at the P7.4 position (image 3), which is well beyond the end of the immediate impact zone (which ends at P7.2). Note that she maintains a slightly bent right arm through impact, which shows that she is not over-actively straightening her right arm (despite manifesting an early internal rotation of her right humerus phenomenon), and that she doesn't actively straighten her right wrist (in a slap-hinge manner) through impact.I think that Kelli Oride demonstrates that it is the interplay of the speed of forward motion of the two arms/hands through impact that primarily determines whether a golfer ends up exhibiting a DH-hand release action, or a non-DH hand release action (left wrist flipping action), through impact.
From a golf instructional perspective, the primary teaching point that will ensure that a golfer will more likely manifest a DH-hand release action through impact is the "idea" that the golfer (who is a swinger, and not a hitter) i) must lead with the left wrist/hand (using either a bowed left wrist or a GFLW); ii) and the golfer must maintain the forward speed of motion of the left arm/hand through impact to P7.2 (or even to P7.4+) and avoid any left arm stalling/slowing through impact; and iii) the golfer must simultaneously avoid any over-active right arm straightening and/or any active right wrist straightening that can cause the right hand to travel faster than the left hand or that can produce a disproportionate amount of push-pressure against the shaft below the coupling point to a degree that will flip the shaft passed the left hand. I think that all the other Kelvin Miyahira-listed biomechanical factors (eg. timing of internal rotation of the right humerus, timing of left forearm supination and degree of degree of lateral bend of the torso) only have a tangential or secondary role.
Addendum added in May 2014:
Here is further evidence that performing an early internal rotation of the right humerus during the mid-downswing doesn't predispose to a non-DH (flipping) hand release action.Consider Michelle Wie's new/improved full golf swing action that she is manifesting in early 2014.
Michelle Wie's driver swing video - https://www.youtube.com/watch?v=eU7l8mayDvw
Here is an animated gif comparing Michelle Wie to Tiger Woods.
Animated gif of Michell Wie and Tiger Woods - modified (re-sized) from an animated gif produced by Jeff Martin
Can you see the significant difference between Michelle Wie's hand release action and Tiger Woods' hand release action? Tiger Woods uses a non-delayed full-roll DH-hand release action while Michelle Wie uses a delayed full-roll DH-hand release action.Here are capture images derived from that animated gif.
Michelle Wie versus Tiger Woods at the P7.2 and P7.5 positions
Note that the clubshaft has not bypassed their left arm at the P7.2 position, which means that there cannot be significant left wrist extension and/or significant counterclockwise left forearm supination between P7 and P7.2, and that defines a DH-hand release action that ensures a stable clubface throughout the immediate impact zone between P7 and P7.2. Note that the clubshaft has bypassed Tiger Woods' left arm at the P7.5 position, which means that there is significant counterclockwise rotation of his left forearm between P7.2 and P7.5 +/- left wrist extension. However, note that the clubshaft has not bypassed Michelle Wie's left arm at the P7.5 position, which means that there cannot be a significant amount of counterclockwise rotation of her left forearm and/or a significant amount of left wrist extension happening between P7.2 and P7.5 (or between impact and P7.5). Michelle Wie is maintaining a DH-hand release left arm/hand alignment all the way from impact to P7.5, and she represents a prototypical role model of a DHer (like Kelli Oride)!Now, consider whether Michelle Wie uses the biomechanical elements recommended by Kelvin Miyahira for a DHer - i) strong left hand grip; ii) slightly bent left arm rather than a very straight (or hyperextended) left arm; iii) late internal rotation of the right humerus action; iv) combined "early left forearm supination + left wrist palmar flexion" maneuver; and v) right forearm supination.
Here are capture images from Michelle Wie's backswing action.
Michelle Wie's backswing action - capture images from her swing video
Note that Michelle Wie has a neutral (2-3 knuckle) left hand grip, and not a strong left hand grip (as recommended by Kelvin Miyahira for a DHer) at address.Note that Michelle Wie has a very extended (hyperextended) left arm at address and also during her entire backswing action, rather than a slightly bent left arm (slightly flexed left elbow) that is recommended by Kelvin Miyahira.
Note that Michelle Wie pronates her left forearm at the start of her backswing and her watchface is parallel to the ball-target line at P1.5 (image 2) and her clubface is therefore very open to the clubhead arc, and yet that doesn't affect her ability to perform a DH-hand release action.
Now, consider Michelle Wie's downswing action.
Michelle Wie's downswing action - capture images from her swing video
Image 1 shows Michelle Wie at the P4 position and image 2 shows Michelle Wie at the ~P5 position. Note that she may be slightly increasing her degree of lag between P4 and P5 as she actively adducts the right arm and drops the right elbow actively downwards.Image 3 shows Michelle Wie at the P5.5/P6 position. Note that she releases her club very early - manifesting an early random release action. Note that her right elbow is high and far above her right hip joint area and that she is already starting to straighten her right arm and internally rotate her right humerus. In other words, Michelle Wie manifests an early internal rotation of her right humerus action, which Kelvin Miyahira wrongly claims will promote a non-DH (flipping) hand release action. Also, note that Michelle Wie's clubface is open to the clubhead arc at the P5.5 position, which Kelvin Miyahira wrongly claims will predispose to a non-DH (flipping) hand release action.
Image 4 shows Michelle Wie at the P6.5 position. Note that her watchface is parallel to the ball-target line and note that she has a GFLW and not a bowed left wrist. In other words, Michelle Wie is using a late left forearm supination action (which represents the release of PA#3) while maintaining an intact LAFW, and she doesn't manifest the "early left forearm supination + left wrist palmar flexion" phenomenon that Kelvin Miyahira wrongly asserts is usually a major/essential biomechanical feature of a DHer.
Finally, note that Michelle Wie has a neutral right forearm in images 3,4 and 5, and not a supinated right forearm.
Michelle Wie's ability to maintain a DH-hand release action to well beyond the end of the immediate impact zone is even more apparent with her iron swings.
Here is a link to a you-tube video of Michelle Wie's recent iron swing - https://www.youtube.com/watch?v=ljYOGd-i38k
Here are capture images from that swing video.
Michelle Wie's late downswing and followthrough action - capture images from her swing video
Image 4 shows that Michelle Wie's clubshaft has not bypassed her left arm at the P7.5 position - and she is therefore definitely a DHer! Note that she even has a bent right wrist at this time point, and that she is using a no-roll DH-hand release action combined with a CP-arm release action.Note that Michelle Wie uses an early internal rotation of her right humerus action in her mid-downswing (image 1 and 2) and that it produces an early random release action. However, although she starts to straighten her right arm early, note that she still has a slightly bent right elbow and markedly bent right wrist at the P7.5 position (image 4), which proves that an early internal rotation of the right humerus action doesn't cause a golfer to "run-out-of-right arm" before impact, and predispose to premature right arm straightening and premature right wrist straightening before impact and therefore flipping-through-impact (as Kelvin Miyahira wrongly claims).
Impact zone insights:
Topic number 10: How to differentiate between a left wrist flipping phenomenon, versus a clubshaft flipping phenomenon, through impact.
I only briefly discusssed the issue of flipping, rolling, and flip-rolling in my impact and followthrough chapter, and I didn't clearly define those terms or clearly differentitate between the concepts of left wrist flipping and clubshaft flipping, which are not synonomous terms because clubshaft flipping can be due to causes other than left wrist flipping.A DHer, like Kelli Oride, uses a DH-hand release action through the immediate impact zone between P7 and P7.2, and she doesn't flip her left wrist or roll her left forearm/GFLW through impact.
Consider Kelli Oride's hand release action.
Kelli Oride's DH-hand release action through impact - capture images from her swing video
Note that Kelli Oride's clubshaft does not bypass her left arm between P7 and P7.2, and that is the best method of establishing that a golfer is using a DH-hand release action through impact. Secondary proof that she is not flipping or rolling her clubshaft through impact comes from observing that there is no biomechanical evidence of left wrist flipping (increased dorsiflexion of the left wrist) and no biomechanical evidence of rolling (no significant counterclockwise rotation of her left lower left forearm/GFLW) between P7 and P7.2.If you notice that the clubshaft bypasses the left arm between P7 and P7.2 in any golfer's face-on swing video, then that means that the golfer is either i) flipping the left wrist and/or ii) rolling the left lower forearm (and therefore the left wrist/hand) counterclockwise through impact. How do you determine if one (or both) of those two biomechanical phenomena are happening and how do you semi-quantify the degree of left wrist flipping and/or rolling through impact?
To answer that question, I have produced a 17 minute video lesson relating to this topic.
Left arm-clubshaft relationship through impact - www.youtube.com/watch?v=9MHDuCkIIwI
I will discuss all the issues that I demonstrated in that video lesson - using capture images from the video.
Author demonstrating an intact LAFW and left wrist flipping - capture images from his swing video
In my video lesson, I deliberately chose to use a neutral left hand grip because it makes it easier to define the terms.Image 1 shows me holding the clubshaft straight-in-line with my left arm and that represents an intact LAFW alignment, and also a DH-alignment if it continuously exists throughout the immediate impact zone between P7 and P7.2. Note that I have a GFLW, and that the left wrist is slightly cupped/scooped (left wrist is slightly dorsiflexed).
Image 2 shows a non-DH alignment where the clubshaft has bypassed the left arm, and it is causally due to left wrist flipping (due to increased dorsiflexion of the left wrist).
I am now going to draw some colored lines over the same two images.
Author demonstrating an intact LAFW and left wrist flipping - capture images from his swing video
I have drawn a pink line over the left antecubital fossa to show its stationary alignment.I have drawn a blue line over the lower radial bone, and it is nearly straight-line-aligned with the left antecubital fossa, which means that the left forearm is neutral (and not supinated or pronated). Note that the left forearm also remains neutral in image 2 when clubshaft flipping is present.
I have a drawn a red line over the length of the 2nd metacarpal bone to the left index finger and it is angled targtwards/forward relative to the radial border of the left lower forearm (blue line). The amount that it is angled targetwards/forward in image 1 represents the reference amount that defines a GFLW and ZERO left wrist flipping (no left wrist extension more than the amount needed to create a GFLW) in a golfer who uses a neutral left hand grip. If the red line is angled more forwards than that reference amount (see image 2) then it signifies the presence of left wrist flipping (left wrist extension more than zero). The greater the amount of forward angulation of the red line relative to the blue line - the greater the amount of left wrist flipping.
I have drawn a green line over the metacarpal bone to the thumb and it is angled backwards (away from the target) relative to the blue line when the left wrist is neutral (not extended more than zero). If it is angled targetwards/forward relative to the blue line, then that's an additional clue that left wrist flipping (left wrist extension more than zero) is present.
In summary, if you notice that clubshaft flipping (= clubshaft that has bypassed the left arm) is present in a face-on capture image of a golfer as his hands move through the immediate impact zone (between P7 and P7.2), then the cause could be left wrist flipping if you can also demonstrate that the left wrist's degree of dorsiflexion is greater than the amount that produces a GFLW (GFLW = zero left wrist extension).
Now, it is important to realise that clubshaft flipping can also be produced by left wrist rolling (counterclockwise rotation of the left forearm/wrist) - even if the left wrist is not flipping through impact.
Author demonstrating rolling of the left forearm while maintaining a GFLW - capture images from his swing video
Image 1 shows an intact LAFW/GFLW alignment with a neutral left forearm (note that the blue line drawn over the radial border of the left lower forearm is nearly straight-line-aligned with the pink line drawn over the left antecubital fossa). Note that the clubshaft is straight-in-line with the left arm.Image 2 shows the "effect" of counterclockwise left forearm rolling while maintaining a GFLW. Note that the blue line has rotated more counterclockwise than the stationary pink line, and that is causally due to left forearm supination. Note that it causes the clubshaft to bypass the left arm even though left wrist flipping (left wrist extension beyond zero) is not present. Note that it "visually appears" as if the left wrist is more bent, but that "visual appearance" is simply due to the "fact" that the GFLW has rolled counterclockwise.
Image 3 shows the "effect" of clockwise left forearm rolling while maintaining a GFLW. Note that the blue line has rotated more clockwise than the stationary pink line, and that is causally due to left forearm pronation. Note that it causes the clubshaft to be angled away from the target (mimicing forward shaft lean due to left wrist palmar flexion) even though left wrist bowing (left wrist flexion beyond zero) is not present. Note that it "visually appears" as if the left wrist is less bent and even bowed, but that "visual appearance" is simply due to the "fact" that the GFLW has rolled counterclockwise.
An important question then becomes - how much does the clubshaft angle forward (relative to the left arm) for a finite amount (eg. 10 degrees) of counterclockwise rolling of the left lower forearm/GFLW through the immediate impact zone?
The degree of forward clubshaft angulation (relative to the left arm) due to counterclockwise rolling of the left forearm/GFLW is directly related to the accumulator #3 angle that is present at impact.
That "fact" leads to the next important question - what factors are responsible for the degree of accumulator #3 angle present at impact.
Author demonstrating an "intermediate", "large" and "very small" accumulator #3 angle - capture images from his swing video
The angle between the blue lines represents the accumulator #3 angle between the clubshaft and left arm (in the plane of an intact LAFW). If the angle is close to 90 degrees (image 2) that represents a large accumulator #3 angle; if the angle is close to 180 degrees (image 3) that represents a very small/near-zero accumulator #3 angle; and if the angle is intermediate between 90 and 180 degrees (image 1), that represents an intermediate-sized accumulator #3 angle.Most golfers have an intermediate-sized accumulator #3 angle at impact (image 1) - note that a low palmar left hand grip where the left wrist is neutral (and not radially or ulnarly deviated) produces an intermediate-sized accumualtor #3 angle.
Note that the adoption of a finger grip and/or increased radial deviation of the left wrist predisposes to a large accumulator #3 angle (image 2) and that the adoption of a high palmar left hand grip and/or ulnar deviation of the left wrist predisposes to a very small accumulator #3 angle (image3).
Now, what effect does the size (magnitude) of the accumulator #3 angle have on the degree of forward clubshaft angulation if the left forearm/GFLW rolls through impact by a finite amount (eg. 10 degrees)?
Author demonstrating the influence of the size of the accumulator #3 angle on the degree of forward clubshaft angulation during a roll motion - capture images from his swing video
Image 1 shows how I have joined two flat paint-mixing sticks togther using a bolt and nut. The central stick (blue line in image 2) represents the "left arm" and the peripheral stick (red line in image 2) represents the "clubshaft". I can vary the hinge-angle between the two sticks in only one plane (plane of the intact LAFW) and "left wrist flipping" is impossible in this "two-flat sticks" model. Note that I have arranged the angle between the two sticks in image 1 to be equivalent to an intermediate-sized accucumulator #3 angle.In image 2, I am rolling the central stick ("left arm") counterclockwise by a finite amount (amount X) and you can see how much it causes the clubshaft to angle forward (targetwards) relative to the left arm.
In image 3, I have zeroed-out the accumulator #3 angle by ensuring that the two sticks are straight-line-aligned.
Image 4 shows that the clubshaft doesn't angle forwards (relative to the left arm) when I roll the left arm counterclockwise by a finite amount (amount X).
Image 5 shows that the clubshaft angles much more forward (targetwards) relative to the left arm if I increase the accumulator #3 angle to roughly a 90 degree angle and roll the left arm counterclockwise by amount X.
The important golf instructional lesson (that can be gained from this demonstration) is that any counterclockwise roll of the left forearm/GFLW through impact will cause the clubshaft to angle forward (targetwards) relative to the left arm (and cause the clubshaft to appear to bypass the left arm when viewed from a face-on perspective), and that the amount of forward angulation is greater if the accumulator #3 angle is greater.
A golfer needs to understand how all these factors interact to cause clubshaft flipping if he hopes to correctly interpret a golfer's non-DH hand release action (where flipping, rolling, or flip-rolling may be present).
Now, consider my recommended analytical approach to determining the likely cause of clubshaft flipping when shown a set of capture images of a golfer's hands/clubshaft passing through impact.
In his introductory release article [3a], Kelvin Miyahira has provided many examples of professional tour golfers flipping between P7 and P7.2, and he labels them as being either pro-flippers or underflippers. Kelvin Miyahira states in his definition of flipping that left wrist extension must be present, but most of his examples do not show any evidence of left wrist extension beyond zero. I think that the clubshaft flipping seen in his capture images is due to excessive left forearm rolling through the immediate impact zone, and that he has misclassified those golfers as being left wrist flippers (= left wrist extension more than zero).
Consider a few examples from Kelvin Miyahira's photo collection of post-impact flippers.
Example 1:
Golfer's non-DH hand release action - composite image created from three images from reference number [3a]
This golfer is using a non-DH hand release action because his clubshaft has bypassed his left arm by the P7.2 position (image 3).Image 1 shows the golfer nearing impact, and the back of his left wrist (which appears to be slightly cupped and therefore compatible with a GFLW) is facing the camera because he has not yet competed the release of PA#3. Note that he has slightly less than an intermediate-sized accumulator #3 angle because his left wrist is slightly ulnar-deviated.
Image 2 shows the golfer at impact with a GFLW and a clubshaft that is straight-line-aligned with the left arm. Note that he has completed his release of PA#3 by impact and that the back of his GFLW *nearly faces the target.
(* I use the word "nearly" because he has a slightly strong (3-knuckle) left hand grip, and the back of the left hand will always be angled slightly away from the target if the back of the f-FLW faces the target)
Image 3 shows that he has evidence of clubshaft flipping at P7.2, but there is no evidence of left wrist flipping (left wrist extension more than zero).
So what is causing his clubshaft to flip passed his left arm? The correct answer is clearly discernible if you consider how much the radial border of his left lower forearm has rolled counterclockwise between P7 and P7.2, and with an intermediate-sized accumulator #3 angle, it could easily account for that small degree of clubshaft flipping seen at P7.2.
Example 2:
Golfer's non-DH hand release action - composite image created from three images from reference number [3a]
This golfer is using a non-DH hand release action because he has evidence of clubshaft flipping at P7.2 (image 3).Image 1 shows the golfer nearing impact, and the back of his left wrist is facing the camera because he has not yet competed the release of PA#3. Note that he has slightly less than an intermediate-sized accumulator #3 angle because his left wrist is slightly ulnar-deviated.
Image 2 shows the golfer at impact. He has a neutral left hand grip and the back of his left wrist may be minimally bowed due to a very small degree of left wrist palmar flexion.
Image 3 shows the clubshaft flipping passed his left arm. What is causing his clubshaft flipping phenomenon? I can see no evidence of left wrist extension more than zero (left wrist extension greater than the amount needed to create a GFLW) so he is not a left wrist flipper. One can clearly see that the radial border of his left lower forearm is rolling counterclockwise between P7 and P7.2, and it is the likely cause of his clubshaft flipping phenomenon. Secondary proof of rolling-through-impact comes from noting that his right forearm is pronating slightly between P7 and P7.2 causing his right palm to roll counterclockwise in synchrony with the counterclockwise rolling of his GFLW. In fact, the right forearm pronatory motion may be too active and it may be causing his counterclockwise rotation of his left wrist/hand/clubshaft through impact - note that his left arm is "chicken-winged" suggesting an underactive left arm "pull-through-impact" action and his rotary right arm/hand action may be the dominant element causing his non-DH hand release action.
Golfer's non-DH hand release action - composite image created from three images from reference number [3a]
This golfer is using a non-DH hand release action because he has evidence of clubshaft flipping at P7.2 (image 3).
Image 1 shows the golfer nearing impact, and the back of his left wrist is facing the camera because he has not yet competed the release of PA#3. Note that he has an intermediate-sized accumulator #3 angle because his left wrist is neutral and not slightly ulnar-deviated.
Image 2 shows the golfer at impact. Note that he has completed his PA#3 release action and that the back of his left wrist/hand faces the target. It looks like his left wrist is slightly bowed (note the acute angle between the medial border of his left thumb's metacarpal bone and the adjacent radio-ventral surface of his left lower forearm).
Image 3 shows the clubshaft flipping passed his left arm. What is causing his clubshaft flipping phenomenon? I can see no evidence of left wrist extension more than zero (left wrist extension greater than the amount needed to create a GFLW) so he is not a left wrist flipper. In fact, it looks like he has retained a slightly bowed left wrist between P7 and P7.2. One can clearly see that the radial border of his left lower forearm is rolling counterclockwise between P7 and P7.2, and combined with an intermediate-sized accumulator #3 angle, it could be the likely cause of his clubshaft flipping phenomenon. Secondary proof of a rolling clubshaft is the "fact" that the back of the right hand faces the camera at P7.2 when it previously faced away from the target at P7 - representing a considerable amount of rotation of the right hand between P7 and P7.2 due to combined "internal rotation of the right arm +/- right forearm pronation". If the left arm is stalling/slowing through impact (and that possibility is suggested by the "chicken-winging" of the left arm) and if the right arm/forearm's rotary motion is active, then the true cause of the clubshaft's rolling motion through impact could be secondary to an over-active rotary phenomenon involving the right arm/forearm.
Now, I will present an example where I agree with Kelvin Miyahira that the professional golfer is manfesting a left wrist flipping phenomenon between P7 and P7.2.
Example 4:
Olin Browne's non-DH hand release action - composite image created from three images from reference number [3a]
Olin Browne is using a non-DH hand release action in this particular swing action because he has evidence of clubshaft flipping at P7.2 (image 3).
Image 1 shows Olin Browne nearing impact with an intermediate sized accumulator #3 angle. The logo on the back of his left hand glove faces the camera because he has not completed his PA#3 release action. The back of his left wrist looks slightly cupped, which suggest that he has a GFLW.
Image 2 shows Olin Browne at impact with a GFLW/intact LAFW (clubshaft is straight-line-aligned with his left arm).
Image 3 shows the clubshaft flipping passed his left arm. What is causing his clubshaft flipping phenomenon? Note that the radial border of his left lower forearm has not rotated more counterclockwise between P7 and P7.2, so it cannot be causing the clubshaft flipping phenomenon. Note that his left wrist appears to be extended more than zero (greater than the amount needed to create a GFLW), and I think that his left wrist flipping action is causing his clubshaft to bypass his left arm. Note that his hands are still opposite his left thigh at the P7.2 position, which suggests stalling/slowing of the forward motion of the left arm through impact, and it could be the likely cause of his non-DH hand release action. However, note how much his right wrist is straightening between P7 and P7.2 and if his right wrist straightening action is active, rather than passive, it may also be a causal factor that accounts for his clubshaft flipping phenomenon.
I would encourage website visitors to carefully examine golf swing videos showing visual evidence of clubshaft flipping through impact, so that they can determine the true cause of the non-DH-hand release action, which can be due to left wrist flipping, left forearm/wrist rolling or a combined flip-rolling phenomenon - because the optimum golf instructional remedy depends on whether one is a flipper (= left wrist flipper) or a roller (= excessive counterclockwise rolling of the left forearm/f-FLW through impact) or a combined flip-roller.
Impact zone insights:
Topic number 11: What do you think of Kelvin Miyahira's golf instructional "fixes" for a left wrist flipping problem that results in a non-DH-hand release action?
Kelvin Miyahira discusses the "fixes" that he recommends to prevent a non-DH hand release action (due to left wrist flipping and/or excessive left forearm rolling) in reference number [3d]. I think that some of his statements are blandly irrelevant while the rest are wrong-headed. Consider a few examples.Kelvin Miyahira states in [3d]-: "A general rule of thumb might be that if one’s spine does not produce enough rotational energy to hit the ball, another body part will take over the role (shoulders, arms, hands). Thus, flipping in all its forms is really an indication that one’s spine is not producing enough energy or stalls way before impact therefore the smaller muscles are taking over."
I think that its wrong-headed to think of the spine being primarily responsible for producing the rotational energy that is used by a golfer who uses an active pivot action. I prefer to think of the upper torso actively rotating around a rightwards-tilted spine being mainly secondary to the active muscular contraction of core muscles of the mid-upper torso. Also, if a golfer's pivot action is reactive, rather than active, and if a golfer mainly powers the golf swing with his arms, then that type of arm-dominant swing action doesn't automatically/necessarily result in left wrist flipping. Many amateur golfers use a reactive pivot action that secondarily responds to an active left arm arm swinging motion (as recommended by Leslie King), and they don't necessarily flip their left wrist through impact if they don't slow/stall the forward motion of their left arm through impact and if they don't over-actively straighten their right arm/right wrist so that it causes their right hand to apply excessive push-pressure against the aft side of the grip below the coupling point.
Kelvin Miyahira also states in [3d]-: "High rate of right wrist flexion (the wrist flexion comes with a bit of right forearm supination) needs to be countered by left shoulder abduction (frontal plane), flexion (sagittal plane), internal rotation, rib cage rotation and left wrist flexion/early left forearm supination".
I presume that the is referring to active right wrist flexion - because passive right wrist flexion (that occurs when the right wrist passively straightens through impact simply because the golfer runs-out-of-right arm), cannot produce flipping, if the passive right hand is not producing any excessive push-pressure against the aft side of the grip below the coupling point. Active right wrist flexion, that produces excessive push-pressure against the aft side of the grip below the coupling point, is a major swing fault, and it cannot be countered by performing alternative biomechanical actions involving other body parts. A golfer needs to understand that active right wrist flexion is a major swing fault that has to be avoided at all costs if the golfer wants to eliminate its potential capacity to induce left wrist flipping (which can occur even if the left arm's motion through impact doesn't slow/stall), and I think that a skilled golfer should never think of applying any countering biomechanical motion (involving other body parts) as a band-aid remedy for this major swing fault. He should simply think of avoiding this major swing fault!
Kelvin Miyahira states in [3d]-: "If you straighten the left elbow (some can even hyperextend) using your triceps, this will cause a pull via the connective tissues that will automatically pronate the left forearm AND extend the left wrist! If you’ve been paying attention, I have just described a cluster of movements that make up an underflip release. Now that I’ve told you that, you need to tap into a different cluster. Left forearm supination is performed by your left bicep which also flex the left elbow (bends it ever so slightly) which also allows for left wrist flexion (bowing). This cluster needs to be driven through impact and then trigger the elbow extension cluster post-impact. This will make drive/holding easier for you".
I think that its is biomechanically incorrect to believe that muscular contraction of the left biceps muscle muscle causes left forearm supination. Contraction of the the left biceps muscle causes left elbow flexion, and not left forearm supination. I also cannot fathom how it could cause left wrist bowing, and I certainly cannot understand why he believes in activating the left triceps muscle post-impact (when he states "then trigger the elbow extension cluster post-impact") and why he infers that it makes a DH-hand release action easier. I think that active muscular contraction of the left triceps muscle (to a finite degree) is needed to maintain a straight left arm throughout the entire downswing and early followthrough swing action (between P4 - P7.2+), and that there is no need to change its degree of contraction between P7 and P7.2. Also, contraction of the left triceps muscle must actually be lessened in degree if a golfer decides to use a left elbow folding technique soon after bypassing the P7.2 position.
I believe that thinking about all the biomechanical elements listed in Kelvin Miyahira's DH-table is of little value when a golfer, who is a TGM swinger (= left arm swinger), is thinking about how best to execute a DH-hand release action through impact. I think that a left arm swinger must primarily think of i) maintaining the forward motion of the left arm through impact while simultaneously ii) avoiding any excessive push-pressure against the aft side of the grip below the coupling point (due to an over-active right arm straightening action and/or an active right wrist straightening action).
Consider yet again Kelli Oride's DH-hand release action through the immediate impact zone.
Kelli Oride's DH-hand release action through impact - capture images from her swing video
Image 1 is at P7, image 2 is at P7.2 and image 3 is at P7.4.Image 4 is a composite image involving images 1,2 and 3. The red arrows show much the clubhead is moving forward between P7 and P7.4. Note that her hands are moving at a slower forward linear speed than her clubhead's forward linear speed. However, they are moving forward at the same angular velocity, which allows Kellie Oride to prevent the clubshaft from bypassing her left arm between P7 and P7.4.
The included diagram demonstrates that the angular forward motion of Kelli Oride's left arm/GFLW is perfectly matched with respect to the angular forward motion of her clubshaft/clubhead. In the diagram, the black dot represents the left shoulder socket. The red line represents her straight left arm. The blue dot represents her GFLW. The green line represents her clubshaft and the orange dot represents her clubhead. Although the clubhead travels further per unit time during its travel time through the immediate impact zone, when compared to her GFLW they are perfectly matched in terms of angular velocity and that allows Kelli Oride to prevent the clubshaft from bypassing her left arm. Kelli Oride doesn't depend on i) muscle strength or ii) a particular anatomical configuration of the left wrist (that is based on left hand grip strength) to prevent left wrist flipping through impact, and her drive-holding capacity through impact comes from maintaining the forward speed of her left arm/GFLW so that it perfectly matches the forward speed of the clubshaft/clubhead from an angular velocity perspective. That's the critical DH-element that a developing golfer needs to learn if he wants to become an efficient DHer!
Henrik Stenson uses the same DH-principle in his DH-hand release action.
Here are capture images from one of his swing videos.
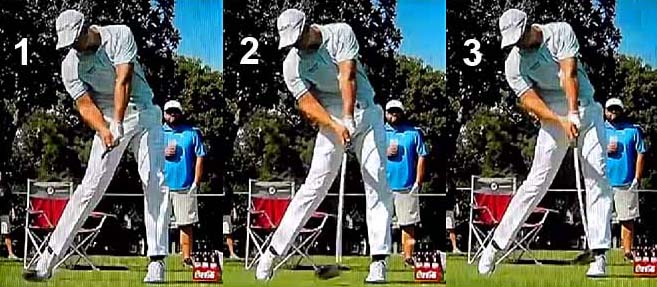
Henrik Stenson's DH-hand release action - capture images from a swing video
Image 1 is at impact (where the ball "appears" to be positioned further back, but that is simply due to parallax distortion due to a forward camera position), image 2 is at P7.1 and image 3 is at P7.2. Note that the clubshaft never bypasses his left arm between P7 and P7.2, which proves that he is using a DH-hand release action, and that the forward angular velocity of his left arm/GFLW is perfectly matched with respect to the forward angular velocity of his clubshaft/clubhead.Note that both Kelli Oride and Henrik Stenson have a slightly internally rotated left humerus at impact, and a neutral left forearm. Note that neither of the two golfers i) externally rotate their left humerus or ii) supinate their left forearm between P7 and P7.2, and that allows the two of them to avoid a roller type of non-DH hand release action. That's another critical DH-hand release action phenomenon that a DHer needs to master between P7 and P7.2. Mastering that rotary DH-release element isn't derived from the biomechanical elements listed in Kelvin Miyahira's DH-table, and it is a biomechanical phenomenon that a DHer needs to learn after perfecting his downswing's PA-release action. Learning how to prevent excessive counterclockwise roll of the left arm/forearm through impact occurs much more easily after a golfer (who is a TGM swinger = left arm swinger) first learns how to perfect the sequential release of PA#4 => PA#2 => PA#3 during his downswing action.
I suspect that most professional tour golfers are TGM swingers (= left arm swingers) who release PA#4 via an active pivot action, which must be somewhat assisted by the left shoulder girdle muscles because the left hand arc path is steeper than the path of motion of the left shoulder socket. The release of PA#2 should occur automatically/naturally according to a natural law of physics (law of the driven double pendulum swing model) and its speed of release is dependent on the particular circular shape of the hand arc path and the speed of motion of the left hand along that hand arc path. The released clubhead should optimally reach low point at the same time as the left hand so that the straight left arm and clubshaft are vertically aligned under the left shoulder socket at low point. If a golfer also traces the SPL of the ball-target line while releasing PA#4 => PA#2, then the clubhead arc should be symmetrically 'in-to-square-to-in' through impact and the golfer should be able to zero-out the clubhead path at impact. The golfer should also be able to square the clubface relative to the clubhead arc and the ball-target line at impact via a perfectly timed release of PA#3, and if he releases PA#3 optimally using an intact LAFW technique, then the back of his GFLW (f-FLW) and clubface should both face the target at impact. From P7 to P7.2+, the golfer (TGM swinger), who wants to be a DHer, must i) continue to ensure that the forward speed of motion of his left arm is perfectly matched with respect to the forward speed of motion of the clubshaft/clubhead from an angular velocity perspective, while ii) avoiding any counterclockwise rotary motion of either the left arm or left forearm/GFLW. A TGM swinger can control these two biomechanical elements using the left arm alone, or he can also use the right forearm's paddlewheeling action (which happens in the late downswing) to i) synergistically assist in the smooth release of PA#4 => smooth release of PA#3 (via push-pressure exterted by the right hand at PP#1, which is above the coupling point) and to also ii) syngergistically help maintain a stable GFLW through impact via *push-pressure continuously maintained by the right palm against PP#1.
(* any push-pressure exerted by the right palm against PP#1 must never be excessive so that it causes the club grip to travel faster through impact than the left arm/hand is pulling the club grip forward through impact - the left arm/hand must be pulling forward as much as the right arm/hand is pushing forward so that they are perfectly balanced if a TGM golfer (= left arm swinger) decides to use an active, rather than a passive, right arm/hand action through impact)
Also, always remember that no excessive push-pressure should be exerted by the right hand against the aft side of the club below the coupling point as this may predispose to left wrist flipping through impact - even if the left arm/hand motion doesn't slow/stall through impact. The degree of straightening of the right arm during the late downswing varies in degree in different TGM swingers, and it is significantly dependent on the motional position of the right shoulder along its downplane path at different time points during the late downswing and early followthrough - note that Kelli Oride's right arm gets fractionally more straight than Henrik Stenson's right arm at comparable time points between P6 and P7.2 because she doesn't get her right shoulder as far downplane as Henrik Stenson's right shoulder. Note that both golfers do not actively straighten their right wrist through impact and that both golfers maintain a neutral (non-pronated and non-supinated) right forearm during their right forearm's paddlewheeling action.
Impact zone insights:
Topic number 12: In topic number 11, I described how a TGM swinger (= left arm swinger) should think about performing his hand release action if he wants to be in DHer, rather than a non-DHer. Now, a really interesting question is how should a right arm hitter (or a swing-hitter) think about performing his hand release action in order to become a DHer. I strongly suspect that Lee Westwood is a swing-hitter, who uses the basic fundamentals of right arm hitting in his mid-late downswing action, and I will be analysing his swing action, and particularly his hand release action, in great detail. However, before I discusss Lee Westwood's hand release action through the immediate impact zone, let's consider a "pure" right arm swinger who only plays golf with his right arm because he was born without a left arm.
"Pure" right arm swinger's swing video - https://www.youtube.com/watch?v=RQQJ9L3XMjQ
This single-digit handicap golfer is seemingly middle-aged and he states that he can hit his driver 250 yards with his "pure" right arm swing action.
Does he use a DH-hand release action, or a non-DH hand release action, through impact?
Here are capture images from his swing video.
One-armed golfer's swing action through impact - capture images from his swing video
Because his swing video is of such poor quality, and because it has such a limited number of frames/second, I could only capture two images near impact. Image 1 is at P6.85 and image 2 is at P7.5.Despite the limitations of these two capture images from a swing analysis perspective, I strongly suspect that he is a DHer who maintains a stable clubface through the immediate impact zone between P7 and P7.2 - and a stable clubface is defined as a clubface that is square to the target for many inches between P7 and P7.2, and where the clubface doesn't roll or flip-closed between P7 and P7.2. How can I rationally make that assumption by simply looking at those two fuzzy images?
First of all, note that he is approaching impact with a neutral right forearm that doesn't pronate through impact, which would predispose to a roller's non-DH hand release action. Also, note that his right palm, and therefore clubface, continues to face the target in those two images, and that he doesn't roll his right palm counterclockwise through impact (as seen in this non-DH golfer). Secondly, note that he maintains a bent right wrist throughout the entire immediate impact zone, and he doesn't actively straighten his right wrist through impact, which would predispose to a clubshaft flipping action (mimicing a left arm swinger's non-DH left wrist flipping action). However, if he doesn't have a left wrist - how do we appropriately define a "pure" right arm hitter's (or "pure" right arm swinger's) non-DH "flipping" action that could conceptually be deemed to be mechanically equivalent to a TGM swinger's (= left arm swinger's) left wrist flipping action, which causes clubshaft flipping through impact?
I think that there is a rational way to solve this quandary by drawing-in an imaginary left arm - see next image.
One-armed golfer's swing action through impact - capture images from his swing video
Note that I have drawn a red-dotted red line between his left shoulder socket and his right hand on the grip- and that represents an "imaginary straight left arm".Note that his clubshaft is behind (further away from the target) than that red-dotted line as he approaches impact (image 1) and that he has forward shaft lean at impact. That combination obviously means that he is not flipping near/at impact.
Note that his clubshaft has only fractionally bypassed that red-dotted line ("imaginary left arm") at P7.5 (image 2) and I strongly suspect that it has not yet bypassed that "imaginary left arm" at P7.2, which means that he manifests no evidence of any clubshaft flipping between P7 and P7.2 - and the absence of any clubshaft flipping between P7 and P7.2 defines a DH-hand release action in a right arm swinger/hitter (because he is not flipping or rolling through impact to any significant degree that can result in clubshaft flipping through impact).
With that modified definition of a DH-hand release action in mind, let's consider Lee Westwood's hand release action through impact.
Lee Westwood swing video - https://www.youtube.com/watch?v=FA6fIz6A6f8
Here are capture images of his hand release action through impact.
Lee Westwood's downswing and early followthrough swing action - capture images from his swing video
Image 1 is at the P4 position - note that he has a straight left arm.Image 2 is at the P5 position - note that he still has a straight left arm, and he looks very similar to a TGM swinger (= left arm swinger).
Image 3 is at the P6 position. Note that his left arm is starting to "chicken-wing" and he has very obvious "chicken winging" of his left arm at impact (image 4) and at P7.2 (image 5). Note that he has a very bent left wrist (that appears to have a greater degree of dorsiflexion than a GFLW) at P7 and P7.2, and he "looks" very similar to a non-DH golfer, who is a left wrist flipper due to stalling/slowing of his left arm motion through impact. However, he is obviously not flipping at impact (image 4) because he has forward-shaft lean. Also, note that the degree of left wrist dorsiflexion isn't increasing between P7 and P7.2, which means that he cannot really be manifesting a left wrist flpping phenomenon between P7 and P7.2.
So, is Lee Westwood a DHer, or a non-DHer, through impact (between P7 and P7.2)?
To better answer that question, let's re-interpret his P7 and P7.2 images using an "imaginary left arm" (see red-dotted line in images 4 and 5).
Note that the clubshaft has not bypassed his "imaginary left arm" at P7 and he has forward shaft lean at impact, which means that he is not flipping at impact. Note that his clubshaft is straight-line-aligned with his "imaginary left arm" at P7.2, which means that there is no clubshaft flipping between P7 and P7.2, and that indicates that he is a DHer who maintains a stable clubface throughout the entire immediate impact zone between P7 and P7.2. Note how his right palm and clubface both face the target at impact (image 4) and that they both continue to face the target at P7.2 (image 5), which demonstrates that Lee Westwood manifests an excellent ability to maintain a stable/square clubface throughout the entire immediate impact zone between P7 and P7.2 (like a prototypical DHer). Because there is no evidence of clubshaft flipping at P7.2, he cannot (by definition) be rolling his clubface counterclockwise too much through impact. That "fact" is also confirmed by looking at his right forearm and the back of his right hand between P7 and P7.2 - note i) that his right forearm remains neutral and that he doesn't pronate his right forearm through impact; and ii) note that the back of his right hand is square to the target and that it doesn't roll counterclockwise through impact. Also, note that he maintains an unchanged bent right wrist between P7 and P7.2 and he is not prematurely/actively straightening his right wrist through impact, which could lead to clubshaft flipping. In other words, I think that Lee Westwood is definitely a DHer, and not a pro-flipping non-DHer (as Kelvin Miyahira wrongly claims in his release articles [3a] and [3c]).
From a biomechanical power-generation perspective, I strongly suspect that Lee Westwood is a swing-hitter, who starts his downswing with a pivot-induced release of PA#4, but who then becomes a right arm hitter in his mid-late downswing action. His power accumulator unloading sequence can be described as follows-: PA#4 => PA#1 => PA#2 => PA#3, which makes him a four-barrel swing-hitter.
To better support my personal opinion, let's consider the biomechanics of Lee Westwood's swing action in much greater detail.
Here is another swing video of Lee Westwood using a driver - https://www.youtube.com/watch?v=EYjLjwt8aqI
Here are capture images from his swing video.
Lee Westwood's downswing and early followthrough swing action - capture images from his swing video
Image 1 shows Lee Westwood at the end-backswing position. Note that he has a straight left arm, which he gets to the 11 o'clock position despite only having a limited shoulder (upper torso) rotation of approximately 90 degrees. Note that he has a rightwards-centralised backswing action - like many TGM swingers playing in the PGA tour.Image 2 shows him at the P5 position (end of the early downswing). Note that he manifests a very assertive hip-squaring action with very little dynamic X factor during his early downswing action, and in that sense he looks very similar to a TGM swinger (= left arm swinger) like Gary Woodland. Note that he still has a straight left arm and that he has retained his lag.
Image 3 shows him at the P5.5 position, and now he doesn't look at all like the three TGM swingers - Gary Woodland and Dustin Johnson and Adam Scott - who are very actively adducting their right elbow down to its pitch location in front of the right hip during their power package slotting phase. Note that Lee Westwood's right elbow is very high and far away from his right hip area. Also, note that he is starting to internally rotate his right humerus and prematurely straighten his right elbow, which causes him to release PA#2 early ( = early random release action).
Image 4 shows him at the P6 position with his right elbow in a punch elbow location, and not a pitch elbow location. This punch elbow position/motion of his right elbow is very suggestive of a TGM hitter's (right arm hitter's) motion.
Image 5 shows him at impact with forward shaft lean and a square clubface. From the perspective of a right arm hitter, his impact alignments would be deemed to be perfect - i) he has his right elbow alongside his right hip area in a punch elbow location; ii) his right arm is still partially bent; iii) his right wrist is still significantly bent; and iv) his right shoulder is far enough downplane that he will not "run-out-of-right arm" through impact - also note that his significant degree of secondary axis tilt and lateral bend makes it easier for him to get his right shoulder far enough downplane by impact to avoid the problem of "running-out-of-right arm" even though he doesn't have an open pelvis at impact.
Image 6 shows Lee Westwood at the P7.2 position (end of the immediate impact zone). Note that his clubface is still square to the target, and that he maintained a stable clubface that is square to the target between P7 and P7.2 - like a protypical DHer. Note that his clubshaft has not bypassed his "imaginary left arm" (red-dotted line) at P7.2. Note that his right forearm is neutral and not pronated. Note that his right wrist remains bent to nearly the same degree all the way between P7 and P7.2 and that his right palm, and therefore clubface, faces the target all the way from P7 to P7.2. Lee Westwood's hand release action would represent a perfect DH-hand release action for a golfer who is a triple-barrel right arm hitter (or a four-barrel swing-hitter who uses a pivot-induced release of PA#4 before activating the sequential release of PA#1 => PA#2 => PA#3). "Chicken-winging" of the left arm through impact is very common, and biomechanically acceptable, in a golfer who is either a triple-barrel TGM hitter, or a four-barrel swing-hitter, and "chicken-winging" of the left arm has no harmful effect if a golfer is controlling the club through the impact zone using right arm/forearm/hand biomechanics. "Chicken-winging" of the left arm is not a sign of left arm stalling/slowing through impact in a triple-barrel TGM hitter or a four-barrel swing-hitter, because the driving force that primarily propels the clubshaft through the immediate impact zone is the right arm/forearm's push action, and not the left arm's pulling action.
Although Lee Westwood manifests the "classical" biomechanics/mechanics of a TGM hitter (or swing-hitter) as described in great detail in my Power Mechanics of Swinging, Hitting and Swing-Hitting review paper, I obviously cannot prove that Lee Westwood is using a right arm hitter's action without *research laboratory testing.
(* Interestingly, I could easily devise a research experiment to definitively determine whether Lee Westwood is really a four-barrel, right arm swing-hitter [versus being an idiosyncratic TGM swinger] by placing pressure-detecting sensors at PP#1, PP#2 and PP#3 so that one could continuously measure left arm pull-pressure at PP#2, right arm/palm push-pressure at PP#1 [which is above the coupling point] and right hand push-pressure at PP#3 [which is below the coupling point] throughout his entire downswing action - but I obviously don't have the necessary political connections in the world of professional golf to try to arrange for the requisite testing)
If my strong suspicion that Lee Westwood is really a right arm swing-hitter (four-barrel swing-hitter) is correct, then I think that he should only deal with golf instructors/coaches who comprehensively understand the biomechanics and mechanics of right arm swinging and right arm hitting, so that they can better help him optimise the biomechanics/mechanics of his downswing and hand release action. His swing action could be harmed if he only deals with a golf coach who tries to coax him to adopt golf swing fundamentals that are only compatible with a TGM swinger's (= left arm swinger's) swing action.
The most important golf instructional lesson that can be derived from this topic's discussion is that if a golfer (amateur or professional) decides to become a triple-barrel TGM hitter, or a four-barrel swing-hitter, then he must re-define the definitional criteria that define a DH-hand release action, and he must not worry if he has a markedly dorsiflexed left wrist and/or "chicken-winging" of his left arm through impact - as long as there is no evidence of clubshaft flipping passed his "imaginary left arm" between P7 and P7.2.
Weight shift insights:
Topic number 13: Providing more insights into weight shift during a full golf swing action.
I wrote a review paper called Optimal Weight Shift in the Full Golf Swing in October 2007, and in that review paper I primarily focused my attention on the different types of centralised backswing actions - rightwards-centralised, leftwards-centralised and vertical-centralised - and I had very little to say about the magnitude of any weight shift during the backswing or downswing action. My primary reason for avoiding any comments on the magnitude of the weight shift (in terms of percentages) is that I didn't believe that there was any solid background scientific evidence (that could be derived from golf researchers) to support an attempt to provide any rational commentary. Many golf instructors in past decades have empirically (subjectively) asserted that one should have 80% of one's weight on the right foot at the end-backswing position, and 80% on the left foot at impact, but this 80:20 rule was not based on scientific research studies. In the past few years, there has been an increasing amount of research performed on the issue of weight shift during a full golf swing action, and there are now a number of companies selling weight shift measuring devices that are based on the use of force pressure plates placed under the feet (eg. Swing Catalyst and SAM Balance Lab) and a number of golf instructors are now using these commercially-available devices when teaching their golf students. I strongly suspect that some of these golf instructors are recommending a particular weight shift pattern that is not based on sound scientific research evidence, and they are simply promoting their particular weight-shift ideology. I have therefore decided to write about this "weight shift" topic in great detail in order to help deeply-analytical golfers make sense of any weight shift recommendations, and to help them avoid being being duped by unsound and scientifically-unsupported weight shift recommendations.The best overview article that I have discovered relating to the topic of weight shift during a full golf swing action was written by Doug Marsh [4]. Doug Marsh is a professional club fitter who became interested in the topic of weight shift and he has become a mini-expert as a result of intensive personal study of the topic. I will be referring to many aspects of his excellent article in my discussion of weight shift during a full golf swing action, and I encourage website visitors to read his entire article.
I think that the most important part of Doug Marsh's article is how he differentitates between the center-of-mass (COM) and the center-of pressure (COP). The COM of an object can be conceived to equivalent to the center-of-gravity (COG) of an object, and Doug Marsh defines it as follows-: "The center of mass (COM) of an object is the location where it would be balanced perfectly, such as on a seesaw or hung by a plumb line." The COM of a golfer depends on the static mass of the different segmental body parts (torso segments, leg segments, arm segments) and how those different segmental body parts are distributed in 3-D space at any particular moment of the golf swing eg. at the P4 position or at P7 position. A researcher, who uses motion capture analysis of swing videos, can then use this segmental analysis approach to determine the position of the COM of the golfer at any moment of the golf swing.
Consider one example used by Doug Marsh - Jamie Sadlowski.
Jamie Sadlowski at impact - photoshop-modified image from reference number [4]
This is how Doug Marsh describes the production of that image by his motion capture software program-: "The video frame at impact is shown on the left with the digitized points connected by lines. The points are the estimated joint center locations and the segment lines are the display model lines superimposed on the video image. The stick figure display model on the right side shows the calculated location of the COM with the red dot. The program calculates the body weight percentage distributions, left and right, based on the location of the COM relative to each foot (a simple proportional relationship)." According to Doug Marsh, 51% of Jamie Sadlowski's body weight is situated over the left foot at impact and 49% over the right foot.Here is Doug Marsh's image showing Jamie Sadlowski's body mass distribution at the end-backswing position, and at impact.
Jamie Sadlowski at the P4 and P7 positions - photoshop-modified image from reference number [4]
Note that Jamie Sadlowski has 38% of his body mass over his lead foot at his end-backswing position, and 51% of his body mass over his lead foot at impact. The large red arrow in the middle of the image shows the position of his COM. Note that there is very little shift of his COM during his downswing action. Minimising shift of the COM during the downswing action allows a golfer to more easily remain in balance between his feet.Using his motion capture analysis software program on many swing videos of professional golfers, Doug Marsh has been able to demonstrate how much the body mass shifts during the downswing action in professional golfers. Here is a smaller copy of a graph from his article.
Note that the "average" professional golfer has approximately 41% (+/- 6%) of his body mass distributed over his lead foot at the end-backswing position, and 62% (+/- 8%) of his body mass distributed over his lead foot at impact. Some professional golfers, like Charlie Wi (a prototypical S&T golfer), has 58% of his body mass distributed over his lead foot at his end-backswing position and 80% of his body mass distributed over his lead foot at impact (blue line extreme); while Bubba Watson is at the opposite extreme, having 31% of his body mass distributed over his lead foot at his end-backswing position and 44% of his body mass distributed over his lead foot at impact (green line extreme). Those body mass distribution figures are not surprising when you consider still images of Charlie Wi and Bubba Watson at the P4 and P7 positions.
Bubba Watson and Charlie Wi at the P4 and P7 positions
I have drawn a vertical red line midway between their feet, so that one can roughly estimate what percentage of their body/limb segments are distributed ahead of the center of their stance. Note that Bubba Watson has only his lead lower limb and a small part of torso ahead of that red line at the P4 position, and that explains the 31% figure obtained by Doug Marsh - while Charlie Wi has more than 50% of his torso and his entire lead lower limb ahead of that red line at the P4 position, and that explains the 58% figure obtained by Doug Marsh. Note that Bubba Watson has less than 50% of his torso and only his lead lower limb ahead of that red line at impact, and that explains the 44% figure obtained by Doug Marsh - while Charlie Wi has most of his torso, his entire lead lower limb and the upper part of his trailing lower limb ahead of that red line at impact, and that explains the 80% figure obtained by Doug Marsh.Most significantly, what's very important to note from Doug Marsh's weight distribution graph, is that there is very little COM (body weight) shift during most professional golfers' downswing action, and that minimising any significant shift of the COM during the downswing action allows a golfer to maintain his balance between his feet while actively swinging his arms/club very fast through the general impact zone between P6 and P8.
What about COP measurements during a full golf swing action?
Consider what Doug Marsh states regarding the topic of COP measurements in his article [4]-: " Center of pressure (COP) – perhaps it should be termed center of force – refers to the specific location where the total measured vertical force beneath your feet acts at the contact surface. When you’re standing still, the COP would be midway between your two feet. In this case, the line of the COP and COM would coincide. However, any abrupt motions you make affect the location of the COP and it begins to deviate from the COM".
In other words, COP measurements are measured by force-plates that are placed under a golfer's feet, and they measure the amount of vertical pressure being exerted by the golfer against the ground during his golf swing action. Those force-plates can measure forces in both the horizontal plane (shear forces) and the vertical plane (COP-force or vertical component of the ground reaction force). Conceptually, the vertical component of the ground reaction force (v-GRF) is equivalent to the COP-force being exerted by each foot against the ground, and the golfer's overall COP position moves between the feet depending on how much pressure is being exerted under each foot at any moment during a golf swing action. As I will soon demonstrate, the overall COP position moves to the right during the backswing action and then back to the left during the downswing action.
Consider a swing video which shows how the overall COP moves during a skilled golfer's backswing and downswing action.
David Wedzik's swing video - https://www.youtube.com/watch?v=aDxac2kYe1Q
David Wedzik (Golf Evolution's 5SK Director of Instruction) is using a Swing Catalyst system to demonstrate how the COP moves during a full golf swing action.
Here are capture images from the swing video.
COP movement during a golf swing action - capture images from the swing video
The % force-pressure being exerted vertically downwards into the ground under each foot (= actual COP-measurement for each foot expressed as a percentage of the total COP measurement) is shown as a white bar graph (with actual % measurements below). The same COP-measurement is shown in a graphical manner in the more central part of the image as a red colored area under each foot - with the intensity of the red color roughly reflecting the amount of COP force-pressure being exerted under each foot against the ground. One can also roughly discern what percentage of the actual COP-measurement is being exerted in the heel area versus the forefoot area of each foot. The white dot (which David Wedzik calls the "white ball") between the feet represents the overall COP position and it reflects the actual L-to-R positional balance between the two COP-measurements obtained under the left foot and under the right foot at any moment in time. The curved white line shows the L-to-R (or R-to-L) directional movement of the overall COP during the backswing and downswing actions.At address, 56% of David Wedzik's overall COP reading was recorded under his left foot and 44% under his right foot. Image 1 shows David Wedzik at the end-backswing position. Note that 65% of his overall COP reading was recorded under his right foot and 35% under his left foot, and note that the white dot (representing the overall COP position) has moved closer to his right foot. However, note that David Wedzik is performing a vertical-centralised backswing action and he is not moving his COM significantly to the right - the red ring around his head shows that he keeps his head very centralised between his feet during his backswing action. So, what is causing the COP measurement under his right foot to increase from 44% (at address) to 65% (at the end-backswing position)? David Wedzik claims that he is increasing the pressure under his right foot during his backswing action as he actively straightens his right leg, and that the "active right leg straightening" action against the resistance of the ground is responsible for the increased COP-measurement under his right foot at the P4 position. I can readily agree with David Wedzik's explanation.
Image 2 shows David Wedzik at impact where 87% of his overall COP reading is being recorded under his left foot. Note that the white dot (representing the position of his overall COP) is very close to his left foot at impact, and that the white curved line traces the right-to-left motion of his overall COP during his downswing action. The orange-colored arrow shows the significant lateral shift of his pelvis to the left during his downswing action (note that the outer border of his left pelvis is outside the outer border of his left foot at impact). I am not surprised by the high 87% COP-measurement under his left foot at impact because David Wedzik is using the "butt tuck-under the spine" lateral pelvic shift motion that is very characteristic of S&T golfers. In his video, David Wedzik claims that the best golfers in the world have 80-95% of their overall COP reading situated under their left foot at impact when hitting an iron. I believe that his claim is wrong (scientifically invalid), and I believe that his claim primarily pertains to skilled golfers i) who use a vertical-centralised backswing action or a leftwards-centralised backswing action and ii) who also use a lot of left-lateral translational pelvic shift motion during their downswing action and iii) who may also use a very active left leg straightening action in the late downswing that abruptly elevates the left pelvis in a "jumping up" manner. I don't think that the 80-95% figure necessarily pertains to equally skilled golfers who use a i) rightwards-centralised backswing action and who also use a ii) rotary pelvic motion during their downswing action that is simultaneously associated with a lot of secondary axis tilt (eg. as seen in Bubba Watson's or Jamie Sadlowski's full golf swing action). Before I discuss in great detail the weight shift "differences" between golfers who follow David Wedzik's "5-Simple Keys" swing ideology (or the very similar S&T swing ideology) and skilled professional golfers (like Bubba Watson) who use an alternative weight-shift pattern that is associated with a lot of secondary axis tilt and lateral bend, let's consider two golfers who more closely follow the David Wedzik-described pattern of COP measurements.
Swing Catalyst COP-measurement video of Suzann Pettersen and Grant Waite - https://www.youtube.com/watch?v=APW2I8d4ngw
I will start off with Suzann Pettersen's full golf swing action.
Suzann Pettersen at address - capture image from the swing video
Note that Suzann Pettersen has a very small degree of rightwards spinal tilt at address - even though her legs are symmetrically aligned and even though her pelvis is centralised between her feet. Note that she has 59% of her overall COP reading situated under her left foot even though she is minimally rightwards-centralised at address. That "fact" demonstrates that there is no necessary correlation between a COM reading and COP reading at rest, and it doesn't surprise me that Suzann Pettersen is choosing to press downwards/groundwards more with her left foot than her right foot at address even if her COM is minimally rightwards-centralised at address. I wouldn't be surprised if the majority of professional golfers (who use a rightwards-centralised backswing action) have a COP force-pressure pattern that is in the range of 50:50 to 60:40 (favoring the left side) at address.
Suzann Pettersen at the end-backswing position - capture image from the swing video
Note that Suzann Pettersen is using a rightwards-centralised backswing action with very little shift of her head to the right (red line was drawn through the center of her head at address). Note that she has a force-pressure reading under her right foot of 71% (of the total COP measurement) at the P4 position. Note that the white dot (representing the overall COP position) has moved slightly from left-of-center to right-of-center. Note that Suzann Pettersen doesn't actively straighten her right leg (like a S&T golfer) and she retains a small degree of right knee flex during her backswing action. However, that doesn't prevent her from actively exerting a lot of downwards force-pressure into her right foot during her backswing action - that allows her to stabilise her right leg and thereby prevent any lateral swaying motion of her pelvis during her backswing action.
Suzann Pettersen at the P5 position - capture image from the swing video
Note that Suzann Pettersen has dual-ER of her thighs at the end of her early downswing (P5 position) and that she is using a rotary type of pelvic motion (rotating-in-a-barrel type of pelvic motion) where she pulls her left pelvis back towards the tush line (using a "left hip clearing action" ala Hogan rotary type of pelvic motion). I am therefore not surprised that she has equal (50%) force-pressure being recorded under her two feet at the end of the hip-squaring phase of her downswing action.
Suzann Pettersen at impact - capture image from the swing video
Note that Suzann Pettersen has 77% of her overall COP measurement situated under her lead foot at impact, and that the white dot (overall COP position) is located much closer to her left foot at impact - even though she has a small small degree of secondary axis tilt (increased rightwards tilt of her upper torso secondary to a small degree of left-lateral shift of her pelvis). I think that it is not surprising that a skilled golfer (who uses a rightwards-centralised backswing action swing style) would be exerting more vertical force-pressure under the left foot (compared to under the right foot) at impact - even though the overall COM may be situated slightly to the right of the overall COP (white dot). The active action of progressively "pressing down" into the left foot during the progressive evolution of the downswing action stabilises the left leg as a "firm supportive post" that i) prevents excessive left-lateral swaying motion of the pelvis during the downswing and that ii) also allows a golfer to continue to efficiently rotate the pelvis counterclockwise around that "firm supportive post" during the followthrough/finish phase of the swing.
Suzann Pettersen at her finish position - capture image from the swing video
Note that Suzann Pettersen finishes in a classical I-position where she is standing erect over a straight left leg. She has no reverse-C angulation of her upper body, and I am not surprised that the COP-measurement under her left foot is 98% of the overall COP measurement and that the white dot (representing the position of her overall COP) is located just inside her left foot.I think that Suzann Pettersen has a superb full golf swing action and I think that she is a perfect role-model for a golfer who elects to use a rightwards-centralised backswing action and a rotary pelvic motion ("left hip clearing action" ala Hogan type of pelvic motion) during the downswing - which happens to be my personal preference if I was obliged to choose only one swing style option for a prospective professional golfer. The COP readings obtained by the Swing Catalyst force-plate device (with respect to Suzann Pettersen's full golf swing action) do not surprise me, and they are fully compatible with my pre-conceived mental expectations.
Now, let's consider the swing of Grant Waite from that same swing video.
Grant Waite's COP measurements obtained by the Swing Catalyst device - capture image from the swing video
Note that Grant Waite has a 61% of his total COP measurement recorded under his left foot at address, and that value is similar to Suzann Pettersen's COP measurement of 59%.Note how rapidly that COP reading changes by the P2 position where he has a 63% COP measurement recorded under his right foot. Note that Grant Waite has a vertically-oriented spine and that he is simply starting to rotate his upper torso around his vertically-oriented spine. I cannot imagine that his COM has moved significantly rightwards at that time point, so the disproportionate movement of the overall COP (white dot) in a rightwards direction must be due to the fact that he is pressing firmly down into the ground with his right foot as he actively straightens his right leg.
What is really interesting is that the COP reading measured under his right foot doesn't really increase more during the remainder of his backswing (between P2 and P4) and he has a 65% COP reading under his right foot at his end-backswing position. When you look at the back view image of Grant Waite at the P4 position, one can see that he is using an arch-extension maneuver (like a S&T golfer) and he seems to be leaning more over onto his left leg. According to Mike Bennett and Andy Plummer (originators of the S&T swing style), who have also evaluated Grant Waite's full golf swing action with a force-plate measuring device, they claim that Grant Waite has 67% of his weight over the left foot and only 33% over his right foot at the P4 position ("checkpoint detail" - 31:00 minute in disc 2 of their DVD set). I have no idea why there is such a large discrepancy between the COP readings obtained by Swing Catalyst at the PGA merchandise show and Mike Bennett's COP readings. Erik Barzeski (of Golf Evolution) claims that Mike Bennett's force-plate data collection process was likely at fault (see reference number [5]).
Note how dramatically Grant Waite's overall COP (white dot) moves leftwards during his downswing action and he has a 91% COP reading recorded under his left foot at impact. Mike Bennett's COP reading for Grant Waite at impact is 86% under the left foot ("checkpoint detail" - 31:00 minute in disc 2 of their DVD set). That COP reading of 91% is significantly higher than Suzann Pettersen's 77% COP reading at impact. However, a 91% COP reading under Grant Waite's left foot at impact is not really surprising when you look at the back view image of Grant Waite at impact - note that the outer border of his left pelvis is outside the outer border of his left foot, and that his left thigh (when viewed from top-to-bttom) is slanted to the right while Suzann Pettersen's left thigh (when viewed from top-to-bottom) is slanted slightly to the left because the outer border of her left pelvis is slightly inside the outer border of her left foot.
David Wedzik claims that the "best" professional golfers manifest this pattern where the overall COP moves rapidly, and inexorably, to the left during the downswing action and where 80-95% of the total COP measurement will be recorded under the left foot at impact. However, I think that David Wedzik has a biased personal opinion, and he is not a scientifically-neutral golf researcher who is performing COP-measurement research in an unbiased manner. So, what have the unbiased golf researchers, who are scientifically exploring the issue of weight shift during a full golf swing action, discovered.
I suspect that the best scientific research paper on the issue of weight shift in a full golf swing is the paper by Kevin Ball, which he wrote for his PhD thesis (reference number [6]).
In his 389-page PhD thesis paper, Kevin Ball reviews all the previously published research studies performed on weight transfer in the full golf swing, which were handicapped by small sample sizes and which only obtained force-pressure (COP) measurements at a few time points during the swing action (eg. P1, P4 and P7 positions). I think that his weight transfer research project was much better than all the previous research studies because i) he had a larger sample size of 62 golfers (of varying handicap, and consisting of both amateur and professional golfers), and because ii) he obtained COP measurements at many more time points during the backswing and downswing and early followthrough, and because iii) he used the advanced statistical technique of cluster analysis.
Here is the main result of Kevin Ball's research project.
COP measurements during a full golf swing action - from reference number [6]
Swing events are recorded on the X axis. TA = Address; MB = Mid-backswing; LB = Late backswing; TB = End-backswing; ED = Early downswing; MD = Mid-downswing; BC = Ball contact (impact); MF = Mid-followthrough. Note that I have added in red the equivalent P positions that are positionally equal to those swing events.COP measurements are on the Y axis, and they are expressed as a percentage where 100% is all the COP-measurement being recorded under the lead (front) foot.
The green curve represents the "average" result for all 62 golfers. Note that 55% of the total COP measurement is recorded under the front foot at address - which is similar to the result obtained for Suzann Pettersen (61%) and Grant Waite (59%). Note that 70% of the total COP measurement is under the rear foot at P2, which is similar to the 63% COP reading under Grant Waite's rear foot at the P2 position. Note that the "average" COP reading under the rear foot didn't change much between P2 - P4, and that ~75% of the total COP measurement was recorded under the rear foot at the end-backswing position, which is similar to Suzann Pettersen's (71%) and close to Grant Waite's (65%) result at the P4 position. Note how rapidly the COP reading changed between P4 and P5.2, where the recorded COP reading under the front foot was ~60% of the total COP measurement. Again, this rapid change (where the overall COP moves rapidly from right-to-left) was recorded in both Suzann Pettersen's and Grant Waite's early-mid downswing action. Note that the COP reading under the front foot peaked at impact with 70% of the total COP measurement being recorded under the lead foot. This impact COP-measurement of 70% under the front foot is slightly less than the COP-measurement obtained for Suzann Pettersen (77%) and significantly less than the COP-value obtained for Grant Waite (91%).
However, what is really interesting is the final result of Kevin Ball's cluster analysis technique (an advanced statistical technique described in the paper), which demonstrated that the 62 golfers could really be divided into two different weight-transfer groups, which Kevin Ball arbitrarily labelled the front foot group (which consisted of 39 golfers) and the reverse group (which consisted of 19 golfers). There was no statistical difference in the overall balance of handicap levels, amateur-versus-professional golfers, and the "average" maximum clubhead speed at impact between the two cluster groups.
Note that the front foot group golfers and reverse group golfers had nearly identical front foot COP measurements at P1, P2, P3, P4, and P5 and they only started to significantly differ in the late mid-downswing (at about P6) and especially in the late downswing (where the difference reached its maximum value). Note that the front foot group had a 80% COP-measurement under the front foot at impact, which is similar to Suzann Pettersen's impact result (77% front foot COP-measurement) and David Wedzik's impact result (87% front foot COP- measurement). The front foot group's result was compatible with Kevin Ball's pre-research mental expectation (based on David Leadbetter's teaching that a golfer should transfer his weight from right-to-left during the downswing action so that most of his weight is located over the front foot at impact). However, Kevin Ball couldn't understand, and couldn't explain, the results of the reverse group (where the "average" COP-measurement reached a maximum of 60% under the front foot at the end of the early downswing, and then decreased to an "average" COP-measurement of 50% under the front foot at impact).
Kevin Ball, unfortunately, didn't perform a COM analysis of the two different groups to see if the COM patterns were different. If he did, he may have discovered a rational explanation for the reverse group's mid-late downswing's COP-measurements. I strongly suspect that many of the skilled golfers in the reverse group had a similar swing style to Bubba Watson, who has a COM reading of 44% over his front foot at impact (according to Doug Marsh [4]).
Let's consider Bubba Watson's swing style in greater detail. I don't know what COP-measurements he generates in his full golf swing action and I will simply be theorising ("guesstimating) about the "likely" COP measurements that could be present at different time points during his swing action.
Bubba Watson's backswing and downswing action - from reference number [7]
Image 1 shows Bubba Watson at address. Note that he is "lefty" golfer who has a significant degree of leftwards spinal tilt (equivalent to rightwards spinal tilt in a "righty" golfer) at address and his head is positioned behind the center of his stance.Image 2 shows Bubba Watson at the P2 position. Note that he is simply rotating his upper torso around his leftwards-tilted spine without leaning his upper torso further away from the target. Note that he is probably pressing firmly down into his left (rear) foot to prevent any pelvic sway motion as he rotates his pelvis counterclockwise in a rotary manner. I don't know what COP-measurement he generates at the P2 position, but I would not be surprised if it is in the range of 65% under the rear foot (as seen in most of the golfers in Kevin Ball's research study [6]).
Image 3 shows Bubba Watson at the P4 position where his COM measurement is supposedly [4] about 69% over the rear foot. I would not be surprised if his COP measurement under the rear foot is in the range of ~70-75% of the total COP measurement. Again, a COP-measurement of 70-75% under the rear foot would be typical for many golfers - according to Kevin Ball [6].
Image 4 shows Bubba Watson at the P5 position. Note that he is performing a rotary type of pelvic motion (rotating-in-a-barrel type of pelvic motion) while keeping his pelvis centralised between his feet. Note that his lead knee has moved towards the target and he is seemingly starting to pressure-load his lead foot in the standard manner that is typical of a golfer who uses a "left hip clearing action ala Hogan" type of pelvic motion, and I would not be surprised if he has a 60% COP measurement under his lead foot at this time point (like the "average" golfer at P5.2 in Kevin Ball's research study [6]).
Image 5 shows Bubba Watson at impact and he doesn't look at all like David Wedzik or Grant Waite at impact. First of all, note that the outer border of his right pelvis is well inside the outer border of his lead foot and that his right thigh is slanting targetwards (red line in image 6) when viewed from top-to-bottom. That means that he hasn't shifted his pelvis (lower body) targetwards as much as a S&T golfer (eg. Grant Waite) or a 5SK golfer (eg. David Wedzik). Secondly, note that Bubba Watson has kept his head well back, and that it is well behind the center of his stance, and that he has acquired a greater degree of secondary axis tilt (red line in image 6) and lateral bend during his later downswing action. According to Doug Marsh [4], Bubba Watson has a COM-measurement of 44% over his lead foot at impact, and I would not be surprised if the COP-measurement under his lead foot is only ~50% of his total COP measurement. If my "guesstimate" is true, then Bubba Watson would be classified by Kevin Ball as being a reverse group golfer who has slightly less force-pressure being exerted by the lead foot against the ground at P7 compared to the situation at P5.2. Certainly, it would make sense from a biomechanical perspective - when you simply consider the underlying biomechanics that will produce the "look" of that still image of Bubba Watson at impact.
Now, lets imagine a situation where Bubba Watson actually gets measured by a Swing Catalyst device, and let's presume that the actual COP-measurement under the lead foot at impact is 50%, or 55%, or 60%. How could that precise "real life" COP-measurement information help Bubba Watson improve his swing biomechanics/mechanics? I can imagine a golf instructor, who believes in the S&T or 5SK swing ideology, telling Bubba Watson that the COP-measurement under his lead foot at impact is too low, and that he should get his "weight forward" at impact so that he can generate a COP-measurement under his lead foot at impact of >80%. However, I think that offering that type of advice would be very inappropriate because Bubba Watson is not using the same biomechanical swing fundamentals in his pivot action that are characteristic of a S&T swing (or a 5SK swing). I am not really surprised that Kevin Ball found that there are two major groups of weight-shift golfers (reverse group and front-foot group) when performing his cluster analysis - based on my study of the different biomechanical movements used by many different professional golfers during their pivot action. Let's consider the different biomechanics used in the pivot action by Bubba Watson versus a S&T golfer.
Consider two professional golfers at impact - Bubba Watson and Troy Matteson (S&T golfer).
Bubba Watson and Troy Matteson at impact
When briefly viewing their respective images at impact, they may look very similar - because they both seem to have a straight lead leg at impact and they both seem to have a similar amount of secondary axis tilt.
However, the differences between the two golfers become much more obvious when you start to draw vertical lines along the outer border of their lead foot and in the middle of their stance.
Bubba Watson and Troy Matteson at impact
I have drawn a vertical yellow line at the outer border of their lead foot. Note that the outer leading border of Bubba Watson's pelvis is well inside that yellow line, while the outer leading border of Troy Matteson's pelvis is just outside that yellow line.I have also drawn a vertical red line that is located midway between the insides of their two feet. Note that Bubba Watson has much more of his torso behind that red line (further away from the target) at impact - compared to the situation with Troy Matteson.
What is also very important to consider, in addition to using a crude COM-evaluation technique (yellow and red lines in that composite image) that is a reflection of static (and not dynamic) weight differences, is to consider the different biomechanical dynamics involved in their respective pelvic/lead leg motion during the late downswing.
Bubba Watson is using a "pure" rotary type of pelvic motion (rotating-in-a-barrel type of pelvic motion) with very little lateral-shift of his pelvis towards the target. Between P6 and P7, his pelvis is becoming progressively more open as his lead hip joint (and lead buttocks) is moving away from the target due to the continuous clockwise rotation of his lead thigh. That type of late downswing pelvic motion (where the lead buttocks moves away from the lead foot) probably decreases the amount of force-pressure being exerted downwards into the lead foot during Bubba Watson's late downswing action. I think that golfers who have a very open pelvis at impact (where the lead hip joint and sacrum have rotated further backwards (away from the target) will be exerting less force-pressure down into the ground under the lead foot than golfers who have a less open pelvis. By contrast, Troy Matteson is using the i) assertive "butt tuck-under-the-spine" lateral pelvic shift motion (that is characteristic of S&T golfers) between P6 and P7, while ii) actively straightening his lead leg in a "jumping-up manner" (and the propulsive force required to jump-elevate the lead hip joint/pelvis as he increasingly straightens his lead leg probably increases the amount of force-pressure being exerted down into the ground under the lead foot). Note that Troy Matteson's pelvis is minimally open at impact and his lead hip joint is situated vertically above his lead foot. I would therefore not be surprised to discover that Troy Matteson generates a significantly higher COP-measurement under his lead foot at impact - compared to Bubba Watson - based on the different biomechanical motions of their lead leg and pelvis that occur between P6 and P7.
Another dynamic factor that will likely also affect the balance between the force-pressure being exerted down into the ground below the lead foot, relative to the rear foot, in the late downswing are due to dynamic biomechanical events that are simultaneously happening above waist level. I have already described how dynamic motions happening at-or-below the level of the hip joints affects the amount of force-pressure being exerted into the ground under the feet, but dynamic biomechnical events happening above hip joint level will also affect the COP-measurements that are measured by force-plates placed under the feet.
Consider what happens during Bubba Watson's late downswing.
Downward movement of Bubba Watson's rear shoulder - from reference number [7]
Image 1 shows Bubba Watson at the P5 position (hip squared phase) - note that his rear shoulder is still far uplane due to the delayed rotation of his upper torso.Image 2 shows Bubba Watson at impact - note how much lateral bend (curved yellow line) he acquires during his later downswing action and how he drives his rear shoulder steeply groundwards in the direction of his rear foot (direction of the red arrow) during his later downswing. The active/dynamic downplane motion of his rear shoulder is being directed more towards his rear foot (rather than towards his lead foot) due to his increased degree of secondary axis tilt and increased degree of lateral bend, and the dynamic forces being generated by the dynamic motion involving his rear shoulder (and adjacent upper torso) will likely increase the COP-measurement in his rear foot more than the CP-measurement in his lead foot. Seeing that the COP-measurements are expressed in relative terms as a percentage (rather than in absolute terms), any increase in force-pressure that is directed down into the rear foot must be decreasing the relative amount of CP-measurement being measured under the front foot (even if the absolute force-pressure being measured under the front foot is unaffected). That represents another dynamic factor that would decrease the CP-measurement (measured as a relative percentage) under the front foot in Bubba Watson's late downswing. So, I would not be astonished if I learned that Bubba Watson's COP-measurement under the front foot decreases from 60% at P5.2 to 50% at impact. That dynamic phenomenon involving the rear shoulder will likely not happen in a golfer like Suzann Pettersen, who doesn't develop a significant amount of secondary axis tilt and lateral bend in her late downswing action.
Kevin Ball was even more surprised by the fact that the reverse group golfers' CP-measurement under the front foot decreased even more after impact and that it decreased from an "average" of 50% at impact to an "average" of 40% by P8 [6], and that this decrease was most prominent in reverse group golfers who generated the highest clubhead velocity at impact.
I am not surprised - consider Bubba Watson at the P8 position.
Bubba Watson at the P8 position - capture images from two different driver swings
Note how much secondary axis tilt and lateral bend Bubba Watson still has at the P8 position (especially in the 2nd driver swing - image 2). Note that his pelvis is even more open at P8 than it was at P7 and that his lead heel has lost contact with the ground as his lead hindfoot float-rotates clockwise. I would not be surprised to discover that Bubba Watson has 60% of his CP-measurement under his rear foot at the P8 position.Although I find the research done on ground forces using force-plate technology of intellectual interest, I cannot presently perceive how the acquisition of precise COP-measurements can help a skilled professional golfer improve the golf swing biomechanics involved in his pivot action. I think that swing videos (taken from multiple views) can clearly demonstrate if a particular professional golfer is performing his pivot action in a non-optimal manner eg. swaying the pelvis too much from side-to-side during either the backswing or downswing, bobbing up-and-down too much during the downswing, "goat-humping", losing one's balance during the downswing and falling forwards (in the direction of the ball-target line) or falling backwards onto one's heels, hip spinning during the early downswing due to premature movement of the right buttocks away from the tush line, "hanging back" during the later downswing and having too much weight on the rear foot through impact.
I particularly favor the full golf swings of Adam Scott and Henrik Stenson because they both use the biomechanical fundamentals that I particularly promote - i) using a rightwards-centralised backswing action; ii) using a "left hip clearing action ala Hogan" type of pelvic motion during the downswing; iii) maintaining an intact LAFW/GFLW from P4 to P7.2+; and iv) using a DH-hand release action through impact. I cannot fathom why I need to know the precise COP-measurement under their front foot at impact, and if it turns out to be 70% or 75% (rather than >80%), then it would not alter my very positive impression of the efficacy of their superb pivot action. Both golfers remain in perfect balance between their feet during their entire swing action and I would not recommend that they alter their pivot action simply because the COP-measurement under their front foot at impact isn't equal to some arbitrary value. I think that professional golfers like Adam Scott and Henrik Stenson probably have an intermediate "force-pressure" pattern of CP-measurements that is not as front-loaded at impact as a S&T golfer, and that doesn't reverse-shift during the late downswing like a reverse group golfer.
Jeff Mann.
First version: March 2014.
References:
1. The Golf Swing, David Leadbetter.

2. Swing Like a Pro. Ralph Mann and Fred Griffin.
3. Kelvin Miyahira's release articles.
a. PGA tour Release Styles.
http://kelvinmiyahira.com/articles/56-2010-09-pga-tour-release-styles
b. What's Your Release style? Part 1.
http://kelvinmiyahira.com/articles/35-2013-04-what-s-your-release-style-part-1
c. What's YourRelease Style? Part 2.
http://kelvinmiyahira.com/articles/34-2012-05-what-s-your-release-style-part-2
d. What's your Release style? Part 3. The Fixes.
http://kelvinmiyahira.com/articles/33-2013-06-what-s-your-release-style-part-3-the-fixes
e. Essentials of the Drive-hold swing.
http://kelvinmiyahira.com/articles/30-2013-12-essentials-of-the-drive-hold-swing
4. Weight Shift in the Golf Swing: Clearing the "Mass" Confusion. Doug Marsh.Available online at http://www.clubmakerscalculator.com/golfbiomechanics
5. S&T 2.0 DVDs and Pressure/Weight Forward - An Examination.Erik Barzeski (aka online as Iacas) - 5SK Director of Instructor Development
Available at http://thesandtrap.com/t/65681/s-t-2-0-dvds-and-pressure-weight-forward-an-examination
6. Weight Transfer Styles in The Golf Swing: Individual and Group Analysis. Kevin Ball. (PhD thesis, Victoria University, Australia, 2006).Available online at http://vuir.vu.edu.au/1432/1/Ball.pdf
7. Golf Digest Swing Sequence: Bubba Watson.Available online at http://www.golfdigest.com/golf-instruction/swing-sequences/2012-07/photos-bubba-watson?printable=true